What you know about HTTP
When you browse webpages, view images, or submit a form, your data is transmitted using HTTP or a secured version of it, which is called HTTPS.
Communicating over HTTP requires at least two parts: the client who requests some information and the server who responds to this request and serves the content. HTTPS is the secured version of HTTP, which makes it better suited to instances where security is a concern.
With HTTPS, the client’s computer encrypts data before it starts its journey to the server. The server then decrypts this client-side data and processes it. But the web server also encrypts the response data and sends the encrypted content back to your browser. Your browser then decrypts the response and displays it.
Since the content is encrypted, it is more secure and very difficult to steal or retrieve information from it. For submitting sensitive data, like credit card information, it is always preferable to use HTTPS to make sure the data is secure.
HTTP methods
HTTP methods are also called HTTP verbs. There are five methods commonly used when accessing content over HTTP. They are:
- GET, which retrieves a resource;
- POST, used to send data to the server and then create a record;
- PUT, which updates the whole resource;
- PATCH, which are used to partially update a resource;
- DELETE, which deletes a resource.
HTTP requests
Next are HTTP requests, which contain different types of information that a user’s browser sends as encoded data. A typical HTTP request includes the following:
- HTTP version type, for example, 1.1 or 2.0
- URL or path
- HTTP method
- HTTP request headers
- an optional HTTP body
HTTP request headers and body
Well, when you submit a form like your username and password to sign into a website, that data is passed to the web server as the HTTP body as either a raw JSON string or a form URL encoded string.
HTTP headers, on the other hand, are a core part of every HTTP request and may contain extra information that helps the server make some decisions on how to present the content.
Examples of HTTP request headers are:
- cookies
- user agents
- referrers
HTTP response
After an HTTP request, comes the HTTP response, which consists of information that the browser uses to properly display the content and the response body.
The response contains the resource that was requested. It also contains information like the length of the content, the content type, and headers like cookies.
It also contains ETags, the time when the content was last modified, and finally, the response also contains some special numerical codes called HTTP status codes.
HTTP response code
They are not really messages addressed to you, the user. They actually provide extra information to your browser about the resource.
For example, if everything is okay, the server sends 200. You will not be aware of this because it doesn’t even display in your browser.
Or if the requested content can’t be found, the server responds with the 404 error code, which usually displays in the browser because there was nothing else to show.
- 100-199 : used for informational messages
- 200-299 : successful responses
- 300-399 : provides redirection information
- 400-499 : client error responses
- 500-599 : server error codes
Server errors
Server errors are usually raised when the server-side code lacks proper error checks in the code, configuration mismatch, incorrect package dependencies, and so on.
Client errors
The client-side errors usually occur when the client makes a bad API request with insufficient information in the request body or when the client requests a resource that is not present on the server.
But take note that sometimes the same status codes can convey different messages in different contexts. For example, a 200 status code for a GET request means the content was found. The same 200 code for a PUT request means that the data transmission and update process was successful. Similarly, for a DELETE request, this 200 status code means that the resource was successfully deleted.
Some of the most used status codes are 200 and 201, 303 and 304, 400, 401, 403, and 404, as well as 500.
HTTP methods, status codes and response types
Introduction
You already know that HTTP methods and status codes play an essential role in REST APIs. It is important to keep to the conventions for HTTP methods and status codes for two reasons. Firstly, if you follow conventions from the developing phase, it will be much easier to avoid bugs in your code and deploy the final project on the production server. Secondly, it makes it easier for other developers to use your APIs. This reading highlights the most important HTTP methods, status codes and API response types that you will use when working on API projects.
HTTP methods
In the world of REST APIs, one endpoint can perform multiple tasks. It can deliver a resource, create a new resource, update or delete it. The endpoint remains the same while the action varies. When a client invokes an API, how does the API developer know which of the multiple actions should be performed? This is where HTTP methods come in.
HTTP methods or request types tell the API endpoint what it should do with the resources. It defines the action. The API developer makes decisions and manipulates resources appropriately based on the HTTP methods in an HTTP request. Here is a list of the most used HTTP methods and which action you should initiate for those calls.
| HTTP method | Action |
|---|---|
| GET | Returns the requested resource. If not found, returns a 404 Not Found status code. |
| POST | Creates a record. The POST request always comes with an HTTP request body containing JSON or Form URL encoded data, which is also called a payload. If the data is valid, the API endpoint will create a new resource based on these data. Although you can create multiple resources with a single POST call, it is not considered a best practice to do so. |
| PUT | Instructs the API to replace a resource. Like a POST request, the PUT request also comes with data. A PUT request usually supplies all data for a particular resource so that the API developer can fully replace that resource with the provided data. A PUT request deals with a single resource. |
| PATCH | Tells the API to update a part of the resource. Note the difference between a PUT and a PATCH call. A PUT call replaces the complete resource, while the PATCH call only updates some parts. A PATCH request also deals with a single record. |
| DELETE | Instructs the API to delete a resource. |
Example calls
| HTTP method | Sample endpoints | Query string / payload |
|---|---|---|
| GET | /api/menu-items /api/meu-items/1 /api/menu-items?category=appetizers /api/menu-items?perpage=3&page=2 | A GET call doesn’t need a payload. However, GET calls can be accompanied by query string parameters and their values to filter the API output. |
| POST | /api/menu-items /api/orders | Here’s a sample JSON payload for the /api/menu-items endpoint to create a new resource: { “title”:“Beef Steak”, “price”: 5.50, “category”:“main”, } |
| PUT | /api/menu-items/1 /api/orders/1 | Here’s a sample JSON payload for this endpoint /api/menu-items/1 to completely replace it. Note that you need to supply all data for a PUT request. { “title”:“Chicken Steak”, “price”: 2.50, “category”:“main”, } |
| PATCH | /api/menu-items/1 /api/orders/1 | Here’s a sample JSON payload for this endpoint /api/menu-items/1 to partially update this resource { “price”: 3.00 } |
| DELETE | /api/menu-items /api/menu-items/1 /api/orders /api/orders/1 | When the DELETE call is sent to a collection endpoint, like /api/menu-items the API developer should delete the entire collection. When it is sent to a particular resource, like this, /api/menu-items/1, then the API developer should delete only that resource. |
Status codes
Sending appropriate status codes with every API response is essential. And as a developer, you should not just pick any code. Every status code has meaning, so you should choose the most appropriate one based on the situation. Here’s a list of the status code ranges and their purposes.
| Status code range | Purpose |
|---|---|
| 100-199 | This range is mainly used to pass on some information. For example, sometimes an API needs time to process the request and it can’t instantly deliver the result. In such a case, the API developer can set it to keep returning 102 – Processing until the result is ready. This way, the client understands that the result isn’t ready and should be checked again. |
| 200-299 | These are the success codes. If the client requests something and the API acts successfully, it should deliver the output with one of these status codes. For example, for a PUT, PATCH, or DELETE call, you can return 200 – Successful if the operation was successful. For a successful POST call, you can set it to return a 201 – Created status code when the resource has been created successfully. |
| 300-399 | These are the redirection codes. Suppose as an API developer, you changed the API endpoint from /api/items to api/menu-items. If the client makes an API call to /api/items, then you can redirect the client to this new endpoint /api/menu-items with a 301 – Permanently moved status code so that the client can make new calls to that endpoint next time. |
| 400-499 | 4xx status codes are used in the following situation: if the client requests something that does not exist, sends an invalid payload with insufficient data, or wants to perform an action that the client is not authorized for. For the above scenarios, the appropriate status codes will be: - 404 - Not Found if the client requests something that doesn’t exist, - 400 - Bad Request if a client sends an invalid payload with insufficient data, - 401 - Unauthorized, - 403 - Forbidden if the client tries to perform an action it’s not authorized for. |
| 500-599 | These alarming status codes are usually automatically generated on the server side if something goes wrong in the code, and the API developer doesn’t write code to deal with those errors. For example, a client requests a non-existing resource, and the API developer tries to display that resource without adequately checking if that resource exists in the database. Or if the API developer didn’t validate the incoming data and attempted to create a new resource with invalid or insufficient data. You, as an API developer, should always avoid 5xx errors. |
Response types
These days, the most common response types involved with REST APIs are JSON, XML, plain text, and sometimes YAML. Frameworks like DRF come with built-in renderer classes that can convert the data into an appropriate format and display it correctly.
There are also third-party renderers available for this job. While making an API call, the client can specify its desired response format with the Accept HTTP header. And that header should be considered to deliver the result in that format using the render classes. Here’s a list of HTTP headers for different response types.
| Response type | Request header |
|---|---|
| HTML | Accept: text/html |
| JSON and JSONP | Accept: application/json |
| XML | Accept: application/xml Accept: text/xml |
| YAML | Accept: application/yaml Accept: application/x-yaml Accept: text/yaml |
Conclusion
In this reading, you learned about different types of HTTP methods, status codes, and API response types.
RESTfulness
API
An API or application programming interface is a gateway to back-end data. It allows you to easily access and modify this data.
REST
REST is an architectural style for designing APIs for your project. It is hugely popular among developers because it’s much easier to develop and implement than other architectural styles.
REST API
REST APIs provide an easy way for you to communicate with the server and access the data that powers your application. But an API is only RESTful if it complies with certain constraints.
- It must have client-server architecture,
- a REST API is always Stateless,
- it should be Cacheable,
- It should be layered,
- have a uniform interface,
- and it might also include code on demand, but this is optional.
Client server architecture
The API should use client-server architecture. There should be a server that is serving the resources and there should be a client who consumes them.
Stateless
A REST API is Stateless, this means that the server does not contain any state of the API client who is making the call, so it cannot identify who is making the request or what their previously requested data was without proper user information.
In fact, the State is only saved on the client machine, not on the server and this influences what you should include in your API endpoints or URL Paths but more on this later.
Cacheable
The API should also be Cacheable. This means that responses can be saved by a web browser or a server or any system.
This caching process can help to reduce the server load by using the API result from the cache instead of making an actual request to the server every time.
Layered
Layered means that the entire system architecture can be split or decoupled into multiple layers and you should be able to add or remove a layer at any time. The following diagram will make this layering more understandable.
Layers of a RESTful API system could include a Firewall Load balancer, a Web server, and a Database.

Uniform interface
This may sound a little confusing at this point, but it means that the system should offer a uniform communication system to access the resources.
For example, there should be unique URLs for each resource. There should also be a unified way to modify or proceed further with a resource from the API result or representation in a standard XML or JSON format.
Code on demand
Lastly, code on demand means that the API may deliver some business logic or code that the client can run to further improve the response result.
To understand this code-on-demand feature, consider the following script tag that loads some JavaScript code from an API endpoint of the Little Lemon Restaurant. Once loaded this script can display any special menu items for that day.
<script
src="https://little.lemon/specials">
<script>
For now, these six constraints are just theoretical. Do not let them confuse you once you start developing your APIs these terms will become clear to you.
Resources
Resources are a core part of every REST API. So, it’s important for you to become familiar with how APIs present Resources.
Say the Little Lemon Restaurant has a mobile App which can be used by customers and managers. Managers can use the App to get information about orders and customers while the customers use this App to browse the menu and place orders.
To support this, the App uses different APIs to fetch data from the server and in each case, the resource type will be different.
Examples
If a manager wants to see all orders, the App makes a call to the API https://little.lemon/orders and displays the result. The resource type in this case is a list of order objects.
If a manager wants to view more specific information about a particular order, say the order with the ID 16, the App makes a call to the API https://little.lemon/orders/16. The resource type is the order object.
To see who placed the order, the App makes an API call with an extra filter forward slash customer. https://little.lemon/orders/16/customer. This retrieves all the details about the customer of that order. The resource type in this case is the customer object.
Say the manager wants to look at what the menu items of order number 16 were, the App makes an API call that replaces forward slash customer with forward slash menu items. https://little.lemon/orders/16/menu-items. Only the menu items of order 16 will show on the result and this time the resource type is the menu item object.
Now on the other hand, if the customer wants to browse the menu, the App uses another API, little dot lemon forward slash menu items. https://little.lemon/menu-items. And although the resource type will also be the menu items object, the return will be all available menu items of the restaurant.
But sometimes the resource type is the same although the result can be filtered to be more specific. Let’s explore a final API to unpack this.
This time the customer wants to browse food items from a specific category say appetizers, the App will add question mark category equal sign appetizers. Notice that the endpoint is the same as the previous API but it filters the output to only appetizers. https://little.lemon/menu-items?category=appetizers. For both cases, however, the resources still menu item object.
Statelessness
WARNING
You need to keep in mind that the server always represents only what you ask for. It does not remember anything of what happened before.
For instance, if the manager retrieves the information about order 16 and then wants to look at the menu items of order 16 (https://little.lemon/orders/16), you cannot just send a follow-up HTTP request to the endpoint forward slash menu items (https://little.lemon/menu-items). Because this API will return all menu items and not just the menu items of order 16.
The server does not remember that your earlier call was for a specific order. If you want to get the menu items for a specific order number, you need to explicitly supply that order number to the server as orders forward slash 16 forward slash menu items. https://little.lemon/orders/16/menu-items
In simple terms, this is what Stateless means. The server cannot recognize the client automatically. API calls must include more information about the user but you will learn more about this later in the course.
Naming conventions
By now you know the importance of API endpoints and how they determine precisely what data the server will send to your app. But a well-designed endpoint also conveys valuable information about its purpose, which is helpful for developers and the project itself in the long run.
Your REST APIs Uniform Resource Identifier or URI is one of the first things that users will notice when a page loads. It is also called an endpoint or URL path.
Say the Little Lemon restaurant menu app needs APIs to display all their orders. A suitable API endpoint is https://little.lemon/orders and not https://little.lemon/Orders with an uppercase O.
TIP
So, your API endpoint should always use lowercase letters and hyphens to separate multiple words.
WARNING
Using underscores or snake case, title case or camel case, two separate words is not optimal because it makes the names difficult to read and understand.
There is an exception to the camel case rule though if you’re API accepts a variable, for example, a userId or orderId you should always represent them in camel case and wrap them in curly braces.
For example, if you want to create an API for a specific order, it should be forward slash orders forward slash open curly brace order Id with a capital I close curly brace. /orders/{orderId}
By adding forward slash menu hyphen items to the API endpoint, you can fetch the menu items for a specific order. /orders/{orderId}/menu-items
Or you can fetch orders of a specific customer by changing the Id to customerId wrapped in curly braces and adding forward slash orders. /orders/customers/{customerId}/orders
Notice that the API endpoints contain two different variables, orderId and customerId. And they are both denoted by wrapping them in curly braces and writing Id with a capital I.
Also, always try to use clear, concise, and meaningful words in your API names to make them easy to read right away.
Forward Slashes
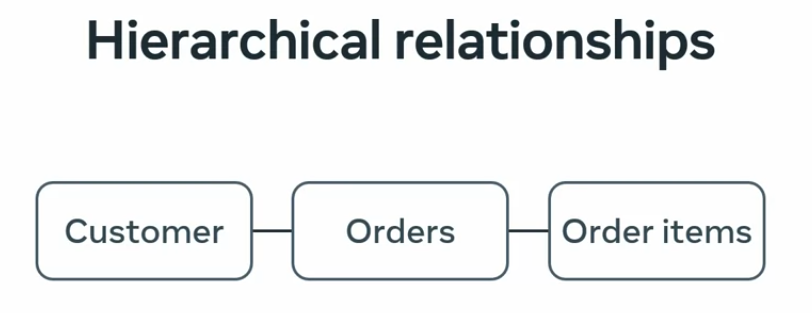
If your project has related objects, you should use forward slashes in your API URIs to indicate their hierarchical relationship.
An example of such a hierarchy is, a customer can have orders with order items in a restaurant API project.
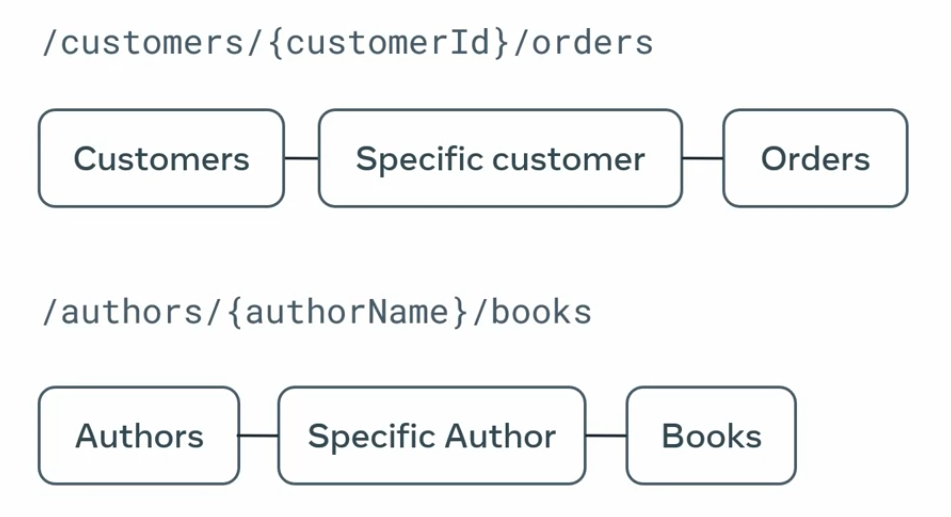
Another example is a library can have books with authors.

So, to get the author of a particular book, you can use the API endpoint: /library/books/{bookId}/author
Or to get all books written by a particular author, you can use an Id for the author instead and add forward slash books. /library/authors/{authorName}/books
Notice how the relationships between the customers and orders, the books, and the author are all indicated with the forward slash in these API URIs.
Another naming convention is that your API should always use a noun to indicate the resources it is dealing with. An API that returns a collection of books or a book should use the nouns /books or /books/{booksId}
Similarly, to get the price of a book, you should use the nouns /books/{bookId}/price
API endpoints with verbs like /getAllBooks or /getUser/{userId} are examples of bad API names.
NOTE
That’s because the resources and a REST API endpoint should be always represented with a noun and never with a verb.
API endpoints such as /users/{userId}/delete or /orders/{orderId}/save are also wrong because they use HTTP requests as verbs to indicate the action the API performs.
NOTE
Remember you should send an HTTP DELETE request to
/users/{userId}to delete a user. And you should send an HTTP PUT or PATCH request to/orders/{orderId}to update the order.
Endpoints that use standard CRUD operation names such as create, read, update or delete should be avoided for two reasons:
- the resources these endpoints represent should be nouns
- the appropriate HTTP requests like GET, POST, PUT, or DELETE should be used with those endpoints to perform the necessary manipulations
Something else to consider is whether file names should be used in APIs, the restaurant API project can return API results as XML and JSON data. So, the question is, can you design your endpoints as /orders/{orderId}.json to get the JSON data? Or perhaps /orders/{orderId}.xml for XML data? No, you should never use a file name extension in your API.
To solve this problem, you should accept the expected data format as a query string parameter. So, if you want the output in a JSON format, you can add question mark format, equal sign JSON to the API endpoint./orders/{orderId}?format=json
And for XML, you can use a question mark, format, equal sign xml at the end. /orders/{orderId}?format=xml
Similarly, to deliver a minified version or source version of a JavaScript file, you use API endpoints like /assets/js/jquery/3.6.0/min.
Or /assets/js/moment/2.29.4/original.
But what if you need to filter a collection or perform a search? For instance, the Little Lemon restaurant has many items on its menu but you are only interested in appetizers, to filter the results, you should always accept the data as a query string parameter. In a URL everything you send after a question mark is a query string.
Remember the API endpoint menu items, returns all menu items (/meu-items) but to only get the appetizers, you should pass the category name to the endpoint as question mark category equal sign appetizer. menu-items?category=appetizers
Consequently, if you design APIs that can be filtered this way, other developers on your team will derive that to get a list of mains or desserts they can change the endpoint to /menu-items/?category=main or /menu-item/?category=dessert.
This is the beauty of a good and consistent API naming strategy. Another best practice is that when you share your API endpoints with your team or the public, you should never add a trailing slash to the end of the API endpoint. What this means is that API names that end with a forward slash, like /orders/{orderId}/ is bad practice.
Simply end the API without the forward slash at the end.
Recap
- Use lowercase URI formatting.
- Indicate hierarchical relationships with a forward slash.
- Use nouns for resource names.
- Avoid file name extensions. Furthermore, use query parameters for data types and don’t use a trailing slash.
- Finally, always follow a consistent naming strategy
- and standard API naming conventions.
Good routes versus bad routes
Introduction
Naming your API properly is the first step in designing a good API. When the API name follows a convention, it provides lots of information about the API and its purpose. To create a meaningful API endpoint, you need to follow some simple guidelines and rules.
In this reading, you will learn about API naming conventions and familiarize yourself with good API endpoints vs. bad API endpoints, or good and bad routes.
Rule 01: Everything in lowercase, with hyphens and not abridged
The URI of your API should always be in lowercase. Do not use camelCase, PascalCase or Title case when you design your API. Also, separate multiple words using hyphens, not underscores. Do not keep abridged, or shortened, words in your URI; always use the full and meaningful form.
If your API accepts a variable, you should always represent it in camelCase, and wrap it inside a set of curly braces {}.
Let’s examine the following examples.
| URI | Status | Why |
|---|---|---|
| /customers | Good | Plural and lowercase |
| /customers/16/phone-number | Good | Lowercase and hyphen used to separate words |
| /customers/16/address/home | Good | Lowercase, no trailing slash, displays the hierarchical relationship with forward slashes. |
| /users/{userId} | Good | Variable in camelCase, and no hyphen in the variable name |
| /Customers | Bad | Title case |
| /generalMembers | Bad | camelCase, no hyphens to separate words |
| /MenuItems /GeneralMembers | Bad | Pascal case |
| /customers/16/tel-no | Bad | Abbreviation |
| /customers/16/phone_number | Bad | Underscores |
| /customers/16/phonenumber | Bad | No separation of words |
| /users/{user-id} | Bad | Variable should be in camelCase, and hyphen between words |
Rule 02: Use a forward slash to indicate a hierarchical relationship
In your API URI, always use the forward slash to indicate a hierarchical relationship. To understand this rule, consider the following scenarios and the relationship from the API endpoints.
A store can have customers who have placed many orders and each of these orders can have delivery addresses, menu items and bills.
| URI | Status |
|---|---|
| /store/customers/{customerId}/orders | Good |
| /store/orders/{orderId} | Good |
| /store/orders/{orderId}/menu-items | Good |
Similarly, a library can have books from many authors. Each of these books has an ISBN number.
| URI | Status |
|---|---|
| /library/authors/books | Good |
| /library/book/{bookId}/isbn | Good |
Rule 03: Use nouns for resource names, not verbs
One of the most prominent features of REST APIs is that it uses nouns to indicate resources, not verbs. And you should always stick to this rule when designing your API. You should also use plural nouns to indicate a collection.
| URI | Expects | Status | Why |
|---|---|---|---|
| /orders | Collection | Good | Uses a noun, not a verb |
| /users/{userId} | Single user | Good | Uses a noun and proper hierarchical relationship and naming convention |
| /order | Collection | Bad | Uses plural nouns for collections |
| /getOrder | Single resource | Bad | Uses a verb, camelCase |
| /getUser/{userId} | Single user | Bad | Uses a verb, camelCase |
Rule 04: Avoid special characters
You should always avoid special characters in your API endpoints. They can be confusing and technically complex for your users. Consider the following bad examples.
| URI | Status | Why |
|---|---|---|
| /users/12|23|23/address | Bad | Special character | |
| /orders/16/menu^items | Bad | Special character ^ |
If your API can accept multiple user ids, then they should be separated using a comma, as demonstrated below.
| URI | Status | Why |
|---|---|---|
| /users/12,23,23/address | Good | Uses a comma for separation |
Rule 05: Avoid file extensions in URI
You should always avoid file extensions in your API names. For example, if your API can deliver an output in both JSON and XML format, it should never look like this.
| URI | Status | Why |
|---|---|---|
| /sports/basketball/teams/{teamId}.json | Bad | File extension at the end |
| /sports/basketball/teams/{teamId}.xml | Bad | File extension at the end |
Instead, your client should be able to indicate its expected format in a query string, just like this.
| URI | Status | Why |
|---|---|---|
| /sports/basketball/teams/{teamId}?format=json | Good | No file extension |
| /sports/basketball/teams/{teamId}?format=xml | Good | No file extension |
Similarly, if your API is serving a static file, for example, CSS or JavaScript files, you should use endpoints like the following to deliver the minified and original source file. You can also use a query string to get the minified or original version. Some API developers use the output format like file extension at the end of the regular API endpoints, which is also bad practice.
| URI | Status | Why |
|---|---|---|
| /assets/js/jquery/3.12/min | Good | No file extension |
| /assets/js/jquery/3.12/source | Good | No file extension |
| /assets/js/jquery/3.12/?format=min | Good | No file extension |
| /assets/js/jquery/3.12/?format=source | Good | No file extension |
| /menu-items?format=json | Good | Perfectly named endpoint with expected output format in a query string |
| /menu-items.json | Bad | Uses the expected output format as the file extension |
Rule 06: Use query parameters to filter when necessary
When designing your API, you should always perform data filtering using a query string. This is the same when you expect some extra parameters, like the number of items per page and page number.
Consider this example of a travel site. You want to find which locations a particular user has traveled to. And then you want to know which locations in the USA the user has already seen.
| URI | Status | Why |
|---|---|---|
| /users/{userId}/locations | Good | Hierarchical |
| /users/{userId}/locations?country=USA | Good | camelCase, no separation of words |
| /articles?per-page=10&page=2 | Good | Proper use of query string |
| /users/{userId}/locations/USA | Bad | Doesn’t use a query string to filter data |
| /articles/page/2/items-per-page/10 | Bad | Redundant and obscure |
Rule 07: No trailing slash
When sharing your API endpoint with others in your team, or in public, avoid using a trailing slash at the end of your API endpoints. Consider the following examples.
| URI | Status | Why |
|---|---|---|
| /users/{userId} | Good | No trailing slash |
| /articles/{articleId}/author | Good | No trailing slash |
| /users/{userId}/ | Bad | Trailing slash |
| /articles/{articleId}/author/ | Bad | Trailing slash |
Conclusion
Now you understand how to create REST API endpoints with good names. Remember, a consistent naming strategy for your API is one of the most important design decisions for the whole project!
Essential tools for API development
Curl
First is curl, a well-known tool for developers who want to make HTTP calls from the command line. It is available for all major operating systems, but it doesn’t have a graphical tool.
To use curl, simply open your PowerShell in Windows or the terminal and Linux or macOS, type curl and hit “Enter”. Curl makes it easy to send HTTP GET requests.
For example, simply add the API URI after curl. This command sends a HTTP GET request to Postman Echo, a service from Postman to display the headers and request body sent to it.
curl https://postman-echo.com/get?project=LittleLemonPretty useful for testing API calls.
It works slightly differently for a POST request. This time, add to the request body using hyphen d and the HTTP method name, which is POST, preceded by hyphen X.
curl -d "project=LittleLemon" -X POST https://postman-echo.com/postPostman
The second tool is Postman, which has cross-platform desktop tools that make it easy to test and debug APIs. With an advanced graphical interface and a web version, Postman is a powerful tool for API development. With Postman, you spend less time fiddling with API details and more time building the perfect API. You can explore their website and the additional readings for more information and learning materials.
Insomnia
Another important tool is the Insomnia REST Client, a powerful REST API client used to store, organize, and execute REST API requests.
Insomnia is free, cross-platform, and comes with a very user-friendly interface. You can download and install insomnia for your operating system from the link provided in the additional reading at the end of this lesson. Note that there’s only a desktop version for insomnia.
In the rest of this course, you will be using Insomnia to play and interact with the APIs you build.
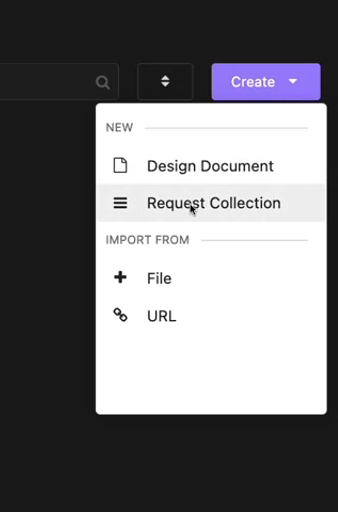
Insomnia is a great tool for playing with APIs. All requests in Insomnia will be saved in a request collection. To get started, click on the Create button in the top right corner and select Request collection. Give it a name like first collection and click on Create.
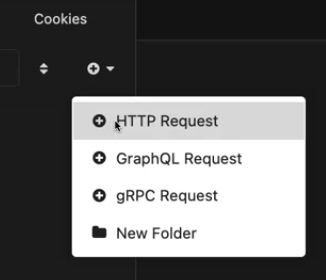
Now you are inside an empty collection. To create your first API request, click on the Plus icon on the left sidebar and select HTTP Request. You can also do this by pressing Command plus N on macOS or Control plus N in Windows and Linux.
You can double-click on the default request name, new request, and change the name to something more personal, like first request. At the top of the middle section where it says GET, you can click and select the type of HTTP method your request is going to be.
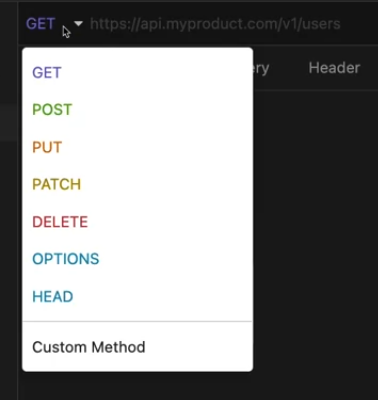
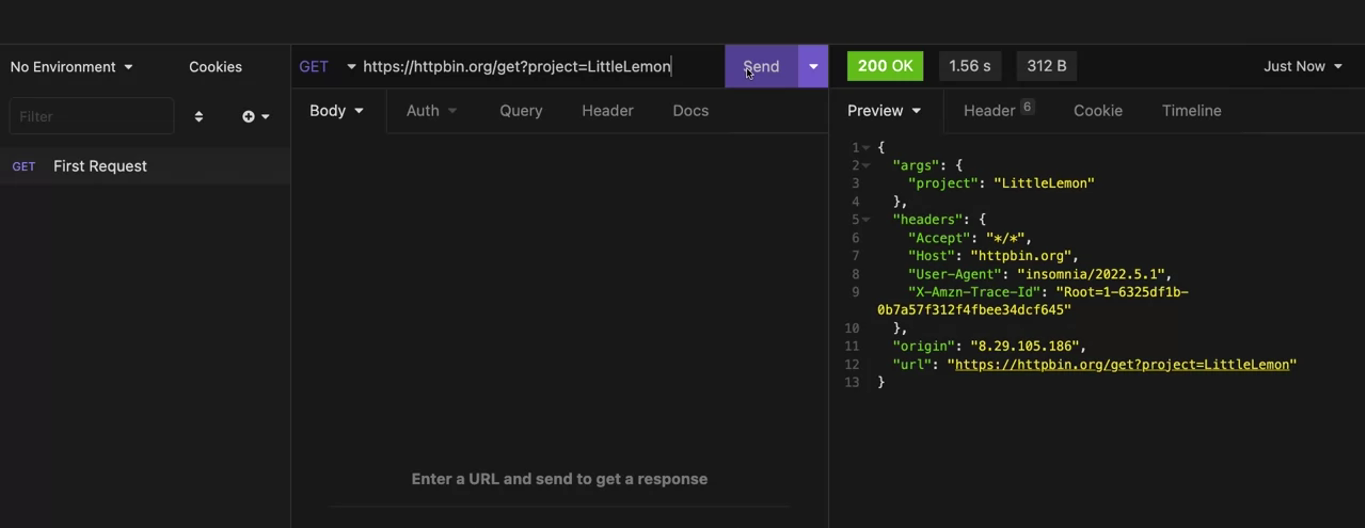
Leave it as GET for now. In the text box next to it, write your API URL (https://httpbin.org/get?project=LittleLemon). httpbin.org is a free service that allows you to experiment with different types of HTTP methods. When you call one of these APIs, it prints back what you sent to it. Now hit the Send button on the right and you will see that httpbin has returned the same query argument you sent to it, which in your case was project is equal to LittleLemon.
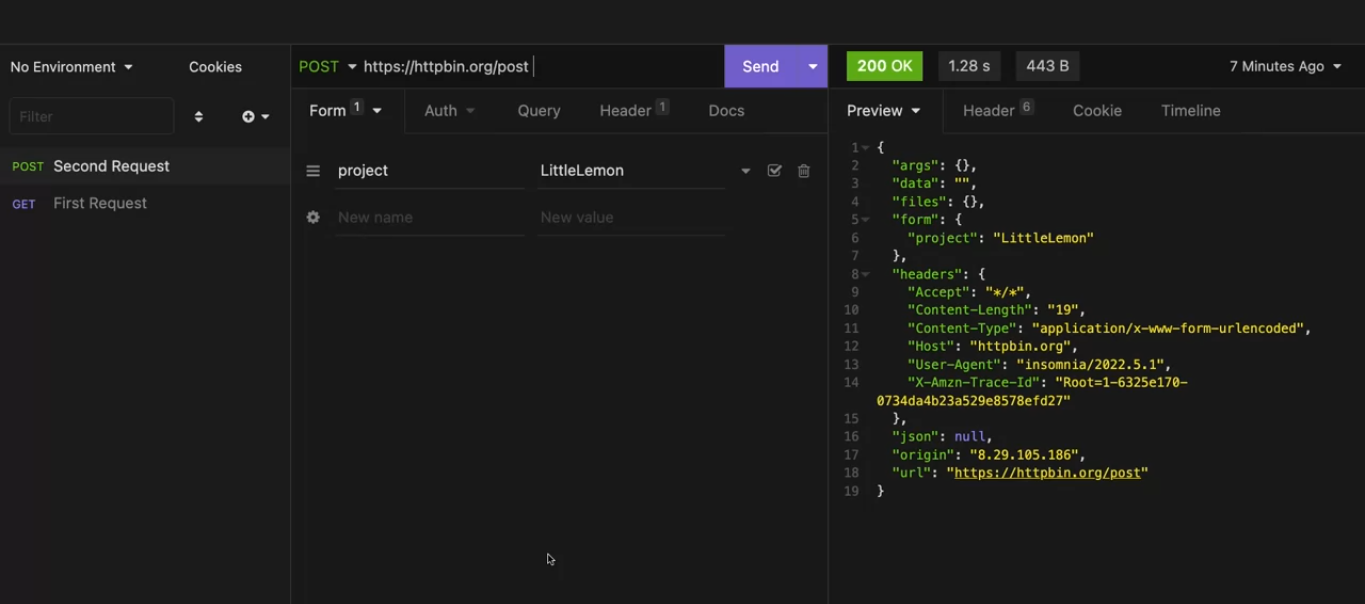
This time let’s try making a new HTTP POST request. To do this, click on the Plus icon in the left sidebar and select HTTP Request. Once the request is created, double-click on its name and give it a new name, such as second request. Now click on the HTTP method drop-down and select POST and this time add https://httpbin.org/post in the URL field.
You already know that a HTTP POST request accepts arguments as form data or JSON data. With Insomnia, you can easily input data for a POST request by clicking on the body tab and selecting Form URL Encoded or JSON.
Here in this argument window, you can finally layout all your arguments in an easy to use and organized manner. On the left, you can write the argument name and on the right, the value. Write project in the argument field and LittleLemon as the value. Now click on the Send button to display the output. You can create as many requests as you want and come back later to play with them anytime.
Setting up tools and environment
Introduction
Before you can start an API project you need to have the right setup on your computer. In this reading, you will learn how to configure necessary extensions in VS Code. You will also learn how to use pipenv to manage the packages and the virtual environment for your API projects.
Step 1: Install VS Code
The previous reading guided you through installing Visual Studio code on your computer. This is the first step in setting up your development environment. If you have not installed it yet, go back to Installing VS Code and follow the steps.
Step 2: Install Python
Download and install the latest version of Python from https://python.org or use the software manager for your operating system.
Step 3: Install the VS Code Python extension
Open VS code and access the extensions panel from the view menu, the left sidebar or by pressing Command, Shift and X. Search for Python and select the first one from Microsoft. This extension provides features like syntax highlighting, autosuggestions, debugging, and linting, which makes it very useful for Python developers.
Step 4: Install additional VS Code extensions (optional)
You can also install a few other useful VS Code extensions for Python development. Search for: Python Indent by Kevin Rose to correct Python indentation in VS Code, and Djaneiro by Scott Barkman for useful Django snippets.
Step 5: Install a package manager
Next, you need to install pipenv, a package manager for Python applications from https://pipenv.pypa.io/en/latest/. pipenv lets you easily create virtual environments for your projects so that you can manage your dependencies more efficiently. This allows you to install packages for your projects without conflicting with other versions of the same package used by other projects.
To install pipenv, open your terminal or PowerShell and type the following command:
pip3 install pipenv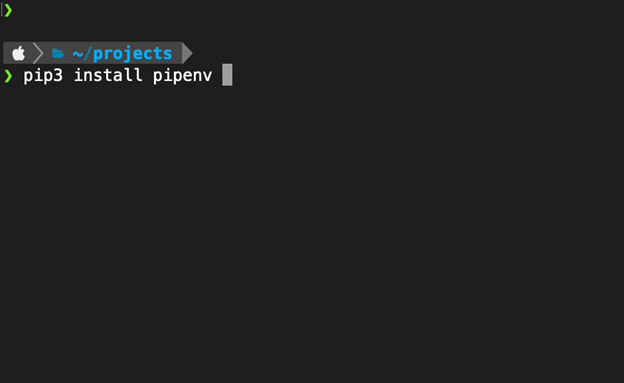
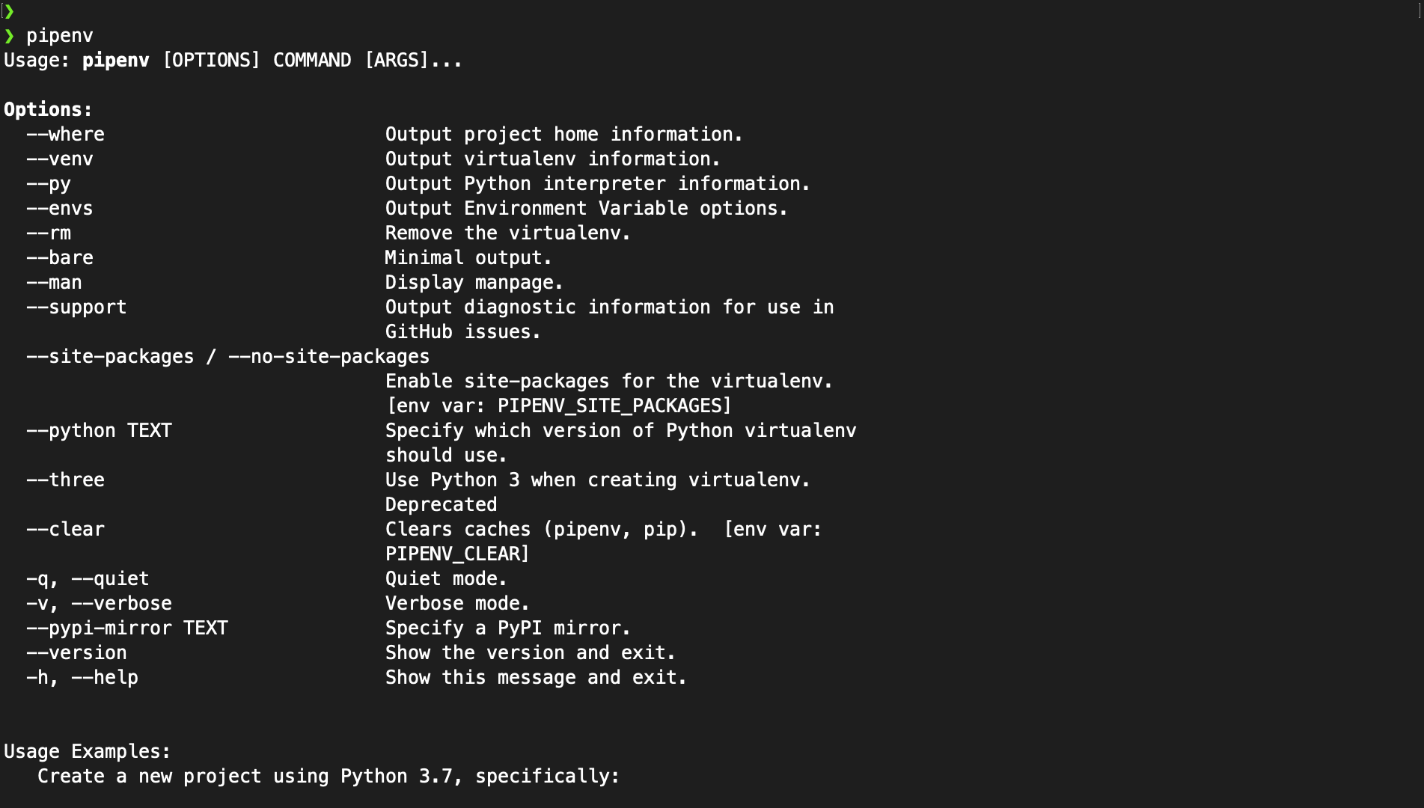
Type in pipenv and press enter. A list of commands and options supported by pipenv will display.
Conclusion
You should be set up to start your first Django API project using Python. You now know how to install the latest version of Python, the Python extension and other useful extensions in VS Code as well as the package manager pipenv.
Create a Django Project using pipenv
pipenv install djangoTo start work with the django project, you have to activate the virtual environment.
pipenv shellThis open a new shell session in the virtual environment of you project.
django-admin startproject Littlelemon .
python manage.py startapp LittlelemonAPI
python manage.py runserver
Running the server on a port other than 8000, for example 9000:
python manage.py runserver 9000Integrate virtual environment in vscode
Open the project directory in vs code. Select the Command Palette from view menu, or press Ctrl+Shift+P. Select the python interpreter and select the one that pipenv has created.
Optional: Creating a Django project (steps and code)
Introduction
This Reading will give you an overview of the steps to be taken while working with VS Code using pipenv as your virtual environment while creating a Django project. The project structure can be variable according to the learner preferences, but the one suggested can also be used for ease.
Note: The instructions in this reading may vary slightly from the instructions in the video about creating a Django project because the video presumes a preconfigured Pipfile.
Note: The commands added below are specific to MacOS. The learner will have to make OS specific changes such as using keyword python instead of python3 for Windows OS.
Step 1
Open VS Code on your computer and click on File. In the drop-down menu select Open Folder and select the folder you have created for the project.

Now click on Terminal and select New Terminal from the drop-down menu. This is the main folder that contains all your files for the Django project you are going to create.
Step 2
Create a directory for the Django project by running the following command:
mkdir LittleLemon
Step 3
Step inside the LittleLemon directory with the command:
cd LittleLemon
Step 4
Run the following command to create a project in this directory:
django-admin startproject BookList .
Step 5
Run a command to activate pipenv:
pipenv shell
Note: It is expected that pipenv is installed using pip in your local machine.
Step 6
Open the file labeled Pipfile that was created inside the project directory. This file contains details of the dependencies for the project. Update it with the following code and save the file.
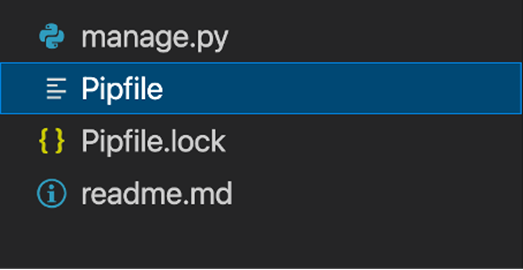
[[source]]
url = "https://pypi.org/simple"
verify_ssl = true
name = "pypi"

[packages]
django = "*"
djangorestframework = "*"
djangorestframework-xml = "*"
djoser = "*"

[dev-packages]

[requires]
python_version = "3.9"
Step 7
Run this command to install the dependencies using the updated Pipfile:
pipenv install
Note: Alternatively, you can also use commands such as pipenv install django to install specific packages. This will also update the Pipfile.
Step 8
Now run this command to create a Django app:
python3 manage.py startapp LittleLemonDRF
Step 9
Run the command to start the server to test if the installation was successful.
python3 manage.py runserver
Stop the server by pressing Ctrl + C while you are in the Terminal window.
Step 10
Create the urls.py file in the app-level LittleLemonDRF directory.
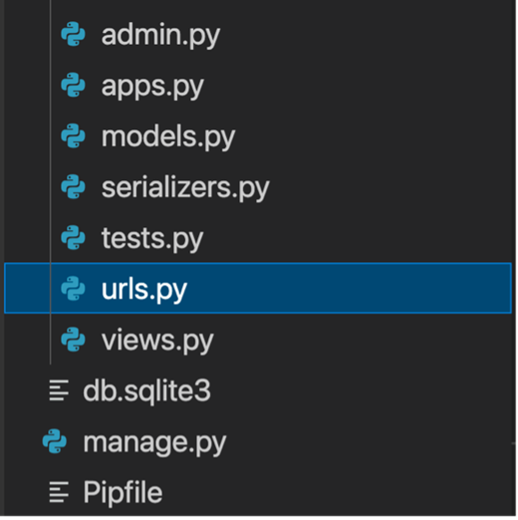
Paste the following code inside it:
from django.urls import path
from . import views

urlpatterns = [
    path('ratings', views.RatingsView.as_view()),
]
Note: The specific url configurations will differ according to the views created
Step 11
Open the urls.py file in the project-level directory and update the code as follow:
from django.contrib import admin
from django.urls import path, include

urlpatterns = [
    path('admin/', admin.site.urls),
    path('api/',include('LittleLemonDRF.urls')),
]
Note: The specific url configurations at the project-level will vary according to the name of the app created.
Concluding Thoughts
In this reading, you learnt about the initial setup you need to make on your local machine while running VS Code with pipenv for creating a Django project.
Exercise: Know your tools
Introduction
In this exercise, you are going to use the REST API client Insomnia to make HTTP Requests so make sure you’ve installed it on your computer. You will also use the Request and Response Service httpbin.org. Httpbin.org is an open-source web service that allows you to make HTTP calls without any additional installations or dependencies.
You will be exploring the different functionalities available in Insomnia such as:
- Creating a
GETrequest - Creating a
POSTrequest with Form Data - Creating a
POSTrequest with JSON Data
Instructions
To get started, open Insomnia on your local device and navigate to the tab labeled DEBUG.

If you haven’t installed Insomnia yet, you can download the install files at https://insomnia.rest/
Create a GET request
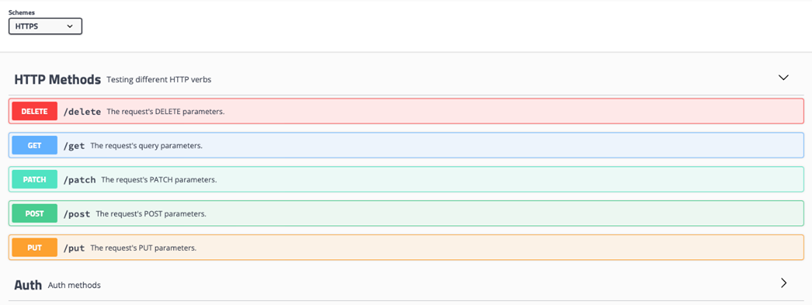
Open the https://httpbin.org/ website and click on HTTP Methods. A menu with different HTTP methods will expand which you can add to your endpoints.
Step 1:
In Insomnia, click on the + icon on the left-hand side of the screen and select HTTP Request from the drop-down menu.
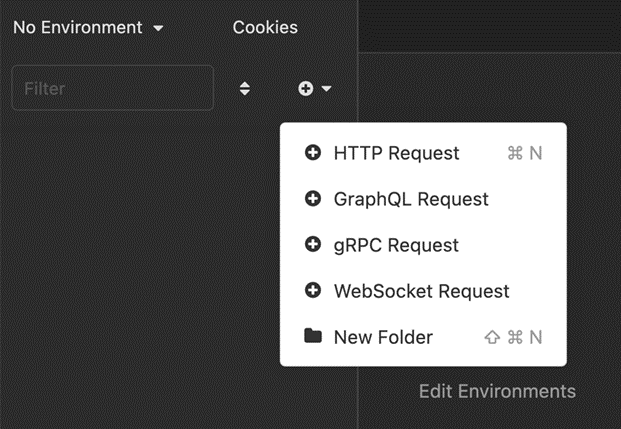
Step 2:
Double-click the request to change its title to GET request using Insomnia.
Step 3:
Click on the GET dropdown to see a list of available options and re-select GET.
Update the URL endpoint with the value: https://httpbin.org/get
Press the Send button and notice the JSON output.
Step 4:
From the Body drop-down option, select Multipart Form.
Add the following values under New name and New value:
- New name: title
- New value: Lord of the Rings
Press the Send button once again and observe the changes.
Notice that the value of Content-Length has been updated to include the changes.
Step 5:
Update a form entry with the following details:
- New name: author
- New value: JRR Tolkien
Press the Send button once again. Notice that Content-Length has further been updated.
Step 6:
You can Filter your output using the Filter response body at the section in the bottom right-hand side of Insomnia as indicated in the screenshot below.

Add the following filter inside it:
$.origin
It should update the Preview. The output will appear similar to what is displayed in the screenshot below.

Step 7:
Modify the filter incrementally as below which should produce the respective outputs.
$.headers
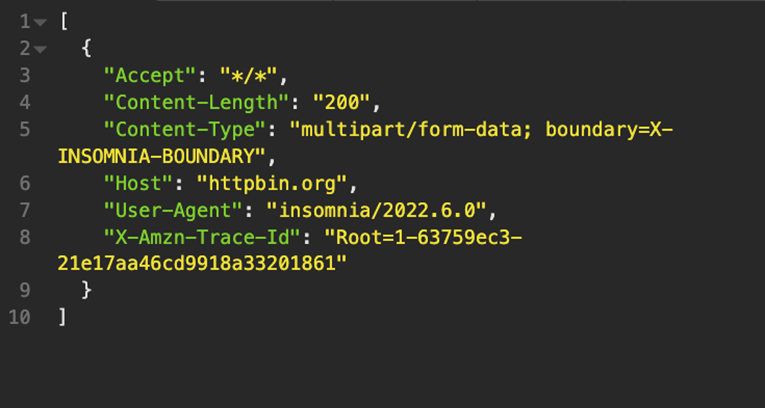
$.headers.Content-Type

Note: The dot operator is used here to explore the contents of the JSON output. Also notice the value of the Content-Type is form-data because you selected Multipart form.
Clear the contents of the Filter response body.
Step 8:
Now deselect the option for the name title and re-create the GET request.
Notice the change in the Content-Length again.
Additional step
Now that you know the steps to create a GET request in Insomnia, you can explore different configuration settings by following the steps discussed to get more accustomed to the tool.
Create a POST request with Form Data
Step 1:
Keeping the contents of the form data the same, update the request type to POST and update the URL endpoint to:
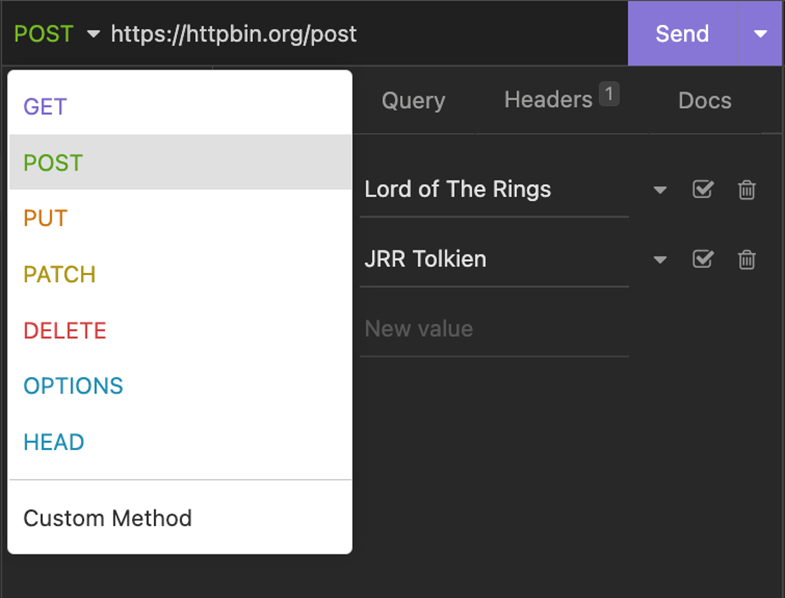
Press the Send button again. The output should appear as below:
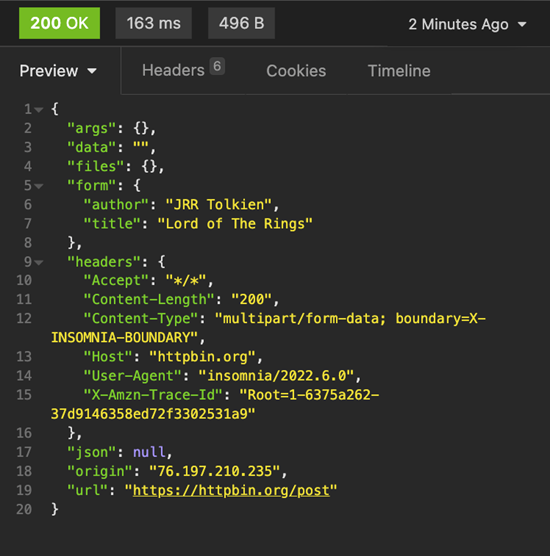
Notice that the contents of the form are updated inside the output for the POST request.
Step 2:
Explore the other tabs under the output such as Headers, Cookies and Timeline.

Step 3:
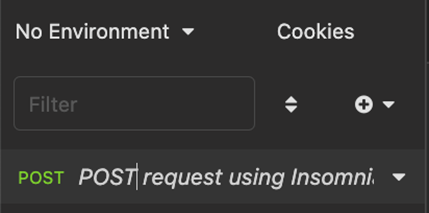
Since you have modified the same HTTP request, update the changes for the title of the request in the left-hand section to POST request using Insomnia.
Create a POST request with JSON Data
Step 1:
Now further create another HTTP Request like the one at the beginning by pressing the + icon and selecting HTTP Request.
Step 2:
Update the request type to POST and the request label as:
POST request using JSON object
Note: The labels are for reference and independent of the request type.
Paste the same URL endpoint that you used earlier in the URL text-box:
https://httpbin.org/post
The updated view should appear as below:

Step 3:
Under the Body dropdown option, select JSON as the text input.
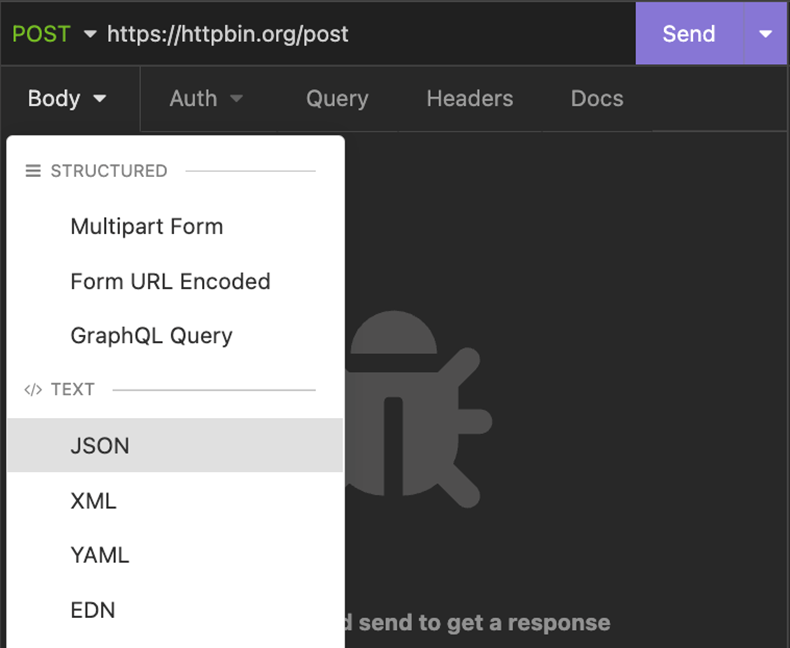
A text input area should appear as below.
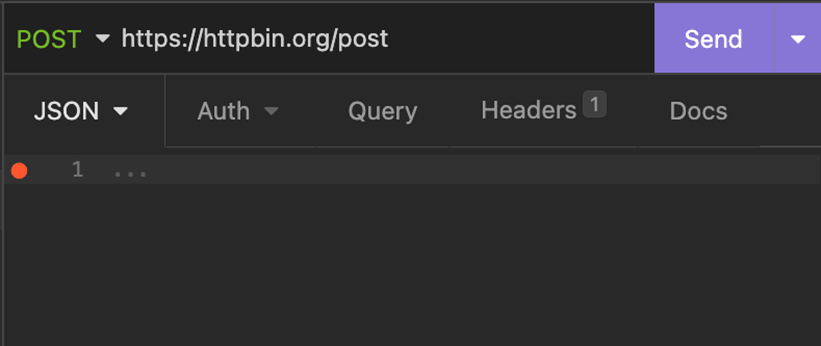
Step 4:
Enter the following content inside the text input area:
{

            "title": "Lord of the Rings",

            "author": "JRR Tolkien",

            "published" : {

                        "year": 1954,

                        "month": "july",

                        "day" : 29

            }

}
Press the Send button.
The output for the JSON input should appear as below:
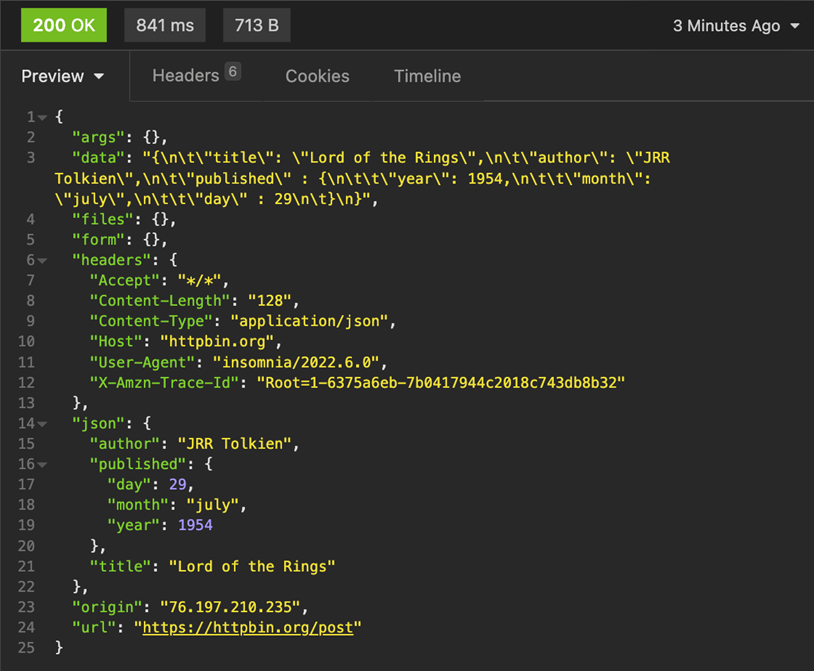
Notice the contents entered as JSON object in both the data and json field inside the JSON output.
Step 5:
- Add the following line to Filter response body:
$.json.published.year
The output will be as follows:
[
	1954
]- Modify the Filter response body as follow:
$[json][published][day]
The output will be as follows:
[
	29
]
Concluding Thoughts
There are several configuration options inside Insomnia. While using a REST API client it is good to explore these. You can also get help from other free and open-source API services that provide options to make API calls to access public data.
Additional resources
The following resources will be helpful as additional references in dealing with different concepts related to the topics you have covered in this section.
Curl command line tool and library for transferring data with URLs
Postman API platform for building and using APIs
Postman Echo service to test REST clients and make sample API calls
Httpbin HTTP request and response service
Previous one → 14.Debugging and testing | Next one → 2.Principles of API development