Setting up the Project
Recap: Version Control
Introduction
Generally, a software product is developed in collaboration by a group of developers, each of whom is responsible for certain functionality of the product.
Everyone modifies the source code accordingly. However, suppose some change in the code results in a particular bug in the product. In that case, there must be a way to track the cause of the problem and seamlessly restore the state of the product to its previously working position.
A Version Control System
A Version Control System (VCS) records changes to one or more files over time, so you can fall back to any specific version if required. Different types of version control mechanisms are employed.
A manual way is to store each version of source code files in separate folders, preferably with a time stamp, so that one can restore the state to the desired version. This approach can be very cumbersome and unsuitable for a collaborative development environment.
Centralized version control system
In comparison, a centralized version control system works well. A single server stores the various versions of the source code. The administrator of the server controls the activity of the other collaborators.
However, if the server encounters any issues, there is a risk of losing all the work done.
Distributed version control system
The distributed version control system is far more reliable and efficient. In this system, each user has a local copy of the code called a repository.
During the development, developers make changes to the working copy of the repository and commit those changes to the local repository.
The changes in the local repository updated are then pushed to the central repository.
Changes from two or more independent branches and subsequently merged.
The merging or integration operation reconciles the multiple changes to a version-controlled file collection.
Git
Git is a popular distributed version control system (DVCS). It’s free and open-source software designed to manage all source code history.
You can keep a history of commits, revert to previous versions, and share code.
To collaborate with it, download and install Git on your machine from https://git-scm.com/downloads.
For example, open the Git terminal on your machine and initialize a local repository for the Little Lemon project.
$ git init littlelemon
Add the project files to the folder and check the status
$ cd littlelemon
$ git status
On branch master

No commits yet
Add the files to the staging area of the repository
$ git add .
Configure the repository with relevant credentials
$ git config --global user.email "[email protected]"
$ git config --global user.name "Your Name"
Commit the files that have been added to the staging area
$ git commit -m "first commit"
GitHub
Usually, you store Git repositories on GitHub. It has the source control management (SCM) features of Git and some other features such as project management, support ticket management, and bug tracking.
Developers use GitHub to share their repositories, access other developers’ repositories, and store remote copies of repositories to serve as backups.
Sign up to https://github.com/ and create a new repository on it.
Go back to the Git terminal and push the local repository to the GitHub repository.
Summary
In this Reading, you learned what version control and Git is. You also learned how to create and push a local repository on GitHub.
Exercise: Setting up the repository
Overview
In this Capstone project, you need to upload your work on a GitHub repository. You will clone the GitHub repository to your machine, and push your code at the end of each exercise of this course.
Scenario
In this exercise, you will create a repository on GitHub, clone it to a local repository, add a test file in it and commit the changes.
Prerequisites
You should have completed Version control course to perform the steps in this exercise.
Step 1:
Download and install Git for your OS and architecture from https://git-scm.com/download.
Step 2
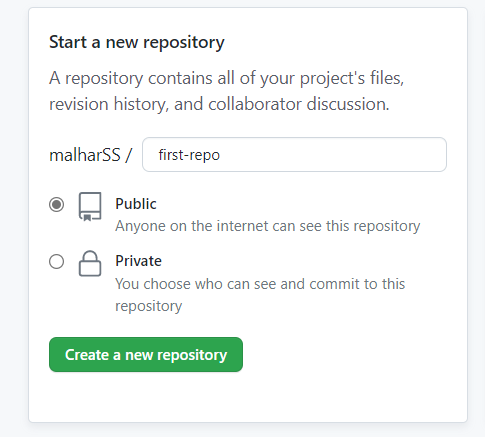
Sign up for https://github.com/and create a new repository. Name your repository as LittleLemon. Use the example shown below:
Step 3
Open the Git terminal on your machine.
Step 4
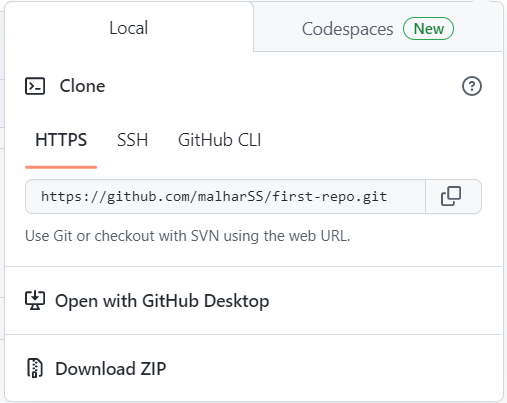
Copy the GitHub repository URL
Step 5
Make a new directory for the local repository.
$ mkdir littlelemon
Step 6
Enter the directory.
$ cd littlelemon
Step 7
Use the copied URL in the git clone command.
$ git clone https://github.com/malharSS/first-repo.git

Step 8
Enter the repository and check the list of files.
$ cd first-repo
$ ls -la
total 5
drwxr-xr-x 1 **********4096  0Dec  209:58 ./
drwxr-xr-x 1 **********4096  0Dec  2 09:58 ../
drwxr-xr-x 1 **********4096  0Dec  209:58 .git/
-rw-r--r-- 1 ********** 4096 14 Dec  2 09:58 README.md
Step 9
Open a newfile.txt file with vi
$ vi newfile.txt
Save Hello World message text in it.
Step 10
Check the git status.
$ git status
On branch main
Your branch is up to date with 'origin/main'.

Untracked files:
  (use "git add <file>..." to include in what will be committed)
        newfile.txt

nothing added to commit but untracked files present (use "git add" to track)
Step 11
Add the newfile.txt to the stage.
$ git add newfile.txt
Step 12
Commit the changes.
$ git commit -m "first commit"
Step 13
Check the status again.
$ git status
On branch main
Your branch is ahead of 'origin/main' by 1 commit.
  (use "git push" to publish your local commits)

nothing to commit, working tree clean
Step 14
Push the changes.
$ git push origin main
Enumerating objects: 4, done.
Counting objects: 100% (4/4), done.
Delta compression using up to 8 threads
Compressing objects: 100% (2/2), done.
Writing objects: 100% (3/3), 294 bytes | 294.00 KiB/s, done.
Total 3 (delta 0), reused 0 (delta 0), pack-reused 0
To https://github.com/malharSS/first-repo.git
   7ecff08..44d2a2e  main -> main
Note: You may be required to enter the GitHub username and password.
Step 15
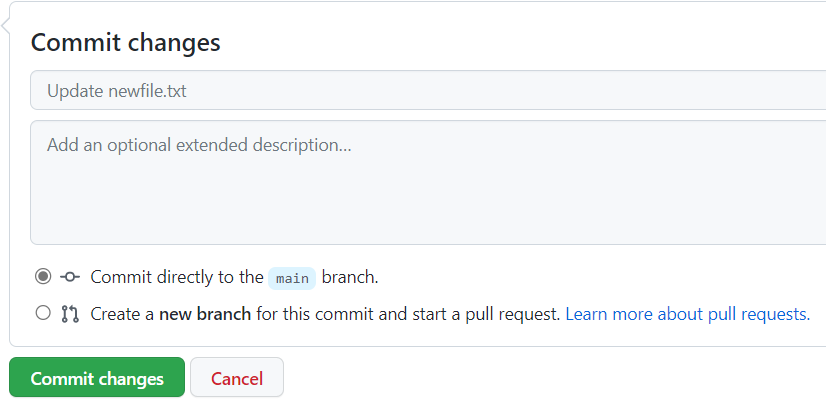
Refresh the GitHub repository page to check that the pushed file appears. Edit the file on GitHub, add some text and commit changes.
Step 16
Go back to Git bash shell and pull the repository to update the local repository.
$ git pull
remote: Enumerating objects: 5, done.
remote: Counting objects: 100% (5/5), done.
remote: Compressing objects: 100% (2/2), done.
remote: Total 3 (delta 0), reused 0 (delta 0), pack-reused 0
Unpacking objects: 100% (3/3), 686 bytes | 14.00 KiB/s, done.
From https://github.com/malharSS/first-repo
   44d2a2e..091e422  main       -> origin/main
Updating 44d2a2e..091e422
Fast-forward
newfile.txt | 1 +
1 file changed, 1 insertion(+)
Conclusion
In this exercise, you created a GitHub repository and cloned it as a local repository in your machine. Then you added a file and committed the changed status. You then pushed the changes back to the remote repository. After making changes remotely, you pulled it to update the local repository.
Recap: Django Set Up
Introduction
As you build a back-end application using Python’s Django framework, you will need to have it installed on your machine. You need Python on your local machine to start.
Installing Python
If you don’t already have it, download the appropriate installer for the operating system and your machine’s architecture from https://www.python.org/downloads/.
Installing VS Code
It always helps to use an IDE to perform application development efficiently. You will be using VS Code while working on this Capstone project. Download and install VS Code from the official website https://code.visualstudio.com/Download.
Choose the appropriate installer depending on your operating system and architecture (32 bit or 64 bit).
Setting up the virtual environment
Python recommends using separate virtual environments for each project to avoid a clash of dependencies of various projects.
The standard method of creating a virtual environment is using the venv module in Python’s standard library.
It’s important to remember that a virtual environment has its own copy of the Python interpreter and the library.
python –m venv c:\workspace
Enter this directory, activate the virtual environment, and start VS Code from inside it.
C:\workspace>scripts\activate
(workspace) C:\workspace>code .
Once inside VS Code, choose the Python interpreter of the current virtual environment.
Installing Django
Open the command terminal, and install the Django framework by entering the following command in the terminal:
pip3 install django
Tip: If you get stuck setting up your environment, revise the reading Working with virtual environments.
The installation command will install the Django framework, along with its dependencies.
To check if the installation is correctly installed, enter the following commands:
(workspace) C:\workspace>python
Python 3.10.7 (tags/v3.10.7:6cc6b13, Sep  5 2022, 14:08:36) [MSC v.1933 64 bit (AMD64)] on win32
Type "help", "copyright", "credits" or "license" for more information.
>>> import django
>>> django.__version__
'4.1.2'
Installing the Django REST Framework and mysqlclient libraries
Later in the course, you’ll also need the Django REST Framework and mysqlclient libraries, so you must install them.
Creating a Django project
You can quickly build a minimal Django project and see if it runs satisfactorily.
Use the django-admin command line utility to start a new Django project.
django-admin startproject littlelemon
Launching the development server
Step into the littlelemon directory, and use manage.py script to launch Django’s development server.
(workspace) C:\workspace>cd littlelemon
(workspace) C:\workspace\ littlelemon>python manage.py runserver
Watching for file changes with StatReloader
Performing system checks...
System check identified no issues (0 silenced).
You have 18 unapplied migration(s). Your project may not work properly until you apply the migrations for app(s): admin, auth, contenttypes, sessions.
Run 'python manage.py migrate' to apply them.
November 29, 2022 - 17:13:39
Django version 4.1.2, using settings 'lemonlittle.settings'
Starting development server at http://127.0.0.1:8000/
Quit the server with CTRL-BREAK.
[29/Nov/2022 17:13:47] "GET / HTTP/1.1" 200 10681
Open a new browser window and paste the localhost URL http://127.0.0.1:8000/
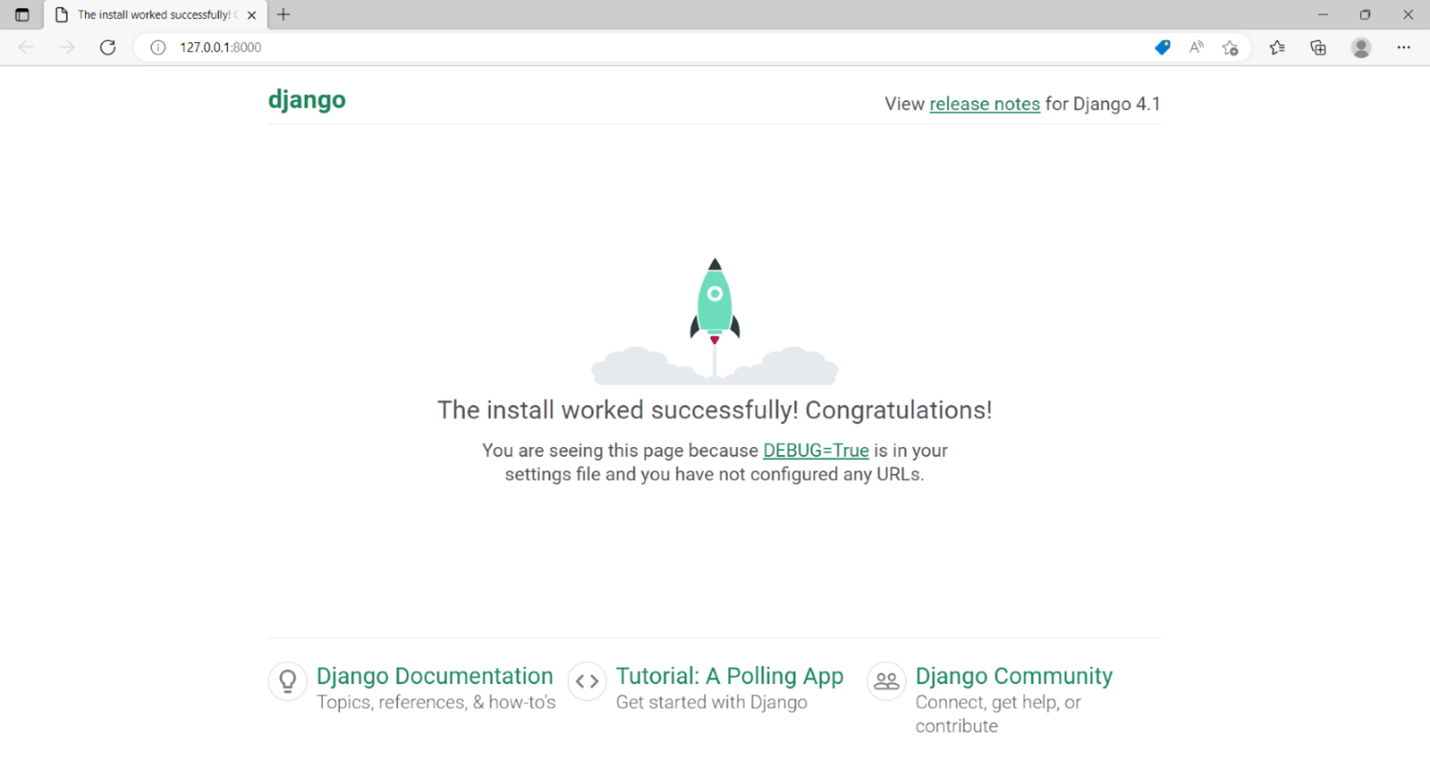
A congratulations page should load in your browser, meaning Django has been installed successfully.
Summary
In this Reading, you learned how to install a Django project and launch the development server.
Exercise: Setting up the Django project
Overview
In this Capstone project course, you are going to build REST APIs using Django and Django REST Framework.
In this exercise, you will build a Django project for the Little Lemon restaurant.
Scenario
The owners of the Little Lemon restaurant have hired you to build two APIs. One API to order food using the Menu API. You need to build the Table booking API to facilitate reserving a table for dining in the restaurant on a specific date and for a certain number of people.
Steps
Step 1
If your computer doesn’t already have Python installed on it, download and install from the link: https://www.python.org/downloads/.
Tip: Make sure to choose the installer for your OS and architecture.
Step 2
You will use VS Code for developing this Capstone project. If not already available locally, install from the link: https://code.visualstudio.com/Download.
Step 3
Create a Python virtual environment, activate it and install Django in it.
python –m venv workspace
cd workspace
scripts\activate
scripts\pip3 install django
Note: The macOS commands to activate virtual environment and install Django
pip install virtualenv
virtualenvmyenv --python=python3
source myenv/bin/activate
pip install django
Step 4
Open VS code from the workspace directory
code .
Step 5
From VS Code extension marketplace, install the Python extension.

Step 6
Press ctrl+shift+p and select Python interpreter. Choose the interpreter in the virtual environment path.
Step 7
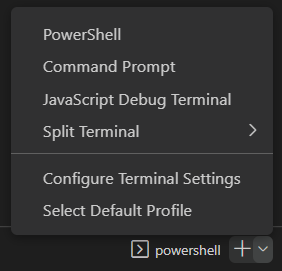
Open a new CMD terminal in VS Code. Use the startproject command of django-admin utility.
django-admin startproject littlelemon
Note: If the Powershell terminal opens by default, choose Command Prompt from the drop down
Step 8
Change the current directory to littlelemon and create a djangoapp with the name restaurant.
python manage.py startapp restaurant
Step 9
Open the settings.py file from the littlelemon project package in a new VS Code window. Add the restaurant app to the INSTALLED_APPS list.
Step 10
From the terminal, start the Django development server with following command:
python manage.py runserver
Tip: It’s safe to ignore the migration related warnings for now.
Step 11
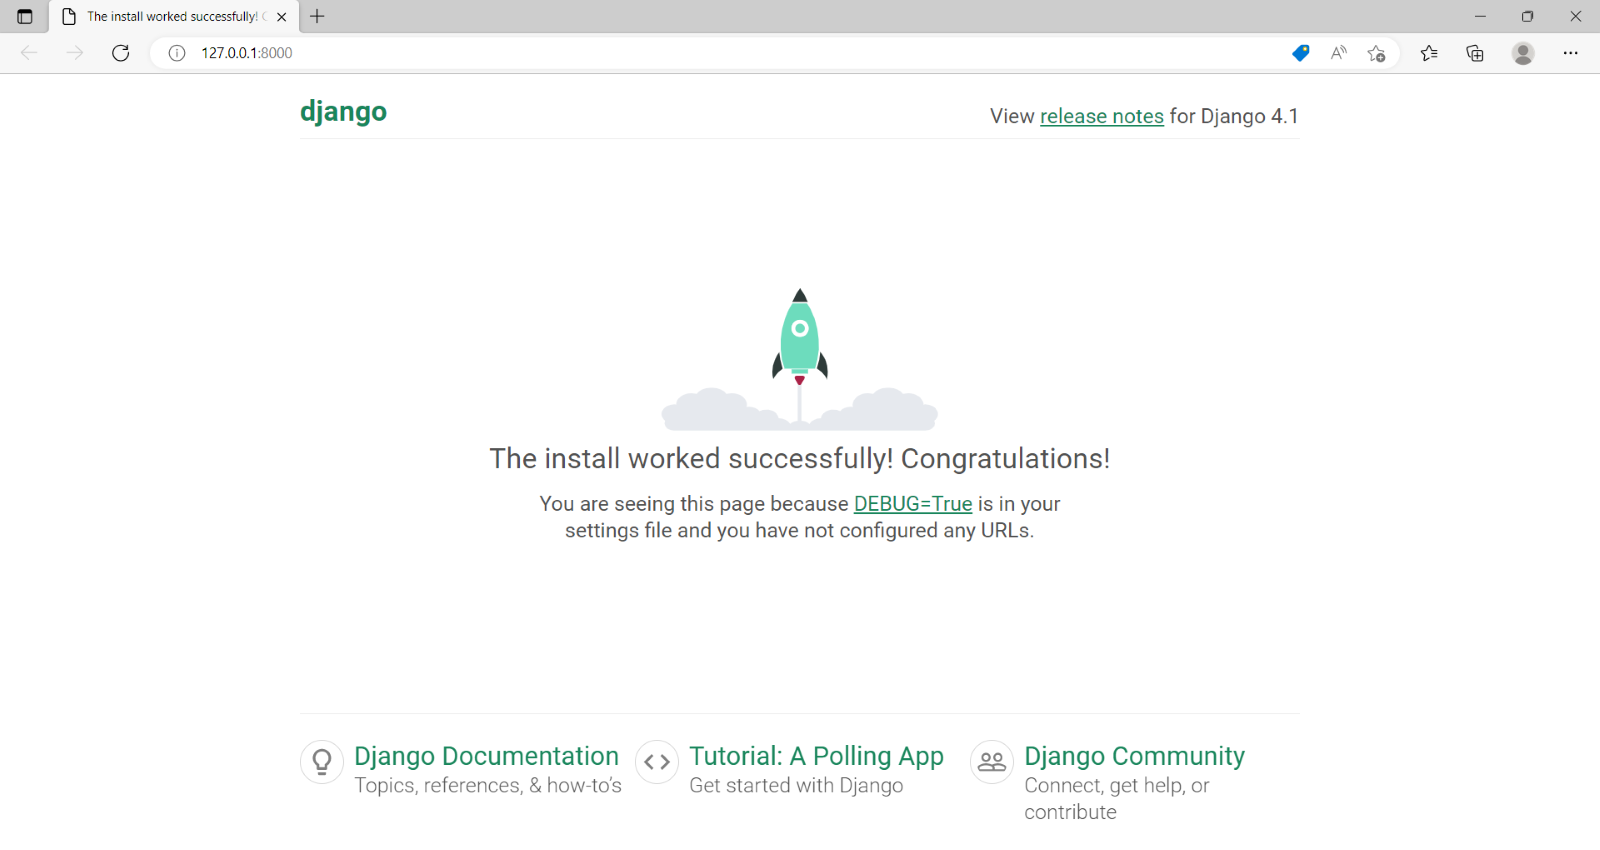
Open the browser window and enter http://localhost:8000/ URL. You should get the page showing the successful installation of Django project.
Conclusion
You have installed Django framework on your computer, and successfully created a Django project.
Exercise: Committing the Project
Overview
You have already cloned the GitHub repository to a local repository named Capstone-project in your machine’s workspace directory.
You have also created a Django project with the name LittleLemon. Inside it, you created a Django app named Restaurant.
In this exercise, you will commit the project to the remote repository on GitHub.
Scenario
For the capstone project, you will build a REST API for ordering food and table reservation.
Prerequisites
You have set up a repository on GitHub and cloned it into the workspace directory. You should already have created a Django project called Littlelemon with an app named Restaurant in it.
Steps
Step 1: Create a new branch of local repository
Open the terminal and use the command git checkout –B <branch-name> to create a new git branch.
Step 2: Add the project folder to the stage
Enter the command git add .
Step 3: Check the status
In the Git terminal enter the git status command.
Step 4: commit the changes
Next, commit the changes using the git command git commit –m "message".
Step 5: Push the changes to the GitHub repository
Use the command git push –u origin <branch-name>.
Step 6: Login to GitHub and open the repository
The repository page should show the Compare & pull request button. Go ahead and press it.

Step 7: Create pull request
On the repository page, you’ll see the changes committed, and the Create & pull request button.

Step 8: Merge pull request
Review the changes and confirm by pressing the Merge pull request button.

Step 9: Login to the main branch of local repository
Go back to the Git terminal and enter the command git checkout main.
Step 10: Update the main branch
Use the git pull command.
Conclusion
In this exercise, you successfully pushed the Django project files to the GitHub repository.
Additional Resources
Here is a list of resources that may be helpful as you continue your learning journey. These resources provide some more in-depth information on the topics covered in this module.
Version control
- What is version control?
- What are Git and GitHub
- Create your GitHub account
- Creating and cloning a repository
- Git staging versus production
- Remote versus local
- Add and commit
- Push and pull
- Branches
Django framework
- Projects and apps overview
- Project structure
- Django-admin and manage.py commands
- App structures
- Creating an app
- What is a web framework?
- MVT overview
- Understanding URLs
- Mapping URLs with params
- Class-based views