What is Django?
Why use it?
Build everything yourself ❌ Use something called a web application framework ✔
Think of a web application framework as a toolkit containing all the components needed for application development.
By using a framework, developers and development teams can focus on the application’s unique features, instead of spending time developing features common to all applications. For example, developing code for user login and authentication.
Django
Django is an open source web development framework. It’s written in Python and it was first created for a newspaper publisher web application. As a result, it’s excellent for building projects that require high volumes of text content, media files and heavy traffic.
- The open source nature of Django has resulted in its rapid growth and adaptation, which has resulted in its usage for a wide variety of web applications.
- The Django framework allows easy integration with many tools and languages with support from other Python libraries.
NOTE
Much of the success of a web framework relies on its ability to provide a robust, secure, adaptable and scalable functionalities.
- Django caters to all of these requirements and provides features like templates, libraries and APIs, which are all easily manageable and scalable.
- Its power lies in its ability to separate features, which is helpful for organizations that need to create projects using more than one framework.
- For example, developers can create a back end framework with Django that can connect to a front end framework via an API. Organizations are then free to choose whatever front end framework they like, such as react or react native from Meta.
- On the back end, developers can make use of powerful features. These include an email system for notifications, data analysis tools, admin dashboards and development tools for online marketplaces and booking systems.
- Developers can use Django to deploy machine learning algorithms that can be made available with the help of APIs, application programming interfaces, RPCs, remote procedure calls and WebSockets.
- Django can handle many API end points, each of which can have several ML models. Django also enables fast integration and deployment of these models.
- An important reason why Django is so popular is its ease of scalability. It’s common for many web applications and tech companies to start on a small scale, but soon expand rapidly.
NOTE
It critical factor of an app’s ability to scale is the ability to provide fast and efficient traffic management for its users.
- Most applications that are built on the web provides some form of service. For Software as a Service or SaaS applications. This can mean platforms that provide things like data storage, app stores and version control systems. For example, Django is a popular choice for Cloud storage applications because it provides something called asynchronous views.
Asynchronous views
This allows the application to run different services concurrently instead of waiting in the queue to complete each service, significantly increasing the application’s performance.
OTT
over the top or OTT media platforms, that provide audio and video streaming services.
- OTT platforms have grown in popularity recently and Django is often used to meet their needs.
More
- Django is more suitable for large projects, because it provides good fault tolerance.
- Also its open source nature is inherently free, drastically reducing company’s costs.
- Also the ease of adaptation, robustness, supportive open-source community, comprehensive documentation and security make Django popular.
- Ultimately, developers and organizations favorite Django because just like Python, it helps them avoid reinventing the wheel.
Setting up a project in VS Code
In this reading you’ll learn how to install Visual Studio Code and add a Python extension to it.
Features of VS Code
A Python program is a text file with a .py extension. Therefore, it is possible to write the code using any text editor. However, an editor familiar with Python syntax helps avoid syntactical errors.
Throughout this course, you will use Visual Code to develop your programs.
Visual Studio Code (VS Code) is Microsoft’s popular source code editor. It is a desktop application for Windows, Linux, and Mac. It is lightweight but speedy and includes essential features such as debugging support, auto-completion and syntax highlighting.
Install VS Code
VS Code is available to download for free at https://code.visualstudio.com/Download
. Choose the downloader that is appropriate for your operating system.
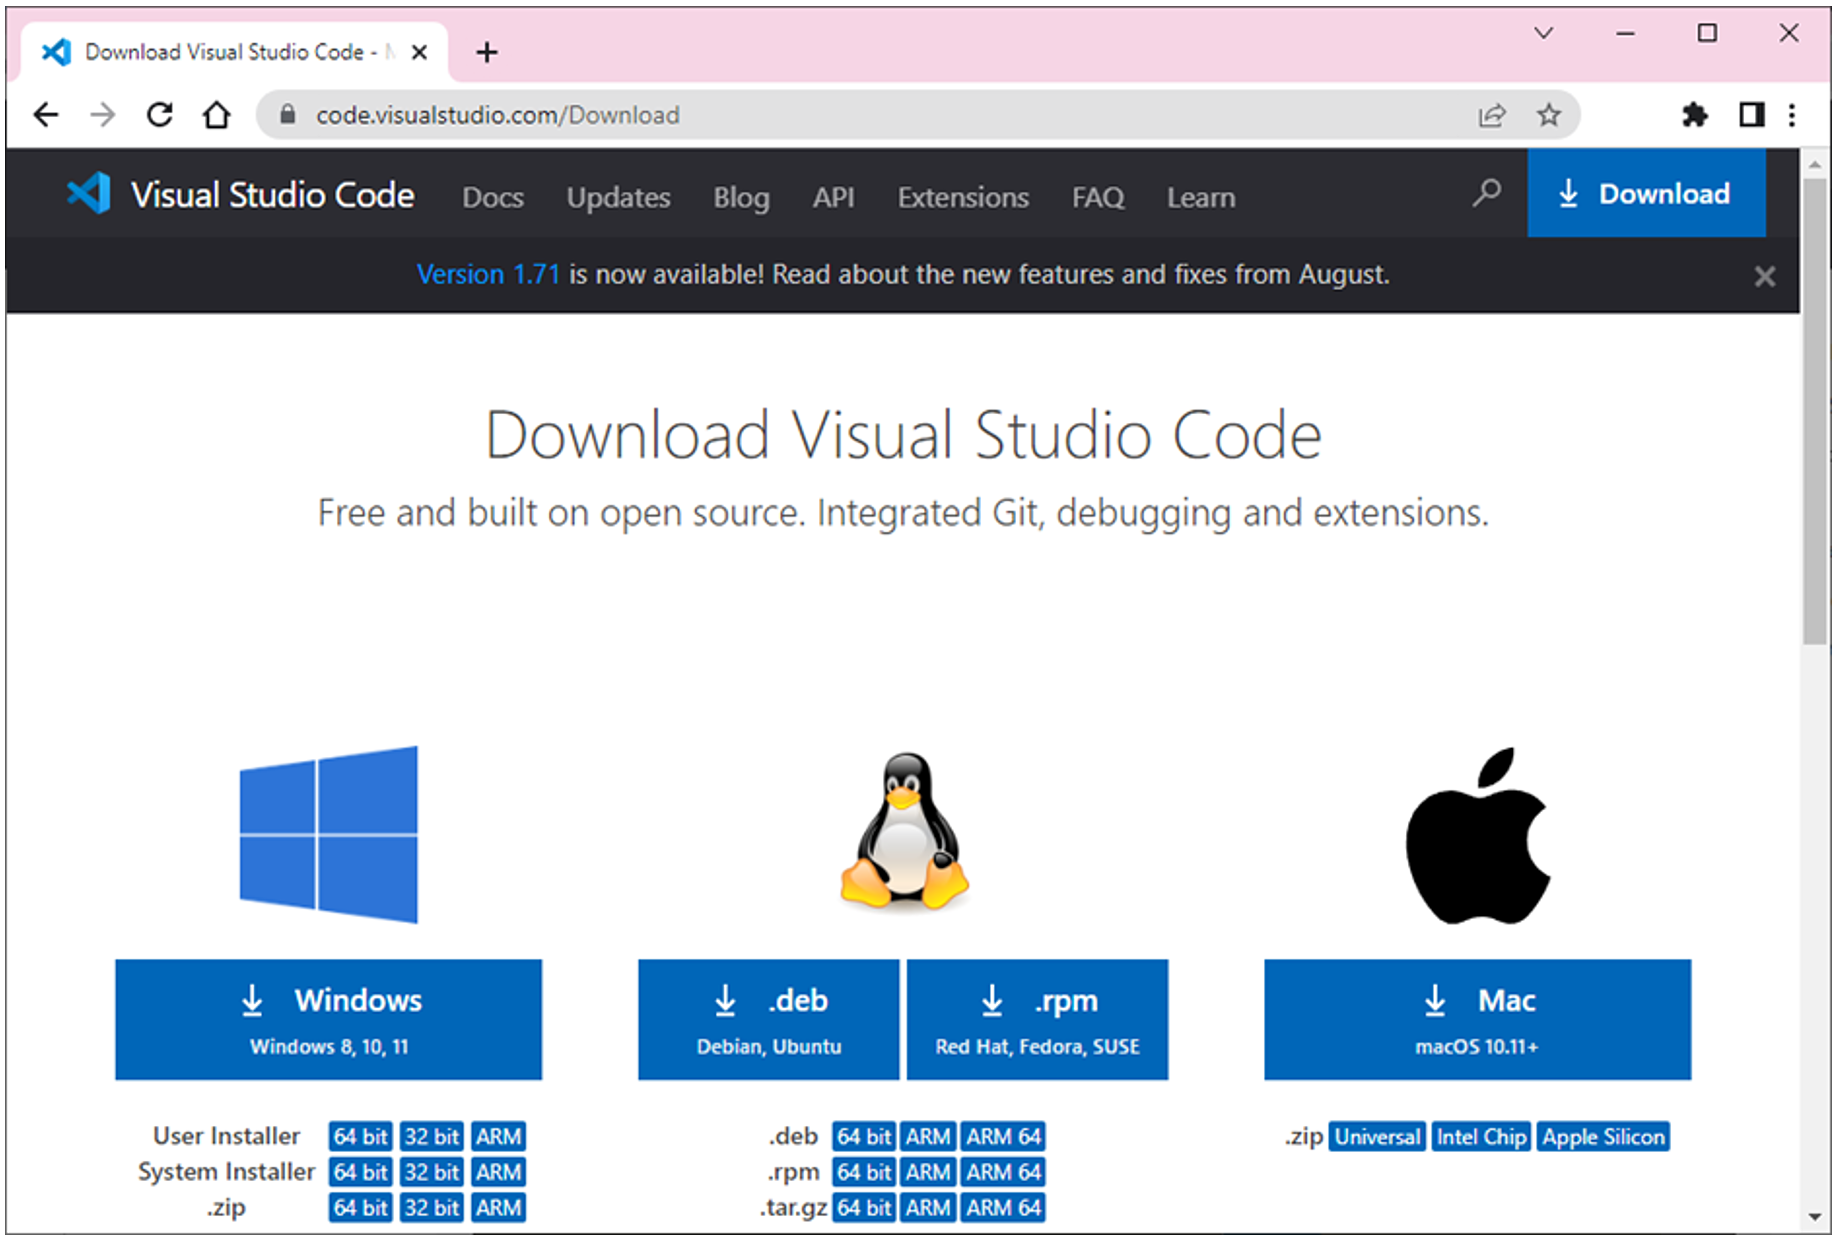
This reading focuses on the Windows platform installation. For other operating systems, follow the instructions on the above page.
The Windows installer is an executable (VSCodeUserSetup-x64-1.71.2.exe). Execute it from the downloads folder. You may need admin credentials to do this, then follow the installation wizard.
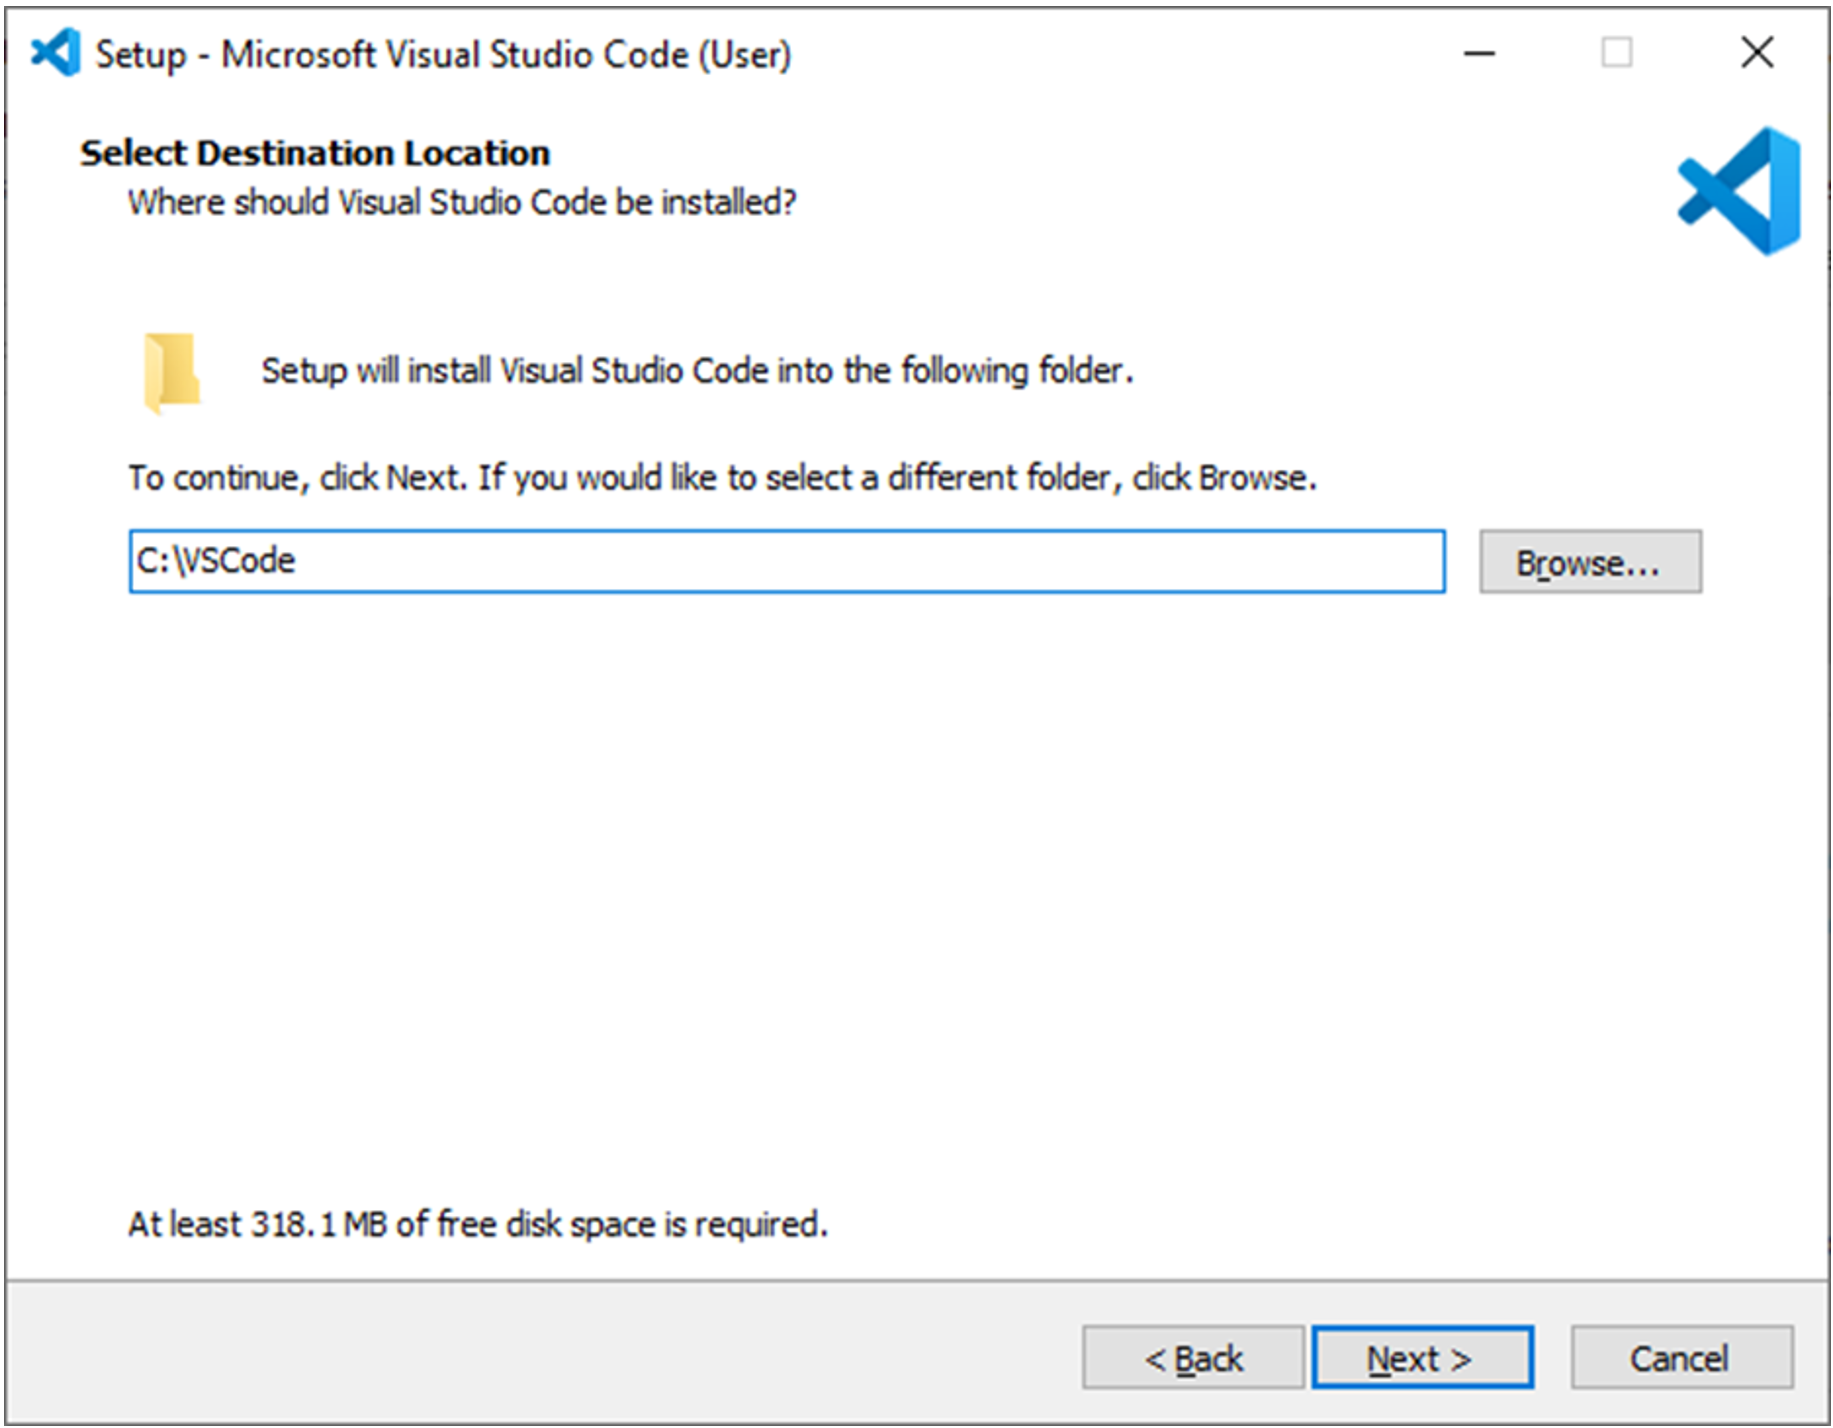
It will help if, during the installation, you specify the installation folder with a short path that is easy to navigate instead of the default path suggested by the installer.
Also, ensure that it is added to the system’s PATH environment variable.
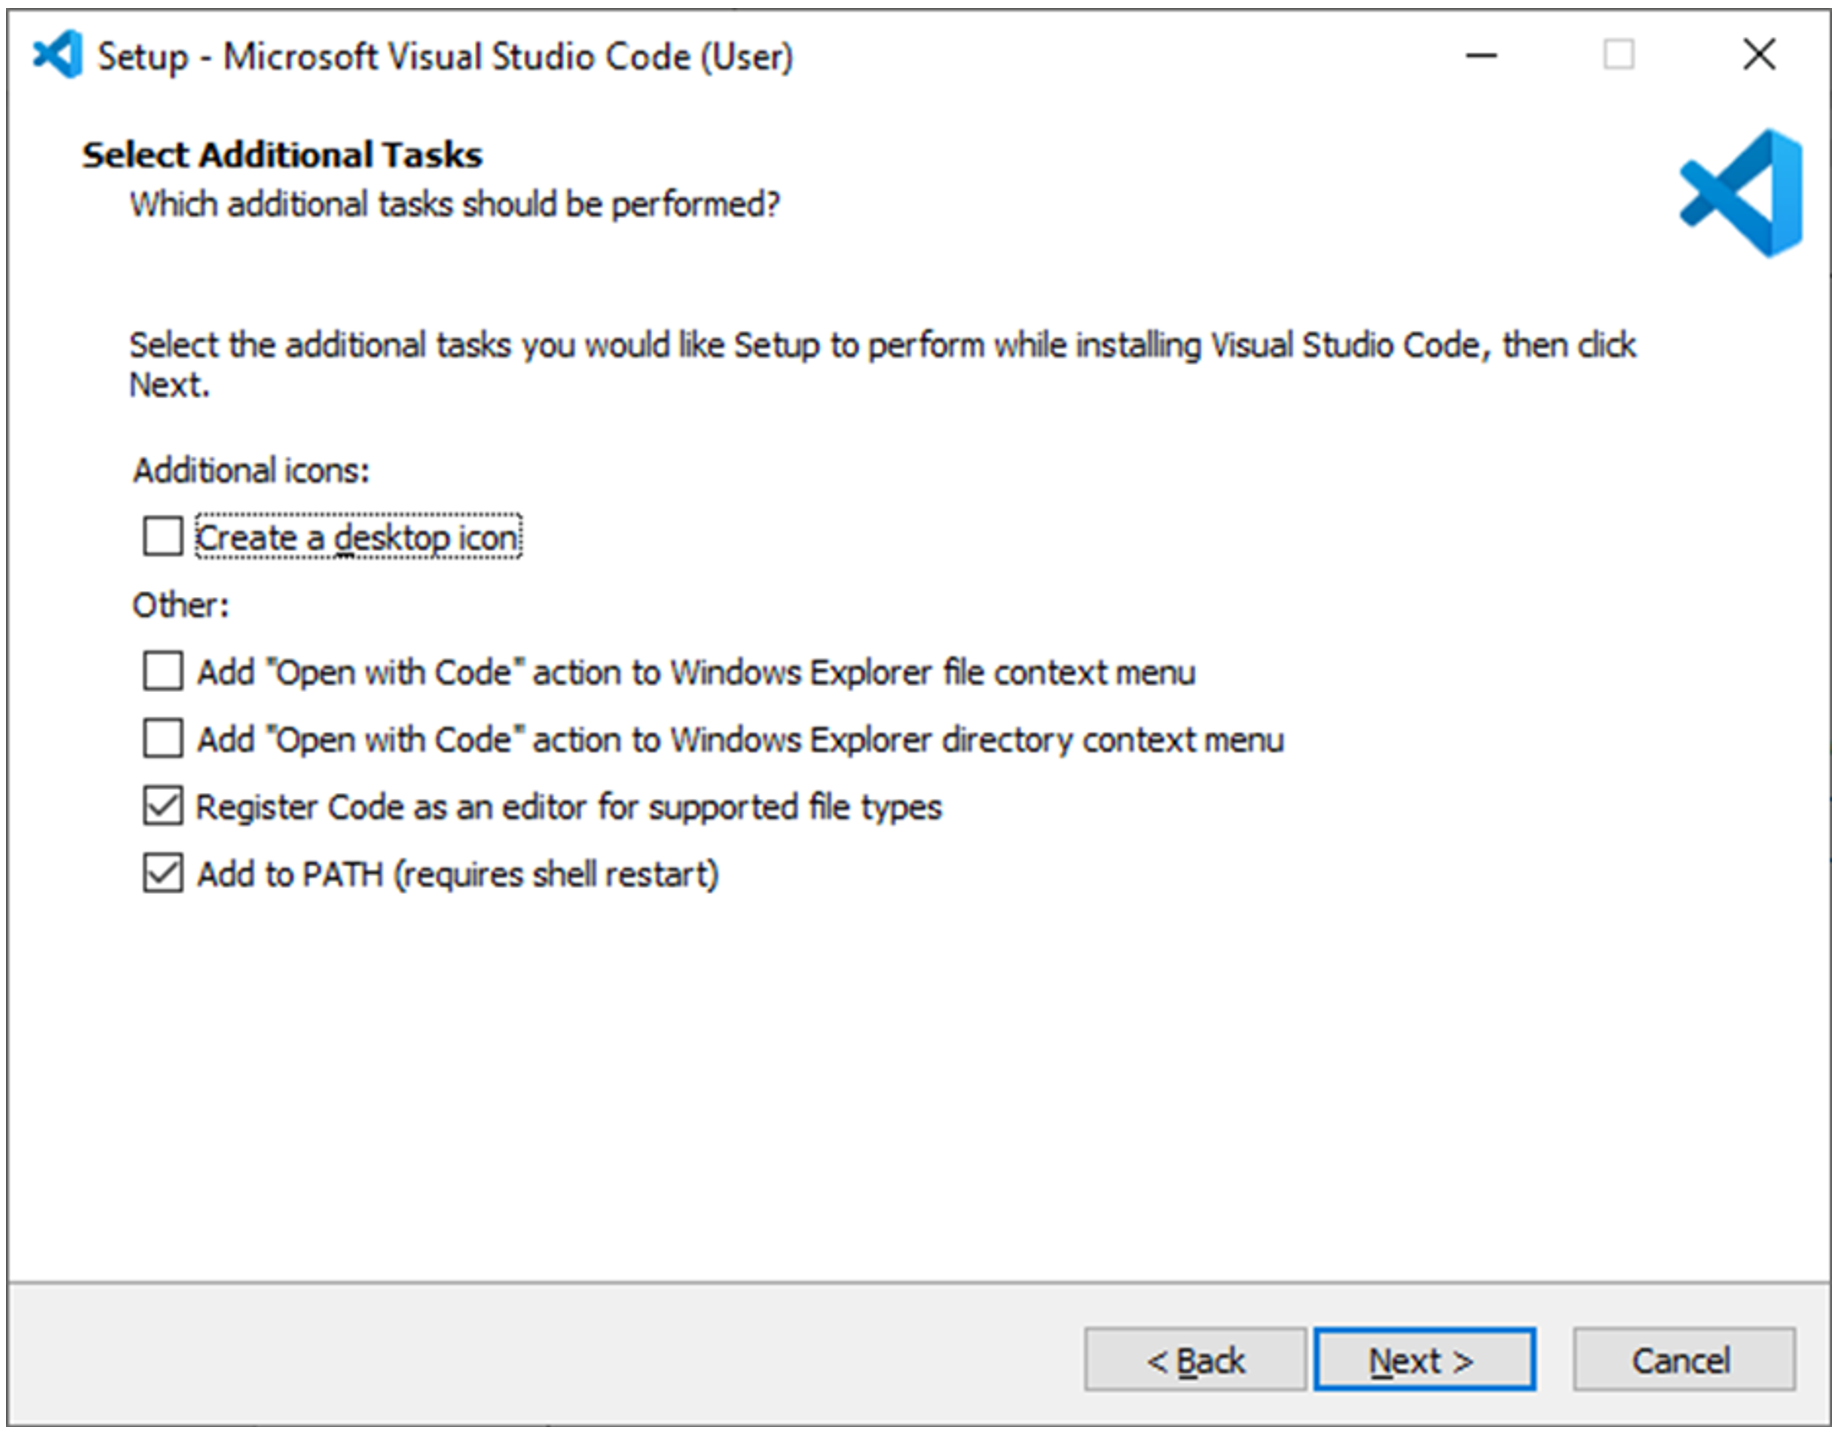
You are ready to launch VS Code from the start menu or the desktop shortcut if you have created it.
It opens to the Getting Started page. Play around with the Appearance and Layout settings according to your liking.

Python Extension for VS Code
VS Code doesn’t support Python as is. So, you need to enable it by adding Python Extension.
Click the Extensions button on the left sidebar (use the ctrl+shift+x shortcut) to open the Extensions Marketplace. Type Python in the lookup box and select the Python extension from the list shown.
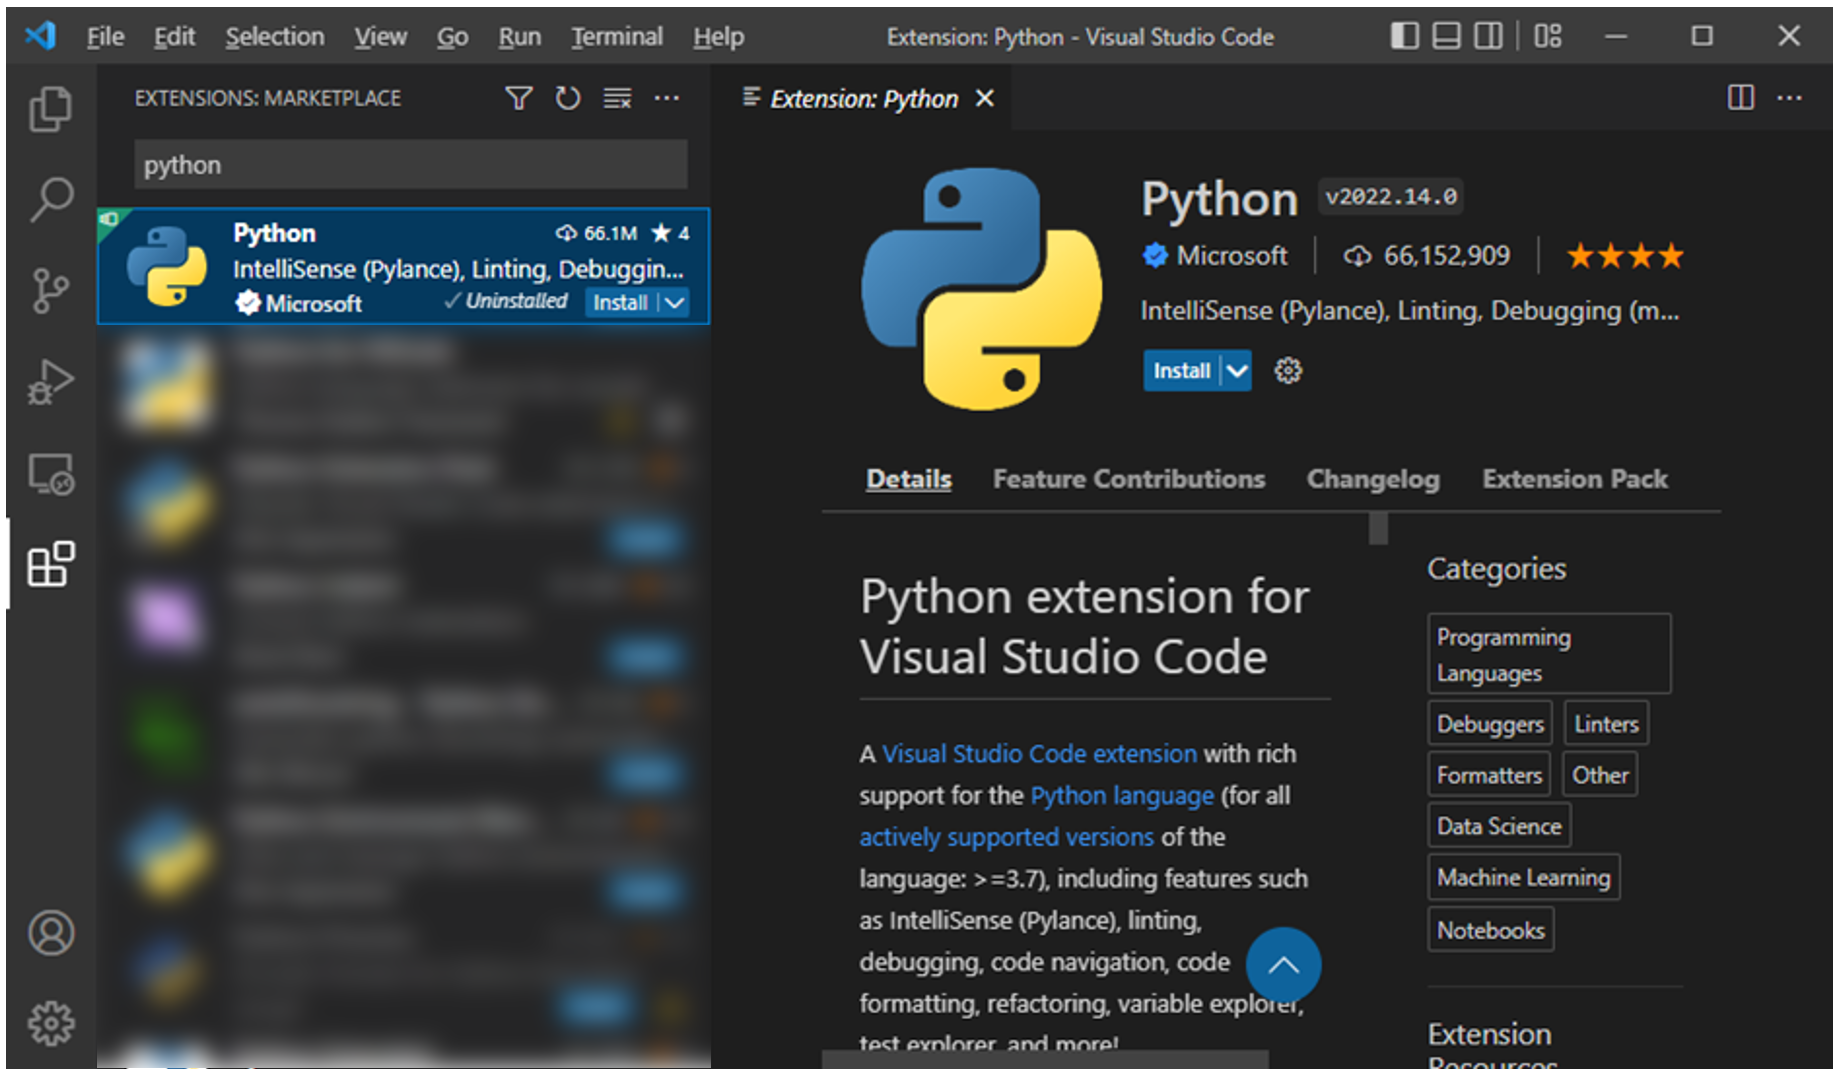
Go ahead and click on Install.
Next up, you need to inform VS Code about the Python interpreter you want it to use while providing highlighting, auto code completion, and debugging support.
Press ctrl+shift+P to open the Command Palette. Type Python: Select Interpreter in the search box.
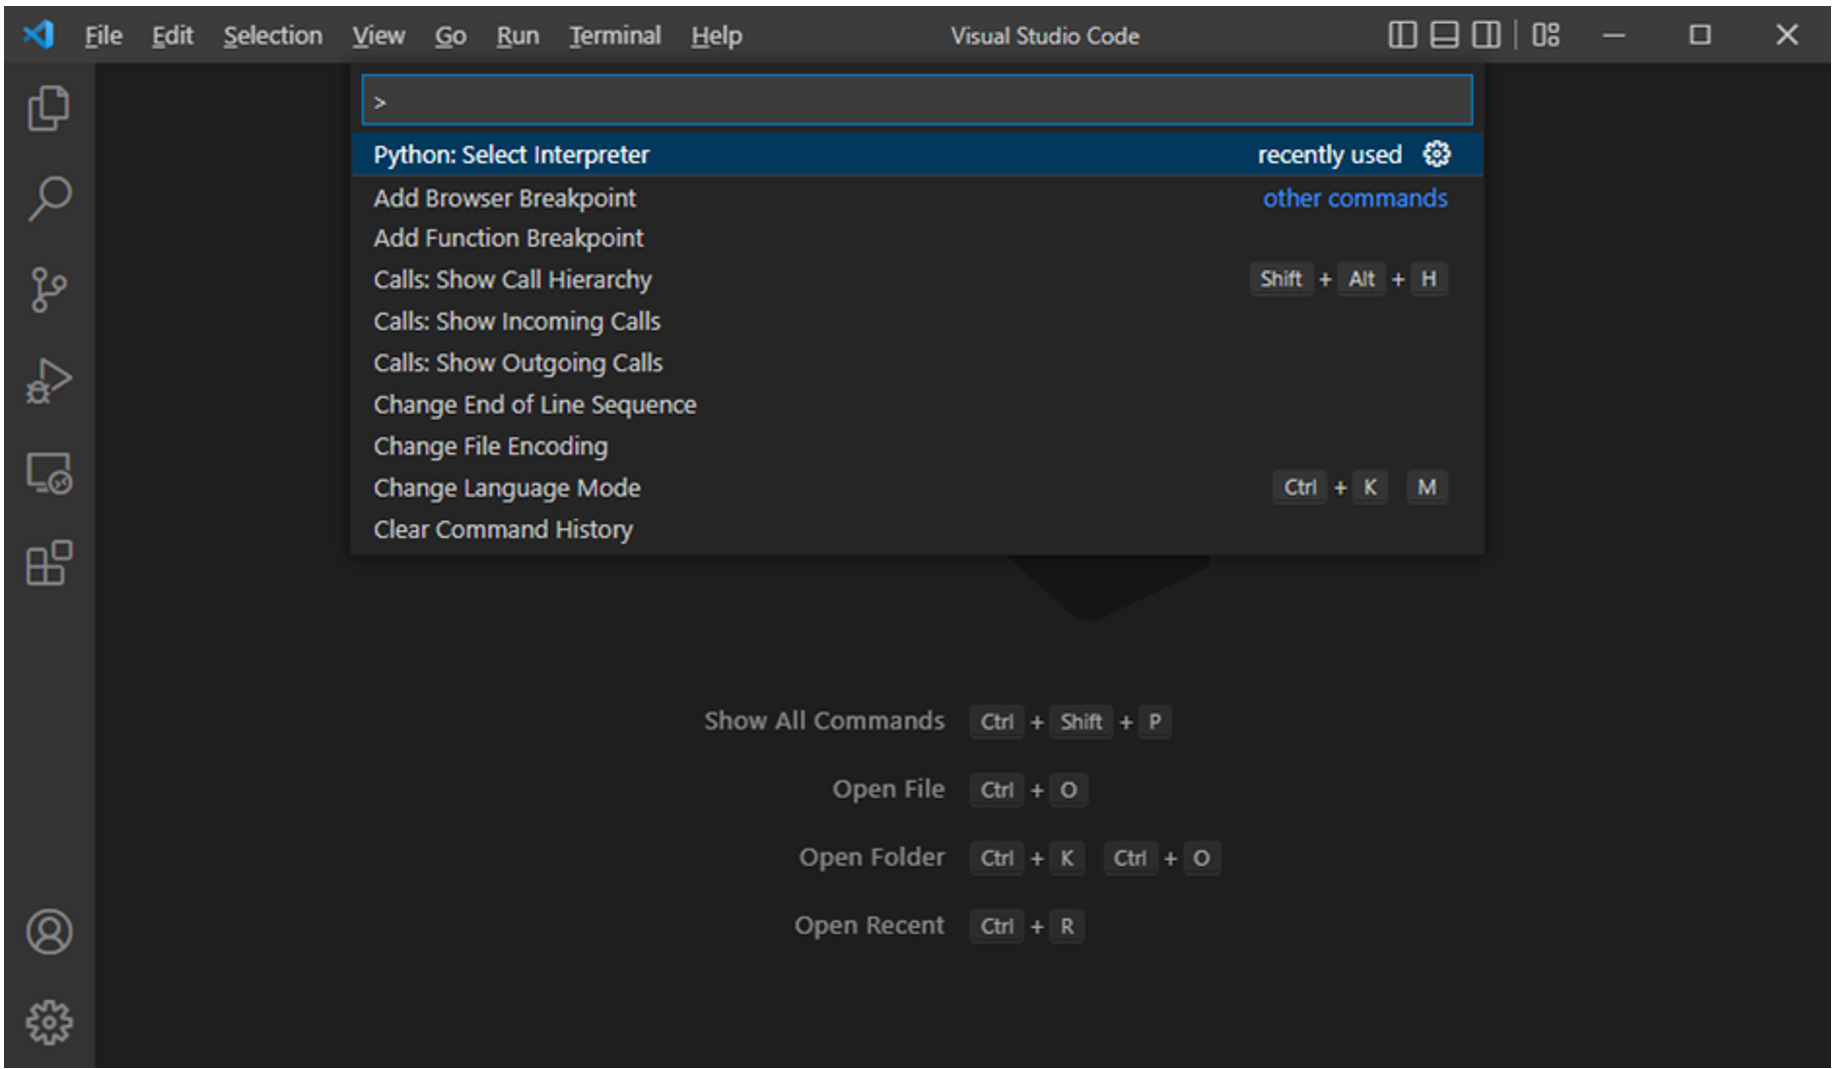
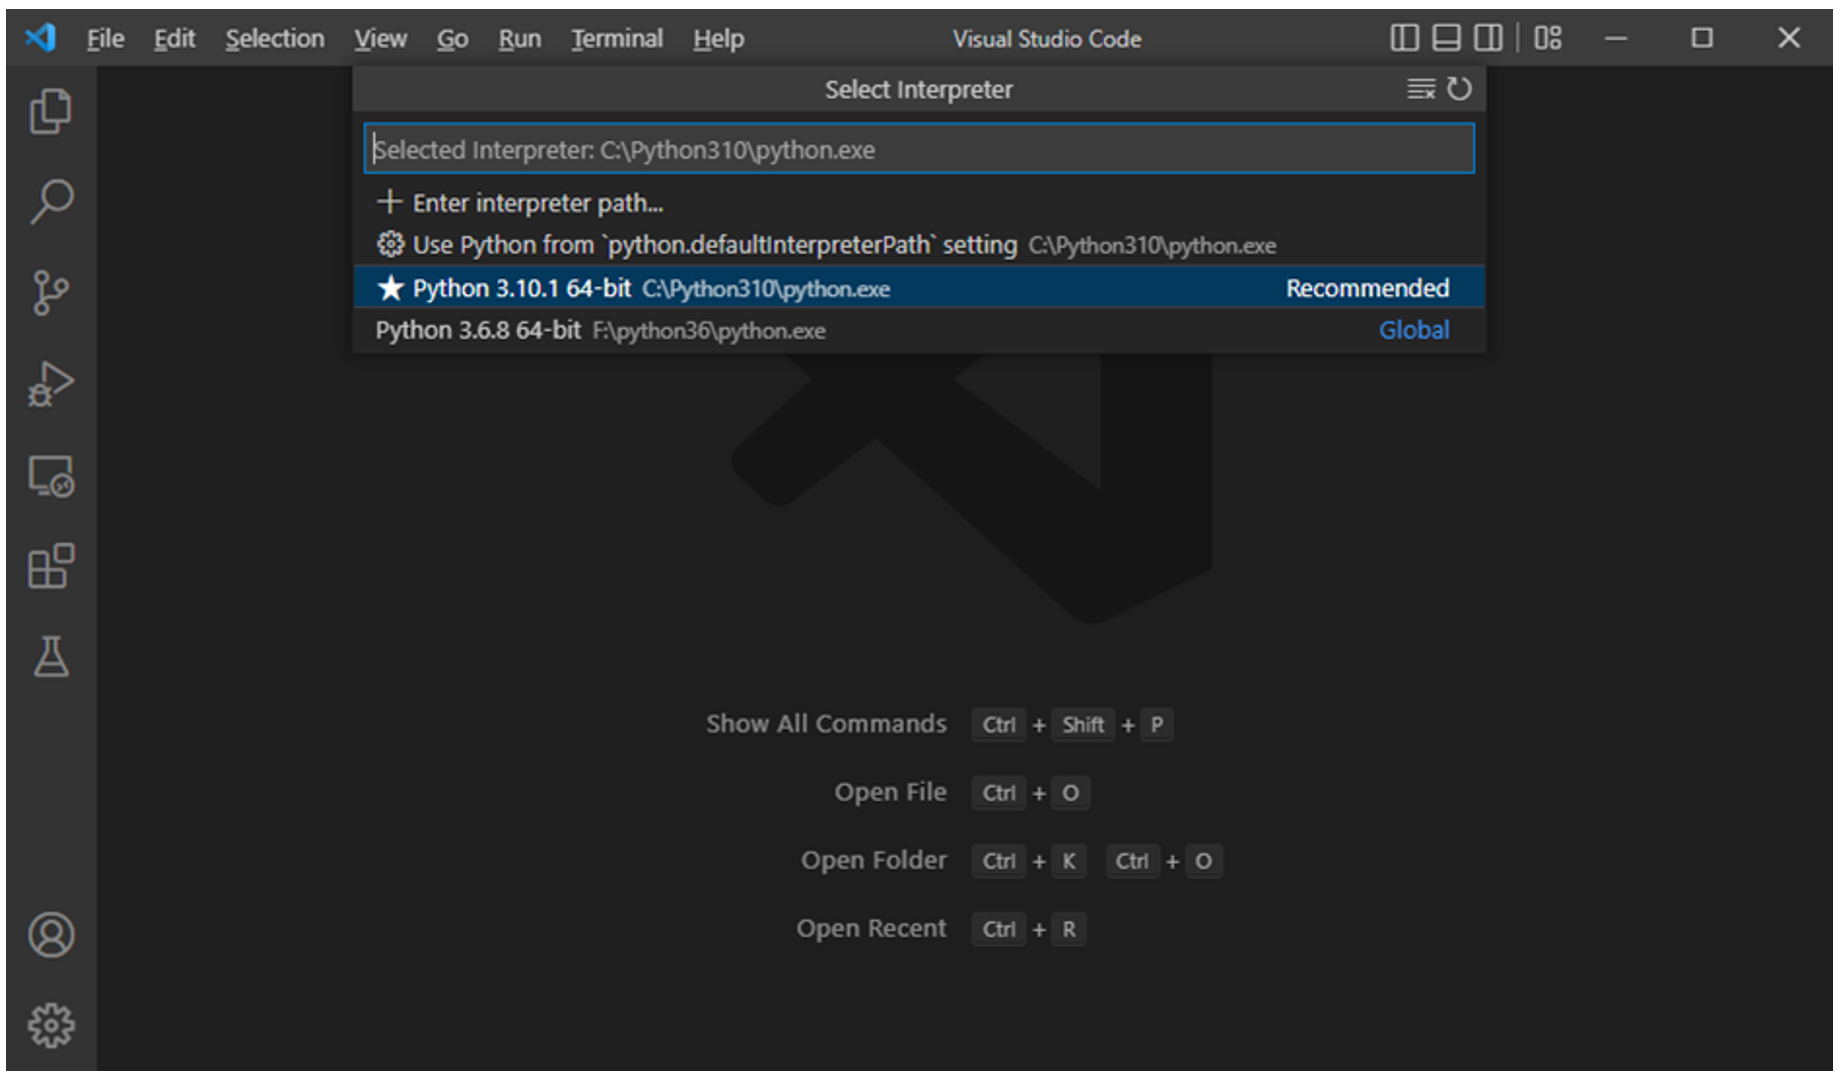
A list of available Python interpreter installations displays.
You may have more than one version of Python on your system or none at all. So, you’ll need to install Python before continuing.
Hello World in VS Code
It is now time to see how VS Code helps write Python programs.
Open a folder from the File menu and add an empty Python code file (name it hello.py). Enter a print statement in it and save.
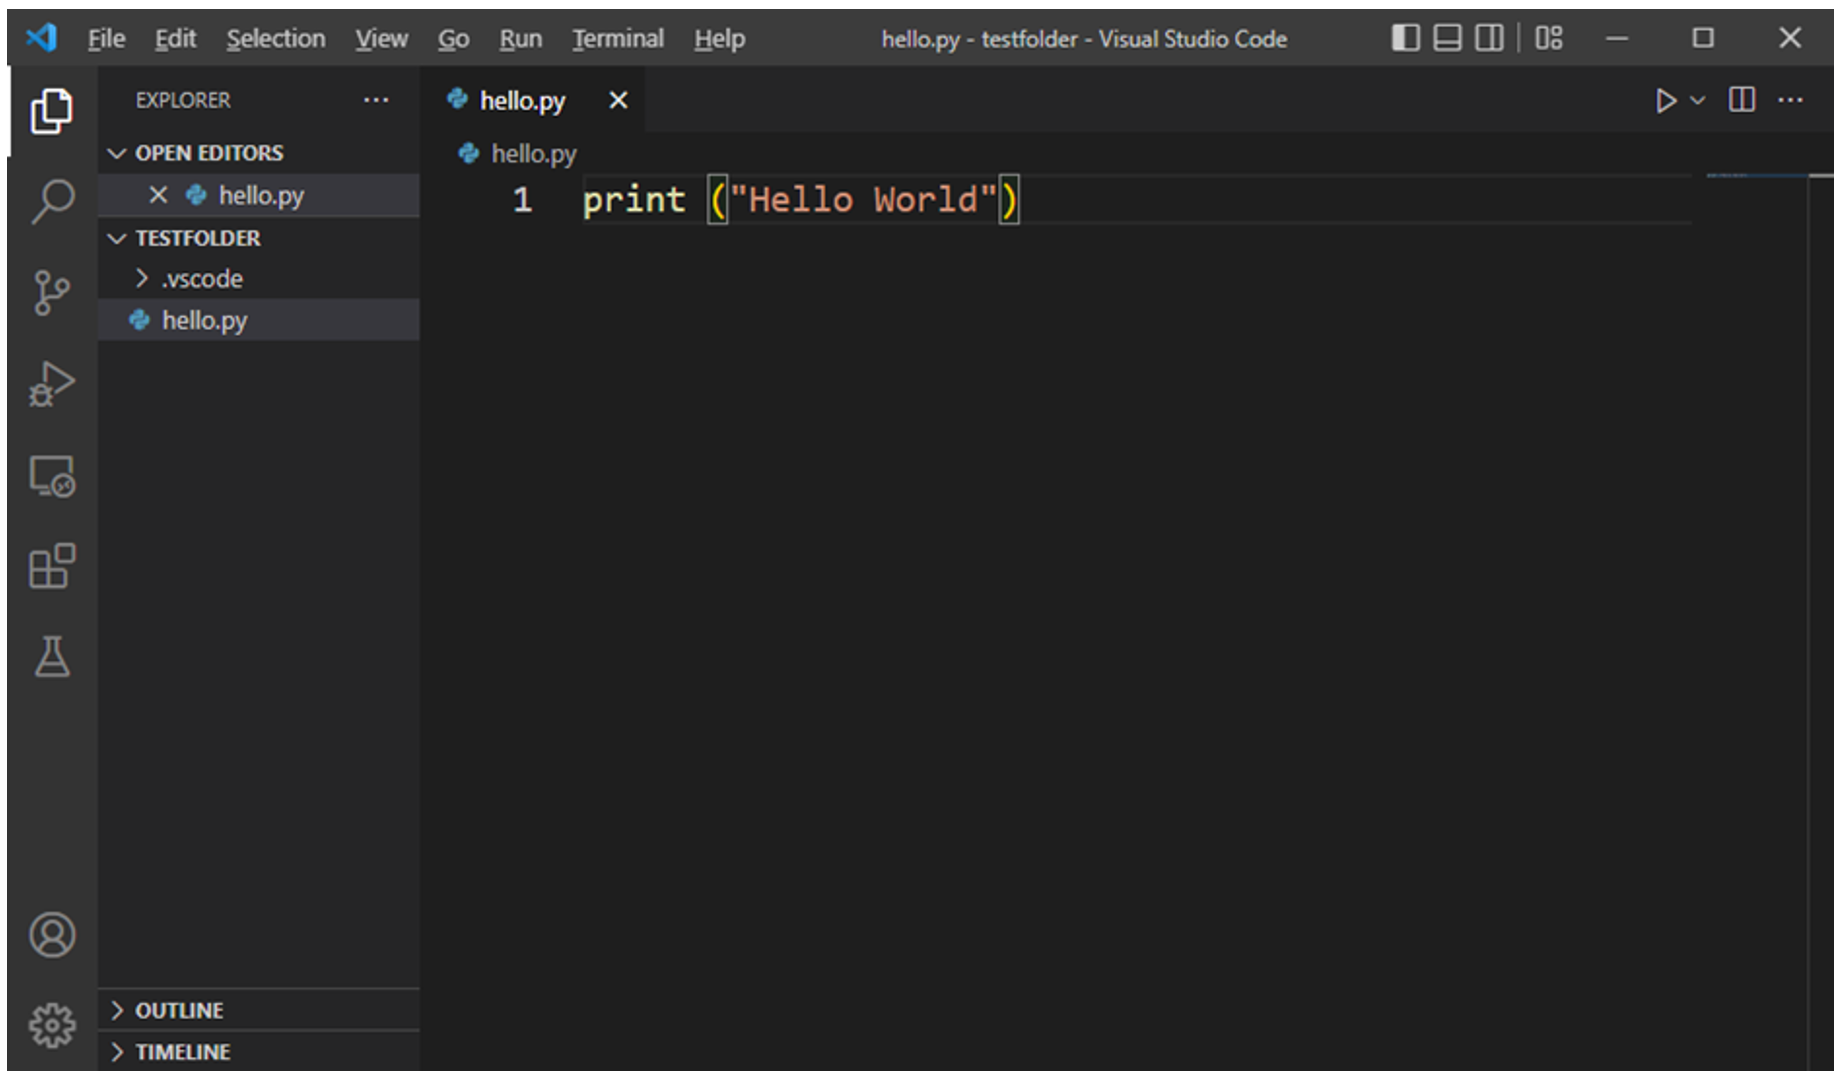
VS Code provides a visual indication of different elements of the code, such as keywords, functions and strings by coloring them appropriately per the chosen scheme.

To run this code, open the command terminal from the Terminal menu.
Execute hello.py with Python by entering the following line in the terminal:
python hello.py
So, you have successfully installed VS Code, enabled Python and test-run a sample code.
Python recommends using a virtual environment to build Python applications.
A virtual environment is an isolated environment having its copy of the interpreter and libraries so that there’s no clash with the global installation of Python.
Python’s virtual environment is set-up with the help of a built-in module named venv. For example:
C:\django>scripts\activate
After the virtual environment is activated, install the Django framework with the following command:
(django) c:\django> pip3 install django
The VS Code software can be launched from within this folder as follows:
(django) C:\django>code .
This is a handy shortcut to start VS Code.
SQLite Extension for VS Code
During this course, you will be learning a lot about SQLite databases.
Hence, it will be convenient, if possible, to browse the database from within the VS Code environment.
VS Code Marketplace has helpful extensions like SQLite Viewer or SQLite. Please find it in the Marketplace on VSCode and install it.
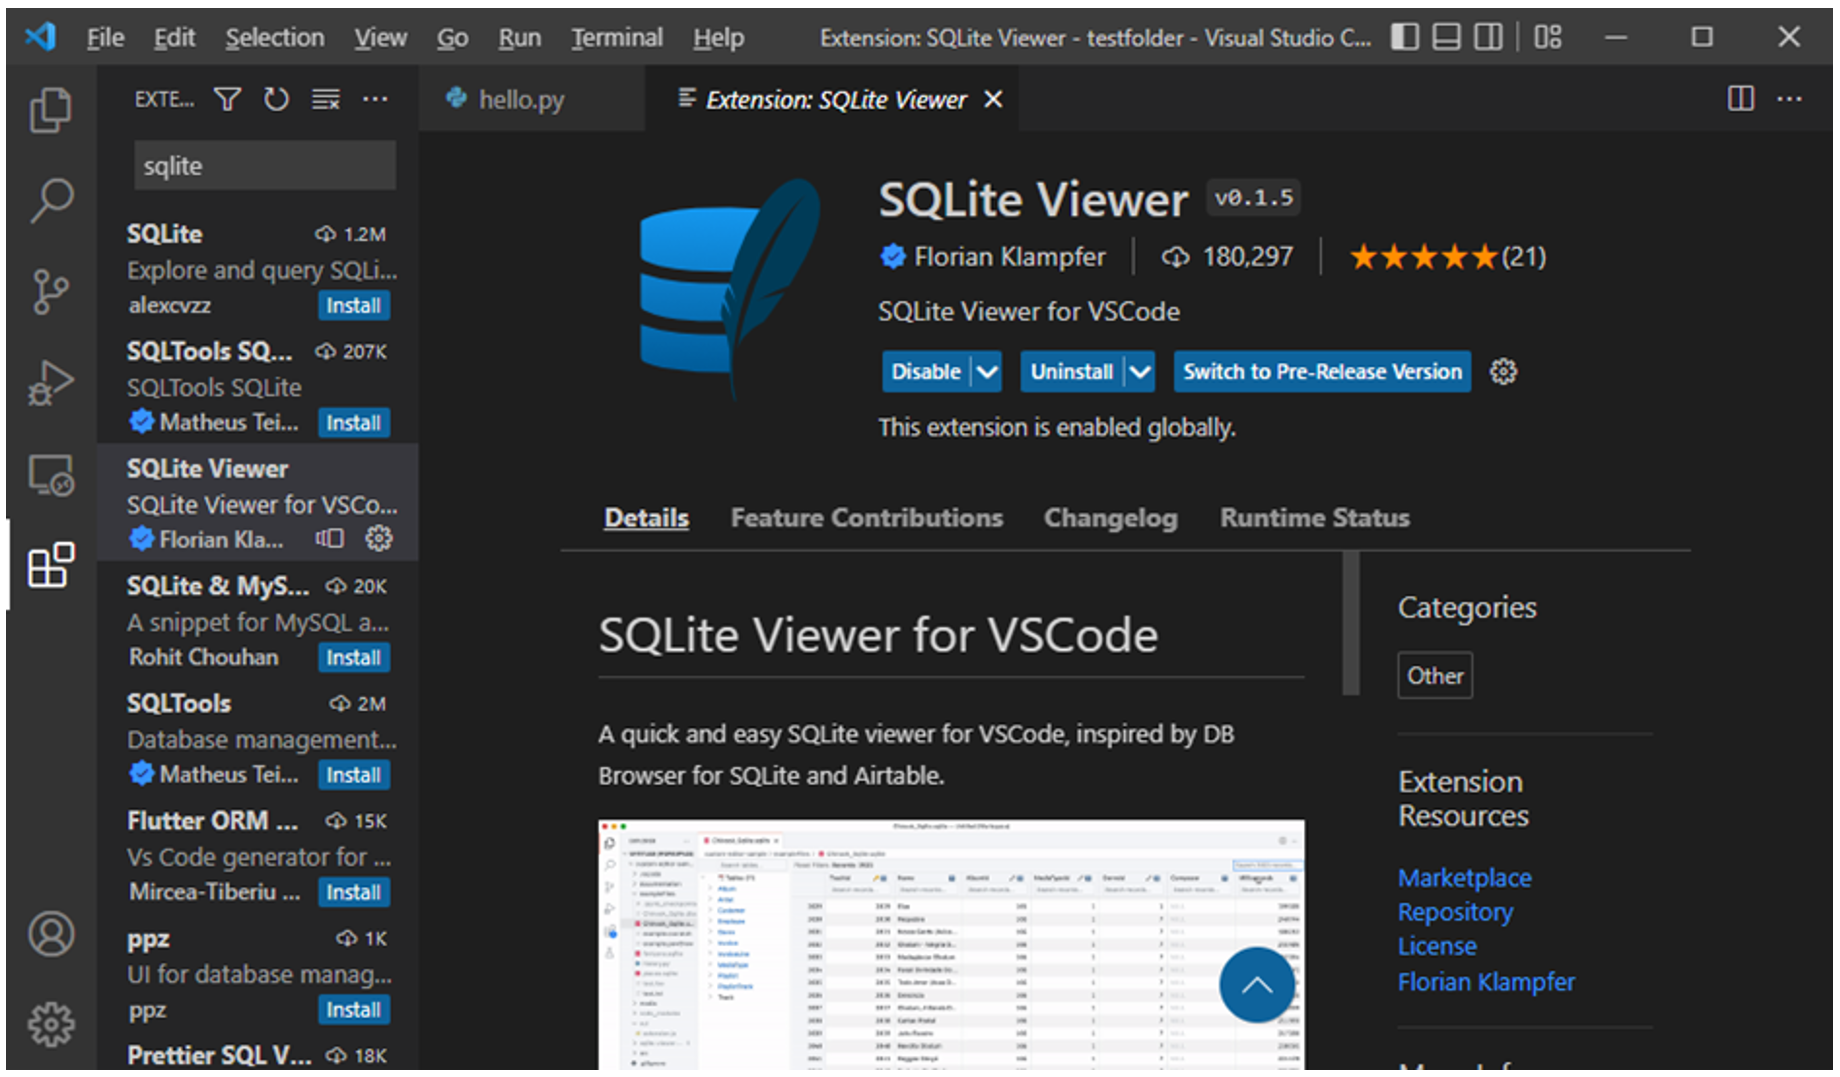
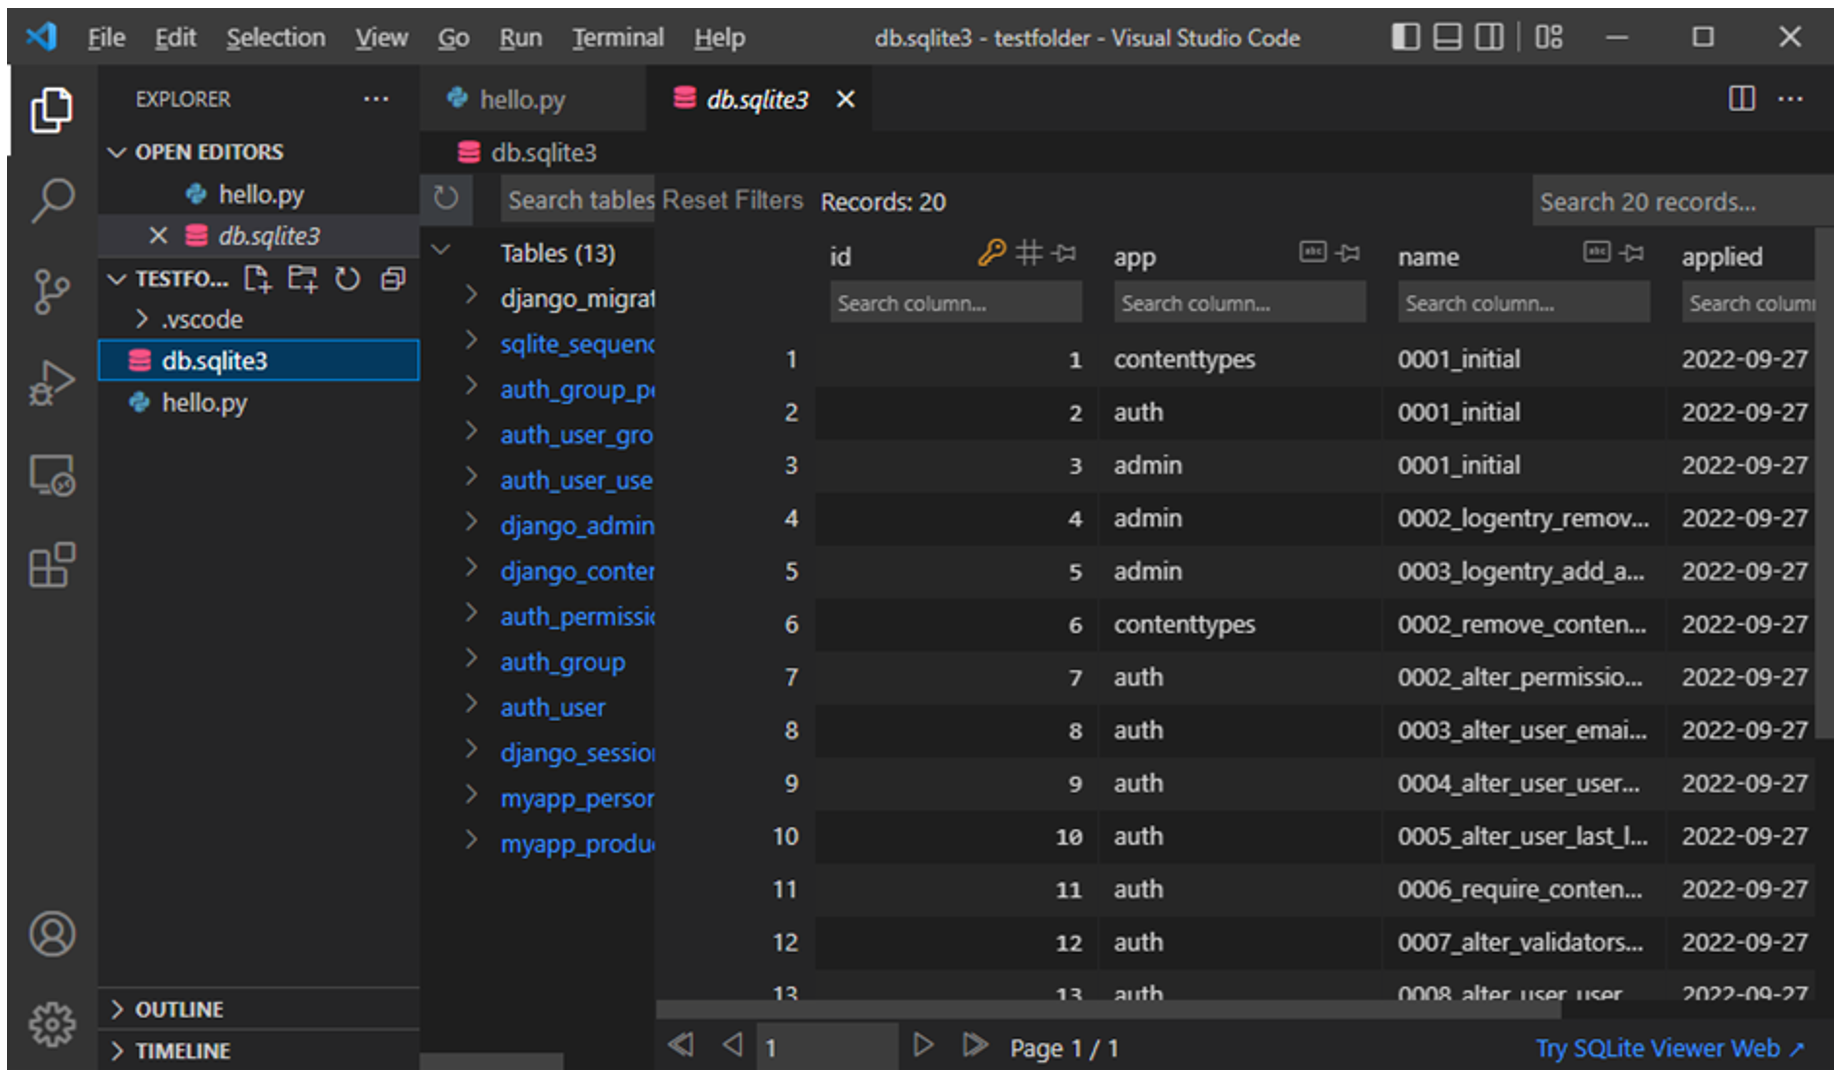
To test, add an SQLite database in the folder and double-click on it. The database tables will be shown on the main panel.
It’s important to know that Django enables the use of SQLite database by default and VS Code Extensions for SQLite help in viewing the tables.
Note: No sample database tables are added by default. Database tables are added using a process known as migrations and will learn about them later in this course. When database tables are added, they will be empty until you populate them with data.
The image below is thus illustrative and will vary according to the tables present in your Django application.
This reading taught you how to install VS Code on Windows OS, add a Python extension and run a Python program. You also added the SQLite Viewer extension to browse the SQLite database.
Working with virtual environments on your local machine
While working with Django, you must first go to the local directory where you want to create your project and setup a virtual environment.
Ensure pip in installed on your device. The latest version can be installed and upgraded by using the command:
Windows
py -m pip install --upgrade pip
MacOS
python3 -m pip install --user --upgrade pip
Python uses venv as the preferred module to create and manage virtual environments. venv is also included in the Python standard library and does not require any additional installation.
venv (for Python 3) and virtualenv (for Python 2) allow you to manage separate package installations for different projects.
In case you want to install virtualenv that is used for earlier versions of Python, use the command:
Windows
py -m pip install --user virtualenv
MacOS
python3 -m pip install --user virtualenv
You can create a virtual environment in the specific project directory by running a command:
Windows
py -m venv env
MacOS
python3 -m venv env
Note:
env is the name assigned to the virtual environment and this will create a virtual Python installation in the env folder.
Activate the virtual environment
Next you need to activate the virtual environment. You will put the virtual environment-specific python and pip executables into your shell’s PATH.
You can do this by running a command such as:
Windows
.\env\Scripts\activate
MacOS
source env/bin/activate
Exit the virtual environment
You can exit the virtual environment by running the command:
MacOS and Windows
deactivate
There may be OS specific difficulties you may encounter while installing and using virtual environments.
More information can be found on the official Python website.
Note: venv is not the only option available for creating virtual environments and other options exist such as pipenv which is another variation.
However, in this course, the use of venv is recommended.
Additional resources
The following resources will be helpful as additional references when dealing with different concepts related to the topics you have covered in this course introduction.
Since this is a course exclusively about an open-source framework, there will also be a wide-scale reference to the official Django website and documentation.
Access the links below to explore more about Django.
Installing VS Code on Mac - Official
Installing VS Code on Windows - Official
Django installation - Official
Setting up Virtual environment in Python - venv (Windows and MacOS)
Previous one → 11.Database normalization | Next one → 2.Projects and Apps