Working with template language
A common requirement when creating web applications is the need to add dynamic data inside HTML markup. This data can be represented by a variable containing dynamic or calculated values or values stored in the database of the application.
Either way, a web framework needs a way to understand this data. To address this, Django uses Django template language or DTL to separate the presentation and application logic.
As you learned earlier, a Django template is a Python string or text document marked up using Django template language and interpreted by the template engine.
The DTL is based on the popular Jinja2 template engine, and has most of the features common to it. As a developer, writing code in a familiar language is beneficial.
DTL helps remove that barrier by providing flexibility that aligns with the core time-saving principle in Django of do not repeat yourself or DRY.
It also adds a layer of security as the Python interpreter does not execute the template code.
Once you understand the use of template languages, much of the logic in creating the templates becomes evident.
There are four main constructs in the syntax of DTL. They are:
- variables
- tags
- filters
- comments
Combined, they provide the substitute for basic functionalities present in a programming language.
Variables
Variables are surrounded by double curly braces. When the template engine encounters a variable, it evaluates that variable and replaces it with the result.
Variables return a dictionary-like object that maps keys to values.
{restaurant_name : 'Little Lemon'}
In this example, restaurant name is the key with the value of Little Lemon. When rendered, this template code displays Welcome to Little Lemon restaurant.
Similarly, you can use dictionary, attribute, and list index lookup using dot notation.
{{ my_dict.key }}

{{ my_object.attribute }}

{{ my_list.0 }}
Tags
Tags are the source of logic that you can add to templates. Tags are created using curly braces and the percentage symbol. {% variable %}
The most commonly used tags are the control structures such as if and for loops.
The if tag is used inside the template to render different outputs. A typical use case is to check the login status of a user.
{% if loggedIn %}

<span>Hello {{user.name}}</span>

{% else %}

<a href="">Login</a>

{% endif %}
The code in this example checks if the value of the Boolean variable logged in is true or false. If true, the page renders the welcome statement. If false, it renders the login link.
Another standard workflow is to iterate over the dictionary to display an unordered list. To do this using a template, you need to have some way of looping over the data and printing out the HTML markup with the data object for each item in the list.
For example, suppose you have a simple list that contains menu items for the restaurant. Each item has a name and a price. To create this menu statically, you wrap each menu item in an unordered list using the list item tag.
<ul>
	<li>Pasta $8.99</li>
	<li>Pizza $6.99</li>
	<li>Salad $4.99</li>
	<li>Special $10.99</li>
</ul>
To create this Menu dynamically with templates, you add the for loop code where items repeat.
<ul>

{% for item in menu_list %}

	<li>{{ item.name }} {{ item.price }}</li>

{% endfor %}

</ul>
In this menu example, it’s inside the unordered list. The code will iterate over the menu list object and display the name and price. The variable item will keep a reference to each object as the iteration continues to go through each menu item.
Apart from if and for, there are many other texts such as extends and include, and you will learn about them later in this lesson.
Filters
Unlike tags, filters can change the values of the variables.
{{ variable|filter }}
For example, if you add a filter such as string upper, it will take an input string and convert it to uppercase.
{{string|upper}}
Filters can also additionally take an argument like when using the date filter.
{{ todays_date|date:"Y-m-d" }}
For example, you can pass the argument for year, month, and day, which produces a date in this exact format.
Comments
You can create comments using the curly brace and percentage symbols. Django ignores everything in-between the two tags.
It’s important to note that developers use comments for documentation as they do not render.
{% comment "optional_note" %}

This is a comment

{% endcomment %}

<h1>Welcome to {{ restaurant_name }} restaurant!</h1>
Template Language and Variable Interpolation
In this reading, you will further explore the templating language and how it can be used to create markup.
This reading will also showcase the use of variables and how they can be dynamically passed in a template to render out different content.
Introduce learners to the template language with variables, filters and tags.”
Template Engine
Modern web frameworks use a web template system to merge a data source with static HTML to generate dynamic web pages.
A web template is an otherwise static HTML script interspersed with placeholder blocks of template language code. The template engine takes one set of data from any source, such as a database table, substitutes in placeholders and renders the generated content to the client browser.
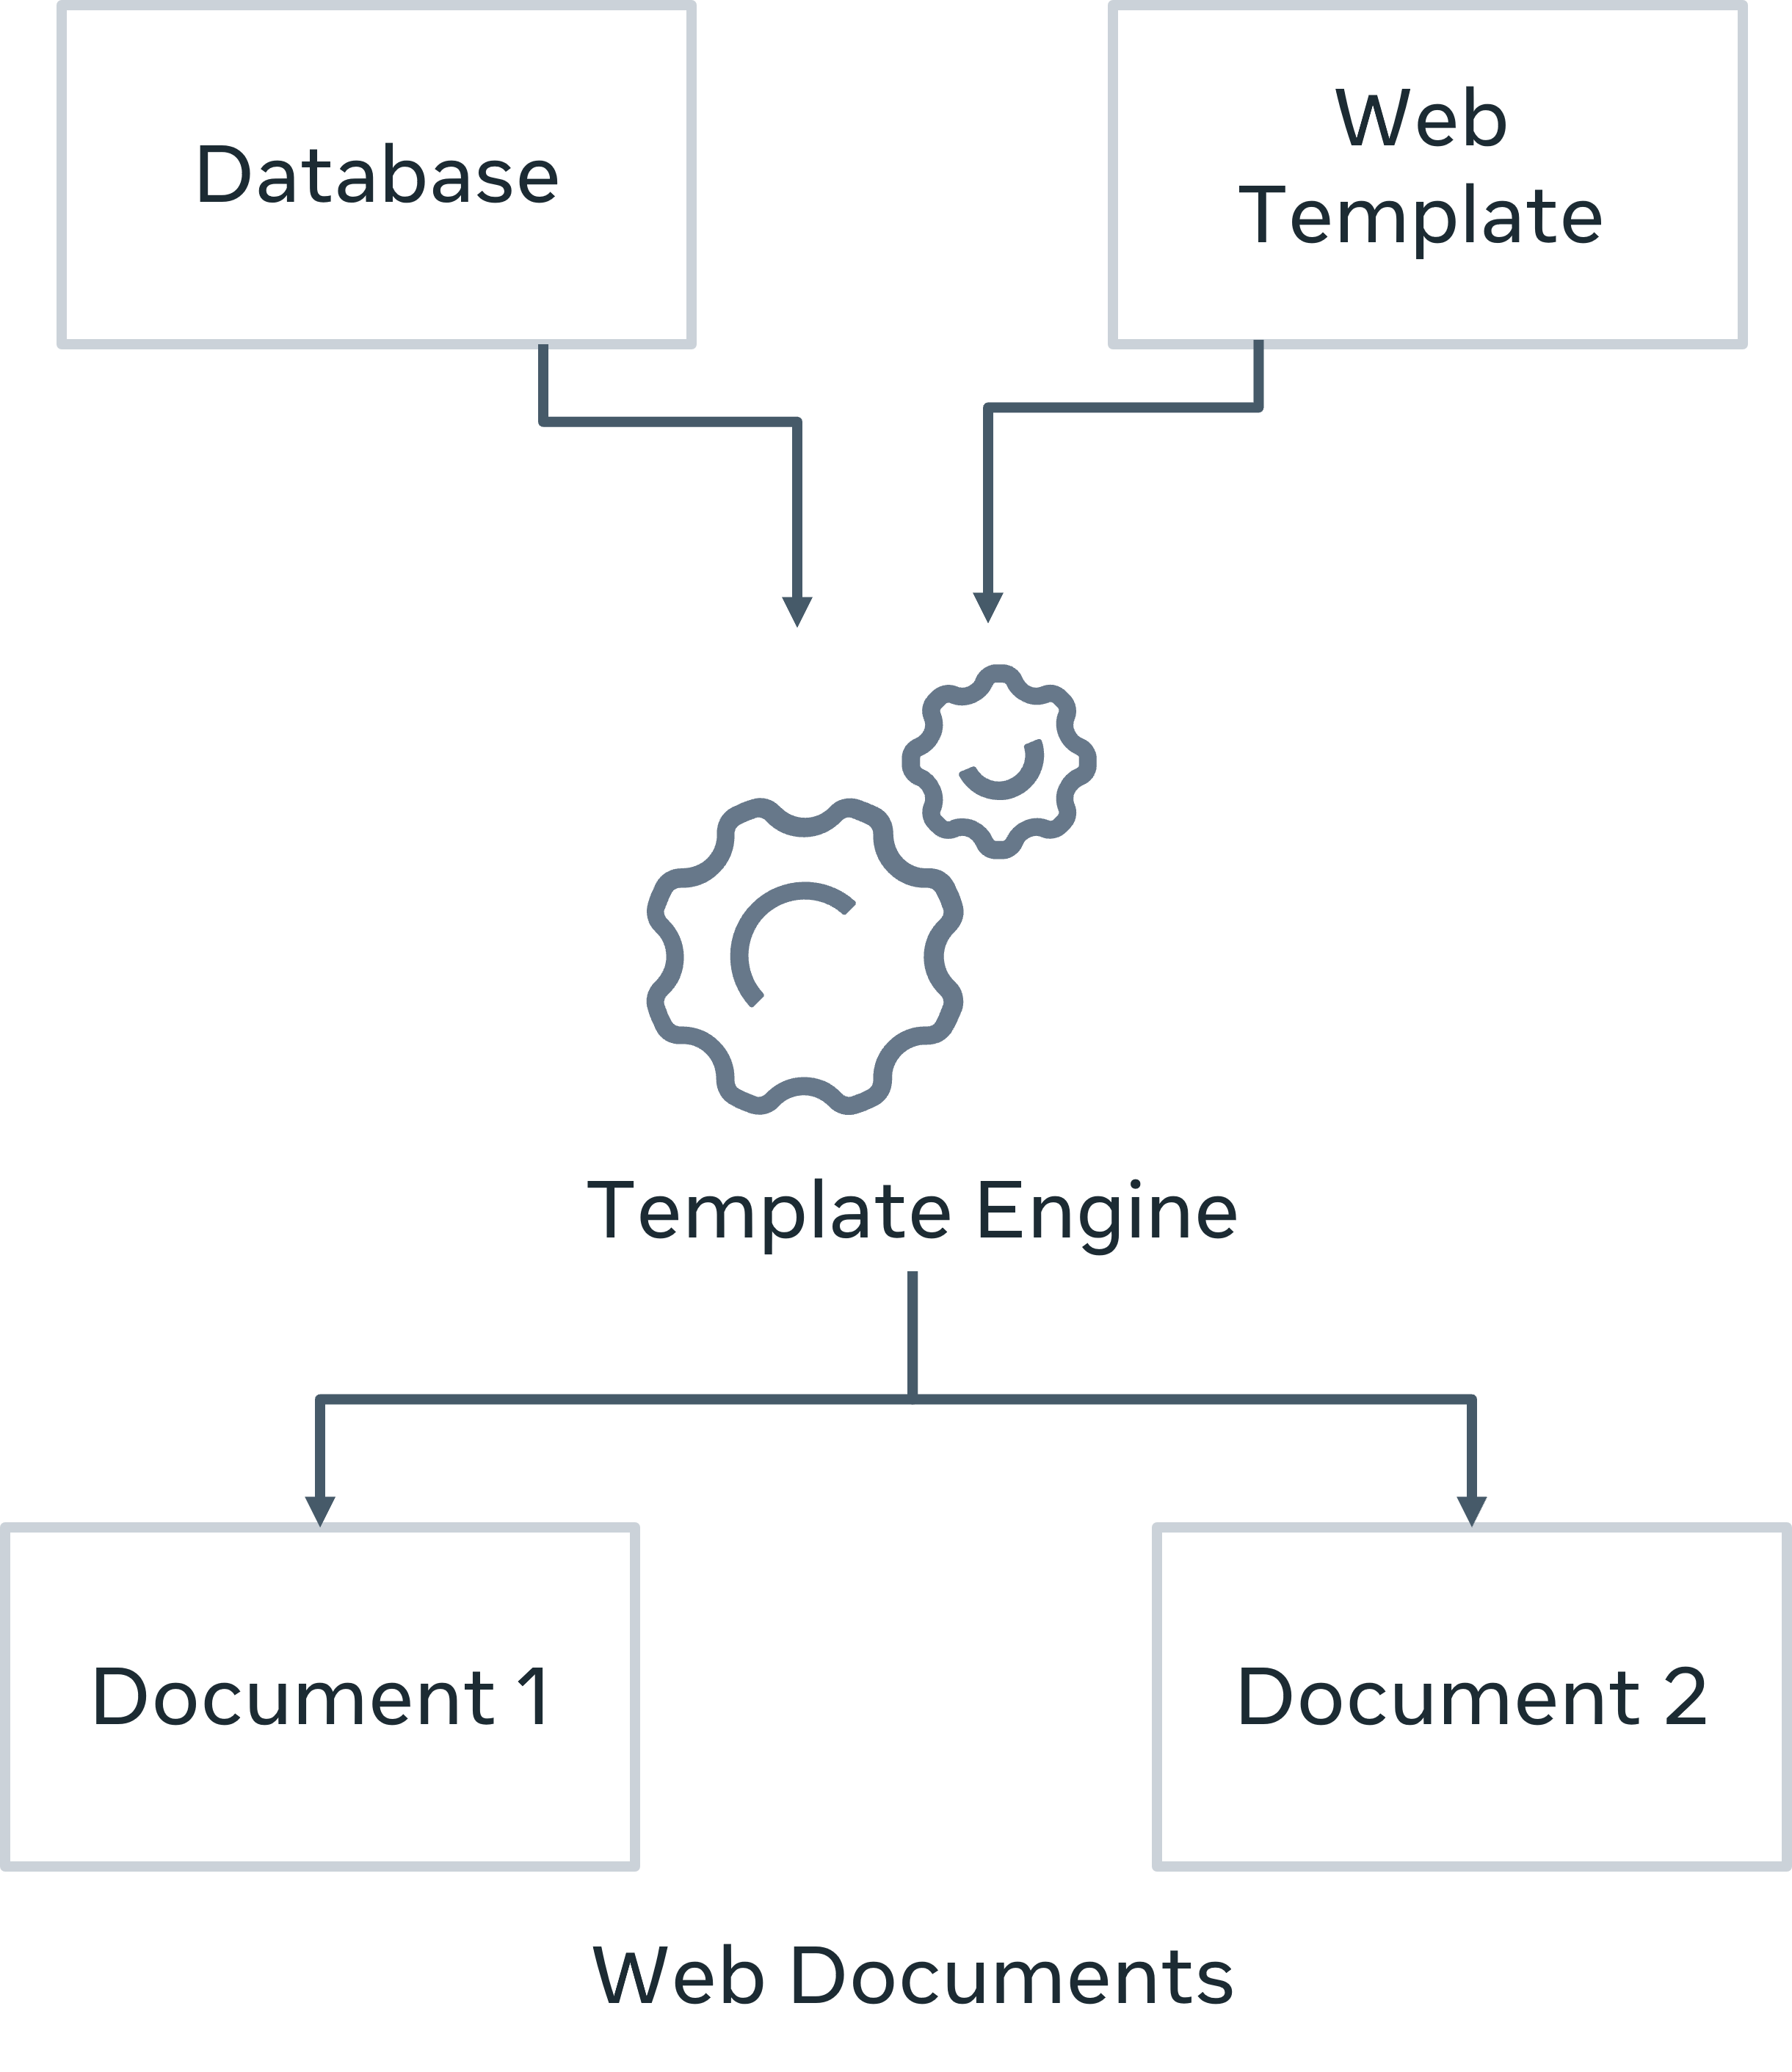
Django’s template engine uses its own Django Template Language. The default project template is configured that way. However, you may choose to use any other template language such as jinja2.
Django Template Language has three important components: variables, tags, and filters.
Template variable
As you have previously learned, templates are HTML pages. The DIRS attribute of the TEMPLATES variable in the settings.py file points to the folder in which the templates are stored. Generally, the templates folder is in the root project folder.
The easiest way to display a template web page is by calling the render() function from within a view function. Its three parameters are the HTTP request object, the page itself, and a context dictionary.
Assuming that the client URL is http://localhost:8000/myapp/Novak
, the following view function receives the path parameter from the URL dispatcher and passes it as context to the template:
def index(request, name):
    context={'name': name}
    return render(request, 'index.html', context)
The keys in the context dictionary are available to the template as a variable.
When put inside double curly brackets, the value is substituted at runtime.
Put the following statement in the body of index.html.
<h2>Welcome {{ name }}</h2>As a result, if the view receives Novak as the parameter, Hello Novak is rendered.
The value of any key in the context may be a singular object (string, integer), a list or a dictionary.
A certain view passes a ‘person’ dictionary as a context.
person={'name':'Roger', 'profession':'Teacher'}}
return render(request, 'person.html', person)
Inside the template, you can access the value associated with each key with the dot (".") operator just as the attributes of an object are used. For example:
Name: {{ person.name }}
Profession: {{ person.profession }}
This will render the following output on the browser.
- Name: Roger
- Profession: Teacher
Template tags
Just as there are HTML tags, the Django template language defines several tags. You can think of the tags as the keywords in a traditional programming language. You place the tags inside {% tag %} symbols.
The if and for tags are important because they add processing logic to the web page.
{% if %}
With the if tag, the template variable is checked against a Boolean expression and a block of HTML is rendered conditionally.
{% if expression == True %}
HTML block 1
{% else %}
HTML block 2
{% endif %}
Even though the syntax of if (and for) is very similar to Python, Django template language (DTL) doesn’t use uniformly indented blocks. Hence, for every if tag, there is an endif tag.
A simple example of Django’s if tag is as follows:
The following view passes {'user':'admin'} dictionary as context to the template.
def index(request):
    context={'user':'admin'}
    return render(request, 'index.html', context)
The conditional block in the template should be as follows:
{% if user == "admin" %}
<h2>Welcome {{ user }}</h2>
{% else %}
<h2>Welcome Guest. You dont have admin access</h2>
{% endif %}
{% for %}
You can construct a looping construct inside the template with {% for %} and {% endfor %} tags. It is used to traverse any Python iterable such as a list, tuple or string.
In the following example, you pass a list to the template as its context.
def myview(request):
    langs = ['Python', 'Java', 'PHP', 'Ruby', 'Rust']
    return render(request, 'langs.html', {'langs':langs})
Inside the template, the for loop is constructed, much like in Python to render the names of languages as unordered list.
<h1>List of Languages</h1>
<ul>
    {% for lang in langs %}
    <li>{{ lang }}</li>
    {% endfor %}
</ul>
If the value of a context variable is a dictionary, you can traverse the key–value pairs using the for syntax.
{% for key, value in data.items %}
    {{ key }}: {{ value }}
{% endfor %}
DTL has a number of helper variables to be used within the loop:
forloop.counter: The current iteration of the loop
<ul>
    {% for lang in langs %}
    <li>{{ forloop.counter }} : {{ lang }}</li>
    {% endfor %}
</ul>
Output:
List of Languages
- 1: Python
- 2: Java
- 3: PHP
- 4: Ruby
- 5: Rust
forloop.revcounter: The number of iterations from the end of the loop (1-indexed)
<ul>
    {% for lang in langs %}
    <li>{{ forloop.revcounter }} : {{ lang }}</li>
    {% endfor %}

</ul>
Output:
List of Languages
- 5: Python
- 4: Java
- 3: PHP
- 2: Ruby
- 1: Rust
forloop.first: True if this is the first time through the loop
<ul>
    {% for lang in langs %}
    <li>{{ forloop.first }} : {{ lang }}</li>
    {% endfor %}
</ul>
Output:
List of Languages
- True: Python
- False: Java
- False: PHP
- False: Ruby
- False: Rust
forloop.last: True if this is the last time through the loop
<ul>
    {% for lang in langs %}
    <li>{{ forloop.last }} : {{ lang }}</li>
    {% endfor %}
</ul>
Output:
List of Languages
- False: Python
- False: Java
- False: PHP
- False: Ruby
- True: Rust
forloop.parentloop: For nested loops, this is the loop surrounding the current one.
If you pass the following dictionary object as context:
dct = {'digits': ['One', 'Two', 'Three'],'tens': ['Ten', 'Twenty', 'Thirty']} The template has nested loops as follows:
<h1>Nested loops</h1>

    {% for key, values in dct.items %}
    <p>{{ forloop.parentloop.counter }}:{{ key }}</p>
    <ul>
    {% for value in values %}
    <li> {{ value }}</li>
    {% endfor %}
</ul>
{% endfor %}
Output:
1:digits
One
Two
Three
2:tens
Ten
Twenty
Thirty
{% comment %}
Everything between {% comment %} and {% endcomment %} is ignored. An optional note may be inserted in the first tag.
{% comment "Optional note" %}
    <p>Commented out text </p>
{% endcomment %}
{% block %}
Defines a block that can be overridden by child templates. This tag will be discussed when you learn about template inheritance.
{% csrf_token %}
This tag is used in a form template as protection to prevent Cross Site Request Forgeries (CSRF). This tag generates a token on the server-side to make sure to cross-check that the incoming requests do not contain the token. If found, they are not executed.
{% include }%
Loads a template and renders it with the current context. This is a way of “including” other templates within a template. The template name can either be a variable or a hard-coded (quoted) string, in either single or double quotes.
{% include "sample.html" %} {% with %}
This tag sets a local variable that is available between {% with %} and {% endwidth %} tags.
{% with rate = 5 %}
   Interest = {amt}*{{ rate }}
{% endwith %}
Filters
The filters modify the representation of the variable used in the template code. The modified value of the variable is rendered in the {{ }} tags. The filter is applied with the | (known as Pipe) symbol. The general form of using filter is:
{{ variable | filter_name }} DTL has defined a number of filters. Here are some of the most frequently used:
default
Django view passes a variable to the template. In the code below, value is a template variable. If it has been initialized in the view, it is set to the specified default, which in this case is nothing.
{{ value|default:"nothing" }} If the value is an empty string, the output will be nothing.
join
This tag is similar to Python’s str.join(list) method. It joins the items in a list with the given separator.
For example:
{{ words|join:" _ " }} If the view passes a list [' Django ', 'Template', 'Language'], the output will be the string "'Django_ Template_Language'".
length
When applied, this filter returns the length of the sequence received from the context. This works for both strings and lists.
{{ name|length }}If name is "John", the output will be 4. It returns 0 for an undefined variable.
first
Returns the first item in a list. Assuming that the list from the view function is ['a', 'b', 'c'].
{{ list|first }} The output will be 'a'.
last
If value is the list ['a', 'b', 'c', 'd'], the output will be the string "d".
lower
Converts a string into all lowercase.
upper
upper converts a string into all uppercase.
title
title converts a string into title case by making words start with an uppercase character and the remaining characters lowercase.
For example:
string = "django template language", the output will be "Django Template Language".
{{ string|title }} length
Returns the length of string or a list.
For the above string variable, the output will be 21.
{{ string|length }} wordcount
wordcount works on a string variable only and returns the number of words. For the above string variable, the output will be 3.
{{ string|wordcount }} In this reading, you explored the elements of Django Template Language, variables, tags and filters.
Dynamic Templates in Django
# app's views.py

def menu(request):
	menuitem = {'name': 'Greek Salad'}
	return render(request, 'menu.html', menuitem)
In the project directory, make a templates folder, and make a menu.hml inside.
<!--menu.html-->
{{name}}
To make sure that django finds the templates, you should add the templates folder name in the settings.py TEMPLATES list. 'DIRS':['templates']
def menu(request):
	newmenu = {'mains': [
		{'name':"falafel", 'price':"12"},
		{'name':"shawarma", 'price':"15"},
		{'name':"gyro", 'price':"18"},
	]}
	return render(request, 'menu.html', newmenu)
<!--menu.html-->
{% for item in mains %}
{{item.name}}
{{item.price}}
{{% endfor %}}NOTE
In these examples I demonstrated the rendering of dynamic data using a dictionary as the data source. It’s important to know that this data source can be other things like a database or an API.
Mapping model objects to a template
One of the reasons Django is so popular is that it allows developers to create dynamic website content quickly. With just a few steps, you can take data that’s stored in a database, write some logic for it, and then display it to the end user in the browser.
# models.py

from django.db import models

class Menu(models.Model):
	name = models.CharField(max_length=200)
	price = models.IntegerField()

	def __str__(self):
		return self.name
If open Django administration in the browser, recall that this model contains data like the menu items for hummus, falafel and so on.
# views.py

from .models import Menu

def menu_by_id(request):
	newmenu = Menu.objects.all()
	newmenu_dict = {'menu': newmenu}
	return render(request, 'menu_card.html', newmenu_dict)
<!--menu_card.html-->
{{menu}}
<!--menu_card.html-->
{% if menu %}
{% for item in menu %}
{{ item.name }} : {{item.price}}
{% endfor %}
{% else %}
No Item to Display
{% endif %}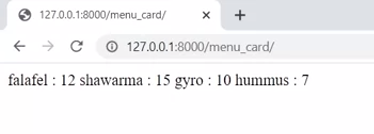
Template inheritance
When developing web applications. In Django recall the key principle of don’t repeat yourself are dry duplication whether inadvertently or purposeful can lead to maintenance issues and logical contradictions.
TIP
Every distinct concept or piece of data should live in one and only one place. The framework within reason should deduce as much as possible from as little as possible.
For example, to create the same header and footer sections across multiple pages for the little Lemon website you can make a copy of the markup and save it multiple times. Then only change the corresponding title for each web page.
But a more efficient method is to build a base template containing all the common elements of the website and assigned them to a block. This block can then be repeated on every web page.
Suppose you have the task of creating a prototype for the new Little Lemon website. The website has four pages for home about Menu and book.
So far only one prototype page exists and this is for the about us page. In order to work with templates efficiently, it helps to break the page up into sections and in Django these sections are referred to as blocks.
Header
For example, at the very top of most websites you find what is called the header and this is the first section or block. The header often contains the company name and logo. It also usually has links to the different pages of the website which is known as the navigation menu.
Additionally, the header might contain a section where users can log in. This usually includes a user icon along with the drop down menu with a link to the user profile.
TIP
When working with the page layout, it’s best practice to keep the look of the header consistent and in the same position across all the pages of a website. This consistency is essential for a good user interface and contributes to a positive user experience.
Because if the header is visible on all pages of your website, it makes it faster and easier for the user to navigate.
Footer
The same can be said for the footer. The footer is a section at the bottom of a web page that contains essential company or contact details, navigation links and copyright information.
At this point, you may be wondering how do I incorporate the header and footer across the four pages for the little lemon website, that’s where you use template inheritance.
Template inheritance
Template inheritance allows you to split out content by breaking it down into individual components. You can then insert and reuse these components without duplicating work.
Include Tag
<html>
	<head>
		<meta charset="utf-8">
		<title>Little Lemon</title>
	</head>
	<body>
		{% include "_header.html" %}

		<h2>About Us</h2>

		{% include "_footer.html" %}
	</body>
</html>
The html markup on the base page now references the files containing the code for the header and footer sections, using the include tag. If you need to make an update to either of these files, you’ll only need to do it once and not on every page.
The include tag lets you either specify a template string or a variable to allow conditions for different rendering.
For example, say you want to pass an object which contains information such as the page name. To do this, you can pass a dictionary as an argument inside the render function to pass variables or objects to the template.
def about(request):
	return render(request, 'about.html', {"pgname": 'About us'})
To gain access to specific data from the header file such as the page object, you need to add additional attributes inside the include tag.
{% include "_header.html" with pgname=pgname %}Once added, you can access the page object anywhere on the page; For example, to display the page name as a heading element.
NOTE
It’s important to remember that this object is part of the dictionary that was passed inside the render function inside the view.
When using the include tag, you instruct the page to render this sub template and include the html. This means that there is no shared state between included templates. Each include is an independent rendering process.
Extend Tag
This is similar to the include tag with syntax and usage. However, its purpose and functionality differ.
Extend
Extend allows you to replace blocks or content from a parent template, as opposed to include that will include parts. Extend creates a parent child relationship where parents functionality can be overwritten. Include, on the other hand, simply includes rendering a template in the current context.
There are two ways to use the extends tag.
- The first is that it can use the string literal as the name of the parent template to be extended.
{% extends "base.html" %} - The second is it can make use of the value of a variable. Once the variable evaluates to a string, Django will use that string as the name of the parent template.
{% extends variable %}
For example, say you have a file called header.html, that contains code for a navigation menu represented as an unordered list.
<nav>
	<ul>
		<li><a href="{% url 'home' %}">Home</a></li>
		<li><a href="{% url 'about' %}">About</a></li>
		<li><a href="{% url 'menu' %}">Mneu</a></li>
		<li><a href="{% url 'book' %}">Book</a></li>
	</ul>
</nav>
You can extend the file contents of header.html to a file called about.html.
{% extends 'header.html' %}

<!--Block content below-->

	{% block content %}

	<h1>{{ pgname }}</h1>

	{% endblock %}

...
The code will effectively add the contents of header.html to the content inside about.html.
More on Template inheritance
This reading introduces template inheritance, along with its main features.
You will learn how template inheritance can be used inside a standard HTML page and how child templates can override blocks inside it. Additionally, you will explore the concept of static files in Django.
Inheritance in Django Template Language
The term inheritance is associated with the principle of object-oriented programming. It refers to the mechanism of a child class inheriting the properties of its parent class, and if required, extending or overriding them.
The question is how is the term inheritance used in relation to the template language?
There are many view functions defined in a Django application. Each view renders a different template (or the same with a different context). Ideally, you want all the web pages to look consistent. For example, elements such as the header, footer, and the navigation bar, must appear similar across all pages.
Structure of parent template
Let us assume that you’re building a three-page web application with a home page, a registration page, and another for logging into the application. Each page should have a main header, a footer, and a sidebar with links to the pages. The corresponding content of each page should appear to the right of the sidebar and between the header and footer.
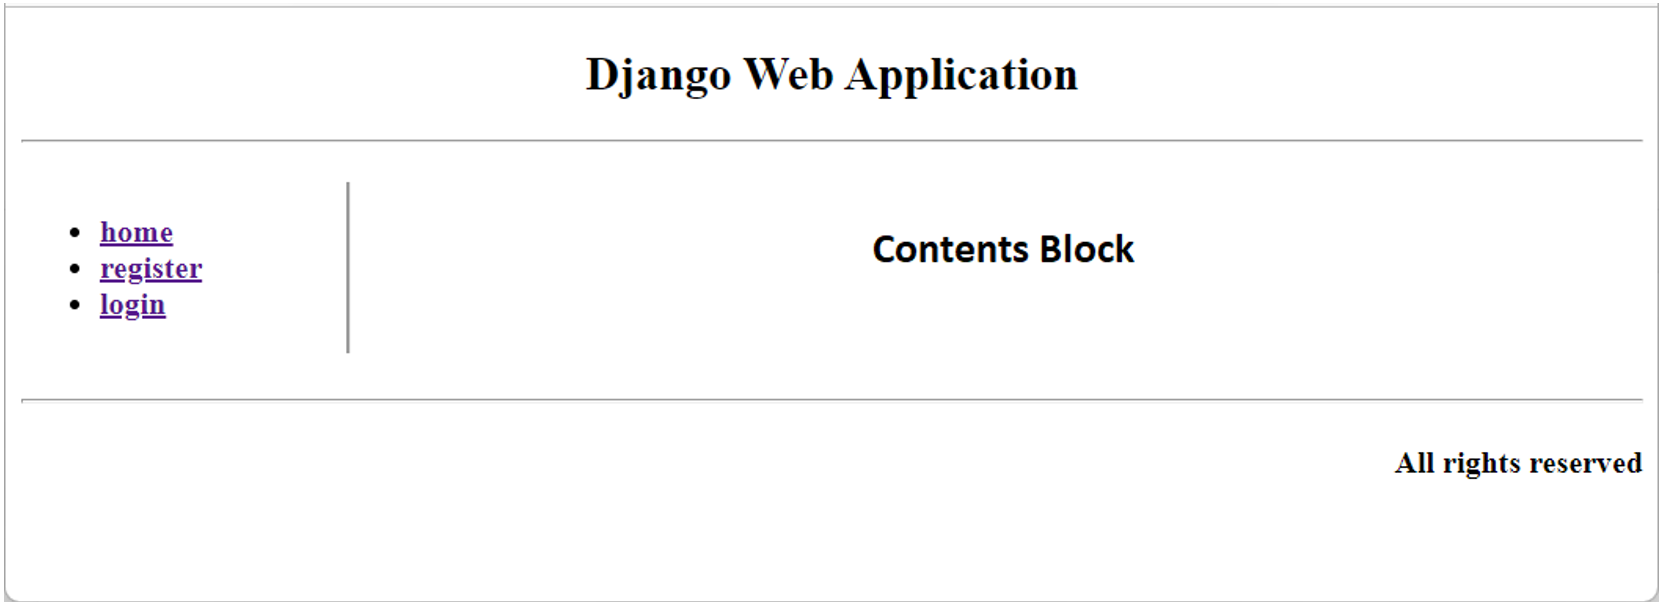
{% block %} tag
Template inheritance helps to implement this structure and it’s similar to the one in object-oriented programming. It is a very powerful, yet equally complex feature of Django Template Language. Template inheritance is implemented with the {% block %} and {% endblock %} tags.
{% block name %}
  ...
{% endblock %}
The block is identified by the given name to be overridden in the child template.
First, identify the components that are required because these will be used across all the web pages. Include those that show variable content on each page. Use the block tags to mark the code blocks with variable content as a dummy block or with no contents.
Base template
For the above skeletal structure, the header is represented by the following HTML:
<!--header-->
<div style="height:10%;">
<h2 align="center">Django Web Application</h2>
<hr>
</div>
The middle part of the page has two sections, represented in two <div> tags of 20% and 80% width. The one on the left is a sidebar.
<!—side bar-->
<div style="width:20%; float:left; border-right-style:groove">
<ul>
<b>
<li><a href="#">home</a></li>
<li><a href="#">register</a></li>
<li><a href="#">login</a></li>
</b>
</ul>
</div>
For now, let us add dummy links to the menu items.
The remaining part of the page is where the contents of each page will be displayed. Once again, mark this as a dummy block with no text between the block tags.
<!--contents-->
<div style="margin-left:21%;">
<p>
{% block contents %}

{% endblock %}
</p>
</div>
Now, address the footer of the page.
<!--footer-->
<hr>

<div>
<h4 align="right">All rights reserved</h4>
</div>
Put the above code blocks in a base.html file and save it in the templates folder. Note that this file will never be rendered as is but the templates for home, register, and login views will inherit it.
Add views
Now, add the view functions for the three operations planned for the applications. Open the views.py file and add the following code:
def home(request):
    return render(request, "home.html", {})

def register(request):
    return render(request, "register.html", {})

def login(request):
    return render(request, "login.html", {})
You also need to update the URL pattern of the app.
urlpatterns = [
. . .,
. . .,
    path('home/', views.home, name='home'),
    path('register/', views.register, name='register'),
    path('login/', views.login, name='login'),
]
Next, replace the dummy hyperlinks in the sidebar with the URLs registered above.
<!—side bar-->
<div style="width:20%; float:left; border-right-style:groove">

<ul>
<b>
<li><a href="/myapp/home/">home</a></li>
<li><a href="/myapp/register/">register</a></li>
<li><a href="/myapp/login/">login</a></li>
</b>
</ul>
</div>
Child templates
Writing the templates for the views is straightforward because the structure is already defined in the base.html. The {% extends %} tag imports the base template components in the child template. Create a new file named home.html in the templates folder and add the following line.
{% extends "base.html" %} We intend to keep the same header, the sidebar, and the footer defined in the base template and put the relevant code inside the contents block. Now, add the following lines in home.html and save it.
{% block contents %}
<h2 align="center">This is Home page</h2>
{% endblock %}
At this stage, start the server and visit /myapp/home/ URL. Since this path is mapped to the home() view, you should get the following page:
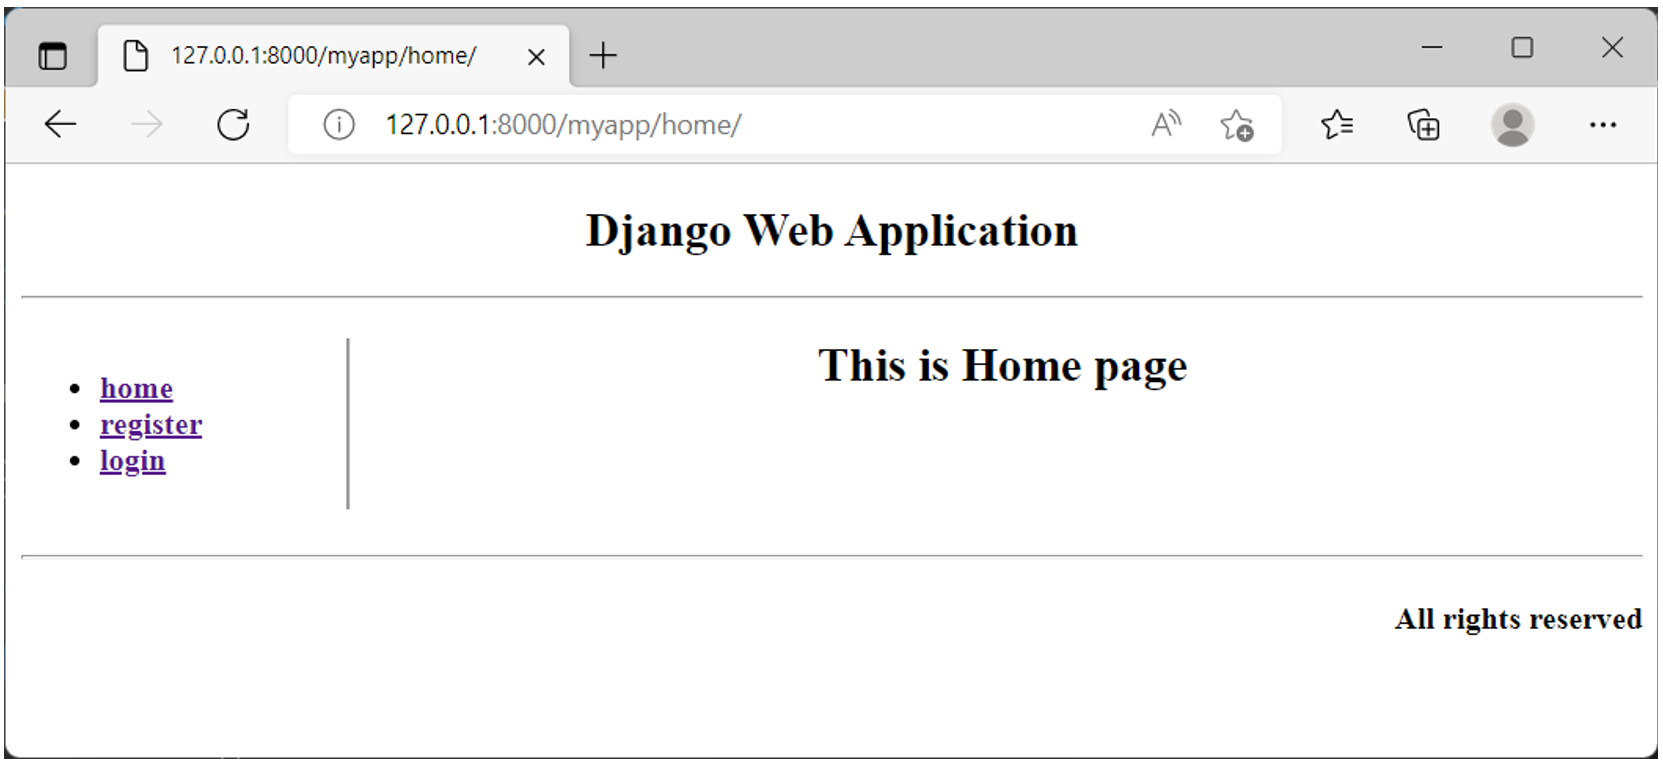
Similarly, create register.html and put it in the templates folder.
{% extends "base.html" %}

{% block contents %}
<h2 align="center">Registration Form appears here</h2>
{% endblock %}
The /myapp/register/ URL invokes the register() function. It renders the registration page as below:
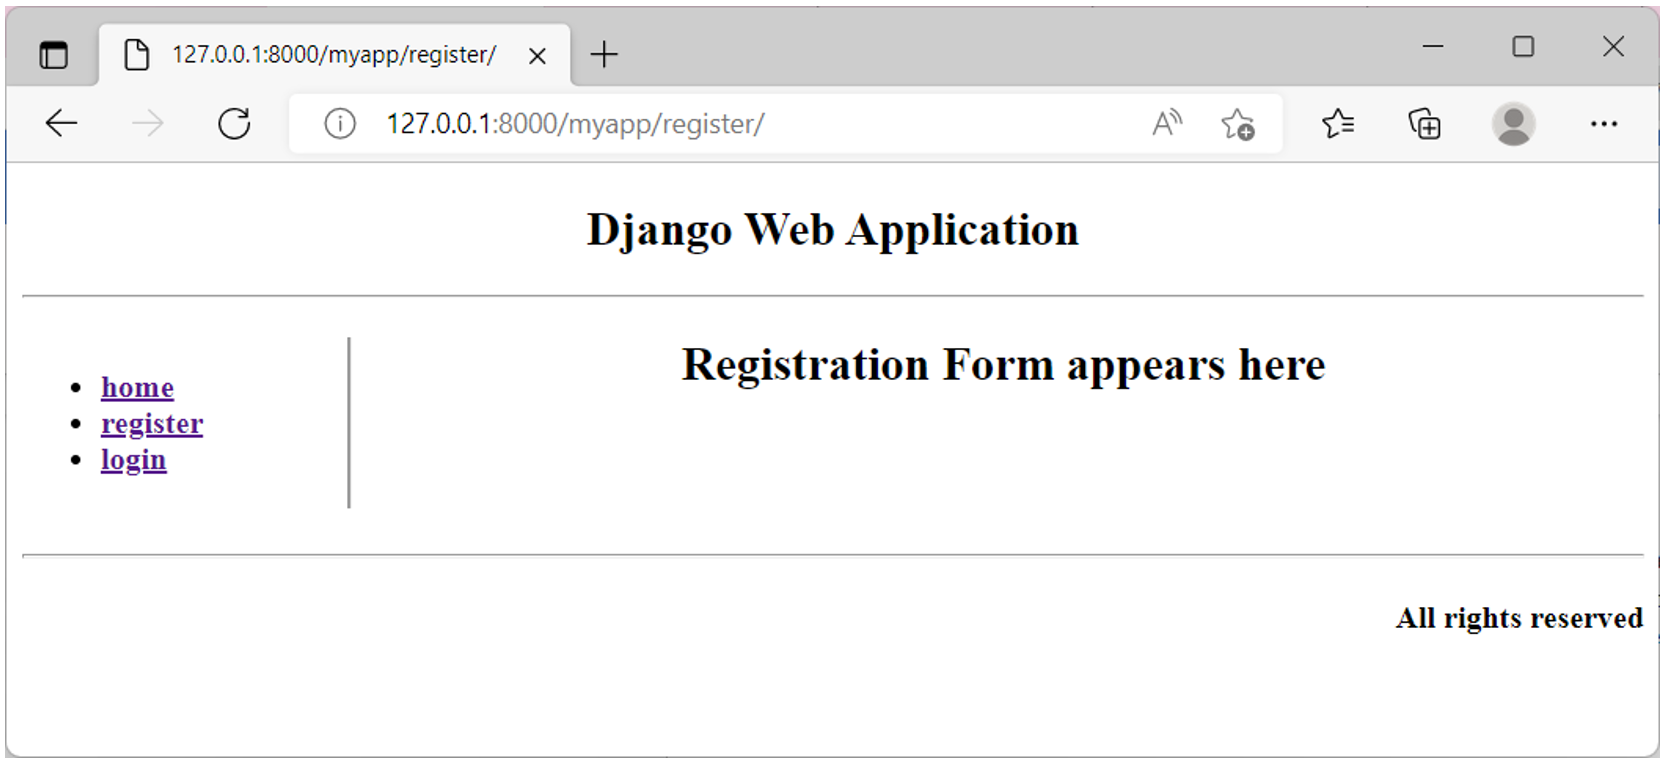
Before creating the login page, let us make some changes to the base template. You’ll want the login page to display some additional text in the footer. For that, the footer is placed in the block tag. Open the base.html and change the footer to:
<!--footer-->
<hr>

{% block footer %}
<div>
<h4 align="right">All rights reserved</h4>
</div>
{% endblock %}
Now, save the login.html template with the following code:
{% extends "base.html" %}

{% block contents %}
<h2  align="center">Login Form appears here</h2>
{% endblock %}
{% block footer %}
{{ block.super }}
<h4 align="right">Designed By: Alexa Designs Ltd</h4>
    {% endblock %}
Notice that the {{ block.super }} tag has been used. It is similar to Python’s super() function whereby you access the parent class methods in a child class. In the same way, the contents of the footer block will be rendered on the login page. Now, include additional text in the block as a part of the header, for the login page.
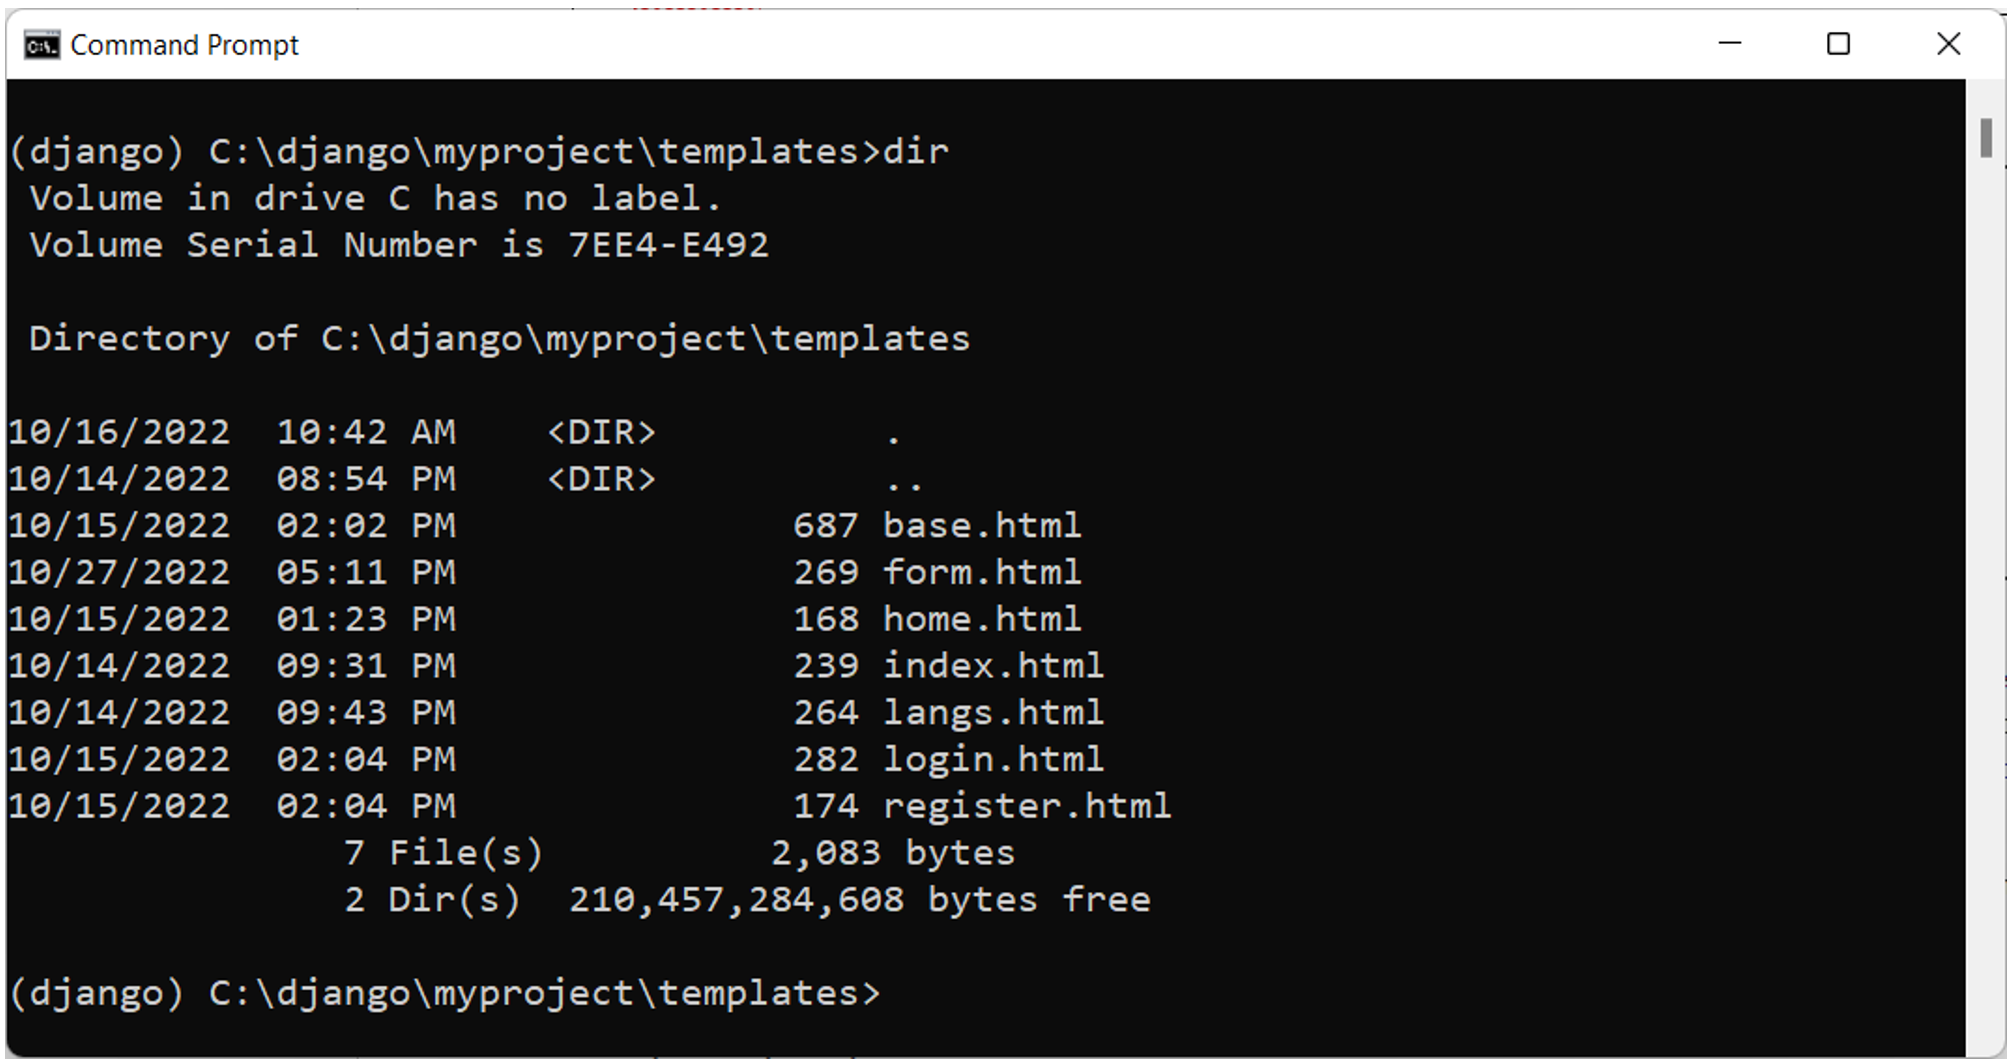
So, we have a “base.html” and three child templates – “home.html”, “register.html” and “login.html” - in the templates folder.
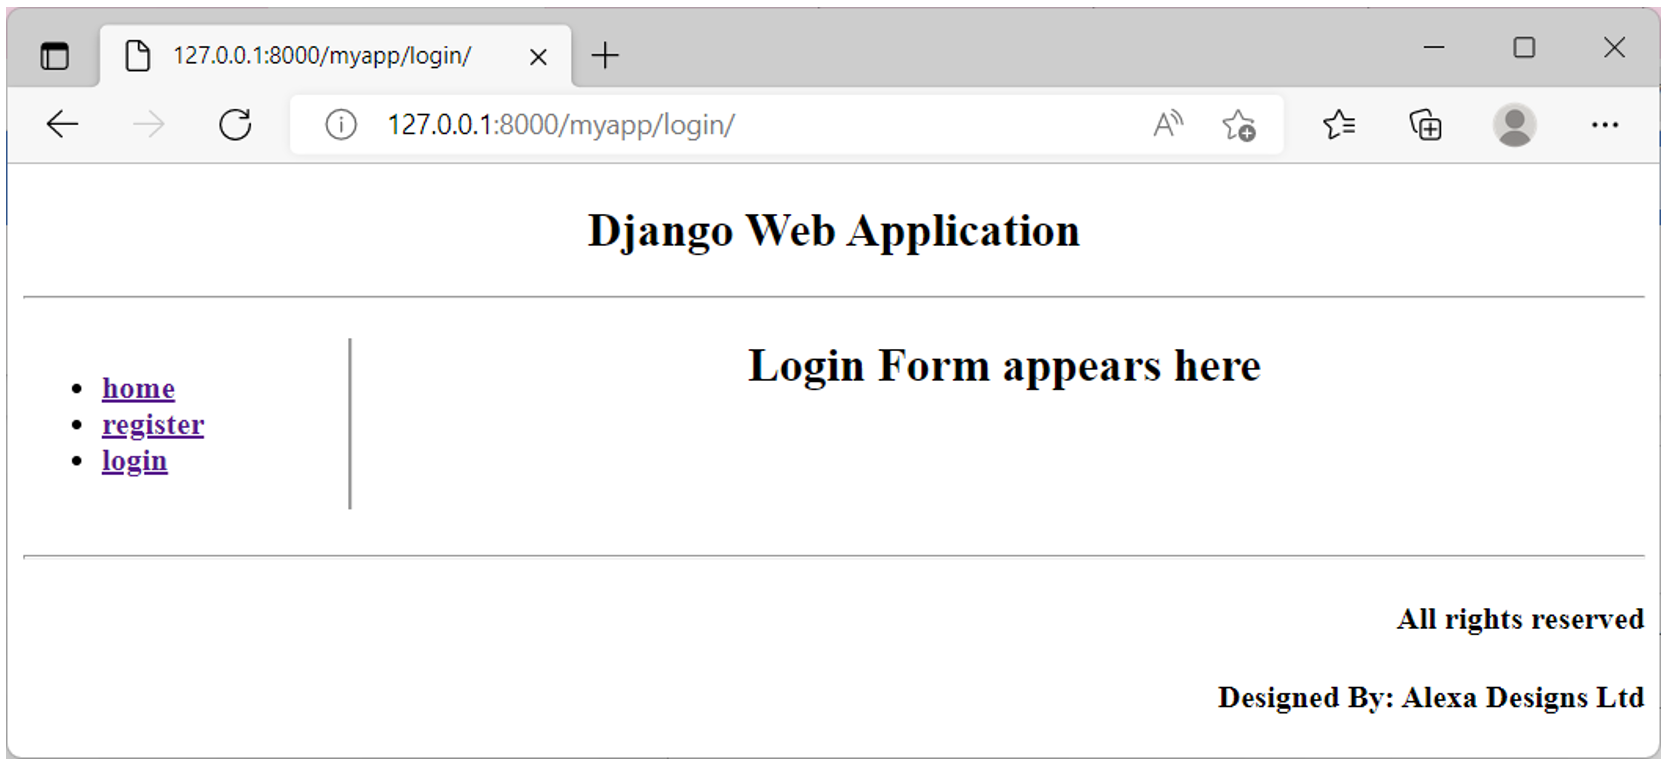
The /myapp/login/ URL displays the following output with the modified footer.
Static files
In addition to the dynamic content, a web application needs to serve certain static content to the client. It may be in the form of images, JavaScript code, or style sheets. Django’s default project template includes django.contrib.staticfiles in INSTALLED_APPS.
The project’s settings file (settings.py) has a static_url property set to 'static/'. All the static assets must be placed in the myapp/static/myapp folder as the static_url refers to it.
While rendering an image from this static folder, load it with the {% static %} tag. HTML provides the <imgsrc> tag. Instead of giving the physical URL of the image to be rendered, use the path that is relative to the defined static_URL.
{% load static %}
<img src="{% static 'my_app/example.jpg' %}">
In this reading, you learned how to use the template inheritance technique to build multiple templates with a consistent layout. You were also introduced to the mechanism of serving static assets.
Working with Template inheritance
Remember, the Extends tag allows you to replace blocks or content from a parent template. It creates a parent-child relationship where the child can overwrite the parent functionality.
Likewise, the Include tag adds parts and includes the rendering of a template in the current content.
It is easy to get confused between Extends and Include, but there are differences that will become clearer with practice.
Suppose that you must design the Little Lemon website that contains three pages called Home, Menu and about. While the contents of each of these pages will differ, there are a few basic styling components that need to be uniform across the website.
Additionally, you may want the menu bar as part of the header so that it can be present on all pages.
# views.py

from django.shortcuts import render

def home(request):
	return render(request, 'index.html')

def about(request):
	return render(request, 'about.html')

def menu(request):
	return render(request, 'menu.html')
These are the three pages you are creating for the Little Lemon website. Ensure that you update your URL configuration file both at the project and app levels. Also, map the respective URLs to the views.
Next, update the settings.py file by adding the app inside installed apps. Then create a template folder as part of DIRS in Templates. To work with templates, you need to create a folder called templates by right clicking on the My Project folder and selecting New folder.
When working with template inheritance, you need to create another folder in My project called partials. This is where you will include the header information.
Now let’s continue by creating a base HTML file inside the Templates folder, which will contain the code for the base HTML that you want inside all other pages of the website.
Still inside the Partials folder, create the three pages for the Little Lemon website about, index and menu.
Also, create a file called _header.html in the Partial folder.
This is a file that you will use inside the Include tag in the base HTML file.
Now that you have the file structure set up, let’s begin by adding some code to the base HTML file. Remember that you can just type Exclamation Mark and press Enter to add the basic HTML stub.
base.html:
<!DOCTYPE html>
<html lang="en">
<head>
    <meta charset="UTF-8">
    <meta name="viewport" content="width=device-width, initial-scale=1.0">
    <title>Little Lemon</title>
</head>
<body style="background-color: #FBDABB;">
    <main>
        {% block content %}
        {% endblock %}
    </main>
</body>
</html>index.html:
{% extends 'base.html' %}

{% block content %}
<p>Index</p>
<p>This is an Index page for Little Lemon</p>
{% endblock %}menu.html:
{% extends 'base.html' %}

{% block content %}
<p>Menu</p>
<p>This is a Menu page for Little Lemon</p>
{% endblock %}about.html:
{% extends 'base.html' %}

{% block content %}
<p>About</p>
<p>This is an About page for Little Lemon</p>
{% endblock %}
Remember, you did not add any specifications for a background color in the index file. What happens here is that the background that you specified in your base HTML file is extended from the base HTML file.
Now let’s add header information using the Include tag, you need to add content to the header file and save it.
_header.html:
<footer style="background-color: #EE9972;">
    <nav>
        <ul>
            <li style="display: inline-block; width: 120px;">Home</li>
            <li style="display: inline-block; width: 120px;">About</li>
            <li style="display: inline-block; width: 120px;">Menu</li>
        </ul>
    </nav>
</footer>
To carry this through consistently to all the Web pages, go to the base dot HTML file and add an Include tag that contains the header file reference.
base.html:
<!DOCTYPE html>
<html lang="en">
<head>
    <meta charset="UTF-8">
    <meta name="viewport" content="width=device-width, initial-scale=1.0">
    <title>Little Lemon</title>
</head>
<body style="background-color: #FBDABB;">
{% include 'partials/_header.html' %}
    <main>
        {% block content %}
        {% endblock %}
    </main>
</body>
</html>PythonDjangoHTMLTemplateFront-end
Previous one → 12.Templates | Next one → 14.Debugging and testing