Recap: What you know about Databases and MySQL
Setting up a MySQL database on Windows
Introduction
MySQL is an open-source relational database management system and it’s one of the most widely used databases for both personal and industry use.
Installation for MySQL and other such databases is relatively straightforward; however, there are some system-specific dependencies and OS-specific differences. This reading is a guide to installing MySQL on a Windows device.
Step 1
The standard MySQL installation in Windows is done with the help of the MySQL Installer tool.
First you need to download the MySQL Installer app from the official MySQL website.
You will be presented with the following screen:
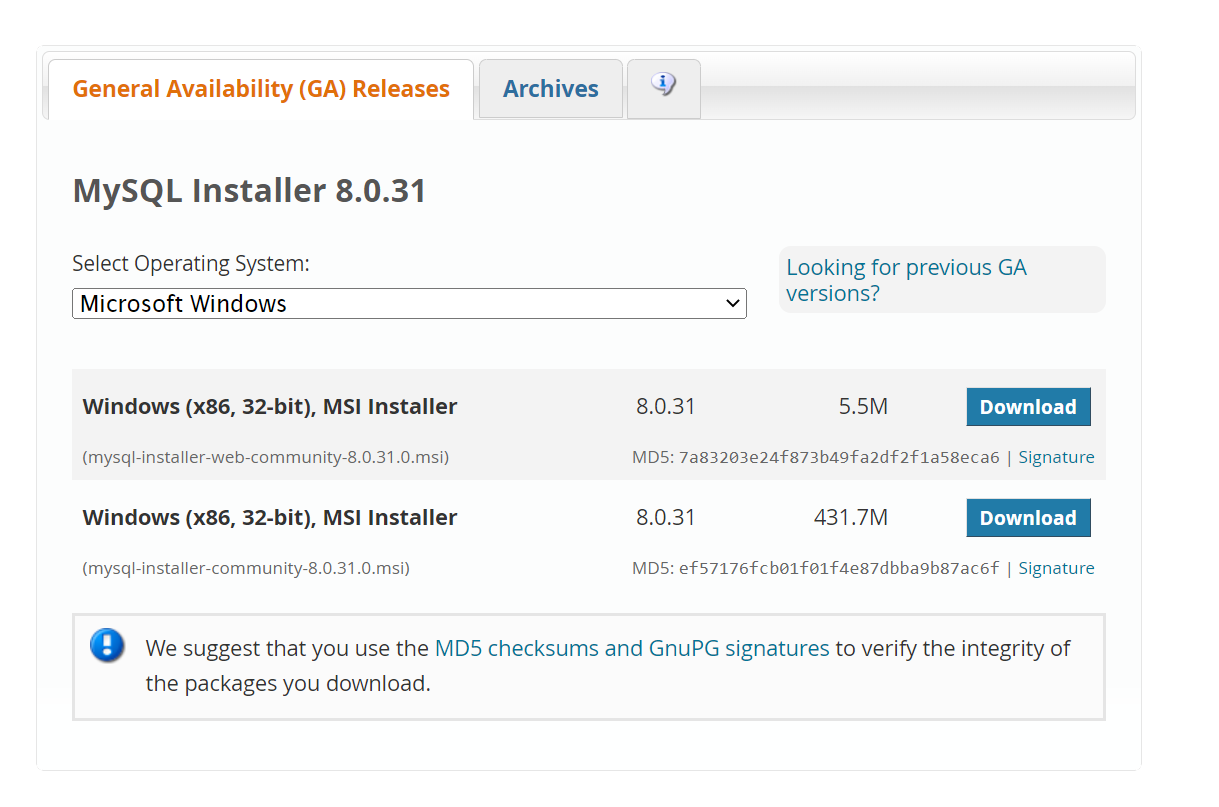
Select the larger installer and press the Download button.
You can also choose the web-based installation if you are going to stay connected to the internet while installing MySQL on your local machine.
Note: The visual layout of the installer may appear slightly different according to the Windows version and MySQL installer at the time of installation. The general sequence of steps will however remain the same.
Step 2
Once downloaded, double-click on the MySQL installer file and follow the steps outlined below.
Note: During the installation, w_henever you’re unsure, select the default options in place._
Select Full as the setup type.
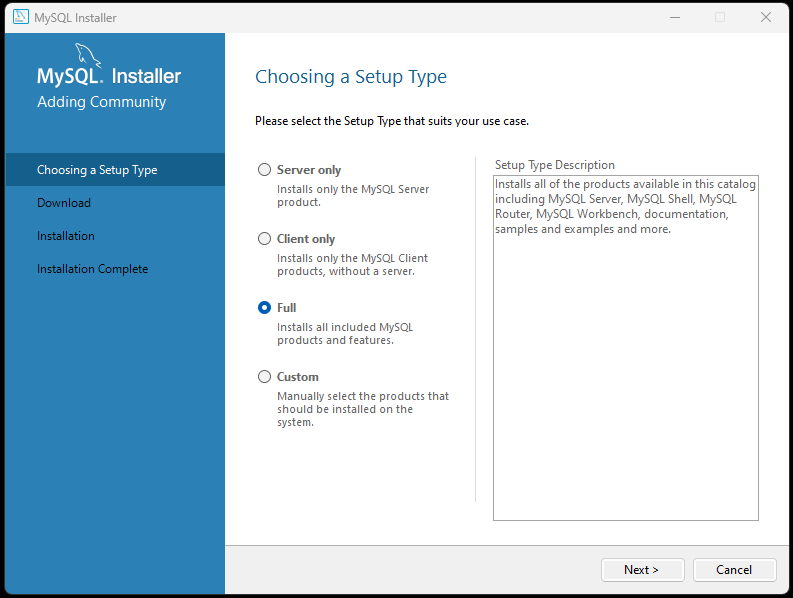
All the required dependencies are selected for the installation.
Step 3
Proceed to the next step by clicking on the Next button.
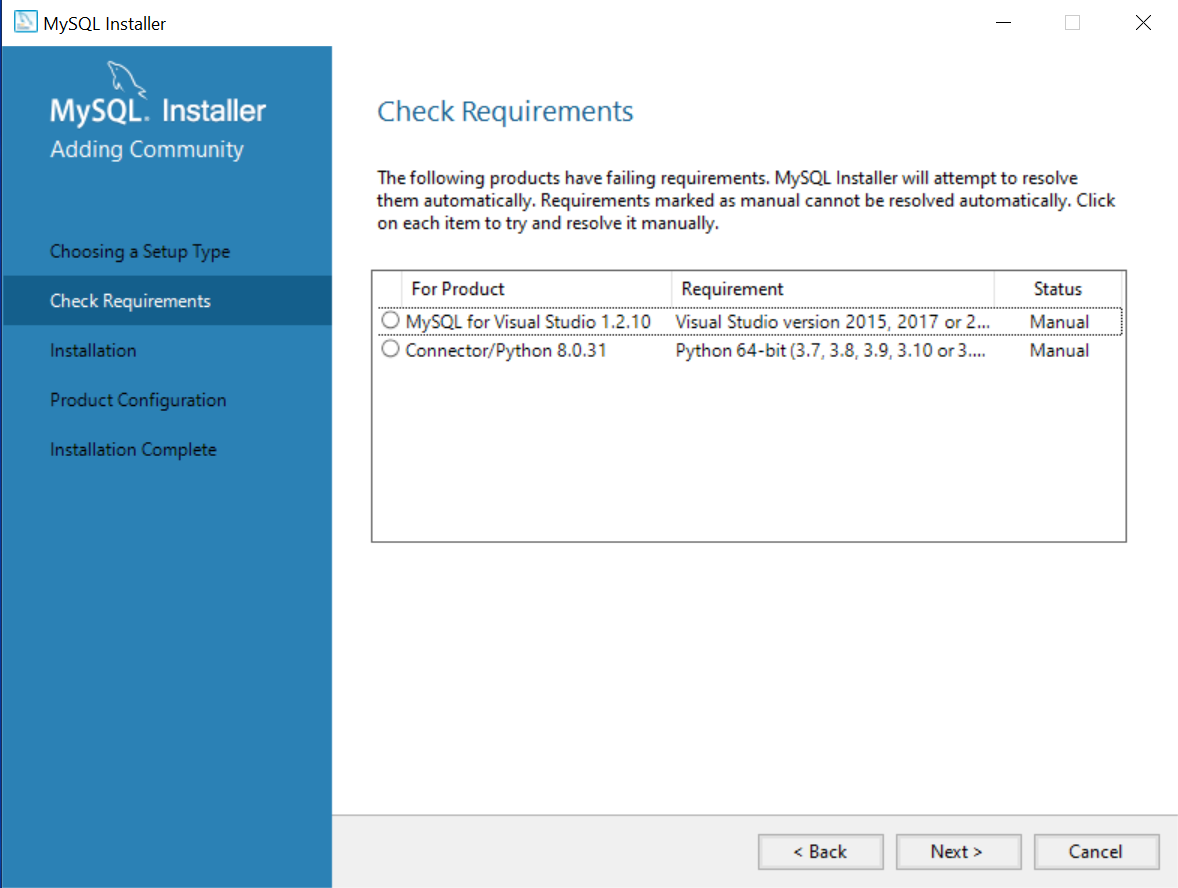
Step 4
This step in the installation process lists all the products you may want to install with your MySQL database as below. Once you press the Execute button, the tools will be downloaded automatically.

In addition to the steps mentioned, specific connectors may be required to use MySQL with different tools such as VSCode and languages such as Python. For example, to use Python you would first need to install the package mysqlclient using pip.
Wait until all the downloads are complete and installed and you’ll get a screen similar to this.
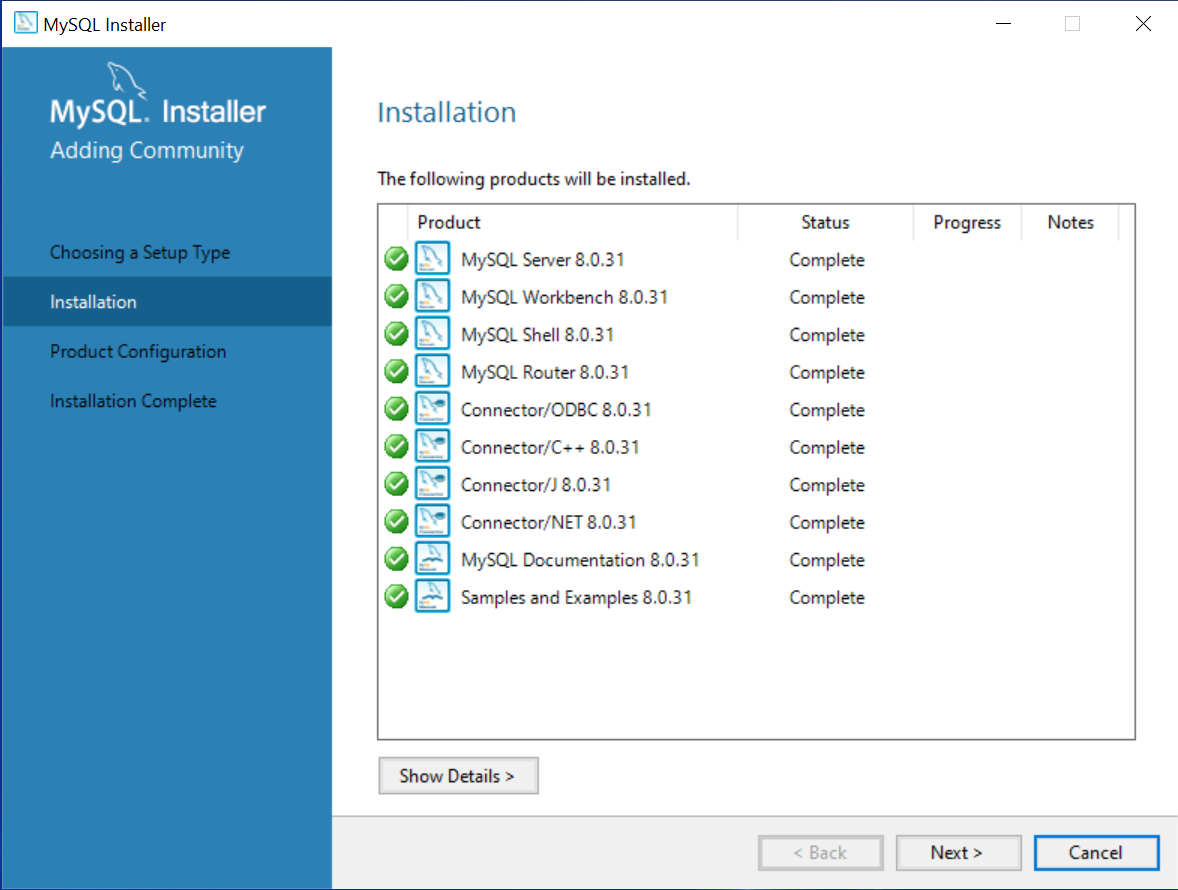
The list will depend on the tools available at the time of your installation. For a complete list of tools that you may require, you can refer to the official MySQL website which also provides an additional option to install tools individually.
Note: For general use, the installation of MySQL Workbench and MySQL Server is important.
Step 5
The next screen provides a Product Configuration Overview of the installation.
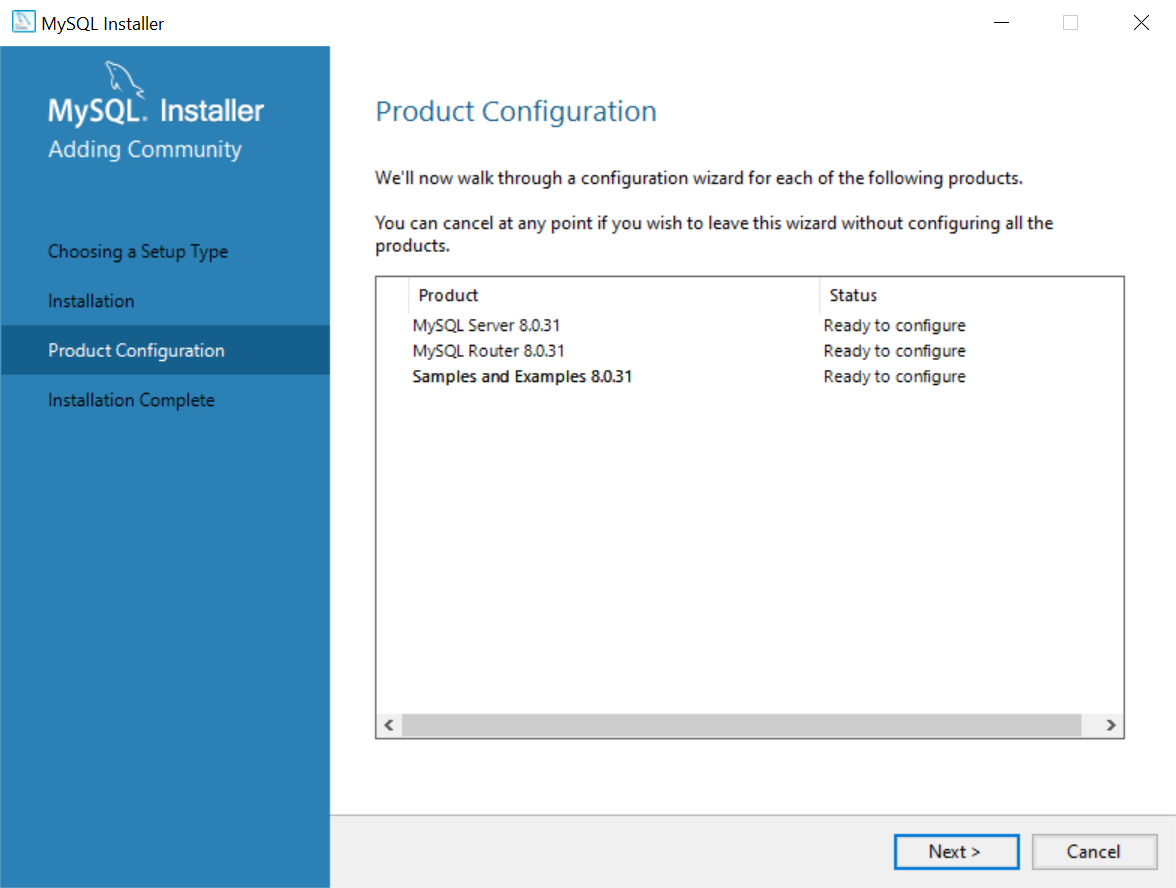
Pressing the Next button, will take you to the following screen:
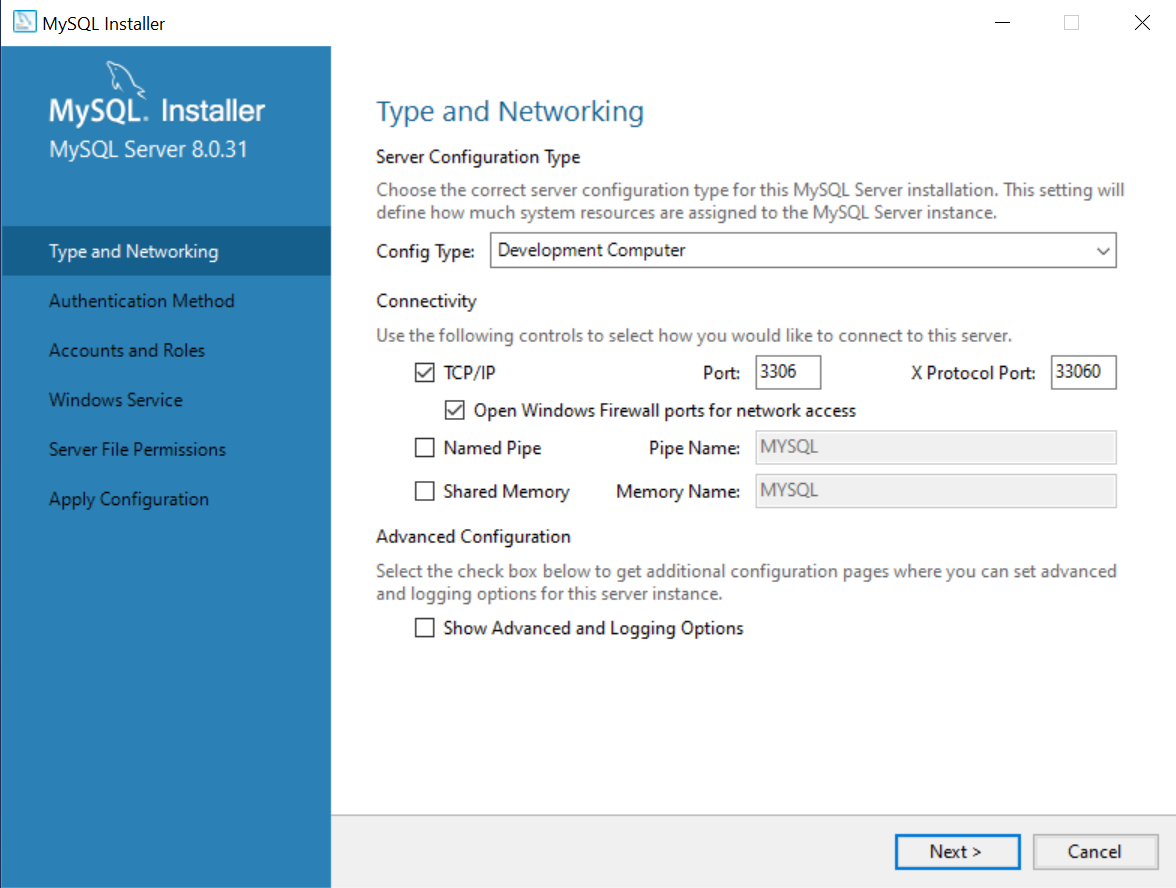
Keep the basic configuration and proceed with setting the password for the root user:
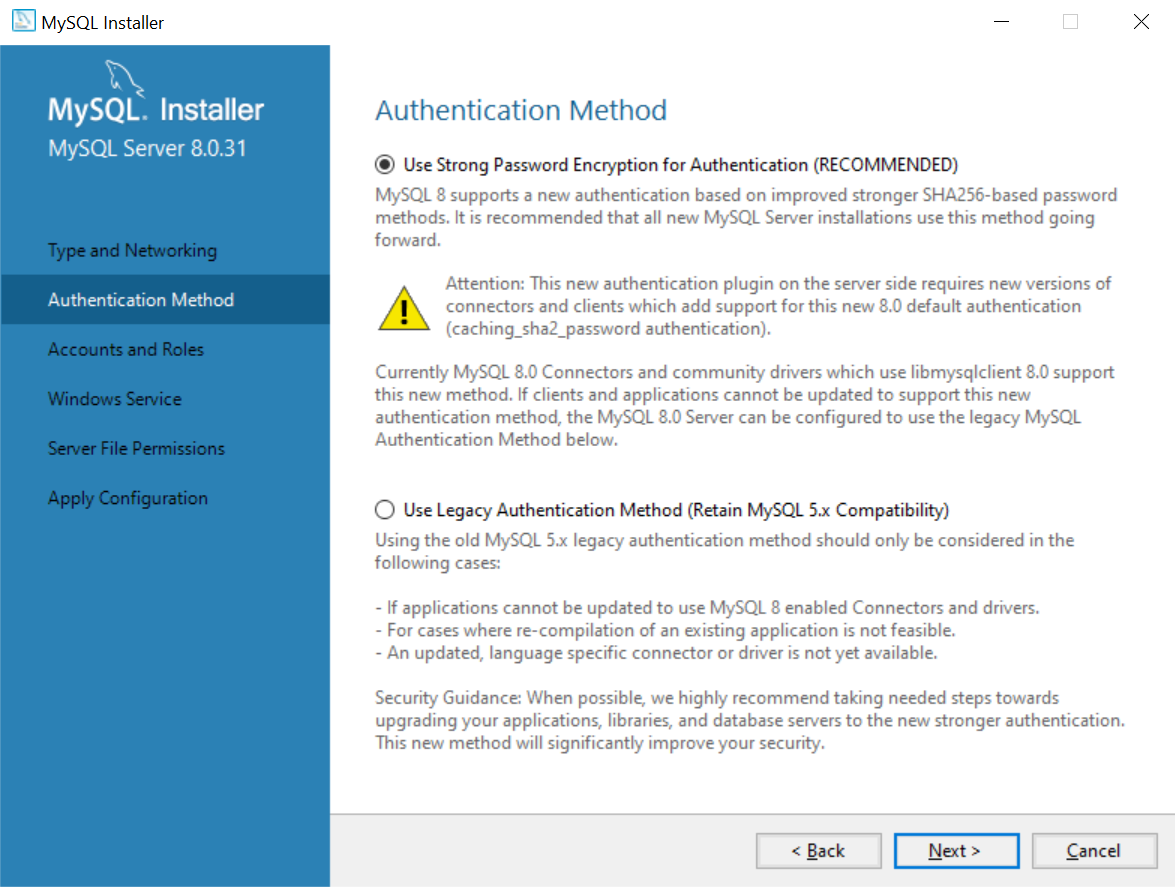
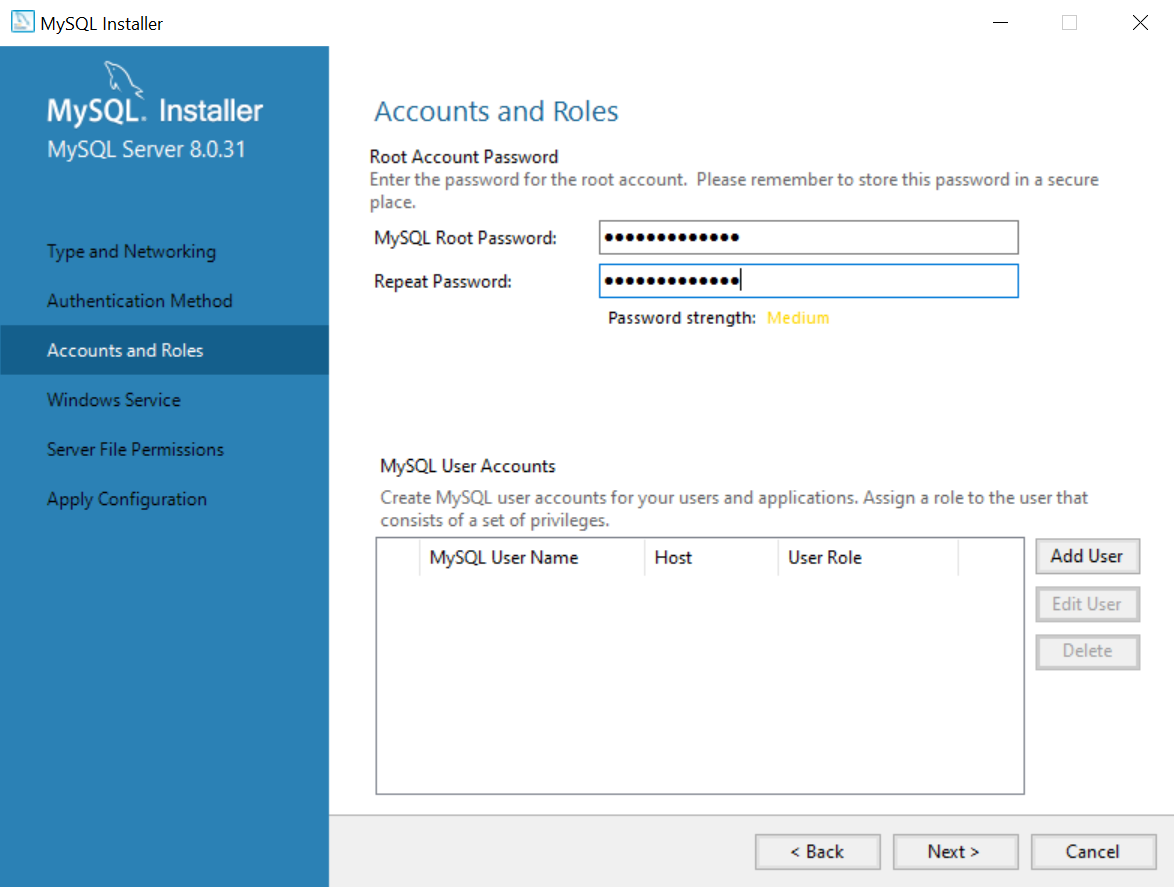
Note: Make a note of the password you set and save it in a secure place to avoid having to reset it if you forget your password.
If necessary, you can also add additional users on this page.
Step 6
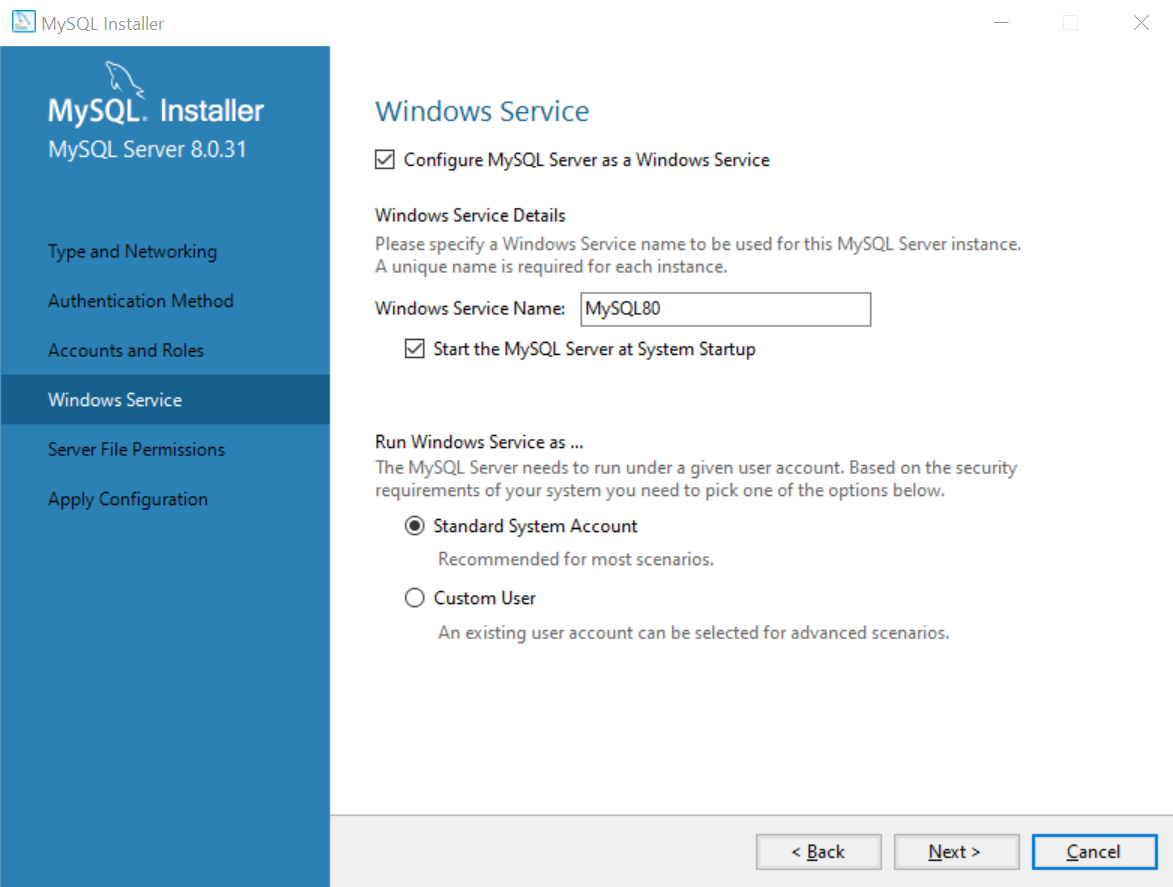
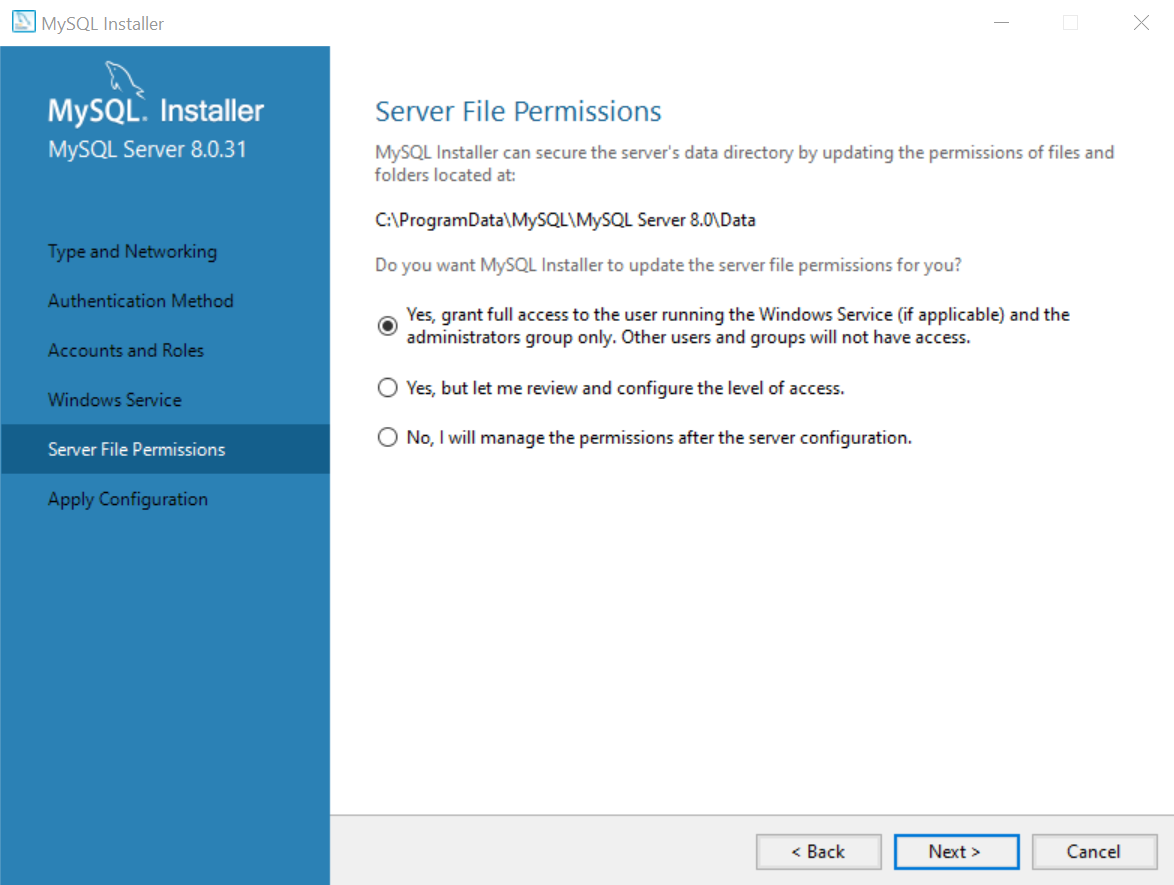
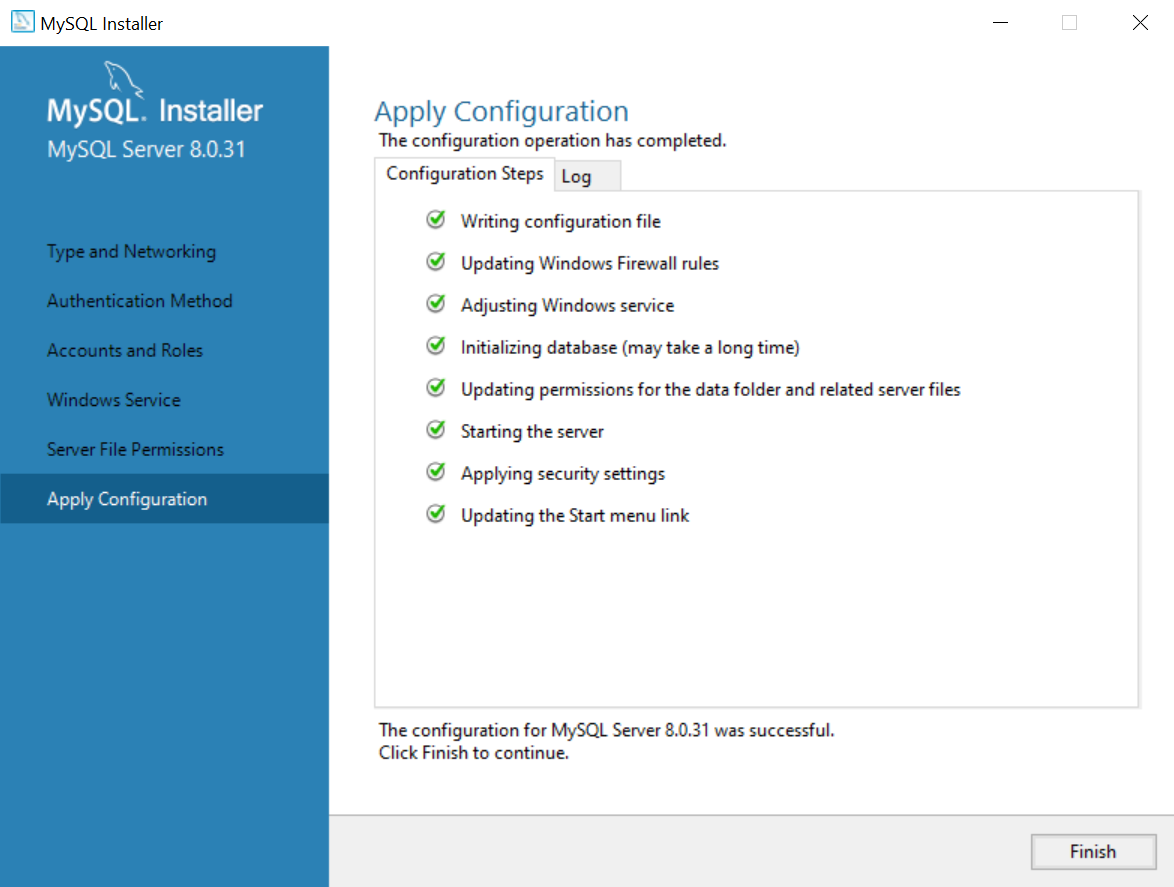
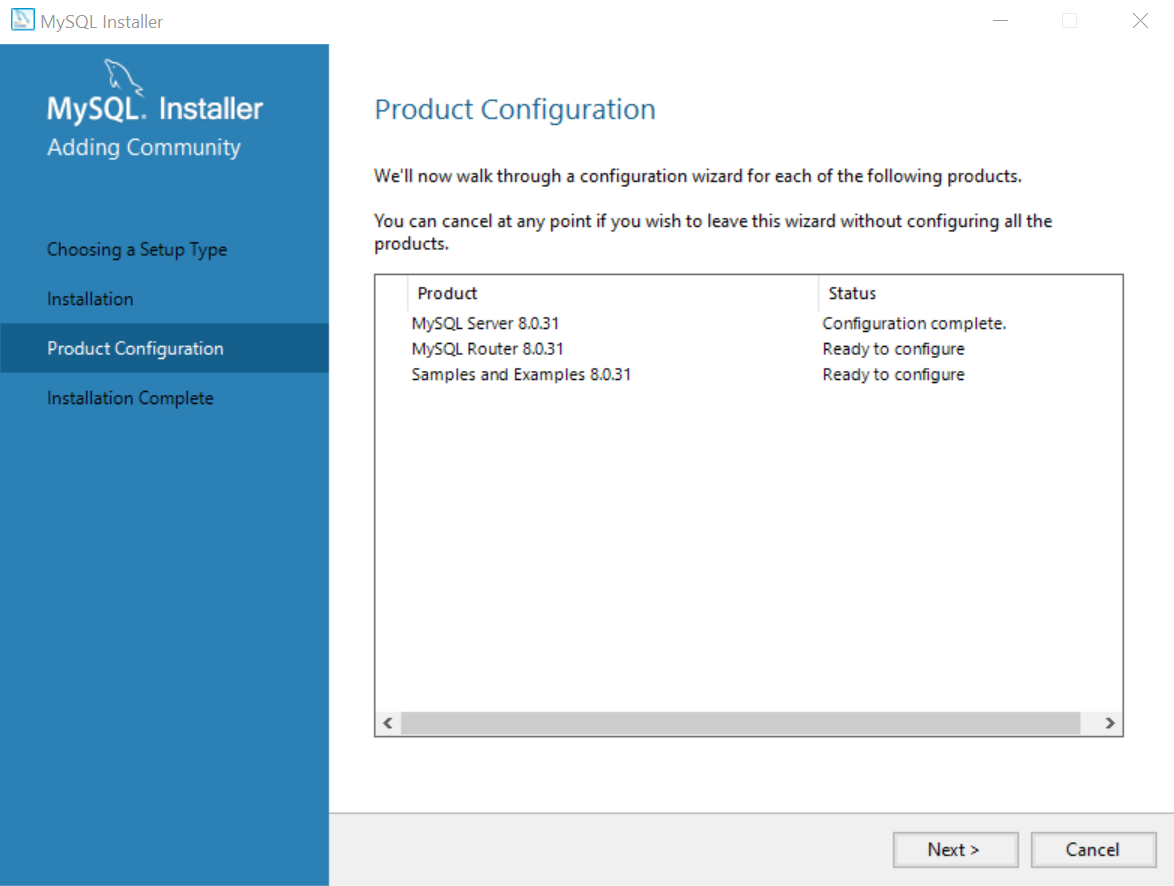
Proceed by pressing the Next button and add the MySQL Server Configuration which will be the first one downloaded.
Proceed with all of the remaining steps by pressing the Next and Finish buttons.
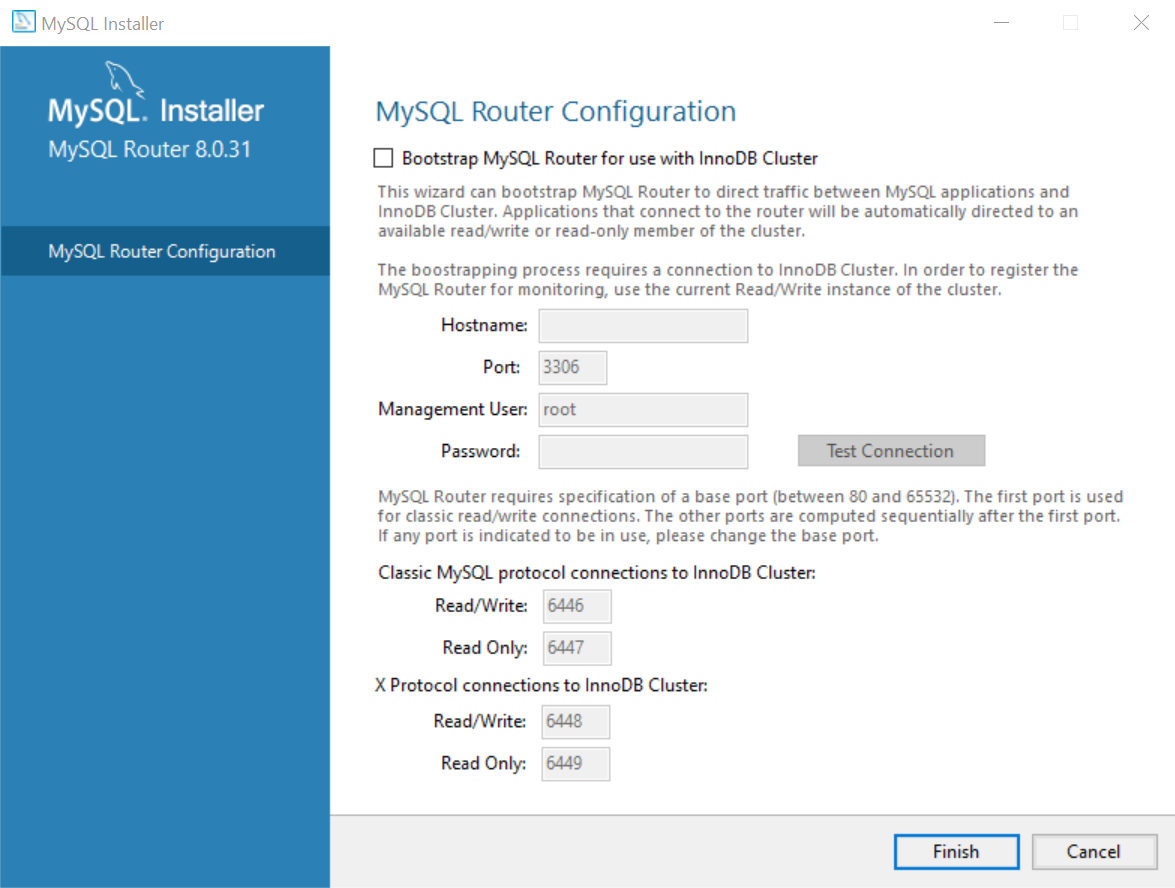
Step 7
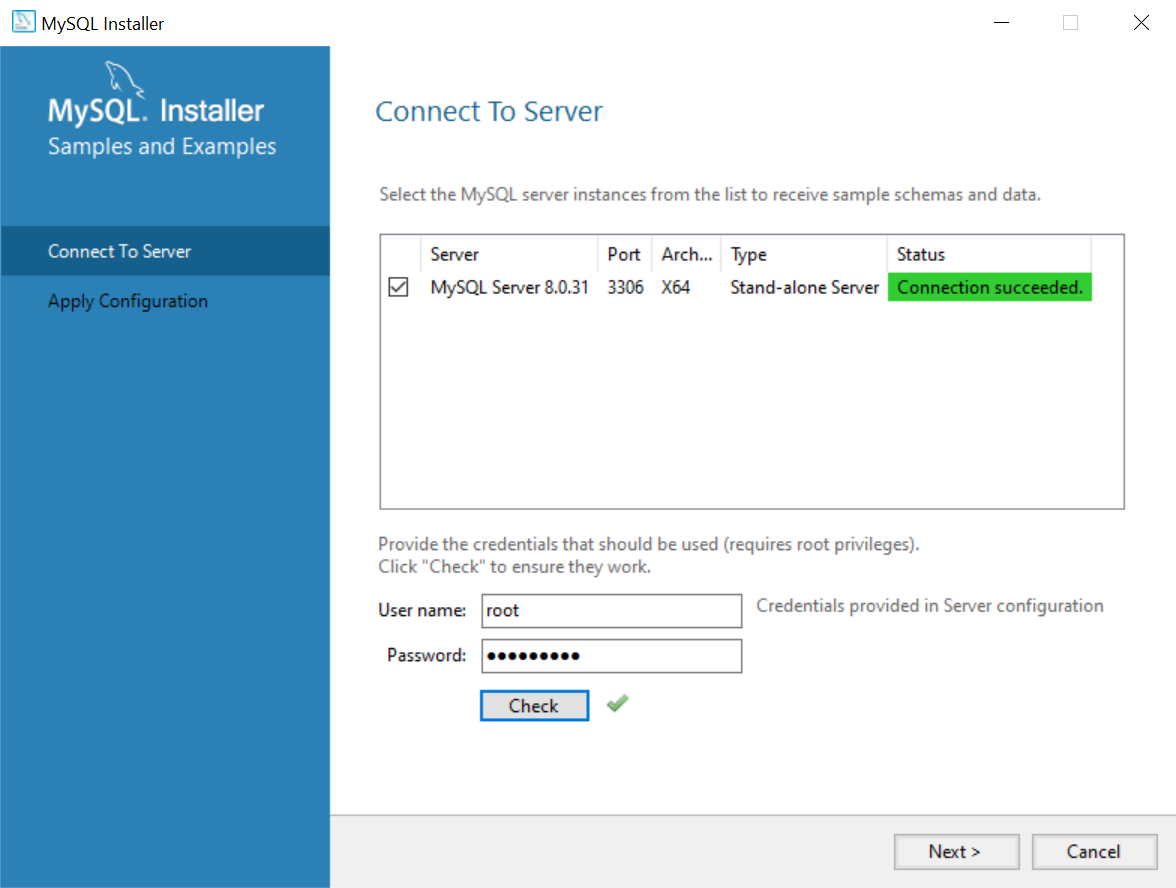
When you come to the screen below, add the root password you configured a few steps back during the installation.
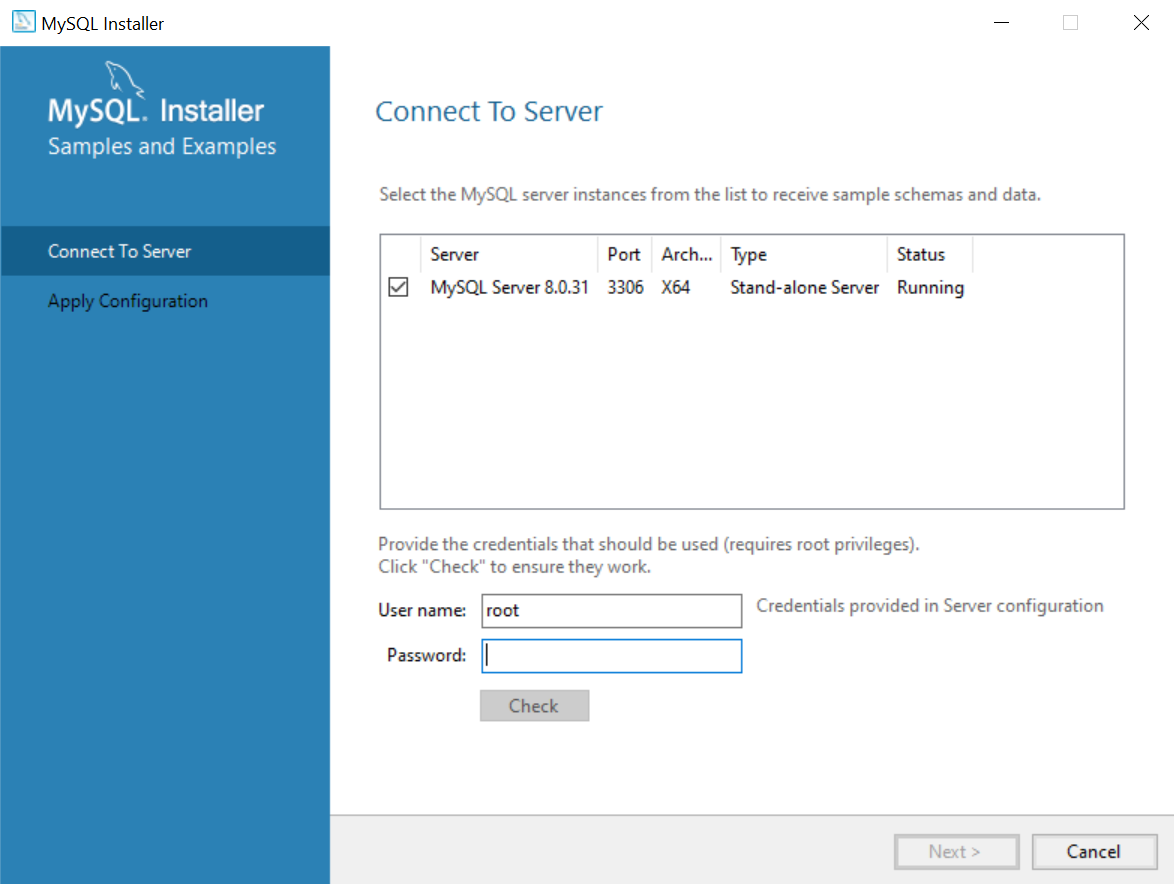
Proceed with all of the remaining steps by pressing the Next button and then Finish, keeping the default settings in place.
Step 8
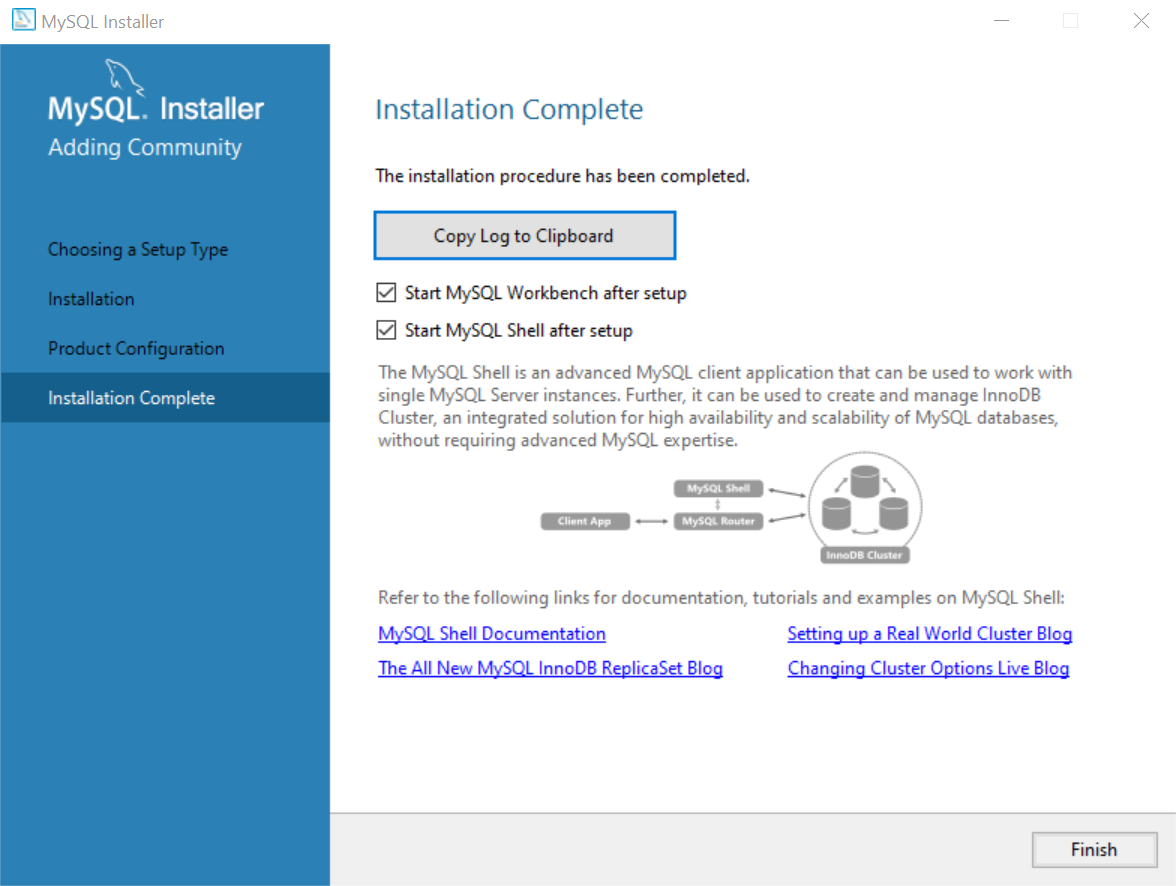
On the final page on the Installer, press the Finish button to complete the installation.
This will open two applications, MySQL Workbench and the command prompt logged into the MySQL shell, on your desktop as in the images below:
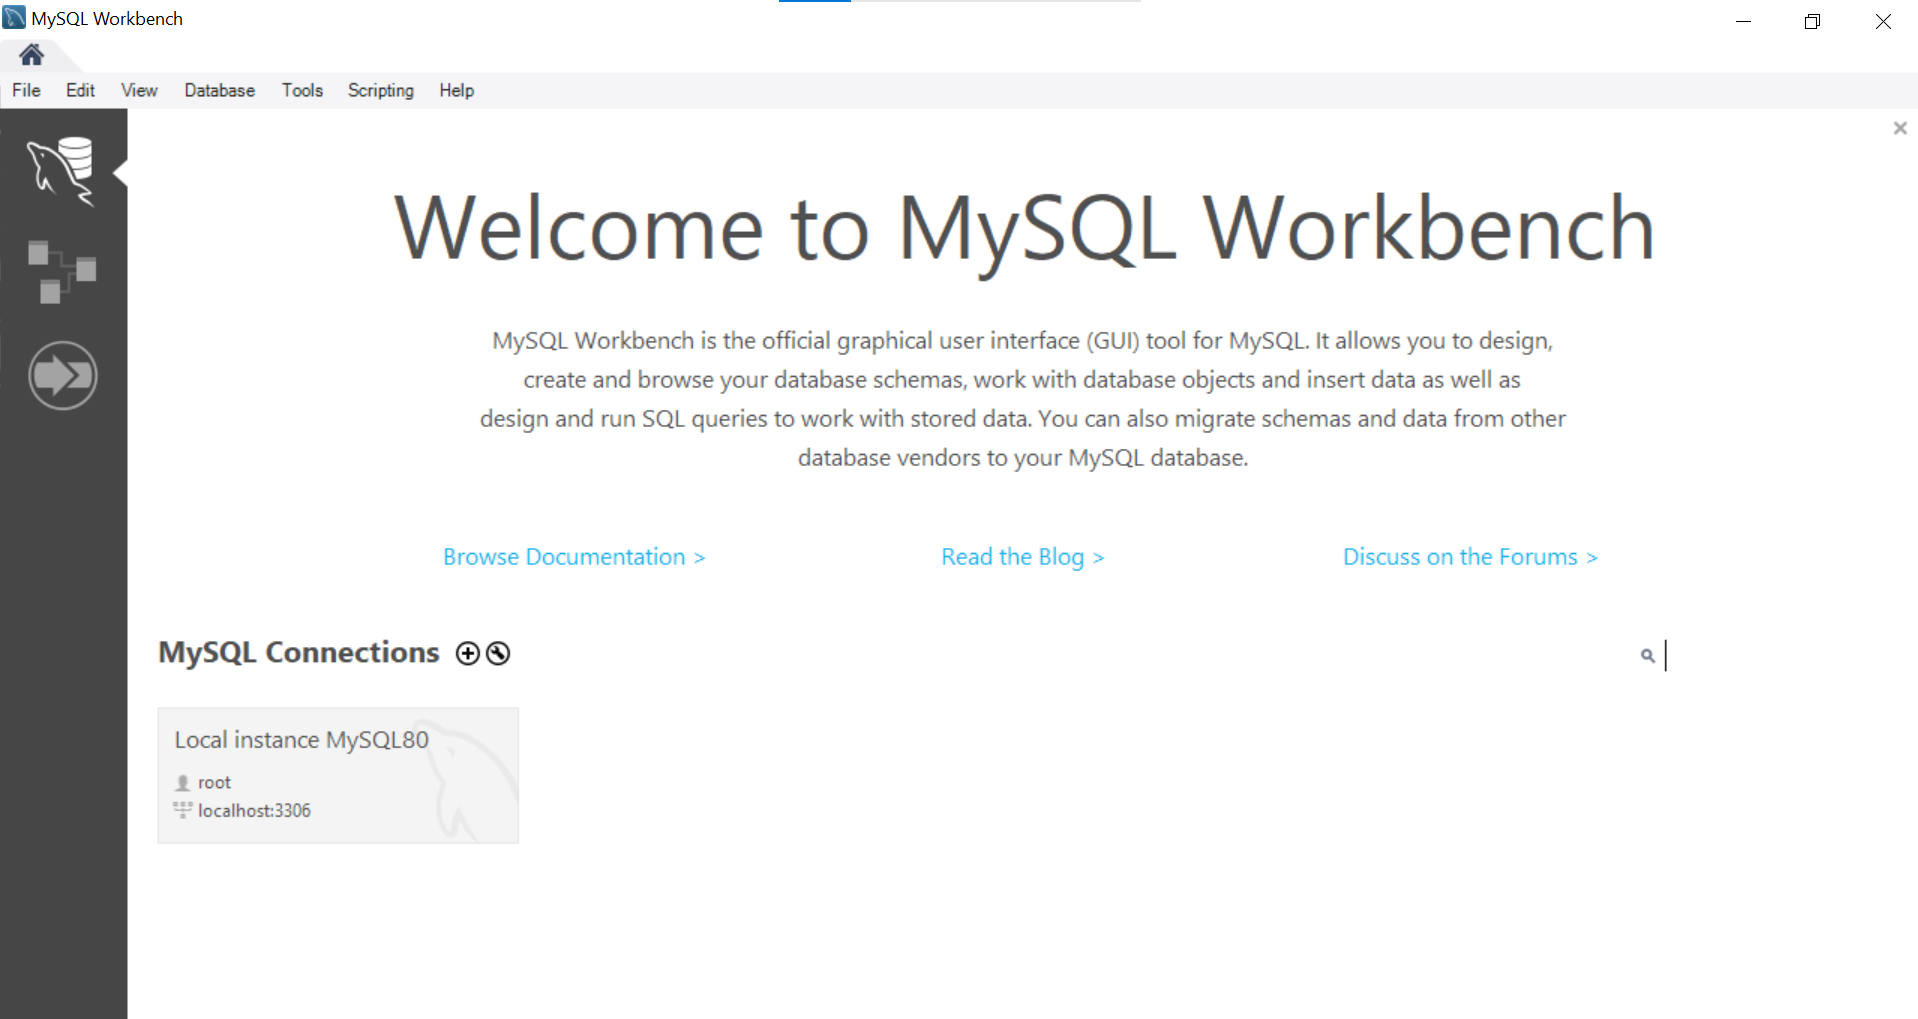
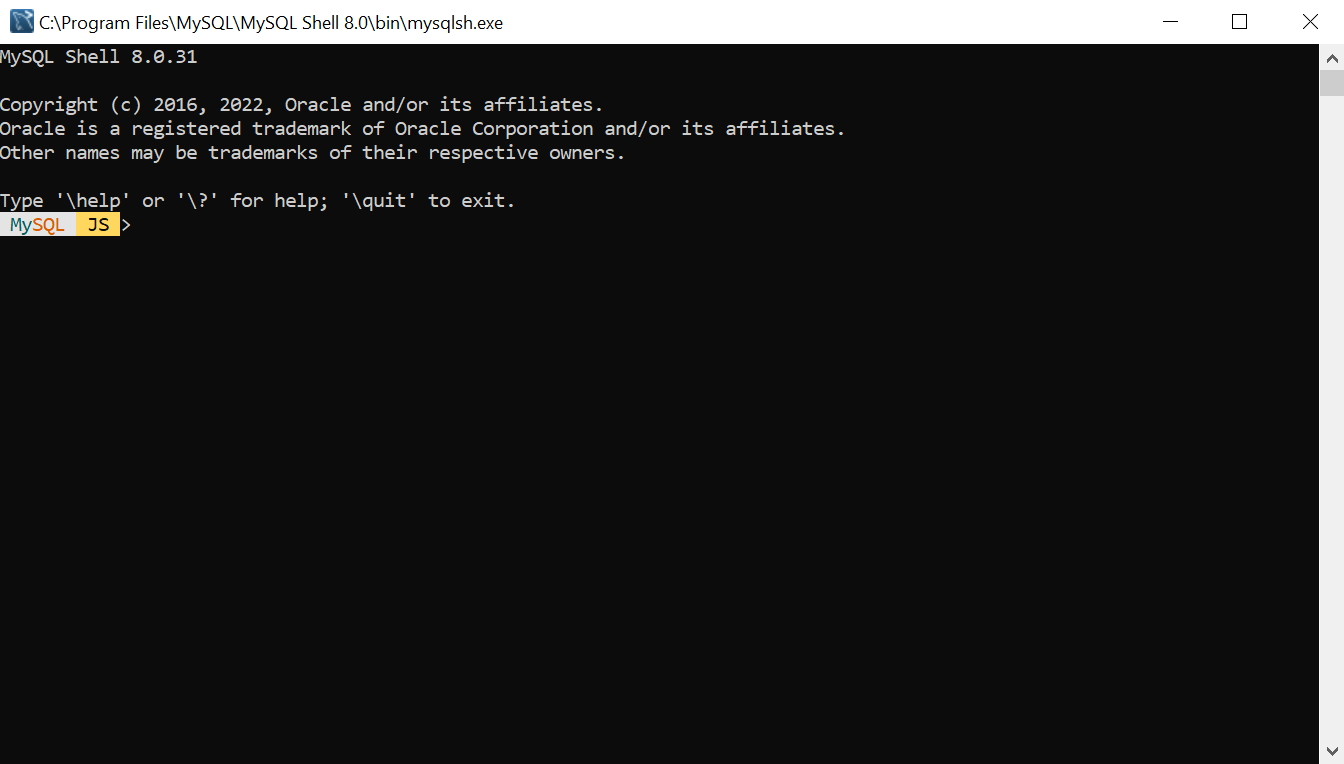
Note: In case you encounter some problems during the installation, there are additional installation-specific details available on the MySQL Windows installation page.
Setting up a MySQL database on Mac
Introduction
MySQL is an open-source relational database management system and it’s one of the most widely used databases for both personal and industry use.
Step 1
To install MySQL on Mac, you first need to first establish which OS X version is in use. Click the Apple icon in top right corner and select About This Mac. It should open a window like this:
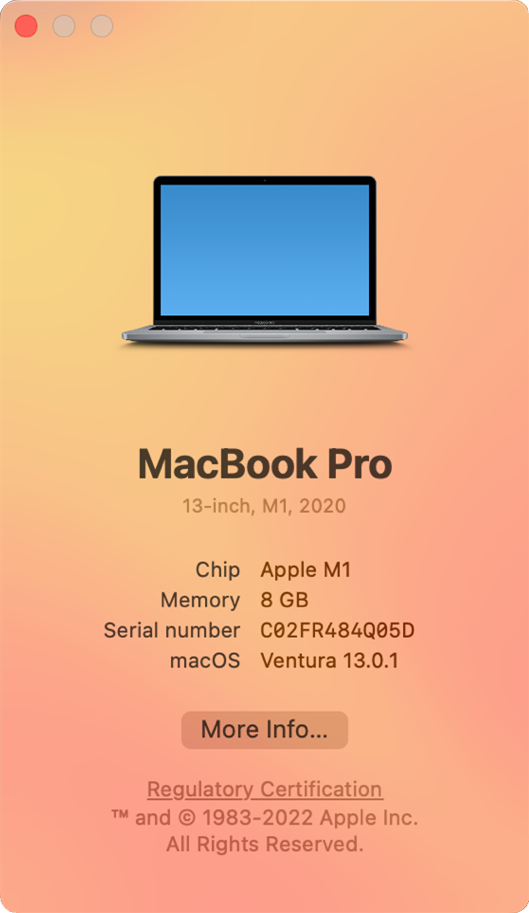
In the example above, the macOS version is Ventura 13.0.1.
For most users, the versions will either be Ventura (13) or Monterey (12).
Note: In the example above, Apple M1 is the chip in use which is ARM 64-bit. The Intel based chips will be x86 64-bit architecture.
Currently, Apple has support for the following versions:

Additionally, the minimum requirements recommended by the official website are as follows:

Step 2
Once you’ve confirmed these details, proceed to the official MySQL website to download the MySQL Community Server.
Note: The packages for version 12 are compatible with both versions 11 and 13.
Press the Download button specific to your OS and chip version.

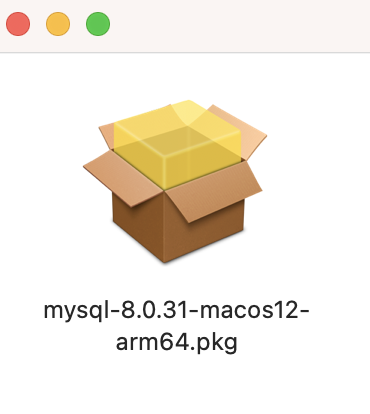
It will download a dmg file like the following:
mysql-8.0.31-macos12-arm64.dmg
Double-click and open the package installer. You will be presented with the image below:
If you receive an error, open the Privacy and Security settings in your System Preferences and scroll down until you see the Security option.
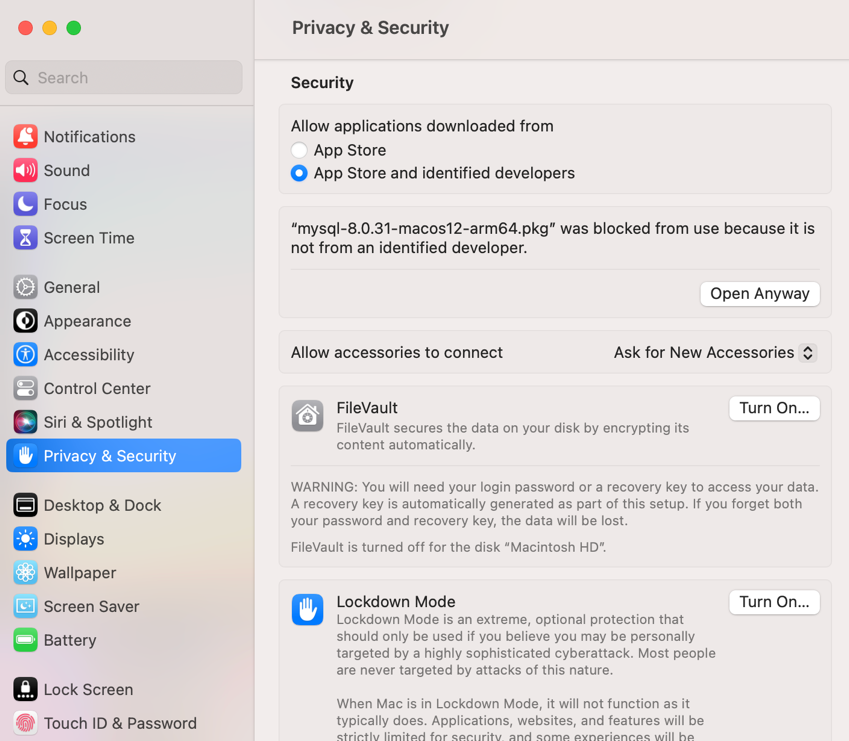
Under the error message, press on the Open Anyway button and proceed with the installation.
Acknowledge the warning message once again and press Open.
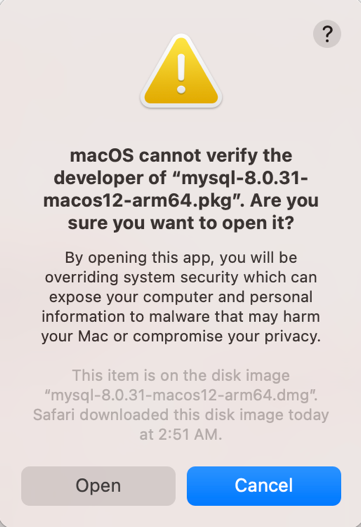
Step 3
A screen like the one below should appear that welcomes you to the MySQL server. Click Continue.
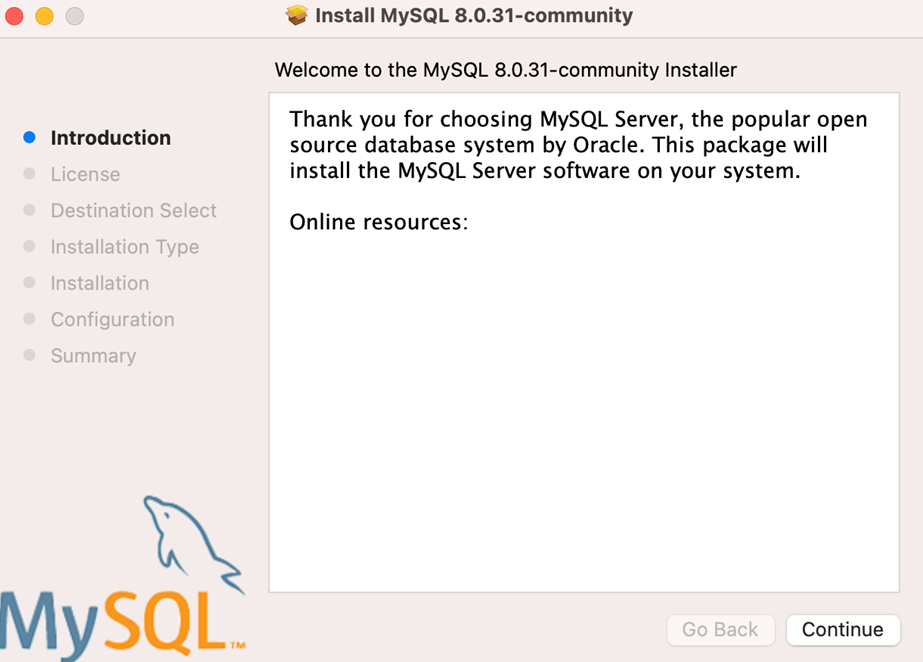
Proceed with the setup by clicking Allow and adding a system password if prompted.
You will come to a screen such as the one below where you need to set a password for the root user:

Keep the checkbox that says StartMySQLServer once the installation is complete selected and complete the installation.
Note: It is very important to keep a note of the root password because if you forget it you’ll have to reset it which takes time and effort.
Step 4
Go to System Preferences once again and search for MySQL in the search box.
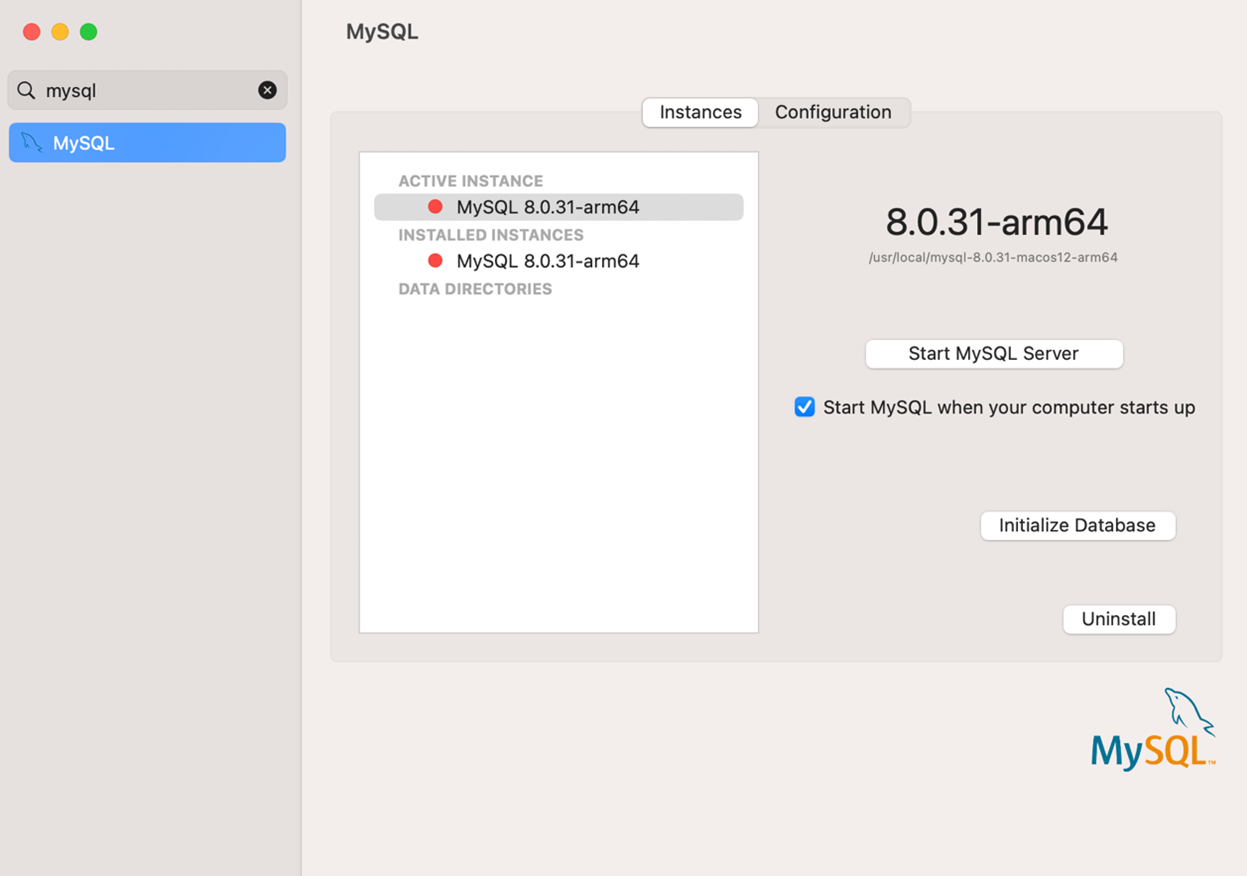
Press the Start MySQL Server button.
Note that the red dots have changed to green on the screen below.
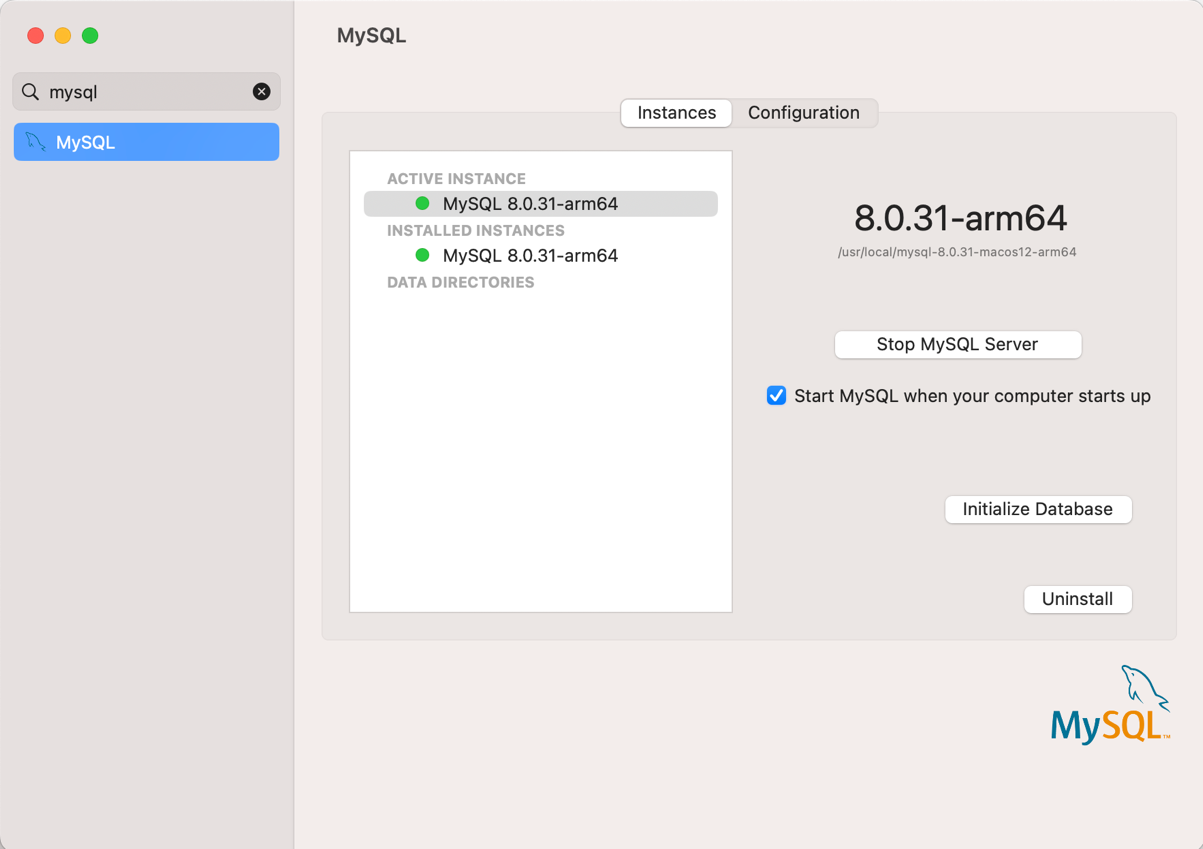
Your MySQL server and database are ready for use on the local machine.
Step 5
You can confirm the status by opening the terminal and typing the following command:
mysql -u root -p
Press Enter and enter the root password you created.
The terminal prompt will change as follows:

Conclusion
Sometimes you may encounter some problems during your installation. Some of these queries are addressed on the official website for MySQL. It also consists of useful information about using MySQL database on your local machine.
Note: It is recommended to use the latest stable version of MySQL (5.7 at present) for your installation. However, you can use any earlier version that is compatible with the OS in use and your project requirements.
The MySQL Community Edition that you may encounter is a free downloadable toolset used with the MySQL database server that includes a host of tools as listed in the image below taken from the official website.
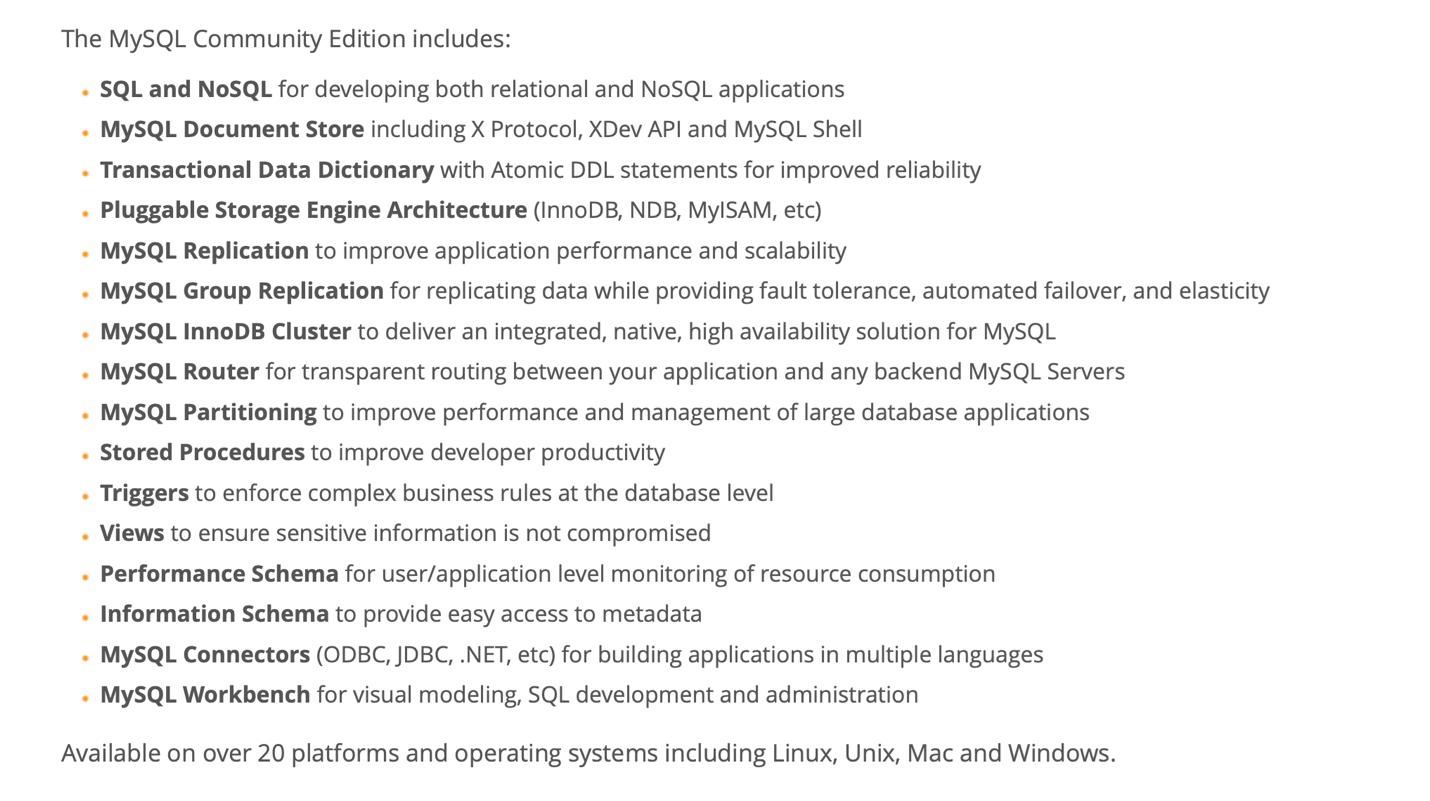
There are also other ways to install mysql such as using binary files and third-party package installers like homebrew. These can be pursued in case the installation from the official package manager file encounters some errors.
In addition to the steps outlined in this reading, specific connectors may be required to use MySQL with different tools like VS Code and languages such as Python. For example, you need to install the package mysqlclient using pip for Python before using mysql.
More information about installation and setup can be found in the additional resources of this lesson.
Recap: Models and migrations
Introduction
Models are the M in the Model, View, Template (MVT) architecture used by Django and models are widely considered to be one of the best features of Django.
Object Relational Mapping, or ORM, is the ability to create a SQL query using an object-oriented programming language such as Python. This enables quick turnaround time in fast production environments where constant updates are the order of the day.
In this reading, you will learn about the models used in Django and how you can use migrations to perform ORM on these models.
ORM and CRUD operations in models

Each model is a Python class which in turn is a subclass of Django.db.models.Model
Each attribute of the model represents a database field. Essentially, you can think of a model as a Python object, and models help developers create, read, update and delete objects, commonly called CRUD operations. The models that you create are saved in the models.py file that is inside the Django app. Examine the example below of the SQL syntax and the corresponding Django models for creating a table called User:
SQL syntax
CREATE TABLE user (
    "id" serial NOT NULL PRIMARY KEY,
    "first_name" varchar(30) NOT NULL,
    "last_name" varchar(30) NOT NULL
);
Corresponding Django code
from django.db import models

class User(models.Model):
    first_name = models.CharField(max_length=30)
    last_name = models.CharField(max_length=30)
The database table columns, first name and last name, are equivalent to attributes in Django. The id in case of the User model is auto-generated while performing migrations. Additionally, the functions called on the models object like CharField are called Formfield. Form fields determine the data type of the attribute.
Let’s briefly explore simple examples of models and their associated SQL methods to perform CRUD operations.
Create
Django:
Django
new_user = User(id=1, "John", "Jones")
new_user.save()
SQL:
SELECT * FROM user WHERE id = 1Update
Django:
user = User.objects.get(id=1)
user.last_name = "Smith"
user.save()
SQL:
UPDATE user(id, first_name, last_name)
SET last_name = "Smith"
WHERE id = 1
Delete
Django:
user = User.objects.get(id=1)
user.delete()
SQL:
DELETE FROM user WHERE id = 1Django ORM provides a large number of options for SQL queries that can be configured and this can be explored on the official website.
raw() function
Django processes data in the form of a QuerySet object and you can also directly use SQL queries on it using the raw() function. For example, in the command prompt inside a Django project, you can enter the Django shell and enter the following code:
people = Person.objects.raw('SELECT id, first_name FROM myapp_person')This code accesses the object from the Person model that was created. The raw() function then runs a SQL query to select id and first name from the myapp_person table that was generated.
Building on this example, a query to print the contents of the entry for the selected id will be:
for p in Person.objects.raw('SELECT id, first_name FROM myapp_person'):
            print(p.first_name, p.last_name)
This will print a result in the console such as:
Jesse Rogers
Model relationship
Model relationships can be of one of the following types:
- One-to-one
- One-to-many
- Many-to-many
If a primary key is in one model, and only one record exists in the other related model, the two models are said to have a one-to-one relationship.
In a one-to-many relationship, one object of a model can be associated with one or more objects of another model. For example, a teacher is qualified to teach a subject, but there can be more than one teacher in a college who teaches the same subject.
In a many-to-many relationship, multiple objects in one model can be associated with multiple objects in another model.
An example of this many-to many relationship is below:
class Teacher(models.Model):
    teacherID = models.IntegerField(primary_key=True)
    qualification = models.CharField(max_length=50)
    email = models.EmailField(max_length=50)

class Subject(models.Model):
    subjectcode = models.IntegerField(primary_key = True)
    name = models.CharField(max_length=30)
    credits = model.IntegerField()
    teacher = model.ManyToManyField(Teacher)
These relationships replicate the table relationships in SQL. Relationships are a big concept, but primarily it involves the understanding and use of foreign keys. Foreign keys are represented in Django by the argument called Foreign Key which is passed inside the Formfield.
In the following example, a one-to-many relationship can be defined for two models in Django: Subject and Teacher.
class Subject(models.Model):
    Subjectcode = models.IntegerField(primary_key = True)
    name = models.CharField(max_length=30)
    credits = model.IntegerField()


class Teacher(models.Model):
    TeacherID = models.ItegerField(primary_key=True)
    subjectcode=models.ForeignKey(
                Subject,
                on_delete=models.CASCADE
                  )
    Qualification = models.CharField(max_length=50)
    email = models.EmailField(max_length=50)
Once you have created a model inside the models.py file, the next step, migrations, is the most important one in Object Relationship Mapping in Django.
Migrations
Migrations in Django help developers to create and make changes to the models that represent a database schema.
In a relational database, data is organized in tables and models are used to represent these tables stored in the database. Migrations are tied into Django models and stored as migration files in a migrations folder inside each app.
Migration commands
For example, suppose you want to add a new column called City to the User table. Without an ORM like the one Django provides, you would have to log into the database and run an SQL ALTER statement. You can use the ALTER statement to alter a specific table to add a column of whatever type is required. When the statement runs, the User table updates with another column called City.
However, in Django, the User table is created using a model which is a class-based representation of the User table in the database. So, instead of writing the SQL query, you only need to add the new attribute to the model. Then you run the migration scripts to implement the changes. Once the migrations scripts run, the changes are applied.
Migration in Django is performed in two steps using specific commands.
To create a migration:
python3 manage.py makemigrations
To apply the migration:
python3 manage.py migrate
In addition to applying changes to the models in your project, migrations also perform syncing and version control for your database schema. Now that you understand the basics of migrations, you also have to learn about the history of changes or version control that happens when you perform migrations.
History of changes
To take an example, let’s say you are adding an extra attribute to a model or changing an attribute name. There are occasions when multiple users use more than one database and migrations ensure schema changes are applied and updated in the database. In Django, a developer must create the change directly in the model, then apply the migration by using the migration scripts.
Another great advantage of using migrations is that it avoids repetition. Once you create a model, writing SQL queries to create corresponding databases for it is repetitive. Migrations generated from the models help prevent such duplication of efforts.
Take note that this history of changes is maintained by Django in migration files. These files are stored in a migrations folder inside the specific app directory of the Django project.
If you run a command such as:
show migrations
It returns an output such as:
 [X] 0001_initial
 [X] 0002_logentry_remove
menu_items
 [X] __init__
 [X] 0001_initial
 [X] 0001_alter_menu_items
This shows all the migration changes and files generated from those migrations. Django automatically generates the file names in line with the actions performed in the given migrations or the timestamp.
The X symbol represents the status of applying migrations after it has been made. This is after the command make migrations, but before the command migrate. After applying migrations, Django does not apply a new migration to the same database again unless it detects changes.
Logic behind migrations
Django creates a new table called Django migrations with reference to the migration files. To summarize the purpose of migration, every time a migration is run:
- The table is updated with the latest changes
- The table is checked prior to the migration script running
- It ensures that the scripts have run and specifies which ones need to be applied
A typical migration file will look like this:
dependencies = [
('LittleLemonDRF', '0001_initial'),
    ]

    operations = [
        migrations.CreateModel(
            name='table_customers',
            fields=[
                ('id', models.BigAutoField(auto_created=True, primary_key=True,   serialize=False, verbose_name='ID')),
                ('first_name', models.CharField(max_length=200)),
            ],
        ),
    ]
It contains mainly dependencies that refer to the previous migration that must be applied before this, and operations that refer to actions performed in the given migration.
Conclusion
While the topics of models, ORM and migrations are pretty broad, this reading gave you a brief overview of the most important aspects of models in Django.
Configuring Django to connect to MySQL
MySQL is one of the world’s most popular and widely used database engines. It’s open-source, very performant, and works with both small and larger scale web applications.
pipenv shell
pipenv install mysqlclient
mysql -u root -pIf MySQL is running on a different port number than 3306, for example 3307, you need to specify it as well.
mysql -u root -P 3307 -pBy default, the host name for MySQL is local host. If it is different in your computer or server, you can specify it with a h switch like this.
mysql -u root -h 127.0.0.1 -pcreate database littlelemon;
show databases;
exitNow, return to your Django project directory and open the settings.py file. There’s a section named databases, which is currently configured to use the sqlite database that comes with every Django project.
In this line where it is mentioning sqlite3 to use as the database engine, replace sqlite3 with MySQL. Write the database name as little lemon.
You need four extra settings to connect to the MySQL engine. These are:
- host
- user
- password
- port
For host, write local host or the host name your MySQL setup is using. For example, 127.0.0.1.
The default username for every MySQL setup is root. Use that as the user. If you created a different username for your database, then use that username.
WARNING
Just note, never use the root user and the production server because root user has full access to every database in MySQL settings. Any misuse could cause serious damage.
For the password, write the password of this database username.
Finally, if the MySQL engine is running at the default port number 3306, you don’t need to specify it. But if it’s running on a different port, for example, 3307, you can write it like this and you’re done.
DATABASES = {
	'default': {
		'ENGINE': 'django.db.backend.mysql',
		'NAME': 'littlelemon',
		'HOST': '127.0.0.1',
		'USER': 'root',
		'PASSWORD': 'root',
		'PORT': '3307'
	}
}
python manage.py makemigrations
python manage.py migratemysql -u root -h 127.0.0.1 -puse littlelemon;
show tables;Exercise: Connect Django to MySQL
Lab Assets
You are provided with a basic setup for Django environment for the project and app inside a Zip file below.
Note that the virtual environment using pipenv has been added as a part of the zip file. You have to activate the virtual environment and ensure the dependencies are installed.
Your goal is to create and connect to a MySQL database that can be used inside a Django project.
Objectives
- Create new MySQL database credentials
- Update the project settings in Django to enable connection with MySQL
Introduction
So far, you’ve learned how to work with the default SQLite database inside your Django project.
In this lab, you will create and connect to an external MySQL database that can be used inside a Django project.
Initial lab instructions
This lab will require you to modify the settings.py file.
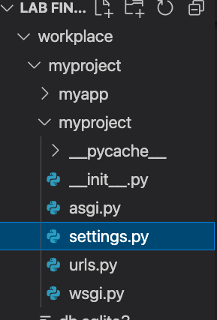
Additionally, you are required to use the command line console inside the VS Code terminal.
If not open already, go to Terminal on the Menu bar at the top of your screen and select New Terminal.

You have already built the project named myproject and added an app inside the project called myapp.
Follow the instructions below and ensure you check the output at every step.
Steps
Note: Make sure you have installed MySQL on your local machine and set up the admin user. In this lab, to keep it simple, you are going to begin with the root user with credentials as below.
Username: root
Password:
Note: You must know the password set for root. In case you don’t recall, the default password for root if not configured is <blank> or empty.
Step 1:
First go to the command line or terminal on your local machine and log into the mysql shell by typing the command:
mysql -u root -p
Press Enter and enter the password when prompted.
Note: Depending on the local machine, in some cases you may have to provide admin privileges for this command. This can be done by adding the keyword sudo before the command. For example:
sudo mysql -u root -p
Step 2:
Now create a database with the name menu_db with the command below:
CREATE DATABASE menu_db;
Note: The commands in MySQL should end with a semi-colon (;).
You will receive a confirmation such as the one below:

Step 3:
Next, you need to verify that the database is created by typing the command:
SHOW DATABASES;
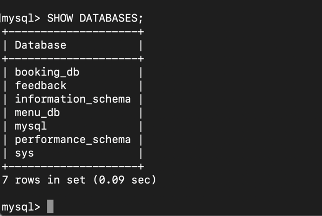
The output will depend on the databases present on your local machine. Confirm that it includes menu_db which is the database you have created.
Step 4:
Now open VSCode and In the terminal, run the command that will enable access to mysql and enter the mysql shell by passing the -u and -p flags that will enable the MySQL console to prompt for a password.

Note: The default password set for mysql here will be root.
Step 5:
Once inside the mysql file, add the command to show the databases already present.
Confirm that the same databases appear in the terminal in VS Code.
Step 6:
Create a new database with the name menu_items by running a MySQL query.
Step 7:
Run the show database command and ensure the menu_items database gets updated in the list of databases.
Step 8:
If you want to use a new MySQL user, then create a new user for the database by running the following command:
CREATE USER 'admindjango'@'localhost' IDENTIFIED BY 'employee@123!' ;
Or simply use the default root user and its password.
Step 9:
Run the following command to grant all permissions to the user you have created:
GRANT ALL ON *.* TO 'admindjango'@'localhost';

Step 10:
Run the command to flush all the privileges.
Note: mysqlclient is already installed as the MySQL database connector using pipenv__.
Step 11:
Run the command to exit the mysql shell.
Step 12:
Inside your Django project, open the settings.py file and go to DATABASES.
Step 13:
Select the values assigned to it by default and replace them with the following code:
Replace DB_name, DB_user and DB_password with actual values.

Next, find the configuration for INSTALLED_APPS and update the value with the name of your app such as:
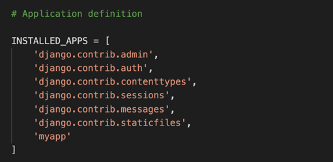
Save the settings.py file.
Step 15:
Open the terminal in VS Code and make sure you are inside the folder containing the file manage.py and outside the mysql shell prompt.
Step 16:
Run both commands to perform the migration.
Conclusion
In this lab, you practiced connecting your Django application to a MySQL database.
Solution: Connect Django to MySQL
Step 1:
mysql -u root -p
Note: Add the root password, if any, when password prompt appears.
Step 2:
CREATE DATABASE menu_db;
Step 3:
SHOW DATABASES;
Step 4:
mysql -u root -p
Step 5:
SHOW DATABASES;
Step 6:
CREATE DATABASE menu_items;
Step 7:
SHOW DATABASES;
Step 8:
CREATE USER 'admindjango'@'localhost' IDENTIFIED BY 'employee@123!' ;
Step 9:
GRANT ALL ON *.* TO 'admindjango'@'localhost';
Step 10:
FLUSH PRIVILEGES;
Step 11:
exit
Step 12:
DATABASES = {
    'default': {
        'ENGINE': 'django.db.backends.mysql',
        'NAME': 'menu_db',
        'HOST' : '127.0.0.1',
        'PORT' : '3306',
        'USER' : 'admindjango',
        'PASSWORD' : 'employee@123!',
    }
}
Step 13:
INSTALLED_APPS = [
    'django.contrib.admin',
    'django.contrib.auth',
    'django.contrib.contenttypes',
    'django.contrib.sessions',
    'django.contrib.messages',
    'django.contrib.staticfiles',
    'myapp',
]
Step 14:
python3 manage.py makemigrations
python3 manage.py migrate
Additional resources
The following resources will be helpful as additional references in dealing with different concepts related to the topics you have covered in this section.
- MySQL installer
- MySQL documentation
- MySQL community edition
- Homebrew package manager for macOS (or Linux)
- JavaScript official
- ModelForm in Django
Previous one → 5.Django Architecture | Next one → 7.Django and the front-end
