Why JavaScript?
Benefits and Importance of JavaScript
JavaScript is a language that builds interactivity into web pages. It is literally the language of the web. Almost every website runs JavaScript in some form or another.
The reason for this is the fact that since its very inception In 1995, JavaScript has been the main way to interact with web pages on the client side, the front and side of websites and web applications.
Using JavaScript updates are displayed in real time on our devices. Some common examples include interactive maps and client side form validation.
Over the years, there have been some alternatives to JavaScript, such as VBScript and more recently TypeScript. But even typescript compiles down to JavaScript so browsers can understand it.
Since JavaScript is one of the most widely available and frequently used methods for interacting with the browser on the client side, the language became immensely popular. In fact, developer surveys often show that JavaScript remains one of the most popular programming languages today.
What makes JavaScript so integral to modern browsers
Direct interaction
JavaScript is currently the only computer language that allows us to directly interact with our web pages dynamically on the client. It’s baked into the browser.
Backwards compatible
Its enduring popularity is down to the rules of backwards compatibility, which states that all websites that were built in the past still need to work today. So removing JavaScript from the browser would effectively render millions of websites completely useless. This means that JavaScript is in the unique position of being one of several central pillars of web development.
JavaScript unique ecosystem is one of the main reasons for its popularity. Simply put, browsers speak JavaScript.
Other reasons to use JS
Ease-of-use
There are many programming languages where a newcomer needs to do a substantial amount of prep work to even get set up and ready to learn. However, with JavaScript it’s as simple as opening the browser’s developer tools and navigating to the console tab because every browser has a JavaScript engine built in and you can interact with it using the console.
Used widely
Another reason to learn and use JavaScript is because as we saw earlier, it’s everywhere. JavaScript is used in almost every website there is.
It’s used on the client side of sites as plain JavaScript also known as vanilla JavaScript. It fuels a myriad of JavaScript frameworks such as React, Vue, and D3 and it’s also used on the server as Node.js and more recently Deno.
Accessible & Community
Another reason why people often choose JavaScript is that it’s considered one of the more accessible programming languages. It also has a wide development community to offer help and guidance. This is especially true when it’s compared to other languages.
There are many languages that for a variety of reasons would be very challenging to begin programming with. But because it’s so approachable, JavaScript can be a great way for new developers to jump into programming. So besides being a useful skill on its own, JavaScript can also be a stepping stone to other languages and technologies.
In demand
Finally, one more reason to learn JavaScript is because JavaScript skills are in demand. Countless job postings appear for JavaScript developers every day and these will keep coming for the foreseeable future.
Programming in JavaScript
Javascript is used in many scenarios:
- In the browser to help add various behaviors and interactivity, like adding an item to a shopping cart when you click a button.
- On the server, it can be used to power up websites, communicate with databases, and provide a native fields to web apps.
- It’s used to build mobile apps using technologies like React Native.
- It’s used to program devices known as the Internet of Things.
jQuery
In the early 2000s, different companies built Internet browsers and were referred to as browser vendors. However, with different browsers came different behaviors with various discrepancies between other browsers.
This resulted in developers sometimes having to write separate JavaScript code for different browsers. This wasn’t the best use of developer time and could lead to a frustrating experience for end-users.
Out of this frustration, several projects appeared trying to solve this compatibility problem. One such project managed to solve these issues and it was a library named jQuery.
Using this library, all a developer needed was to import jQuery and write code using its features. This code would then work across all browsers.
At the time, it was like magic, as it was such a great solution to the problem of incompatibility and jQuery became the most popular JavaScript library for well over a decade.
React
However, as the web and the way we code kept evolving, new problems appeared, and soon enough, new solutions to those problems needed to be built.
Once such solution was React, which came out in 2011 and it had a considerable effect on the way we think about websites and how we build them. React, solved many of the issues associated with creating, updating and maintaining complex websites.
Soon, many other technologies appeared attempting to do the same. These include Knockout, Backbone, Angular, Ember, Vue, Alpine, and others.
Legacy code
With millions of websites containing JavaScript code from different versions and libraries, there is a lot of old code. This is known as a legacy code.
While you probably won’t use jQuery to build a modern website today, you might still come across it in a project that is still actively running.
But don’t worry, sometimes beginners think they have to learn or even master all the different technologies associated with JavaScript. However, that’s not really necessary.
Variables
When you start programming in JavaScript, it helps to think of an empty JavaScript program as the first level of a sandbox game. The world is still empty, but there’s some underlying structure to it to build on. That structure needs to be there so that you can write custom JavaScript code in the first place.
However, besides the underlying structure, a new JavaScript program is like a blank slate for you to build on.
Now I want to give JavaScript some idea of what I want to build, and I start by adding a person’s name. I do this by typing John in double quotation marks. JavaScript receives this person’s name and accepts it.
"John"
'John'
There are no errors. This means I’ve given it some valid data, something that JavaScript can work with.
To declare a variable, I type the keyword, var.
var person;
undefined
I’ve given JavaScript one fact about the world that I’m building. The fact that there is a value that I’d like to reuse and that this value is accessible using the word person. Thus I have completed the variable declaration.
However, I still haven’t given a name to the person variable. In programming jargon, I’d say that the person variable hasn’t been assigned a value yet. The person variable is still undefined.
In other words, for the person variable to hold the value of John, I need to assign the value of John to the person variable. To do this, I’ll use the assignment operator, the equals sign.
Operators perform certain operations, and the assignment operator’s purpose is to take the value that is on its right and put it into what it’s on its left.
var person = "John"
undefined
person;
'John'
The console.log method can accept one or more values separated by commas.
console.log("Hello", person)
Hello John
var greeting = "Hello"
console.log(greeting, person)
Hello Johngreeting = "hi"
person = "James"
console.log(greeting, person)
hi JamesNotice that now I haven’t used the var keyword when I reassigned the values to the variables that I created earlier. That’s because JavaScript already knows that these variables exist in the world that I’m building.
Exercise: Declaring variables
In this exercise, you will practice declaring variables.
To check the output of your code, please enter it into the text box provided and click the “Run” button. This will execute the code and display the resulting output.
Tasks
- Declare a new variable named
petDogand give it the nameRex. - Declare a new variable named
petCatand give it the namePepper. - Console.log the
petDogvariable. - Console.log the
petCatvariable. - Console.log the text
"My pet dog's name is: "and thepetDogvariable. - Console.log the text
"My pet cat's name is: "and thepetCatvariable. - Declare another variable and name it
catSound. Assign the string of"purr"to it. - Declare another variable and name it
dogSound. Assign the string of"woof"to it. - Console.log the variable
petDog, then the string"says", then the variabledogSound. - Console.log the variable
petCat, then the string"says", then the variablecatSound. - Reassign the value stored in
catSoundto the string"meow". - Console.log the variable
petCat, then the string"now says", then the variablecatSound.
Make sure to output all your variables. Feel free to play.
var petDog = "Rex"
var petCat = "Pepper"
console.log(petDog)
console.log(petCat)
console.log("My pet dog's name is:", petDog)
console.log("My pet cat's name is:", petCat)
var catSound = "purr"
var dogSound = "woof"
console.log(petDog, "says", dogSound)
console.log(petCat, "says", catSound)
catSound = "meow"
console.log(petCat, "now says", catSound)
Solution: Declaring variables
Here are the solutions to the previous exercise, which was to practice declaring variables.
Please note: The solutions presented here use single quotes and double quotes interchangeably to delimit pieces of text. This is done on purpose to illustrate that both ways of representing text are possible and acceptable so that you are aware of it.
Task 1 solution to: Declare a new variable named petDog and give it the name Rex.
var petDog = 'Rex';Task 2 solution to: Declare a new variable named petCat and give it the name Pepper.
var petCat = 'Pepper';Task 3 solution to: Console log the petDog variable.
var petDog = 'Rex'; // Task 1 solution
console.log(petDog);
Task 4 solution to: Console log the petCat variable.
var petCat = 'Pepper'; // Task 2 solution
console.log(petCat);
Task 5 solution to: Console.log the string "My pet dog's name is: " and the petDog variable.
var petDog = 'Rex'; // Task 1 solution
console.log("My pet dog's name is: " + petDog);
Please note that in this specific example, because the text in line 2 contains a single quote within it, you should use double quotes to surround the whole piece of text. Otherwise, JavaScript will return an error. We will cover this issue in more detail later.
Task 6 solution to: Console.log the string "My pet cat's name is: " and the petCat variable.
var petCat = 'Pepper'; // Task 2 solution
console.log("My pet cat's name is: " + petCat);
Please note that in this specific example, because the text in line 2 contains a single quote within it, you should use double quotes to surround the whole piece of text. Otherwise, JavaScript will return an error.
Task 7 solution to: Declare another variable and name it catSound. Assign the string of "purr" to it.
var catSound = "purr";Task 8 solution to: Declare another variable and name it dogSound. Assign the string of "woof" to it.
var dogSound = "woof";Task 9 solution to: Console.log the variable petDog, then the string "says", then the variable dogSound.
var petDog = 'Rex'; // Task 1 solution
var dogSound = "woof"; // Task 8 solution
console.log(petDog, "says", dogSound);
Task 10 solution to: Console.log the variable petCat, then the string "says", then the variable catSound.
var petCat = 'Pepper'; // Task 2 solution
var catSound = "purr"; // Task 7 solution
console.log(petCat, "says", catSound);
Task 11 solution to: Reassign the value stored in catSound to the string "meow".
var catSound = "purr"; // Task 7 solution
catSound = "meow";
Task 12 solution to: Console.log the variable petCat, then the string "now says", then the variable catSound.
var petCat = 'Pepper'; // Task 2 solution
var catSound = "meow"; // Task 11 solution
console.log(petCat, "now says", catSound);
Data types
There are seven primitive data types in JavaScript. These are string, number, Boolean, null, undefined, BigInt and symbol.
Data
Each piece of information in your app has a different value and all values are collectively referred to as data but the values differ and therefore need to be stored differently.
Numbers and Strings
In JavaScript, text values are known as the string data type while numerical values are referred to as the number data type.
To build a number, you simply type in the numerical values but to build a string in JavaScript, the characters must be enclosed in either single or double quotes.
The number data type has a very wide range in JS enough for most common use cases. However, it is limited up to a point determined by JavaScript calculation capabilities.
The string data type practically has an unlimited number of combinations of characters. There is almost an infinite number of ways we can combine different characters into strings.
Other data types
The Boolean data type has only two values, true and false. This means that it is useful for making decisions.
Sometimes it’s necessary to know when a variable does not contain a value. And JavaScript has two data types to express just that.
First, there is the null data type which only has the value null and represents the absence of value.
You also have the undefined data type which can only hold the value undefined and usually refers to a variable that has not yet been assigned a value.
The capabilities of JavaScript have evolved over time and version ES6 introduced two new primitive data types to help with more complex tasks.
One is the BigInt data type which is like an extra large box that can accommodate a much greater range of numbers than the number data type.
Finally, there is the symbol data type which can be used as a unique identifier. Think of it as having multiple boxes with the same label and using different serial numbers to avoid mixing them up.
Operators
Operators
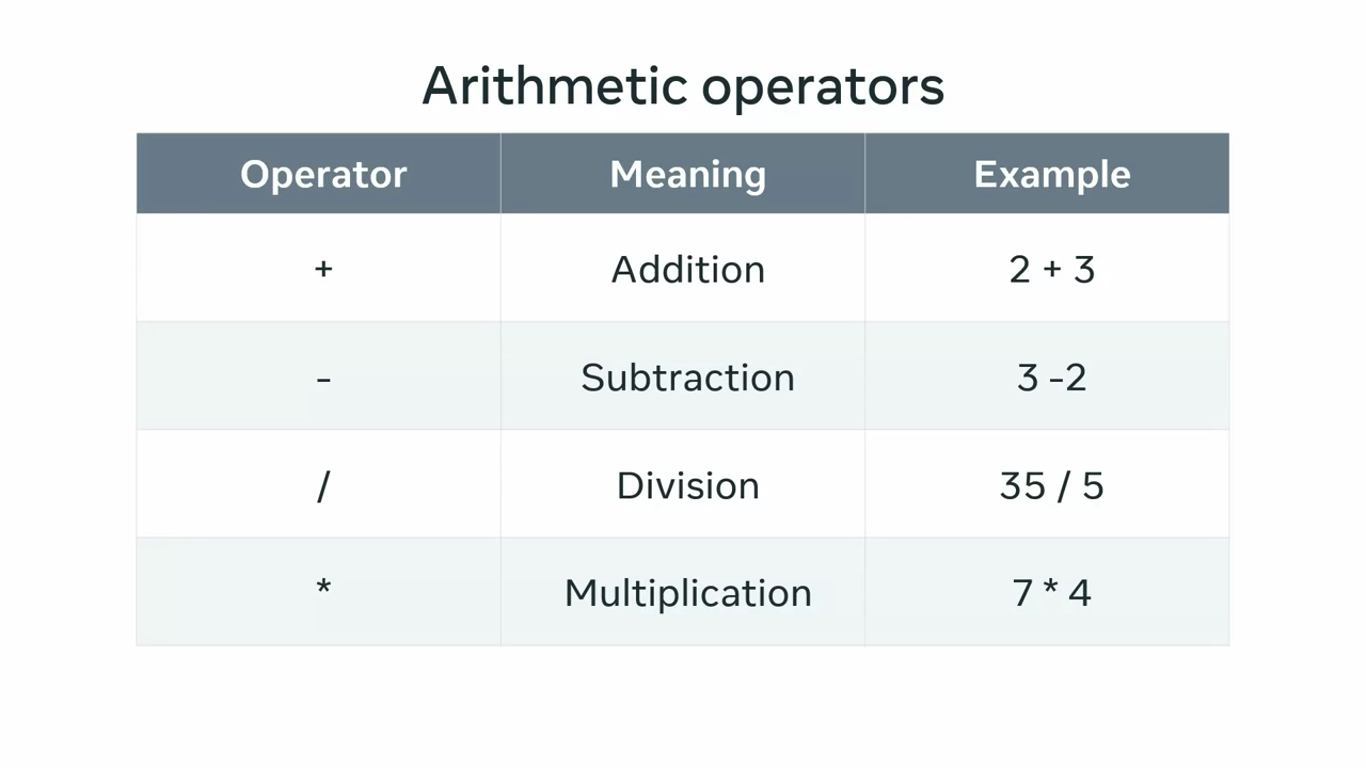
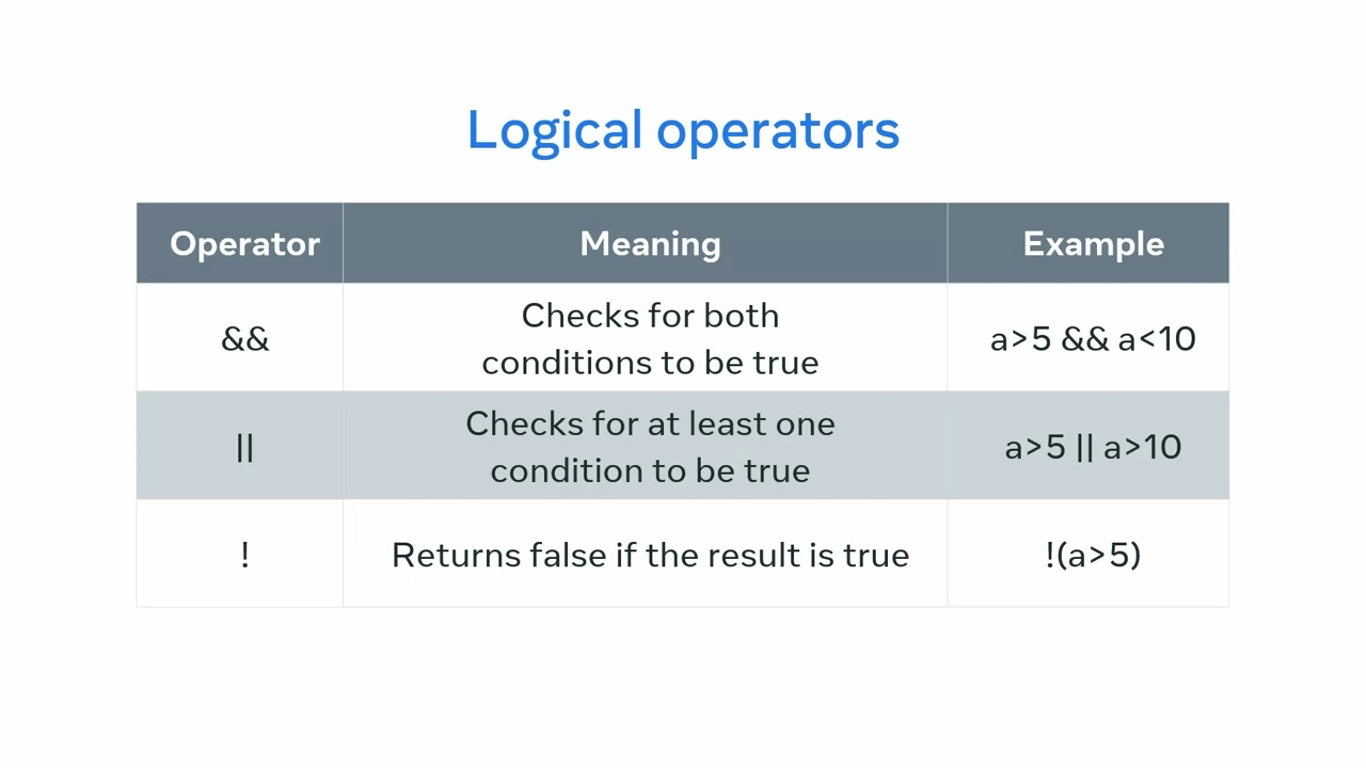
Operators are used to perform operations on variables and values. An operator is used to manipulate individual data items and return a result.

Comments
// comment

/*
comment
*/
Numbers
The number of data type is a foundational part of JavaScript as a programming language because it represents both integer and decimal point numbers.
Strings
Strings are used to represent and work with a sequence of characters while programming in JavaScript.
String
A string in JavaScript is a collection of characters enclosed by single quotes, double quotes.
'' as well as "" are referred as empty string.
if you write 'It's a lovely day, you’ll get error. You can use "It's a lovely day".
Booleans
The Boolean data type is used to check if a statement is true or false, which makes it a foundational part of knowing how to use JavaScript.
There are no maybe’s here. That’s why the Boolean data type has only two possible values, true and false.
In JavaScript 100 == "100" returns true!!!
It compares the values, not the data type.
But 100 === "100" returns false, and it also compares the types.
JavaScript interactivity
The purpose of this reading is to introduce you to a simple explanation of web page manipulation and some examples of it.
Did you know that JavaScript’s initial purpose was to provide interactivity in the browser?
In other words, it was the set of controls that allowed web developers to control the behavior of webpages and even the browsers that these web pages worked on.
This is still the case today.
As the web ecosystem developed and the world became ever more digitized, so did the myriad of ways that one can use JavaScript as a web developer to manipulate websites.
Initially, in the late 1990s, there was plain JavaScript that had to be tweaked to suit individual browsers.
Then, by the mid-2000s, the jQuery library came out, with the idea of writing less code, but doing more with it. It leveled the playing field as it allowed developers to use a single code base for various browsers.
This trend continued and many other frameworks such as React, Vue, Angular, D3 and more came along.
Together with npm and Node.js, the JavaScript ecosystem is not slowing down.
Even though it has gone a long way, sometimes it’s good to go back to basics. JavaScript is still the king when it comes to making websites interactive.
Although CSS has developed significantly over the years, it is still JavaScript that allows users to:
- Get their geolocation,
- Interact with maps,
- Play games in the browser,
- Handle all kinds of user-triggered events, regardless of the device,
- Verify form input before sending it to the backend of a webapp,
- and more!
There are many, many ways in which JavaScript allows you to build rich, interactive experiences on the web.
JavaScript selectors
One of the most powerful features of JavaScript is dom manipulation. For example, you can click on a button and change the color of some text or even display a pop up message. Essentially, you’re dynamically updating the html content in real time. To do this, you must be able to locate the objects in your html document that you want to manipulate.
JavaScript selectors work with the document object which you can access by typing the keyword document.
This returns the webpage stored in the browser’s memory known as the document object model or DOM. Alternatively, I can run a council log on the document keyword to get the same result.
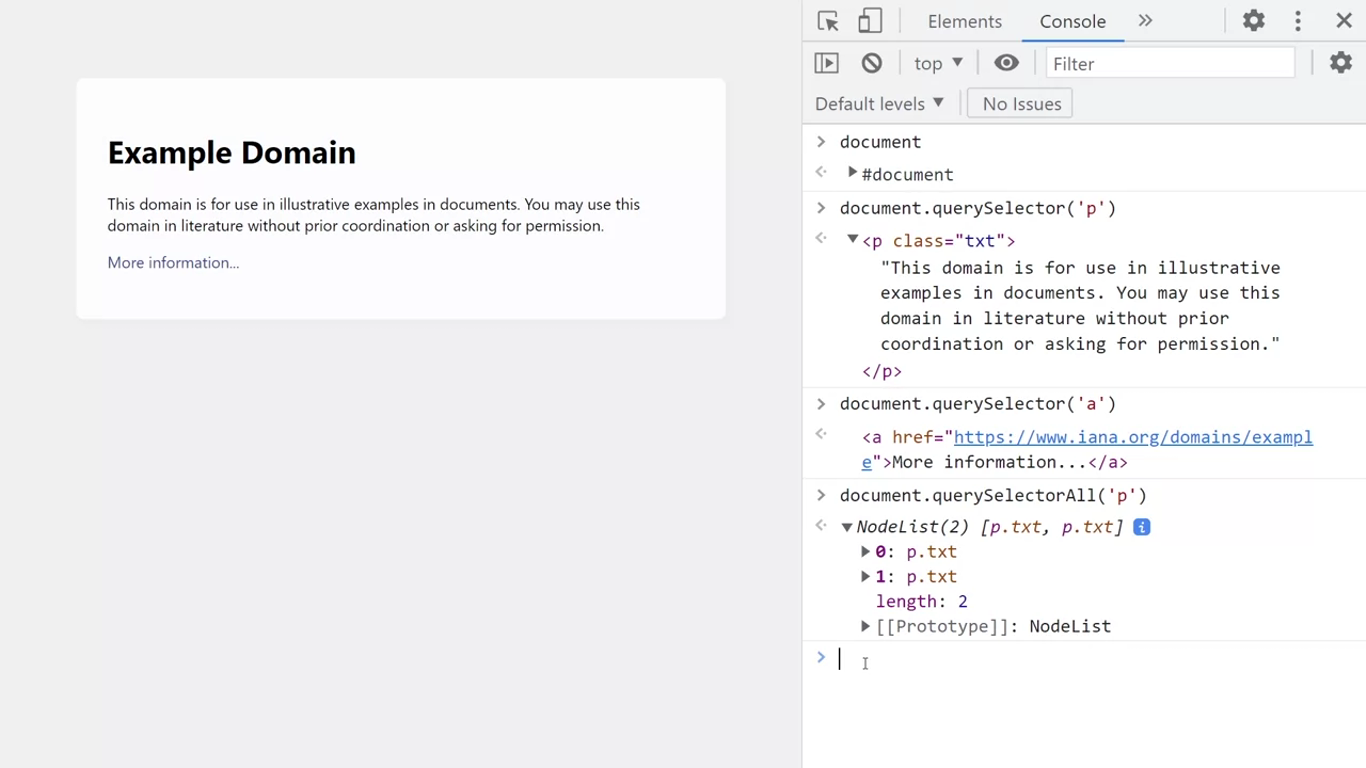
Locating specific elements
I know this page contains two HTML paragraph elements, to access the first one I typed document.querySelector, then in single quotes inside of the parentheses, I typed the letter P.
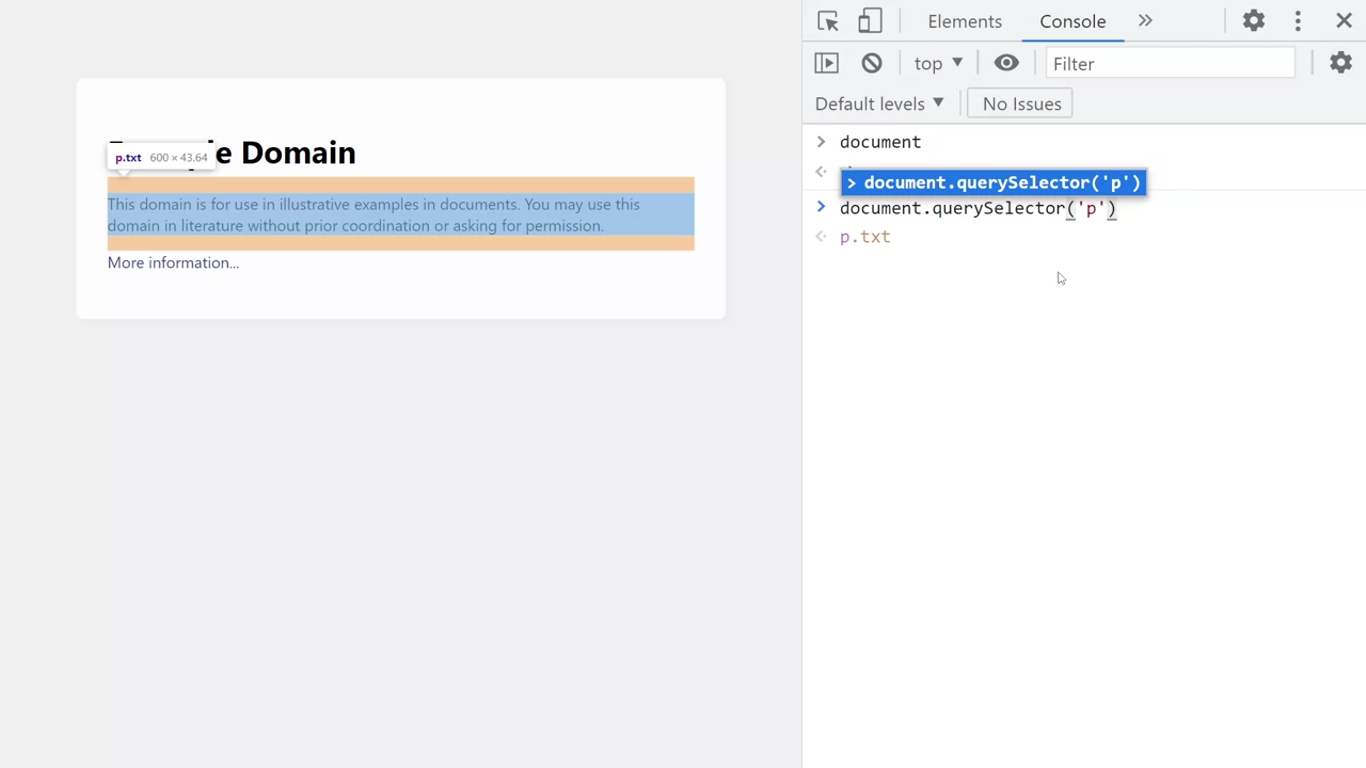
When I press enter to run the command, it returns the first P element. I can then expand this to view the paragraph text contained within, this method can be used with other html elements, such as the anchor tag.
If I run the same command with the letter A, I get back the first anchor element on the page.
Get all matches
There is a very similarly named JavaScript selector that allows me to get all the matches from a web page.
Get element by ID
Another useful JavaScript selector is get element by ID which can find objects in the dawn that match a specified html ID attributes.
document.getElementById('heading')
-> <h1 id="heading">Example Domain</h1>
Get element by class name
We can do this by calling document.getElementsByClassName.
document.getElementsByClassName('txt')
-> HTMLCollection(2) [p.txt, p.txt]
NOTE
If you are a beginner on your journey with JavaScript, it is important to note that the word element is singular for ID and plural for class name.
TIP
Additionally, suppose the element you’re looking for cannot be found in that case you will be returned null for IDs. An empty collection represented by square brackets for class names.
Scoping with var, let and const
You might recall that scope relates to code accessibility. It determines which part of the code are accessible by different parts of the program.
You may recall that all the code outside of functions is referred to as global scope, and all the code inside of a function is known as local scope.
Local scope states that a variable is only accessible in the function where it is declared.
In the ES5 version of JavaScript, only functions can build local scope. The ES6 version of JavaScript introduced a new variety of scope known as the block scope.
Block scope states that a variable declared in a block of code is only accessible inside that block. All the other code outside of the code block cannot access it.
Block scope is built when you declare variables using let or const.
In other words when you build variables with let or const, they become immediately scoped to the code block they were created in. The scope of these variables is contained within curly braces.
For example, you can declare two separate variables with the same name, if one is declared inside curly braces and the other is not.
let color = 'red';

if (color == 'red') {
	let color == 'blue'
}
You can then only access these variables inside their scope.
Before ES6, the only way to declare a variable in JavaScript was to use the var keyword. The var keyword is very lenient.
Characteristics of variables that are declared with var
- First, you can use it in your code even before it is declared.
- Also, you can redeclare the same variable when you use VAR.
- The variables are scoped to a function or if they are declared outside the function their scope is global.
With ES6, the suggested way to declare variables is to use the let or const keywords. Its syntax is very similar to the var syntax. Only the keyword is replaced.
For example, let’s say you want to declare a variable named user and assign it to a string set to the value of Miranda.
//ES5 JS
var user = "Miranda"

//ES6 JS
let user = "Miranda"
const user = "Miranda"
Difference between var, let, const
The simplest explanation is that the behavior of let and const is more strict. With a let or a const variable, you cannot use it in your code before you declare it. You can redeclare it using the variable keyword like you can with var. Finally, it’s scoped to the block, even within if statements and loops, like the far or while loops.
TIP
A pro tip is to remember it’s like this. Use let if the value might change in the future, and use const if the value will never change.
Functions
One of the basic principles of programming can be summed with the acronym DRY in other words don’t repeat yourself. And it’s thanks to functions that you can avoid repetition.
With functions you can take several lines of code that performs a set of related actions and then group them together under a single label. Then when you need to run the code that you’ve saved, you just invoke or call the function.
function myFunc() {
	console.log("Hello World!");
}

myFunc();
You need to pass values to the function. These values are known as function parameters and are placed inside the function definition.
The values passed to the function are called arguments.
function addTwoNums(a,b) {
	var c = a + b;
	console.log(c);
}

addTwoNums(2, 2);
addTwoNums(4, 4);
JavaScript DOM manipulation
Did you ever think of the functions your TV remote does for you? It allows you to make changes to your TV. You can think of the DOM like a TV remote that lets you change the webpage content on the screen. It even allows you to replace only certain parts of the page, such as an image or the heading or both.
A remote however, has certain limitations. You can only change the channel, contrast, brightness, and volume. The DOM gives you much finer-grained control than a TV remote ever could.
For example, imagine you can change what characters in a TV movie look like with a few simple commands while the movie is playing. The DOM allows you to change properties of objects on a webpage.
You can think of the DOM as a superpower remote for websites. It gives developers power in how they can manipulate and update webpages.
DOM
The DOM is in the form of a JavaScript object with nested objects for different parts of the page. These objects have nested objects of their own until the entire HTML file is mapped out in what looks like a tree structure.
The DOM is the model of the HTML file saved as a JavaScript object in your browser’s memory. The browser automatically builds the DOM for every webpage that it downloads.
For example, if you type a URL into your browser’s address bar, the browser would fetch the webpage that exists on this domain. If the browser connects to the server and it allows the browser to download the page, it will receive all the HTML code and save it in its memory. The browser will then show the downloaded page. It would also build that webpage’s DOM a model of the HTML document your browser has just downloaded.
As a developer, you can interact with the page’s DOM to make changes to the webpage. To interact with the DOM, you can use the Elements tab inside the browser’s DevTools.
You get to the DevTools by right-clicking anywhere in a browser window and then by clicking “Inspect”. The Elements tab allows you to interact with the DOM of the currently active webpage using a graphical user interface, also known as a GUI.
The browser also allows you to interact with the DOM using JavaScript. To do this, you should click the Console tab in the browser’s DevTools. You can focus on the Console panel by pressing the Escape key on your keyboard.
Once done, you can start typing JavaScript commands to view and manipulate the DOM.
document.body.innerText = "Hello"This is similar to how you interact with the DOM using the Elements panel, only this time you’re using code to do it.
The entire DOM object is saved inside the document variable and accessible via the console.
DOM manipulation
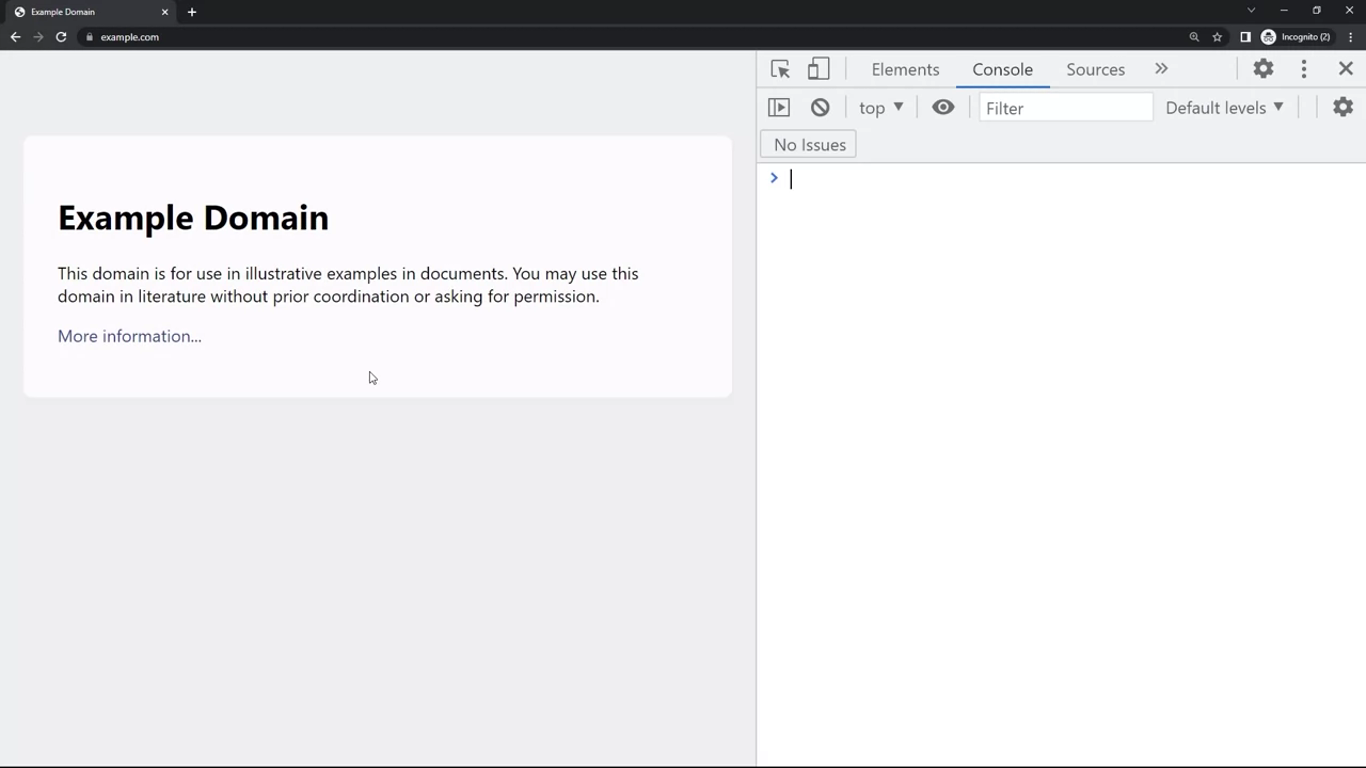
Using the document object model allows us to manipulate live websites. For example, I’ve opened my browser and loaded the example.com webpage from the Internet. I want to add a heading 2 HTML element to this webpage using the DOM.
NOTE
It’s important to remember that any changes I make to the DOM are relative to my browser’s local copy of the webpage. I’m not updating the content of the live website. If I reload the webpage, all changes I make to the DOM will be lost as it will reset to the page that was downloaded from the server.
const h2 = document.createElement('h2')
h2.innerText = "This is an h2 heading"
h2.setAttribute('id', 'sub-heading')
h2.setAttribute('class', 'secondary')
h2
// <h2 id="sub-heading" class="secondary">This is an h2 heading</h2>

document.body.appendChild(h2)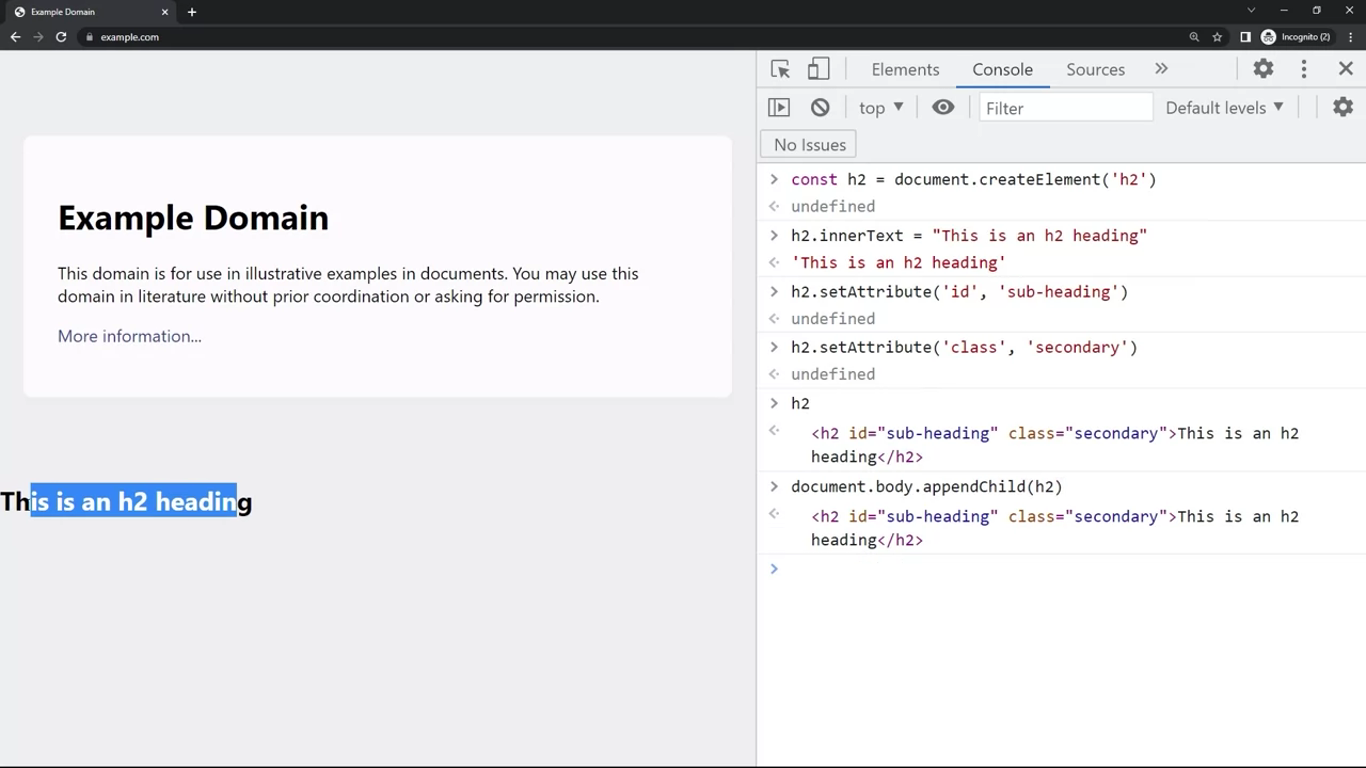
Event handling
Let’s say you are using a webpage on your computer and you click a button, or you tap the like icon on a friend’s picture on your phone. In JavaScript, the button click and the like icon tap are examples of user triggered events. Events are happening all the time.
You can use JavaScript code to listen for these events. You can even choose the parts of the page on which you are listening for events.
In JavaScript, the function that handles captured events is known as the event handler.
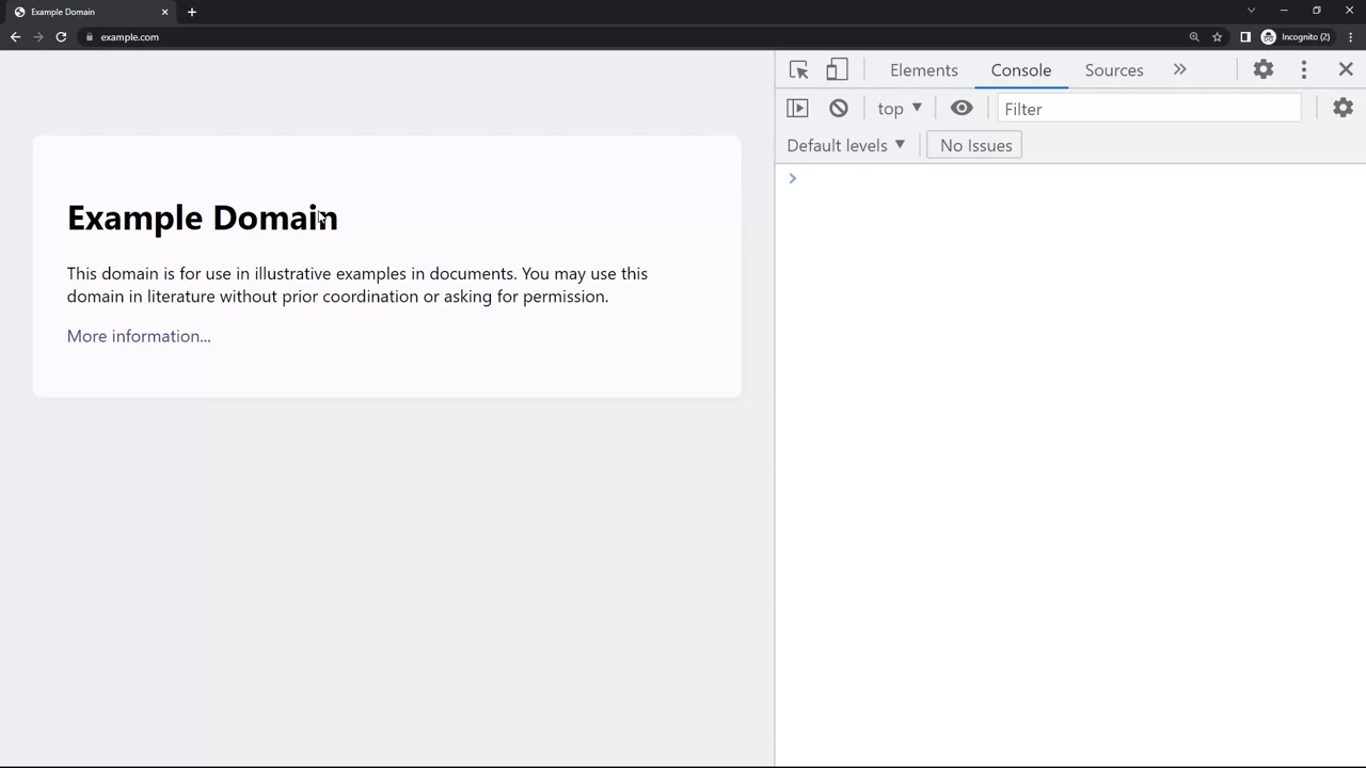
One of the easiest ways to listen for an event is to use the add event listener method. You can do that on a given HTML element.
For example, suppose I want to listen to the click event on the body of this example website. First, I need to get a reference to the body element where we want to listen to this event. In the console of the browser developer tools, I type document.queryselector, and then the name of the element inside of the parenthesis.
documnet.querySelector('body')Next, I want to assign the body object to a variable.
const target = documnet.querySelector('body')I’ve named this variable target because it’s the target of our click event.
function handlClick() {
	console.log('clicked the body')
}

target.addEventListener('click', handleClick)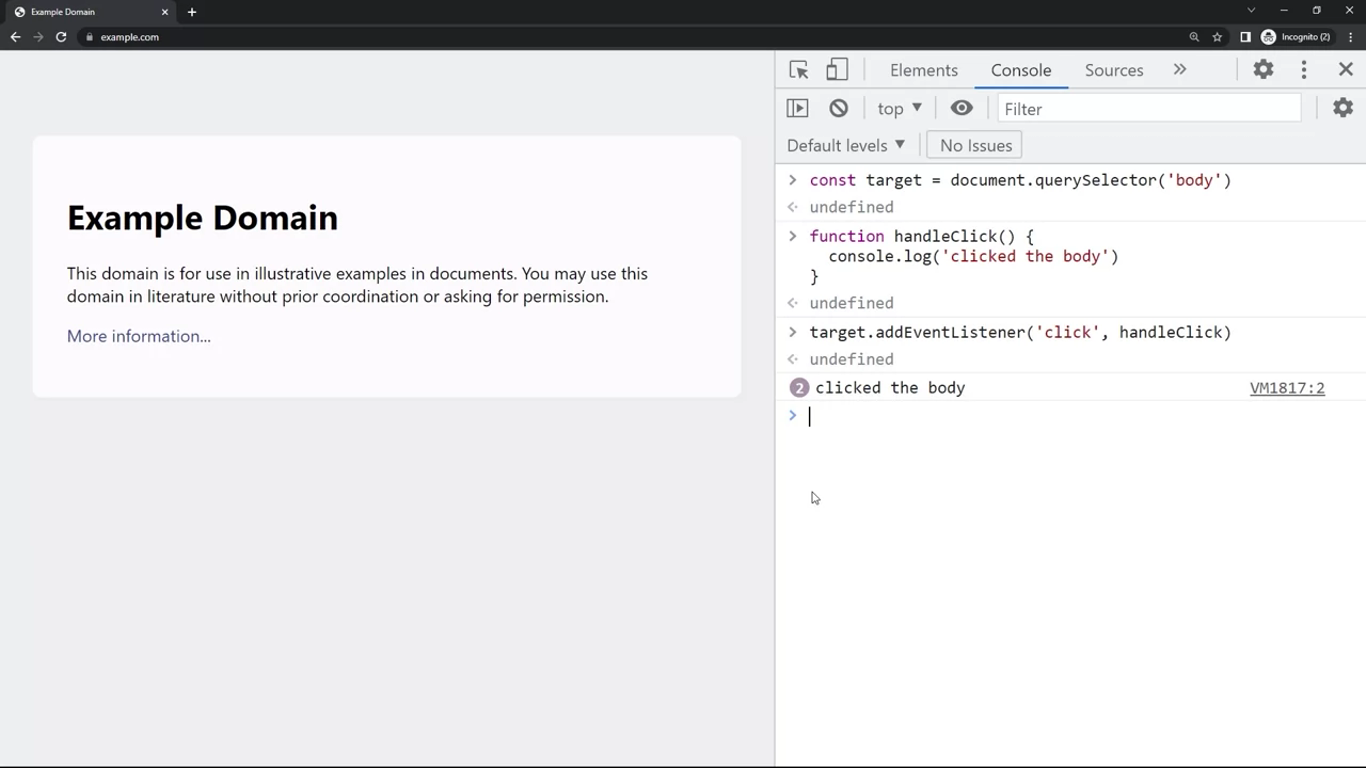
HTML event attribute
In addition to the addEventListener method, an alternative way to listen for events is by using HTML event attributes.
function handleClick2() {
	console.log('Clicked the heading')
}
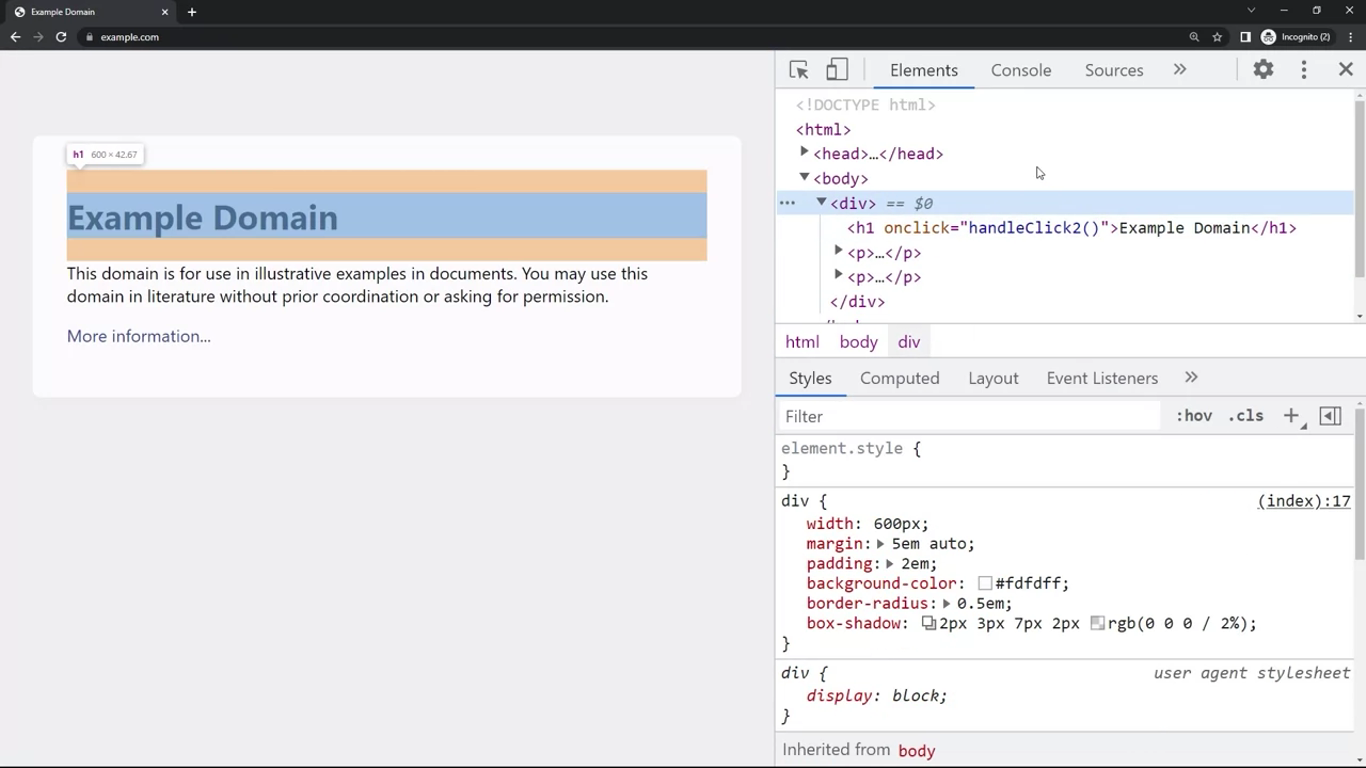
Next, I need to open the elements panel of the developer tools and expand the view for the div element, then the heading element should be visible. I right-click the H1 element and click edit as HTML.
Then after the H1, I create the attribute by typing onclick equals followed by my function name handleClick2 with a pair of parenthesis at the end.
Exercise: Web page content update
In this reading, you will learn how to capture user input and process it. You’ll be introduced to a simple example that demonstrates how to manipulate information displayed based on user input.
To capture user input, you can use the built-in prompt() method, like this:
let answer = prompt('What is your name?');Once you have the user-provided input inside the answer variable, you can manipulate it any way you need to.
For example, you can output the typed-in information on the screen, as an <h1> HTML element.
Here’s how you’d do that:
let answer = prompt('What is your name?');
if (typeof(answer) === 'string') {
    var h1 = document.createElement('h1')
    h1.innerText = answer;
    document.body.innerText = '';
    document.body.appendChild(h1);
}
This is probably the quickest and easiest way to capture user input on a website, but doing it this way is not the most efficient approach, especially in more complex scenarios.
This is where HTML forms come in.
You can code a script that will take an input from an HTML form and display the text that a user types in on the screen.
Here’s how this is done.
You’ll begin by coding out a test solution to the task at hand:
var h1 = document.createElement('h1')
h1.innerText = "Type into the input to make this text change"

var input = document.createElement('input')
input.setAttribute('type', 'text')

document.body.innerText = '';
document.body.appendChild(h1);
document.body.appendChild(input);
So, you’re essentially doing the same thing as you did before, only this time you’re also dynamically adding the input element, and you’re setting its HTML type attribute to text. That way, when you start typing in it, the letters will be showing in the h1 element above.
However, you’re not quite there yet. At this point, the code above, when run on a live website, will add the h1 element with the text Type into the input to make this text change, and an empty input form field under it.
You can try this code out yourself, for example, by pointing your browser to the example.com website and running the above code in the console.
Tip: Remember you can access the console from the developer tools in your browser.
Another thing that you did in the code above is setting variables using the var keyword.
Although it’s better to use either let or const, you’re just running a quick experiment on a live website, and you want to use the most lenient variable keyword, the one that will not complain about you having already set the h1 or the input variables.
If you had a complete project with a modern JavaScript tooling setup, you’d be using let or const, but this is just a quick demo, so using var in this case is okay.
The next thing that you need to do is set up an event listener. The event you’re listening for is the change event. In this case, the change event will fire after you’ve typed in the input and pressed the ENTER key.
Here’s your updated code:
var h1 = document.createElement('h1')
h1.innerText = "Type into the input to make this text change"

var input = document.createElement('input')
input.setAttribute('type', 'text')

document.body.innerText = '';
document.body.appendChild(h1);
document.body.appendChild(input);

input.addEventListener('change', function() {
    console.log(input.value)
})
This time, when you run the above code on the said example.com website, and you subsequently type some text into the input field and press the ENTER key, you’ll get the value of the typed-in text logged to the console.
Now, the only thing you still need to do to complete the code is to update the text content of the h1 element with the value you got from the input field.
Here’s the complete, updated code:
var h1 = document.createElement('h1')
h1.innerText = "Type into the input to make this text change"

var input = document.createElement('input')
input.setAttribute('type', 'text')

document.body.innerText = '';
document.body.appendChild(h1);
document.body.appendChild(input);

input.addEventListener('change', function() {
    h1.innerText = input.value
})
After this update, whatever you type into the input after pressing the ENTER key will be shown as the text inside the h1 element.
Although this completes this lesson item, it’s important to note that combining DOM manipulation and event handling allows for some truly remarkable interactive websites.
Additional resources
The following resources will be helpful as additional references in dealing with different concepts related to the topics you have covered in this section.
- Mozilla Developer Network Expressions and Operators
- Mozilla Developer Network Operator Precedence and Associativity
- JavaScript Primitive Values
- ECMA262 Specification
- jQuery Official Website
- React Official Website
- StackOverflow Developer Survey 2021 Most Popular Technologies
- Emojis
- MDN: Modules
- Nodejs.org official docs on CommonJS
- MDN: DOM
- MDN: Document.querySelector
- MDN: Event
- MDN: EventTarget.addEventListener
- MDN: Working with JSON
Front-endJavaScriptHTMLSyntaxDataTypescope
Previous one → 3.CSS | Next one → 5.Django Architecture