REST best practices
KISS
First is KISS, which stands for “keep it simple, stupid!“. What this means is that you shouldn’t try to perform too many tasks with one API. A single API should do one specific job and do it well.
For example, for the Little Lemon project, the manager needs to update the item of the day, and you want to make this easier for him by creating a new API. One approach is to let the API determine what the previous item of the day was, and to remove that status from the item. And then it has to randomly pick one item based on some criteria and set its status as the new item of the day.
But this is asking the API to do too many things. And if you randomly pick an item, it might not actually be the most popular item that day, right? A better approach is to create only one API which updates the menu item.
Now, when the manager updates the item of the day, a HTTP PATCH or PUT call is sent to the API to set the status of the previous item of the day to Off.
Say item 16 is the item of the day, the API for such a call would be menu-items/16 with an HTTP request body with a status set to Off.
The manager then manually selects a new item of the day, which makes another API call to update its status. A PUT or PATCH request is sent to menu-items/21 with a status parameter set to On in the HTTP request body. The new item of the day is now item 21.
This way, there will be no chance of accidentally selecting the wrong menu item as the item of the day, and you’re keeping your API endpoints simple and focused.
Filter, order and paginate
The next best practice is that you should always provide a way to filter large result sets and rearrange them in ascending or descending order. Using pagination, you can deliver results in smaller chunks.
For example, the API/menu-items returns all available menu items at once. But a customer may want to see only the desserts or only the main courses, so your API should be capable of filtering the results.
When building an API, it is always a good idea to enable it to send results in smaller chunks. This way, if the client application wants to display 20 menu items per page, it will not need to make an API call for thousands of items all at once.
By using pagination, you can deliver API results in chunks, and clients can decide the page number and how many records they want per page.
Versioning
Did you know that you may break a client’s applications if you make changes to your API that might drastically change the response?
It’s better to be safe and use versioning for your apps. There are several factors to consider when deciding if an updated version is needed or if a modification to an existing representation is enough.
TIP
In general, you should only support two versions of any given resource, because maintaining multiple versions can be complex, error prone, and costly.
Caching
Previously, you learned that an API should be cacheable because it reduces the load on your database-related API calls.
You should always implement cacheing and send relevant HTTP headers in your response. This will minimize the number of calls your client makes to your API.
For example, if the mobile app makes a call to the endpoint /menu-items, you can cache the results the first time it runs, and then serve the cached result every time after that.
This way, you can avoid putting a heavy load on your database every time you need to fetch menu-items. You will only update the cache when a menu item is modified or added.
For instance, if the appetizers menu was requested, but if there are no modifications to the menu items, all future calls to this endpoint can serve the same cached result without communicating with the database. And that saves a lot of computing power.
Rate limiting
If you want to prevent abuse of your APIs, try rate limiting. This limits the number of times someone can call your API in a period of time, like per minute, hour, or day. Some people even limit their APIs per 30 days.
Monitoring
What about monitoring? You should monitor latency to make sure your clients are getting the best possible response time. If you are looking to get the most out of your API, it is essential to also monitor status codes. By keeping an eye on 400 to 499 and 500 to 599 codes, you can assure that your API runs smoothly and identify any potential problems early on.
Monitoring network bandwidth is also important to know if someone is abusing your API.
Security and authentication in REST API
The core purpose of APIs is to make your data more accessible. Not just for your apps and websites but also for third party clients. This way your data becomes even more useful.
But don’t forget, because APIs are publicly available, they may pose a risk to your back-end services. Essentially, APIs give third party apps access to your server and database. That is why it is crucial to secure APIs.
SSL
First up is SSL, or Secure Socket Layer. SSL encrypts your data and protect your data when it leaves your browser and the web server. When you set up the SSL certificates properly your APIs can be served over HTTPS.
The frontend and mobile application team that works on the Little Lemon project, want to ensure that the data is transported securely. So, the API team has used SSL certificates from a reputed provider and installed them. Now all the API endpoints are secured and serve data over HTTPS instead of HTTP.
That’s why it’s important to always check that the endpoint of your APIs starts with HTTPS instead of HTTP.
Signed URLs
The little Lemon Project team wants to ensure that the API calls are coming to it from their mobile application and their website only. This is where signed URLs come in.
Signed URL
Signed URLs give a client application limited access to a specific resource for a brief period of time.
With a signed URL, every time an API is called, a particular piece of text called a signature is included with the URL. Server side code can verify the signature and ensure that the call comes from an authentic source.
But how do developers create these signatures?
HMAC is a popular signing mechanism used by modern applications. It is easy to use and ensures the authenticity and integrity of the message.
For example, some secret message, encoded by a digest algorithm with a secret key, some secret key creates this HMAC signature.

Authentication
All of us are familiar with the user names and password based authentication, but sending a user name and passwords to every API call is frustrating and it’s not secure. So, the Little Lemon team prefers using token based authentication over HTTP based authentication when securing its API.
Because basic authentication requires users to send their user name and password in every call.
With token-based authentication, the user sends their user name and password to the sign in URL, and then receives a unique token in text form. After that, every API call will include this token as a HTTP header.
The server side code can check the token, extract the information hidden in it and match it with an existing user. After this verification, the rest of the work is performed on behalf of that matching user.
To create this token, you can use an ad hoc policy from the backend framework we’re using, or you can use something more industry standard, like JSON Web Token or JWT.
HTTP codes
Next, you need to know that there are a couple of popular HTTP codes involved during the authentication process, that you should be aware of.
- 401 means unauthorized. In this context, unauthorized means the user name and password don’t match. So the server cannot continue further.
- 403, which means forbidden. This is an interesting code, and it means that your credentials are valid and you have successfully identified yourself, but you don’t have the authority to perform the action.
CORS policy and firewalls
Last is the cross origin resource sharing or CORS policy and firewalls. When you design an API, you can accept calls from everywhere, or by configuring the cores headers, you can only accept calls from some specific domains.
And finally, another security measure that you can use is firewalls. If you want to ensure that only specific IP addresses can access your API, you can use a firewall application on your server.
Access control
The Little Lemon API provides a variety of API which allow you to view the details of an order. The output of these API may contain sensitive data such as customers delivery addresses which should not be visible to the public.
Roles and privileges
Roles and privileges are the building blocks of designing and access control system. A role is a collection of privileges and a privilege is if you are allowed to do a particular task.
If you consider the customer role in the restaurant project, it is made of the following privileges. Customers can browse menu items, add menu items to the cart, place orders, add food reviews and browse their own orders.
On the other hand, someone with a manager role will be able to do the following, add menu items, edit menu items, delete menu items and browse all orders. Managers can also browse customer data, assign orders to the delivery crew and browse transaction data.
And the delivery crew will only be able to perform the following tasks, browse orders that are assigned to them and update the status of an assigned order.
There can be several roles like these in your project, for example, administrators, senior managers, HR accounts and so on. Each role has a collection of carefully thought out privileges, the more detailed and specific these privileges are the better the access control system you can design for your API project.
You have probably heard about the term authorization before, it is just another word for access control.
Title
Keep in mind that authentication and authorization are two different things. Authentication gets you in and authorization allows you to do something after authentication or prevents you from doing it.
You can create one role and assign all the essential privileges to it. So a manager will have all the privileges and accountant as, then you can update or edit these privileges from time to time as needed.
This makes it easy to keep your rolls up to date and tailored to your needs.
The second approach is that one user can have multiple roles, task specific roles make it easy to assign the right privileges to the right people. So your accountants will only have access to accounting features while your HR team will only have access to HR management features. And there’s also a manager specific role with relevant privileges, this way you can assign all three roles to the general manager and they will be able to perform every task an accountant HR and a manager can do. And if you assign a new privilege to the accountant role, the general manager will automatically have that privilege added to their role.
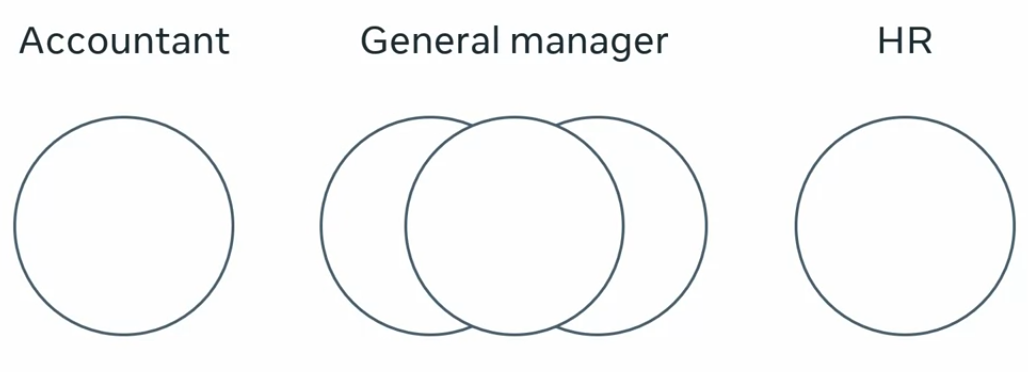
Authentication versus authorization
Introduction
You need to secure your APIs because they provide third-party clients access to your backend data. If you don’t secure your APIs properly, anyone can tamper with the data and access sensitive information. But even if a client is allowed to access the data, you need to control who can do what. This is where authentication and authorization come in. You now know that although they sound similar, they are not the same. In this reading, you will learn about the difference between authentication and authorization and how you can use it to protect your API endpoints.
Authentication
Authentication is the process of verifying the credentials of a user. Logging into websites with a username and password is a typical example of authentication. When the username and password match, the website recognizes the user and sets some cookies in the user’s browser. When the user visits another page on that website, the browser sends those cookies within the HTTP request header. The website recognizes the cookies as well as server-side session data and therefore doesn’t ask for credentials until the user logs out again.
So, how does this work? Token-based authentication usually involves two steps in the API Architecture. First, the client identifies itself with a username and password. Then the API server gives it a bearer token. From there, the client includes the bearer token with every API call that it places. The API server verifies it and then allows the client to perform the action or not. This is where authorization comes in, but more on this later.
If the credentials are not valid, the client will receive a 401 - Unauthorized HTTP status code.
This is like coming to the office on the first day, submitting all your papers and documents, and then receiving your employee card. After that, only your employee card will be sufficient to get inside. Authentication works just like that!
The two steps in the API authentication process can be represented by the following two diagrams.
Authentication process: Getting an access token

Authenticated API calls

Authorization
However, even with your employee card, you will not be able to access all the rooms or spaces in the office. There are some places that are only accessible to a certain group of people who have been given that privilege. Authorization is exactly like that. Authentication lets you in, authorization lets you act. It checks after authentication if the user has the proper privileges to perform some tasks.
On the server side, this is typically done by assigning the user to a group or a set of groups. Then, after verifying the token, the code checks if the user belongs to the appropriate group to perform that task. If not, the client will receive a 403 - Forbidden HTTP status code.
API authorization

This extra authorization layer in the API architecture ensures that only people with proper privileges can access and modify data. An authorization system in an API project is very important because it prevents data corruption and data breaches.
Implementing authorization
Privileges are the tasks that an API user performs, and they are the building blocks of an authorization layer. First, as an API developer, you identify the required privileges in your project. For example, for a bookshop, there might be the following types of privileges:
- Browse the books
- Add new books
- Edit books
- Delete books
- Place orders
There can be many other privileges like this. And not every user will have every privilege. For instance, regular customers are not allowed to add and edit books, even if they are properly authenticated. Only managers are allowed to perform those operations.
So, after identifying the privileges, you carefully distribute all these privileges into multiple roles. And then, the authorization check is done in the backend code of each API endpoint that requires a user role check. The developer verifies if the user belongs to the appropriate group or roles, and then makes the decision to allow or deny the action.
User groups in Django
The Django admin panel comes with excellent support for the user group system. If you log into the admin panel, you will find two distinct sections – users and groups.
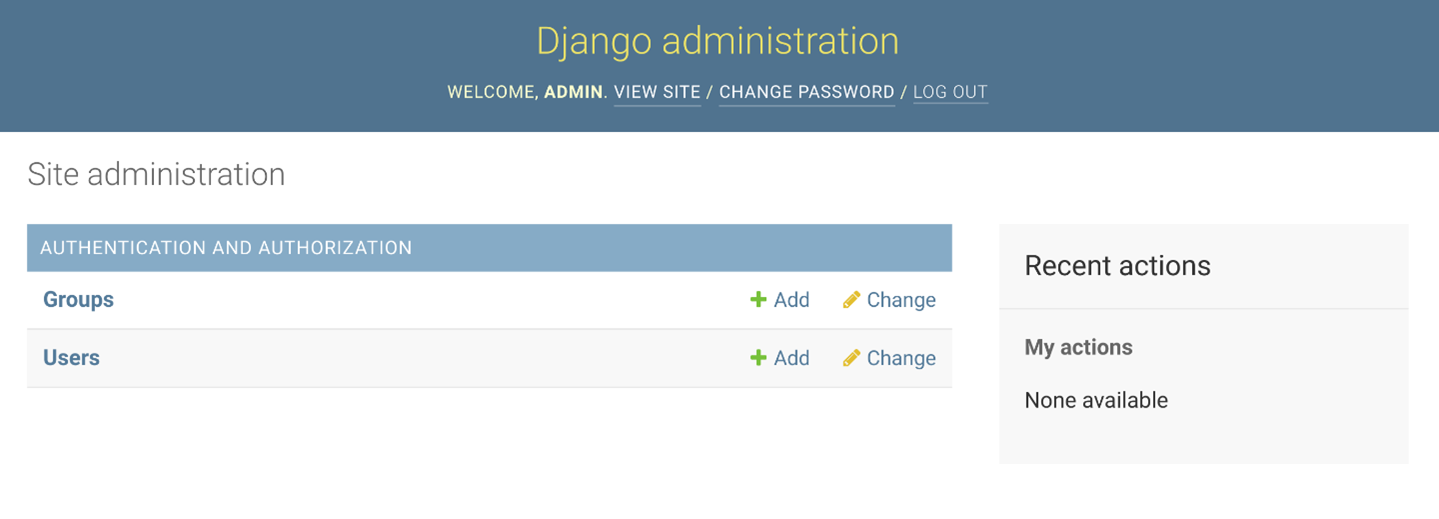
From here, you can create groups or roles like Manager, Editor, Customer, Admin and so on and assign privileges to these groups. If you click on the Add button next to the groups, you will be taken to a screen where you can create new groups. The Django admin panel will list all the necessary privileges based on the models in your project. Here is a screen that indicates the available privileges for a bookshop.
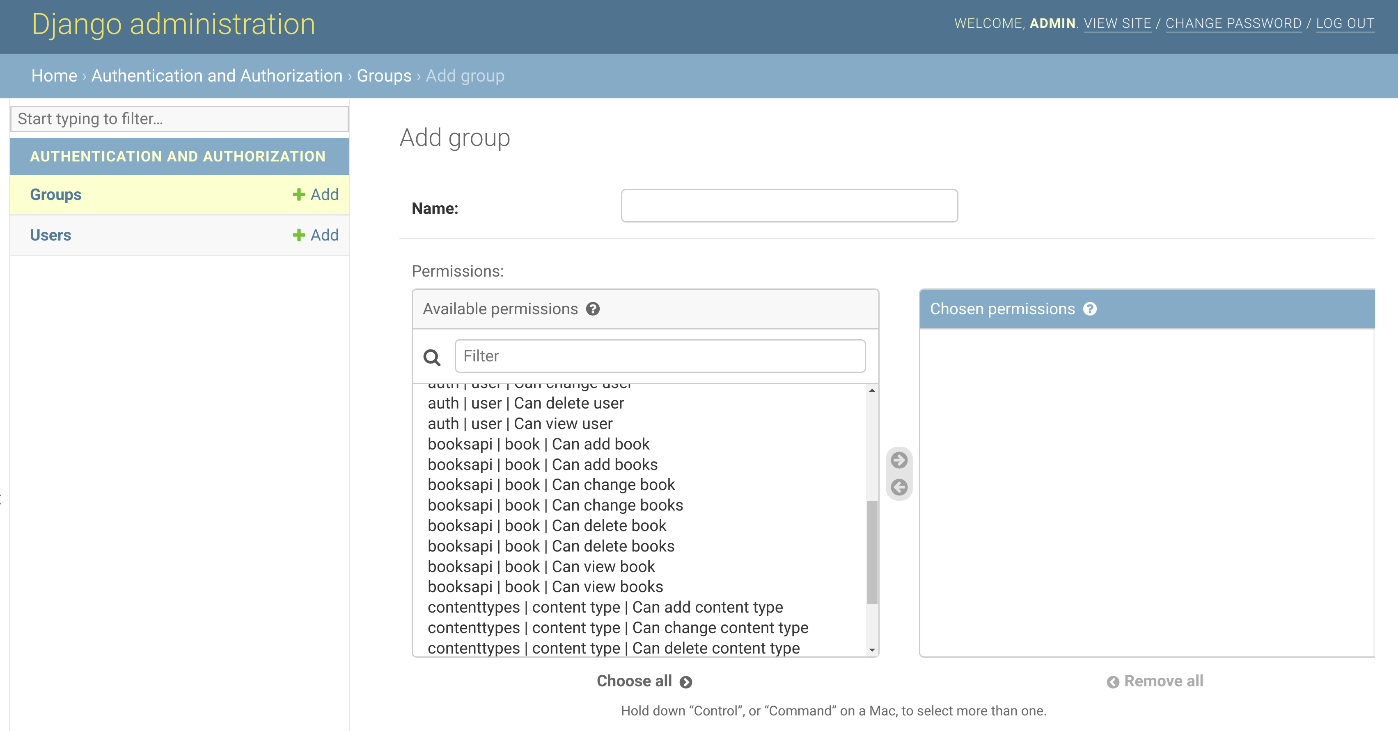
On this screen, you can create an Editor role, for instance, and add privileges to it.
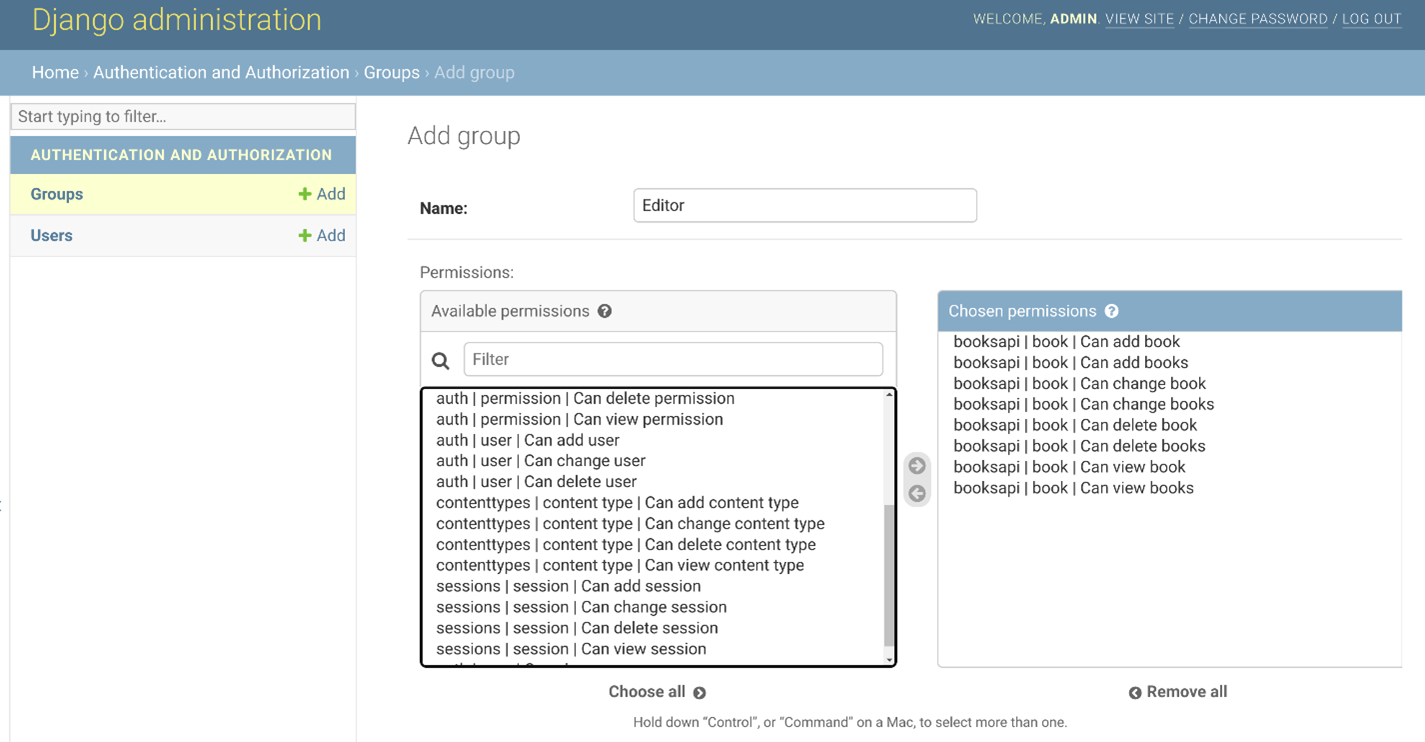
Or you can create a Customer role that will have different privileges.
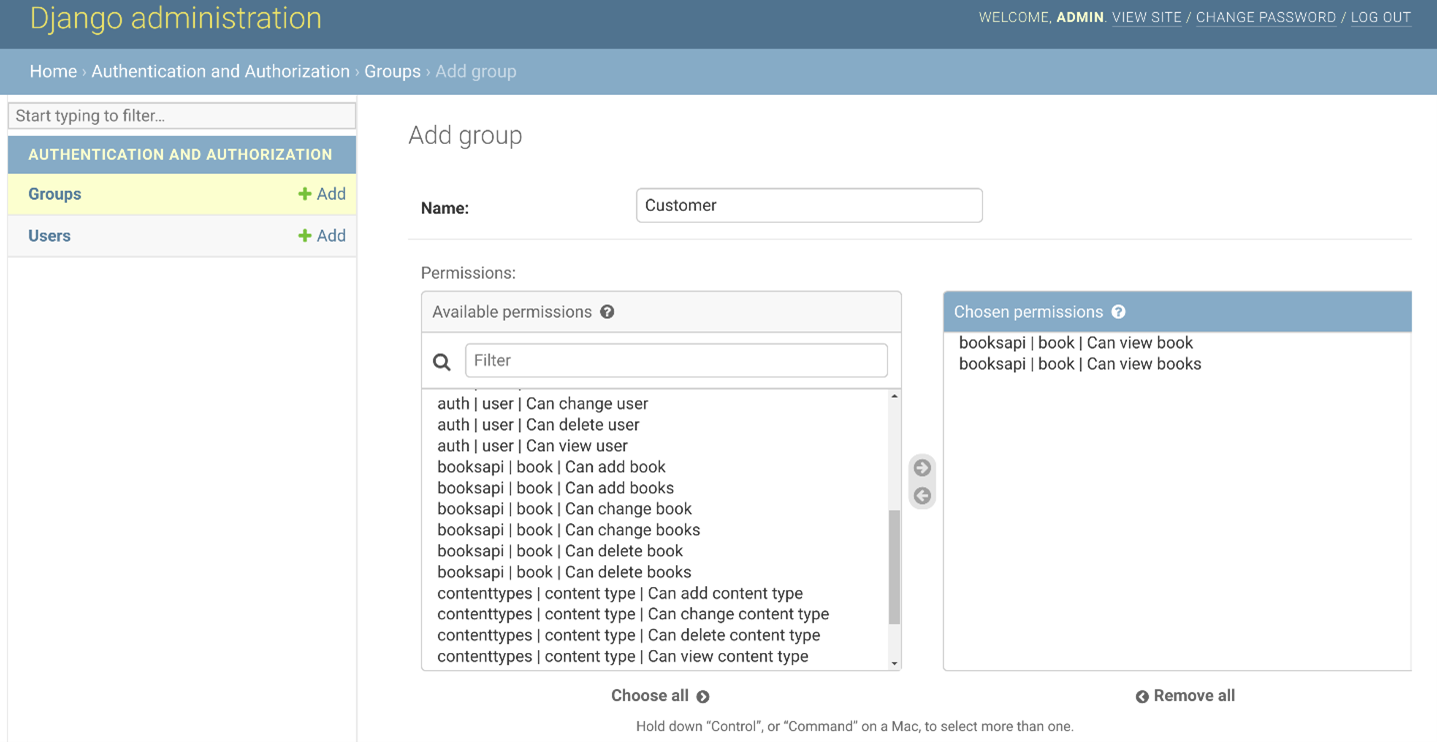
The Django admin panel allows you to manage groups throughout the project. You can add and remove privileges to groups as the project grows.
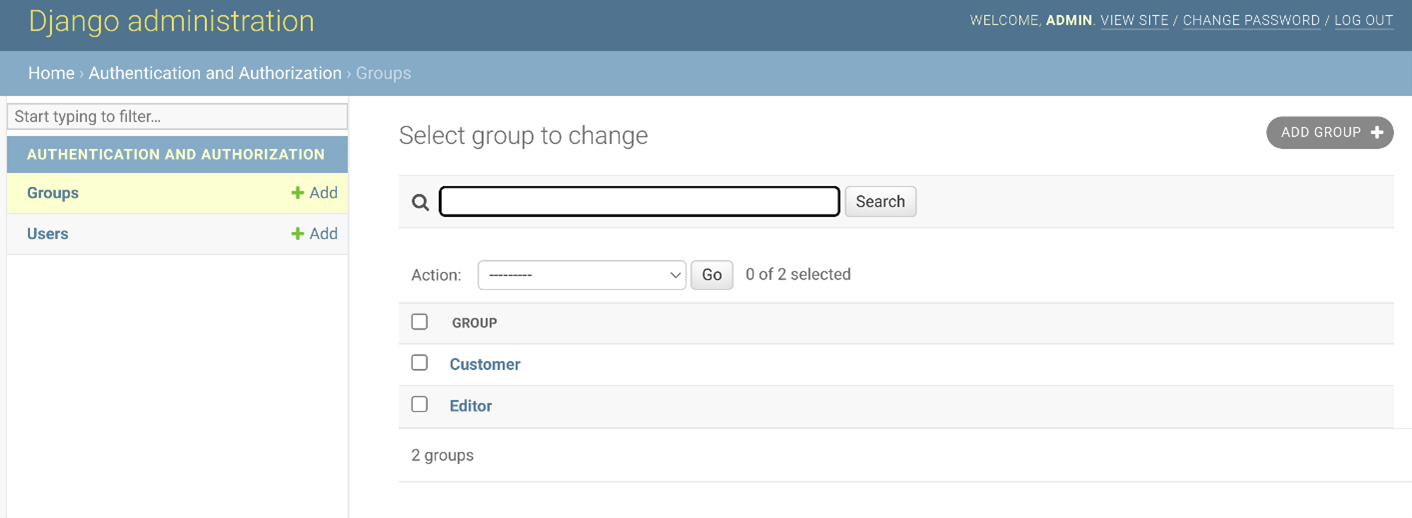
But creating groups with privileges is not enough. After creating these groups and assigning users to them, you need to write some code in the function or class-based views that determine if authenticated users belong to those groups and then make decisions based on that. But you will learn to do this later in the course.
Conclusion
Authentication and authorization are concepts that differ in function and how they are set up in an API architecture. The knowledge you gained in this reading about user groups, roles and privileges lay the groundwork for all the steps that you will learn later on for setting up a proper security layer in your API projects.
APIRESTRESTfulHTTPAuthenticationAuthorizationSecurity
Previous one → 1.Introduction to APIs | Next one → 3.Writing your first API