Filtering and searching
Remember the menu item endpoint you developed in the Little Lemon project, it displays all available menu items at once.
When a client application makes an HTTP call to the menu items endpoint, it will display all items along with their categories.
But what if a visitor only wants to view items from the appetizers category or only the main dishes, rather than everything at once?
Similarly, a visitor may want to search for menu items containing the word pizza or drinks with the word mojito, and this is where the filtering feature comes in.
Filtering
Filtering is a process that allows the client applications to get a subset of the results from your API based on some criteria.
You have two options when client applications want a subset of the result, for example, all the menu items from the appetizers or desserts category.
- First, you can do nothing and to display all the items with their category names. The client application then processes this data and managers all filtering on its end.
- Or as an API developer, you process those conditions in the server and deliver results matching those criteria.
There are pros and cons to both approaches:
Handling search and filter on client VS server
Handling on client
Using the first approach, you need less time to develop your API, but it comes with a price. First, you have to pull all the records from the database every time. For hundreds of records, this might not be an issue, but when there are thousands of records or 10,000 or even millions of records, then this is not sustainable.
It will create a significant load on the server and fetching 10,000 records from the database does not make any sense when you need only 10 or 20.
Handling on the server
The second approach will take some extra time to develop but the benefits are huge. For example, you are putting less load on the server and reducing the development time for the client applications because all the filtering is done on the server side.
Filtering
# views.py

from rest_framework.reponse import Reponse
from rest_freamework.decorators import api_view
from .models import MenuItem

@api_view(['GET', 'POST'])
def menu_item(request):
	if request.method == 'GET':
		items = MenuItem.objects.select_related('category').all()
		serialized_item = MenuItemSerializer(items, many=True)
		return Reponse(serialized_item.data)
	if request.method == 'POST':
		serialized_item = MenuItemSerializer(data=request.data)
		serialized_item.is_valid(raise_exception=True)
		return Response(serialized_item.data, status.HTTP_201_CREATED)

@api_view()
def single_item(request, id):
	item = get_object_or_404(MenuItem, pk=id)
	serialized_item = MenuItemSerializer(item)
	return Response(serialized_item.data)
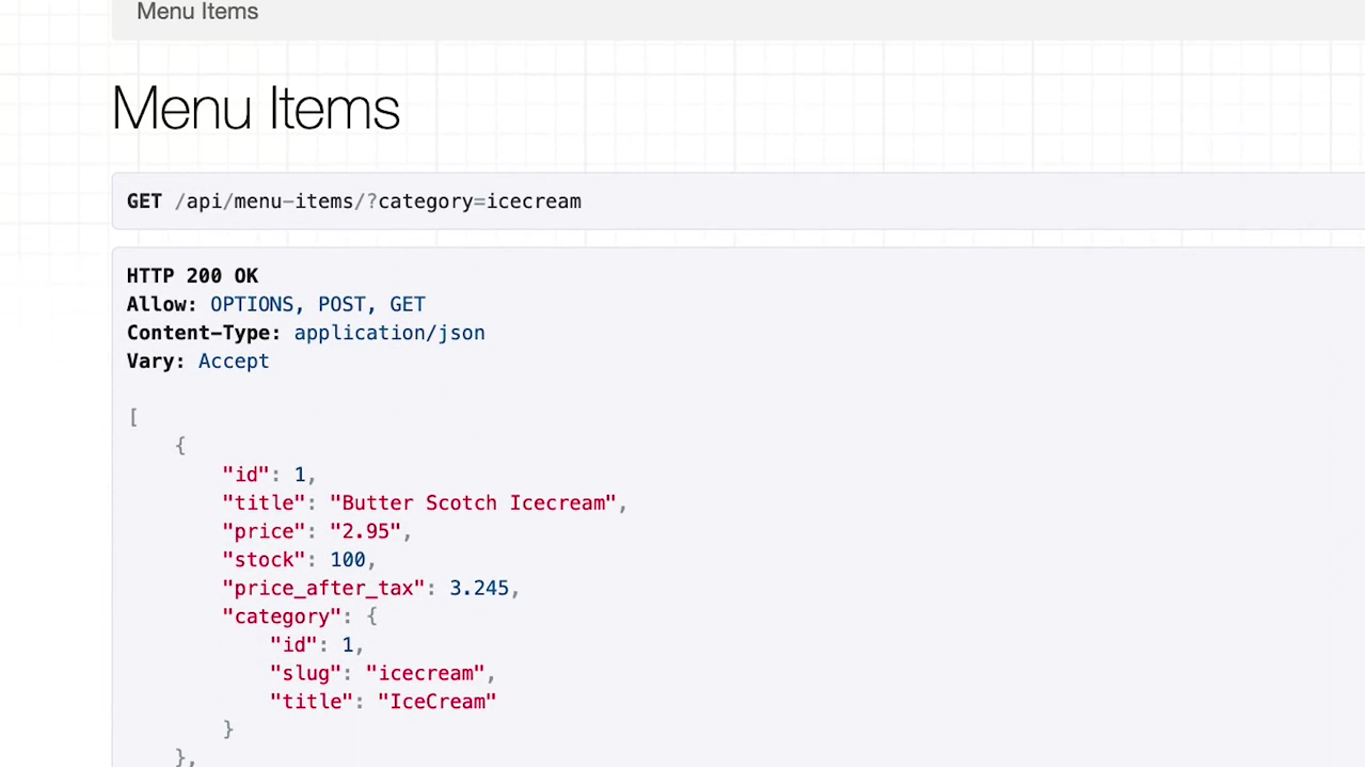
Client applications can pass a query string to the menu items endpoint with the query string, question mark, category, equal sign, and then the item they are searching for, such as main or ice cream.
http://127.0.0.1:8000/api/menu-items/?category=mainhttp://127.0.0.1:8000/api/menu-items/?category=icecreamhttp://127.0.0.1:8000/api/menu-items/?to_price=3http://127.0.0.1:8000/api/menu-items/?to_price=3&category=main
# views.py

from rest_framework.reponse import Reponse
from rest_freamework.decorators import api_view
from .models import MenuItem

@api_view(['GET', 'POST'])
def menu_item(request):
	if request.method == 'GET':
		items = MenuItem.objects.select_related('category').all()
		category_name = request.query_params.get('category')
		to_price = request.query_params.get('to_price')
		serialized_item = MenuItemSerializer(items, many=True)
		return Reponse(serialized_item.data)
	if request.method == 'POST':
		serialized_item = MenuItemSerializer(data=request.data)
		serialized_item.is_valid(raise_exception=True)
		return Response(serialized_item.data, status.HTTP_201_CREATED)

@api_view()
def single_item(request, id):
	item = get_object_or_404(MenuItem, pk=id)
	serialized_item = MenuItemSerializer(item)
	return Response(serialized_item.data)
NOTE
You should check if the API user supplied some value for these parameters. This can be done with a simple if else block.
Now very important, add two underscores, title, equals, category name, close parenthesis. This title field belongs to the category model and is linked to the menu item model.
You need to use a double underscore between the model and the field to filter a linked model like a category inside the menu item.
# views.py

from rest_framework.reponse import Reponse
from rest_freamework.decorators import api_view
from .models import MenuItem

@api_view(['GET', 'POST'])
def menu_item(request):
	if request.method == 'GET':
		items = MenuItem.objects.select_related('category').all()
		category_name = request.query_params.get('category')
		to_price = request.query_params.get('to_price')
		if category_name:
			items = items.filter(category__title=category_name)
		if to_price:
			items = items.filter(price__lte=to_price)
		serialized_item = MenuItemSerializer(items, many=True)
		return Reponse(serialized_item.data)
	if request.method == 'POST':
		serialized_item = MenuItemSerializer(data=request.data)
		serialized_item.is_valid(raise_exception=True)
		return Response(serialized_item.data, status.HTTP_201_CREATED)

@api_view()
def single_item(request, id):
	item = get_object_or_404(MenuItem, pk=id)
	serialized_item = MenuItemSerializer(item)
	return Response(serialized_item.data)
What is this lte added after the price?
This is a conditional operator or fields lookup and the price double underscore lte means price is less than or equal to a value.
You can find a list of these fields lookups and the additional resources at the end of this lesson.
To filter for an exact price, you can price=to_price.
Searching
If a client application supplies a search parameter followed by some characters, you will perform a search and return those menu items whose names start with those characters.
http://127.0.0.1:8000/api/menu-items/?search=chocolate
# views.py

from rest_framework.reponse import Reponse
from rest_freamework.decorators import api_view
from .models import MenuItem

@api_view(['GET', 'POST'])
def menu_item(request):
	if request.method == 'GET':
		items = MenuItem.objects.select_related('category').all()
		category_name = request.query_params.get('category')
		to_price = request.query_params.get('to_price')
		search = request.query_params.get('search')
		if category_name:
			items = items.filter(category__title=category_name)
		if to_price:
			items = items.filter(price__lte=to_price)
		if search:
			items = items.filter(title__startswith=search)
		serialized_item = MenuItemSerializer(items, many=True)
		return Reponse(serialized_item.data)
	if request.method == 'POST':
		serialized_item = MenuItemSerializer(data=request.data)
		serialized_item.is_valid(raise_exception=True)
		return Response(serialized_item.data, status.HTTP_201_CREATED)

@api_view()
def single_item(request, id):
	item = get_object_or_404(MenuItem, pk=id)
	serialized_item = MenuItemSerializer(item)
	return Response(serialized_item.data)
What if you want to search if those characters are present anywhere in the title?
items = items.filter(title__contains=search)
How about making those searches case insensitive?
items = items.filter(title__icontains=search)
There is also a case insensitive version of startswith, which is istartswith.
items = items.filter(title__istartswith=search)
Ordering
There is a DRF package called Django-filters, which offers advanced filtering, sorting, and searching. But that package is mostly used with class-based views.
Since you are using function based views with API view decorator, you can take advantage of django’s native sorting methods.
After the implementation is done, menu items can be sorted using this query string with the menu items endpoint http://127.0.0.1:8000/api/menu-items? ordering=price.
# views.py

from rest_framework.reponse import Reponse
from rest_freamework.decorators import api_view
from .models import MenuItem

@api_view(['GET', 'POST'])
def menu_item(request):
	if request.method == 'GET':
		items = MenuItem.objects.select_related('category').all()
		category_name = request.query_params.get('category')
		to_price = request.query_params.get('to_price')
		search = request.query_params.get('search')
		ordering = request.query_params.get('ordering')
		if category_name:
			items = items.filter(category__title=category_name)
		if to_price:
			items = items.filter(price__lte=to_price)
		if search:
			items = items.filter(title__startswith=search)
		if ordering:
			items = items.order_by(ordering)
		serialized_item = MenuItemSerializer(items, many=True)
		return Reponse(serialized_item.data)
	if request.method == 'POST':
		serialized_item = MenuItemSerializer(data=request.data)
		serialized_item.is_valid(raise_exception=True)
		return Response(serialized_item.data, status.HTTP_201_CREATED)

@api_view()
def single_item(request, id):
	item = get_object_or_404(MenuItem, pk=id)
	serialized_item = MenuItemSerializer(item)
	return Response(serialized_item.data)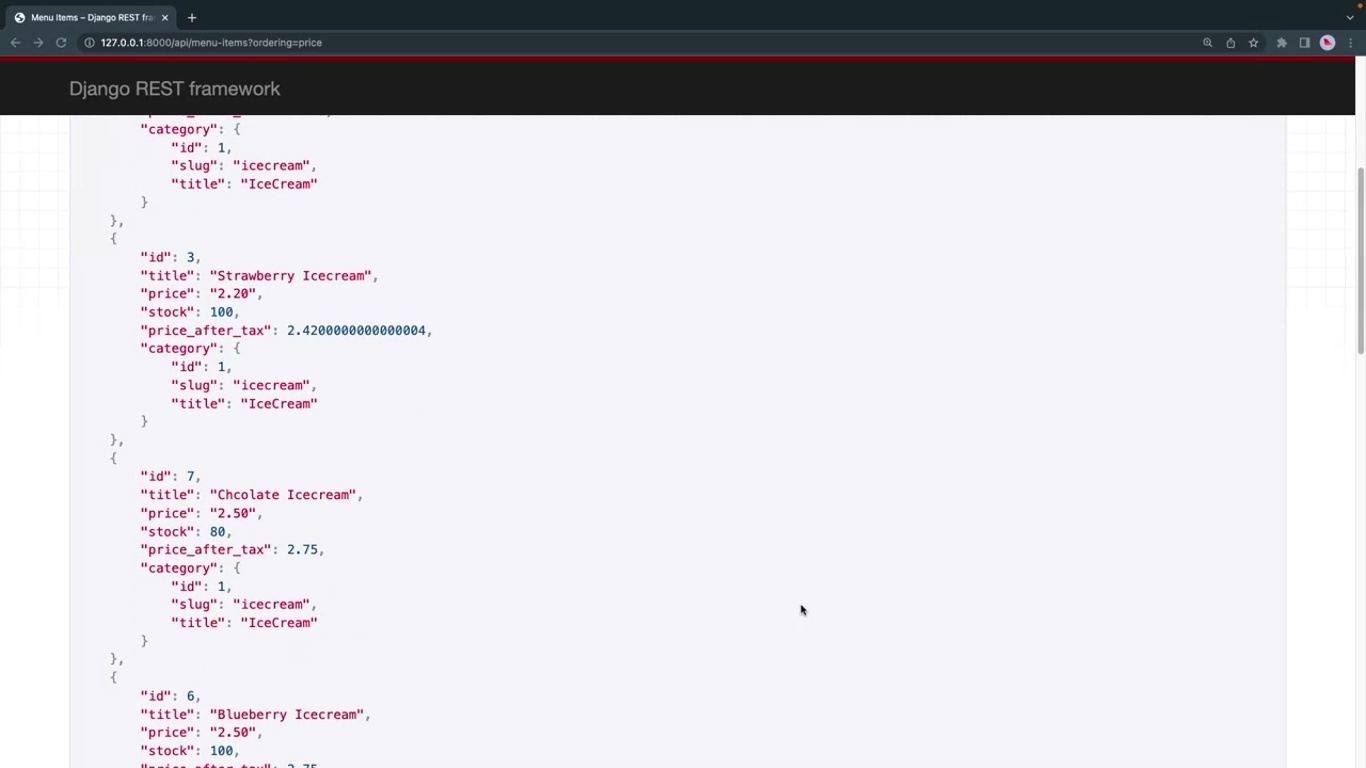
The items are ordered in an ascending order.
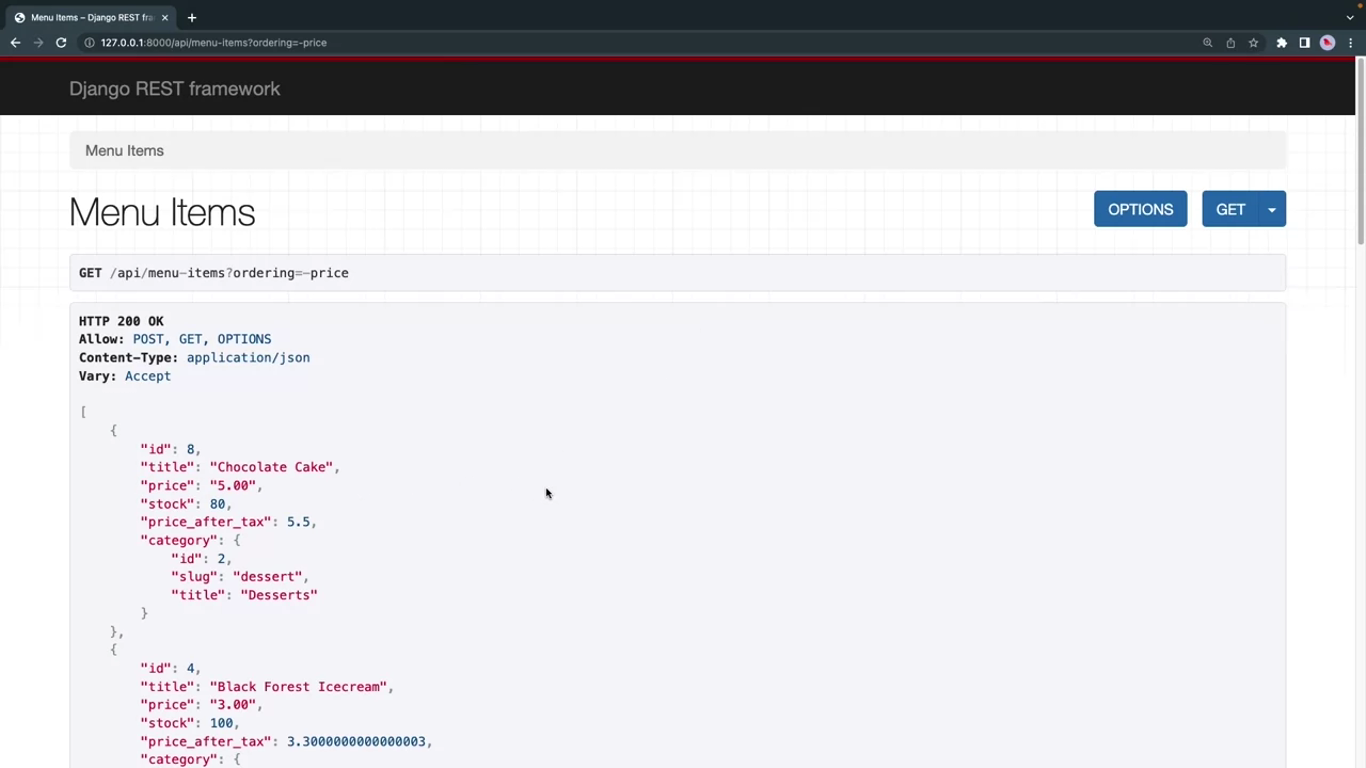
For descending order just add a - before the parameter.
Sorting by two or more parameters
http://127.0.0.1:8000/api/menu-items? ordering=price,inventory
This way, items will be sorted by price first and then buy inventory in ascending fashion. This means that if two menu items have the same price but different inventory values, the one with the lower value will go at the top.
# views.py

from rest_framework.reponse import Reponse
from rest_freamework.decorators import api_view
from .models import MenuItem

@api_view(['GET', 'POST'])
def menu_item(request):
	if request.method == 'GET':
		items = MenuItem.objects.select_related('category').all()
		category_name = request.query_params.get('category')
		to_price = request.query_params.get('to_price')
		search = request.query_params.get('search')
		ordering = request.query_params.get('ordering')
		if category_name:
			items = items.filter(category__title=category_name)
		if to_price:
			items = items.filter(price__lte=to_price)
		if search:
			items = items.filter(title__startswith=search)
		if ordering:
			ordering_fields = ordering.split(",")
			items = items.order_by(*ordering_fields)
		serialized_item = MenuItemSerializer(items, many=True)
		return Reponse(serialized_item.data)
	if request.method == 'POST':
		serialized_item = MenuItemSerializer(data=request.data)
		serialized_item.is_valid(raise_exception=True)
		return Response(serialized_item.data, status.HTTP_201_CREATED)

@api_view()
def single_item(request, id):
	item = get_object_or_404(MenuItem, pk=id)
	serialized_item = MenuItemSerializer(item)
	return Response(serialized_item.data)
What if you want to sort by price in ascending order and then by inventory in descending order?
http://127.0.0.1:8000/api/menu-items?ordering=price,-inventory
Importance of data validation
Introduction
Data validation is an important step in every web application because it ensures that user data is valid and sufficient. In this reading, you will learn about different validation techniques in DRF.
Validation
Validation is the process of ensuring that user-submitted data is in the correct format, meets the requirements and is safe to add to the database. The serializers in DRF provide different features which you can use to validate these data while building your APIs. Before jumping into the details let’s examine some user inputs while adding or modifying the menu items in the Little Lemon API project and how they should be validated.
| Field | Value | Status |
|---|---|---|
price | 0 | Invalid, because the price of a menu item cannot be 0 |
stock | negative value | Invalid, because stock of a menu item cannot be lower than 0 |
title | Duplicate values | Invalid, because there should not be more than one menu item with the same name or title |
Besides these common validations, every project has additional requirements. For example, in the Little Lemon project, you can set it so that the price can’t be less than 2.0. And if someone tries to add items with a price below 2.0, it will raise an error. Some of the validation functionalities in DRF will now be discussed.
Validation in DRF
There are two serializers in the serializers.py file, MenuItemSerializer and CategorySerializer.
from rest_framework import serializers
from decimal import Decimal
from .models import MenuItem, Category

class CategorySerializer (serializers.ModelSerializer):
    class Meta:
        model = Category
        fields = ['id','slug','title']

class MenuItemSerializer(serializers.ModelSerializer):
    stock =  serializers.IntegerField(source='inventory')
    price_after_tax = serializers.SerializerMethodField(method_name = 'calculate_tax')
    category_id = serializers.IntegerField(write_only=True)
    category = CategorySerializer(read_only=True)
    class Meta:
        model = MenuItem
        fields = ['id','title','price','stock', 'price_after_tax','category','category_id']

    def calculate_tax(self, product:MenuItem):
        return product.price * Decimal(1.1)
What follows are four different ways in which to modify some fields in the MenuItemSerializer.
Method 1: Conditions in the field
For the price field, the validation rule is that it should not accept prices less than 2.0. To achieve that result, add the following line before the Meta class in the MenuItemSerializer.
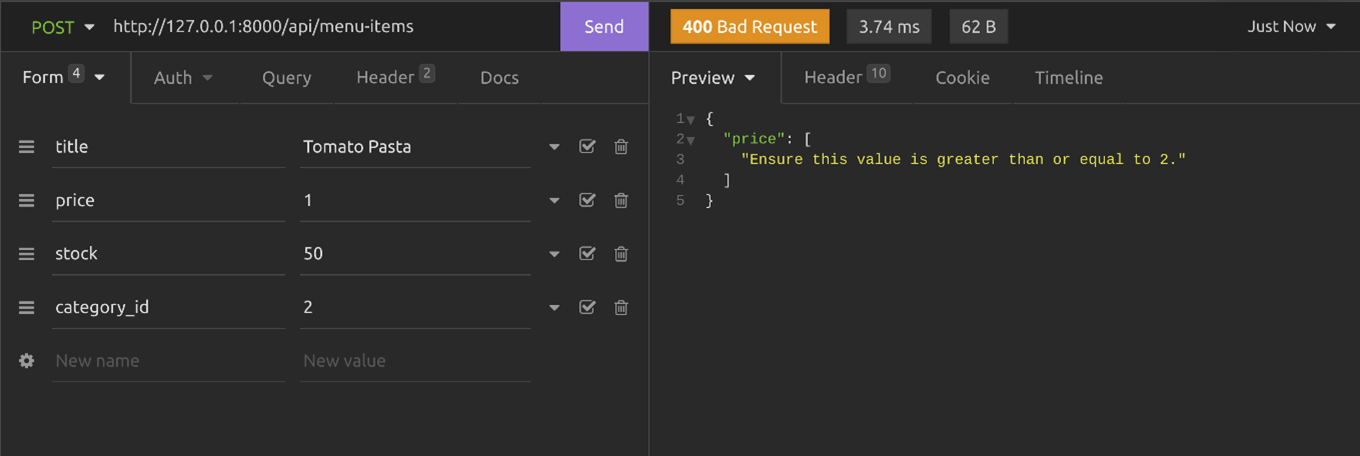
price = serializers.DecimalField(max_digits=6, decimal_places=2, min_value=2)If you make a POST call to the menu-items endpoint, with the price set to 1, DRF will display the error that the price should be greater than or equal to 2. The validation works.
Method 2: Using keyword arguments in the Meta class
If the field is not declared above the Meta field, you can still validate it using keyword arguments in the Meta class. For this method, you need to remove the line you added in the previous section. Add an extra_kwargs section in the Meta class with the following code. This extra_kwargs section allows you to add additional properties and validations for every field in the serializer.
class Meta:
        model = MenuItem
        fields = ['id','title','price','stock', 'price_after_tax','category','category_id']
        extra_kwargs = {
            'price': {'min_value': 2},
        }
If you send the previous POST call, you will see the same error displayed in Method 1.
You can add additional validation so that the stock cannot go below 0. Add the following line in the extra_kwargs section in the Meta class.
'stock':{'source':'inventory', 'min_value': 0}Here is the complete code of MenuItemSerializer class.
class MenuItemSerializer(serializers.ModelSerializer):
    price_after_tax = serializers.SerializerMethodField(method_name = 'calculate_tax')
    category_id = serializers.IntegerField(write_only=True)
    category = CategorySerializer(read_only=True)
    class Meta:
        model = MenuItem
        fields = ['id','title','price','stock', 'price_after_tax','category','category_id']
        extra_kwargs = {
            'price': {'min_value': 2},
            'stock':{'source':'inventory', 'min_value': 0}
        }

    def calculate_tax(self, product:MenuItem):
        return product.price * Decimal(1.1)
If you send a negative stock value in an HTTP POST call, DRF will give you an error like in the screenshot below.

Method:3 Using validate_field() method
Serializers in DRF provide you with another clean way of validating user input by writing valid_field() methods, where you replace the field with an actual field name. If the field name is price, the method name has to be validate_price(). If the field name is stock, then the method name has to be validate_stock().
Add the following two methods above the Meta class in the MenuItemSerializer.
def validate_price(self, value):
        if (value < 2):
            raise serializers.ValidationError('Price should not be less than 2.0')

def validate_stock(self, value):
        if (value < 0):
            raise serializers.ValidationError('Stock cannot be negative')
In these methods, the user-submitted data is passed as a value. As the API developer you need to check if the value meets the requirement, otherwise, raise the ValidationError with a message.
Test this by sending a POST request with invalid values in the price and stock fields. You should get the error message displayed in the screenshot below.

Method 4: Using the validate() method
You can add a validate() method in the serializer and validate multiple field values at once. DRF will pass all input values to this method. Here’s an example of how to validate the price and inventory values using a validate() method.
Note: To follow this method you need to remove the previous two methods validate_stock and validate_price in the serializer.
Add the following code above the Meta class in the MenuItemSerializer.
def validate(self, attrs):
        if(attrs['price']<2):
            raise serializers.ValidationError('Price should not be less than 2.0')
        if(attrs['inventory']<0):
            raise serializers.ValidationError('Stock cannot be negative')
        return super().validate(attrs)
Note: You used the actual field name for validating the stock which is inventory. If you send a POST request to the menu-items endpoint, you will see an error like the screenshot below.

Unique validation
Sometimes API developers need to make sure that there is no duplicate entry made by the clients. In such cases, unique validators become useful. Using this validator, you can ensure the uniqueness of a single field or combination of fields. Let’s examine how to use this validator. For a single field, use UniqueValidator class and for the combination of fields, use UniqueTogetherValidator.
UniqueValidator
First, import the classes.
from rest_framework.validators import UniqueValidatorOr
from rest_framework.validators import UniqueTogetherValidatorTo make sure that the title field remains unique in the MenuItems table, you can add the following code in the extra_kwargs section in the Meta class. Here’s an example of using UniqueValidator for the title field.
extra_kwargs = {
            'title': {
                'validators': [
                    UniqueValidator(
                        queryset=MenuItem.objects.all()
                    )
                ]
            }
        }
Or you can add it when declaring a field above Meta class, like this.
title = serializers.CharField(
        max_length=255,
        validators=[UniqueValidator(queryset=MenuItem.objects.all())]
    )
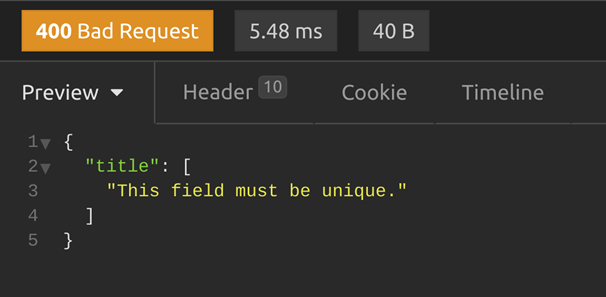
If the client sends a duplicate entry, they will see an error as below.
UniqueTogetherValidator
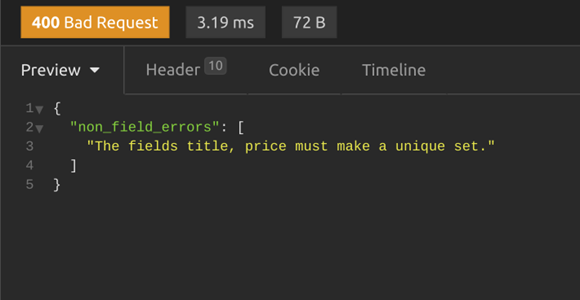
When you want to use UniqueTogetherValidator validator, the code will be a little different. Here’s a sample code that will make the combination of title and price field unique. With this validation, there will be no duplicate entry of an item with the same price. This code goes directly inside the Meta class.
validators = [
            UniqueTogetherValidator(
                queryset=MenuItem.objects.all(),
                fields=['title', 'price']
            ),
        ]
If the client sends a duplicate entry, they will see an error as below.
Conclusion
In this reading, you learned about the importance of data validation and four different methods that you can follow to modify certain fields in the MenuItemSerializer to validate data in DRF.
Data sanitization
Introduction
Sanitization is the process of cleaning data from potential threats. Without proper sanitization, your API project can be exploited using common attacks like SQL injection. Additionally, client applications can suffer attacks like cross-site scripting or session hijacking via injecting JavaScript. For such cases, doing data validation is not enough. While Django performs different types of sanitization behind the scenes, you can set in motion additional sanitization processes to meet project-specific requirements.
In this reading, you will learn how to avoid script injection and SQL Injection using data sanitization techniques in DRF.
Sanitize HTML and JavaScript
Unless it is intended, you should always check if the user client added an HTML tag inside the data and neutralized it by converting special HTML characters into HTML entities. This is because hackers can use <script> tags to inject JavaScript and <img> tags to add unwanted trackers.
Imagine someone inputs Tomato Pasta <script>alert(‘hello’)</script> as a menu item. If you don’t sanitize the data, the script tag will successfully execute when you display this menu title. Attackers can inject malicious scripts in this way. An alert like (‘hello’) cannot do any harm, but attackers can inject malicious code which can be harmful.
There is a popular third-party package called bleach that can help you to clean this. It will convert all HTML special characters like <’, ‘> and other tags to HTML entities so that the browser doesn’t execute them as HTML anymore.
Install bleach
Step 1
Install the bleach package using pipenv first.
pipenv install bleachStep 2
Import the bleach module in the serializers.py file.
import bleachStep 3
Sanitize the field data using both the validate_field() and validate() methods. Inside these validation methods, you have to use the clean() function provided by the bleach module to clean up the input data.
To sanitize the title field, write a validate_title() method above the Meta class in the MenuItemSerializer.
def validate_title(self, value):
        return bleach.clean(value)
Test it
If you send a POST request to the menu-items endpoint with HTML tags in the title field, the input data submitted by the client or user will be sanitized properly. Note how the script tag has been converted to HTML entities in the screenshot below.

Without sanitization, the input data will be saved in the database as it was submitted.

You can also sanitize the title field inside the validate method using this line of code.
attrs['title'] = bleach.clean(attrs['title'])This way, you can sanitize multiple fields from one single place. Here is the complete validate() method inside the MenuItemSerializer.
def validate(self, attrs):
        attrs['title'] = bleach.clean(attrs['title'])
        if(attrs['price']<2):
            raise serializers.ValidationError('Price should not be less than 2.0')
        if(attrs['inventory']<0):
            raise serializers.ValidationError('Stock cannot be negative')
        return super().validate(attrs)
Preventing SQL injection
SQL injection is commonly used by attackers by injecting SQL queries in the input data to perform malicious actions in the database.
Preventing SQL injection is comparatively easy. Although it is usually not advisable to run raw SQL there are cases where it’s necessary. Still, if you really need to run raw SQL, you must escape the parameters using string placeholders. You should never keep the placeholder inside quotations because then you will be at risk of SQL injection. Below are one correct and two incorrect examples of preventing SQL injection.
Note: Always avoid running raw SQL queries unless it is absolutely necessary.
Correct way: Using parameterized query and no quotation
limit = request.GET.get(‘limit’)
MenuItem.objects.raw('SELECT * FROM LittleLemonAPI_menuitem LIMIT %s', [limit])
Incorrect: Using string formatting
limit = request.GET.get(‘limit’)
MenuItem.objects.raw('SELECT * FROM LittleLemonAPI_menuitem LIMIT %s' % limit)
Incorrect: Using a string placeholder inside quotation
limit = request.GET.get(‘limit’)
MenuItem.objects.raw(“SELECT * FROM LittleLemonAPI_menuitem LIMIT ‘%s' “, [limit])
Conclusion
In this reading, you learned that it is important to sanitize data to protect data from potential threats such as script injection and SQL injection. You now know about a few practical ways to sanitize your data in DRF.
Pagination
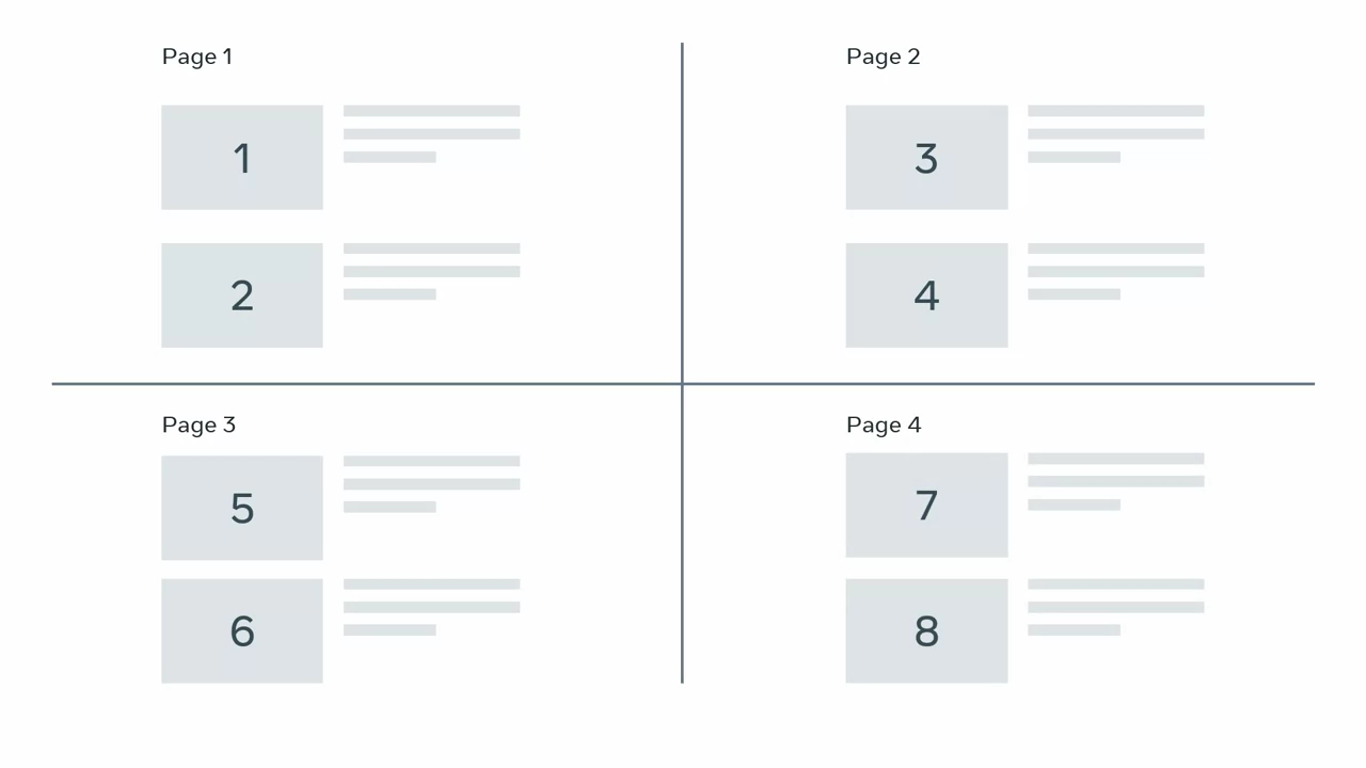
By now you know it’s good practice to enable a PIS to send results in smaller chunks. Imagine a database with 1000 orders and the client visits the orders end point. If there is no pagination, the client will get 1000 orders every time when they actually only need the latest 10 orders.
This unnecessary operation will put a huge load on the database server and waste the bandwidth developers use pagination to chunk results. Client applications can then decide the page number and how many records they want per page.
/api/menu-items?perpage=2&page=4
TIP
But here is a useful tip. You should limit the maximum number of records a client can request per page. This is a security measure to prevent abuse of your api endpoints.
If you set the maximum limit to 10 records per page from an api endpoint but the client needs 20 records ranging from 31 to 40. Then the client needs to make two calls to this api.
The first api call will request 10 per page from page three which will serve records 21 to 30. The second call will serve the next 10 records which are 31 to 40 from page four.
But say if a client requests 50 records in one single ap I call when the maximum limit is 10, you can send a 400 bad request http status message.
# views.py

from rest_framework.reponse import Reponse
from rest_freamework.decorators import api_view
from .models import MenuItem
from .serializers import MenuItemSerializer
from rest_framework import status
from decimal import Decimal
from django.core.paginator import Paginator, EmptyPage

@api_view(['GET', 'POST'])
def menu_item(request):
	if request.method == 'GET':
		items = MenuItem.objects.select_related('category').all()
		category_name = request.query_params.get('category')
		to_price = request.query_params.get('to_price')
		search = request.query_params.get('search')
		ordering = request.query_params.get('ordering')
		perpage = request.query_params.get('perpage', default=2)
		page = request.query_params.get('page', default=1)
		if category_name:
			items = items.filter(category__title=category_name)
		if to_price:
			items = items.filter(price__lte=to_price)
		if search:
			items = items.filter(title__startswith=search)
		if ordering:
			ordering_fields = ordering.split(",")
			items = items.order_by(*ordering_fields)

		paginator = Paginator(items,per_page=perpage)
		try:
			items = paginator.page(number=page)
		except EmptyPage:
			items = []
		serialized_item = MenuItemSerializer(items, many=True)
		return Reponse(serialized_item.data)
	if request.method == 'POST':
		serialized_item = MenuItemSerializer(data=request.data)
		serialized_item.is_valid(raise_exception=True)
		return Response(serialized_item.data, status.HTTP_201_CREATED)

@api_view()
def single_item(request, id):
	item = get_object_or_404(MenuItem, pk=id)
	serialized_item = MenuItemSerializer(item)
	return Response(serialized_item.data)
More on filtering and pagination
Introduction
You already know how to use filtering and pagination using function-based views in your DRF project. But, there are also some interesting filtering classes available in DRF which can help you to quickly implement these features in a class-based view. In this reading, you will learn how to use these built-in classes for filtering, searching and pagination.
Scaffolding the project
Step 1
To scaffold the project you have to use a class-based view extending the ModelViewSet to quickly implement a functional CRUD API endpoint for the menu items. To create this class-based view you should add the following code lines in the views.py file.
from rest_framework.response import Response from rest_framework import viewsets from .models import MenuItem from .serializers import MenuItemSerializer
class MenuItemsViewSet(viewsets.ModelViewSet):
    queryset = MenuItem.objects.all()
    serializer_class = MenuItemSerializer
Step 2
The second step is to open the urls.py file and map the MenuItemViewSet class to the menu-items endpoint. You only map the GET methods.
from django.urls import path
from . import views
urlpatterns = [
    path('menu-items',views.MenuItemsViewSet.as_view({'get':'list'})),
    path('menu-items/<int:pk>',views.MenuItemsViewSet.as_view({'get':'retrieve'})),
]
Step 3
The final step is to open the settings.py file and add OrderingFilter and SearchFilter classes as DEFAULT_FILTER_BACKENDS in the REST_FRAMEWORK section.
REST_FRAMEWORK = {
    'DEFAULT_RENDERER_CLASSES': [
        'rest_framework.renderers.JSONRenderer',
        'rest_framework.renderers.BrowsableAPIRenderer',
        'rest_framework_xml.renderers.XMLRenderer',
    ],
    'DEFAULT_FILTER_BACKENDS': [
        'django_filters.rest_framework.DjangoFilterBackend',
        'rest_framework.filters.OrderingFilter',
        'rest_framework.filters.SearchFilter',
    ],
}
After completing these steps you can list all menu items by visiting http://127.0.0.1:8000/api/menu-items and any single menu item by visiting http://127.0.0.1:8000/api/menu-items/1.
Ordering and sorting
To implement sorting by the price and inventory fields you can use DRF’s built-in ordering classes. You can do this by specifying these two fields in the ordering_fields list in the MenuItemsViewSet class.
class MenuItemsViewSet(viewsets.ModelViewSet):
    queryset = MenuItem.objects.all()
    serializer_class = MenuItemSerializer
    ordering_fields=['price','inventory']
If you visit http://127.0.0.1:8000/api/menu-items you’d notice a new filter button on the top right-hand side like in this screenshot.
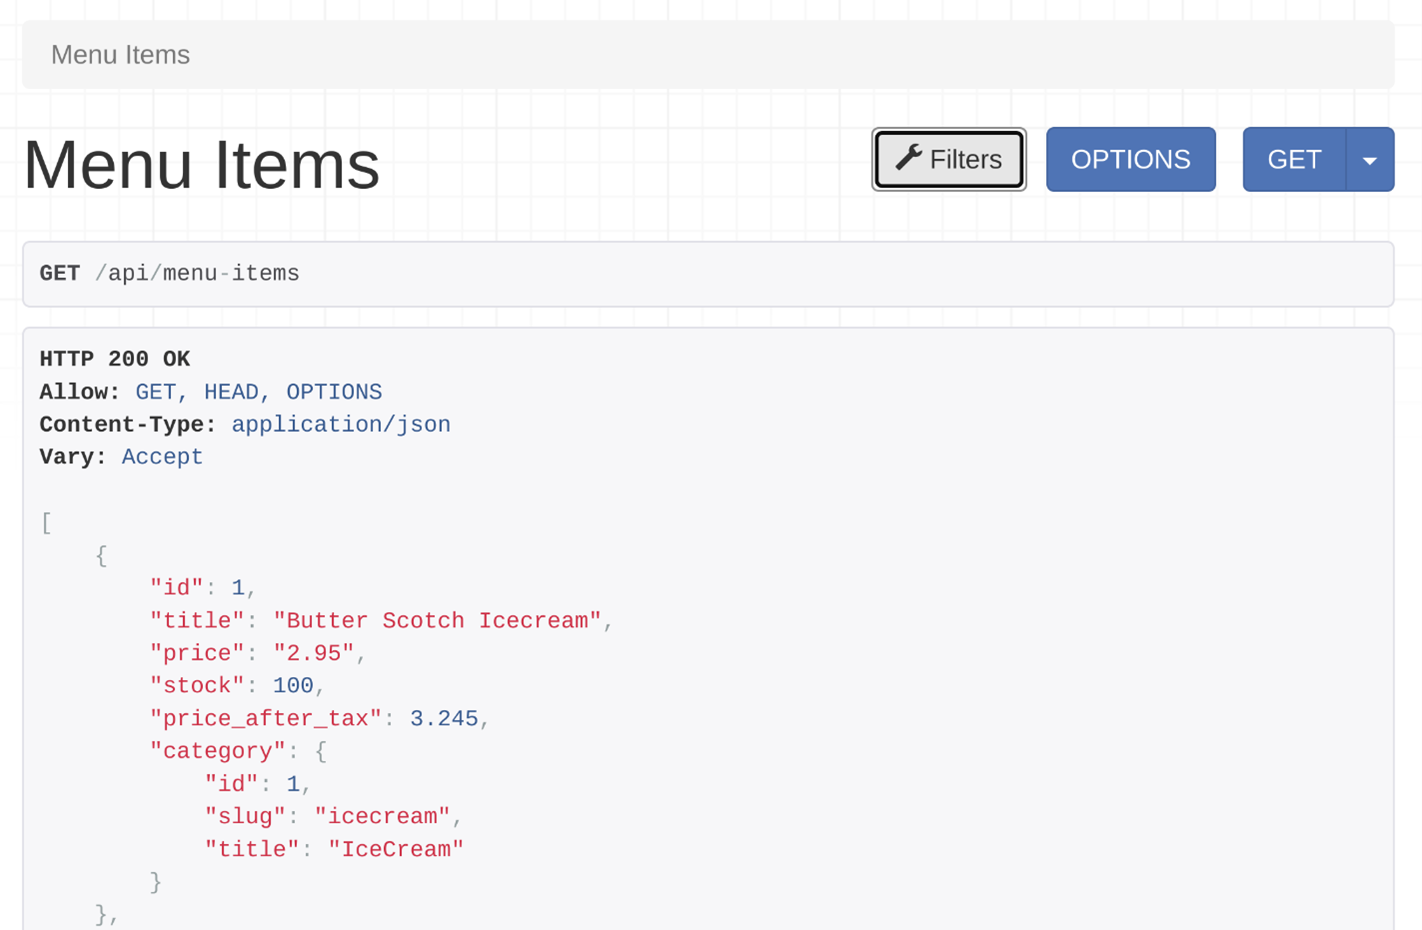
If you click on that button, a popup will appear where you can get the ordering options.
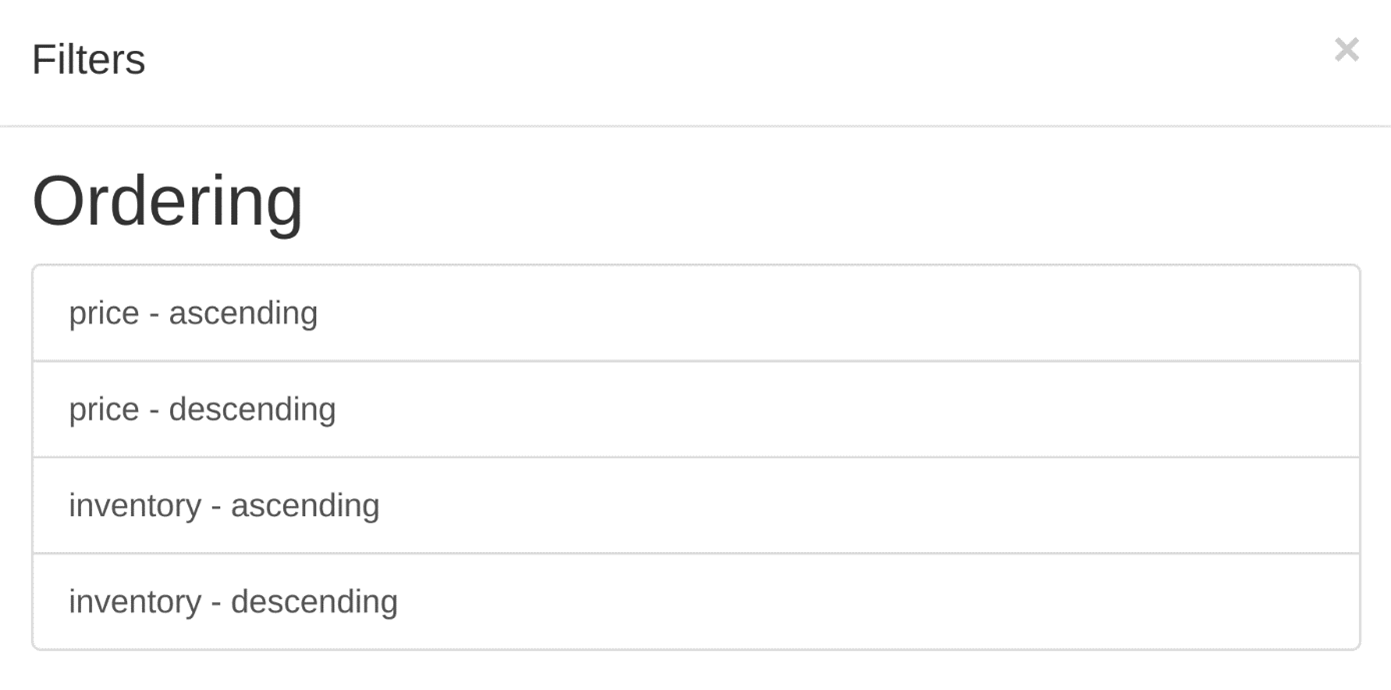
You can click on any of these options to sort the /api/menu-items API output by order and inventory in ascending or descending order. You can also sort the output by both fields by using ordering=price,inventory query string, like this: http://127.0.0.1:8000/api/menu-items?ordering=price,inventory.
Pagination
Using DRF’s built-in pagination classes makes paginating the API result very easy. Add these two lines in the REST_FRAMEWORK section in the settings.py file.
'DEFAULT_PAGINATION_CLASS': 'rest_framework.pagination.PageNumberPagination',
'PAGE_SIZE': 2
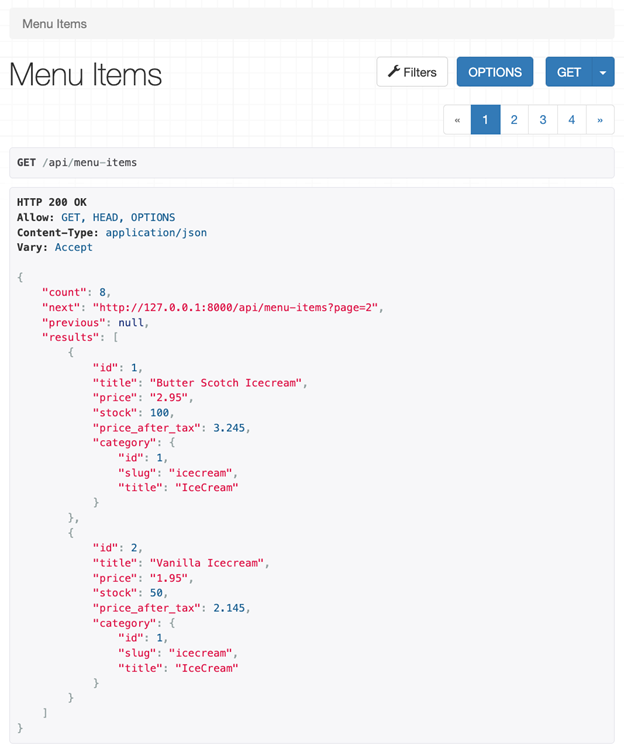
The PAGE_SIZE property tells DRF how many items to show per page. Now if you were to visit the menu items endpoint you’d notice how the output has been paginated in the browsable API interface, and how the output data format has changed. Under the filter button, there are page numbers as well. Only two records per page show because that’s the setting in the settings.py file.
Search
You can add search capability so that API clients can search by title field. To do that, you add search_fields=['title'] in the MenuItemsViewSet class.
class MenuItemsViewSet(viewsets.ModelViewSet):
    queryset = MenuItem.objects.all()
    serializer_class = MenuItemSerializer
    ordering_fields=['price','inventory']
    search_fields=['title']
When you open the menu-items endpoint and click on the filter button there will be a new search field. You can use both ordering and searching together.
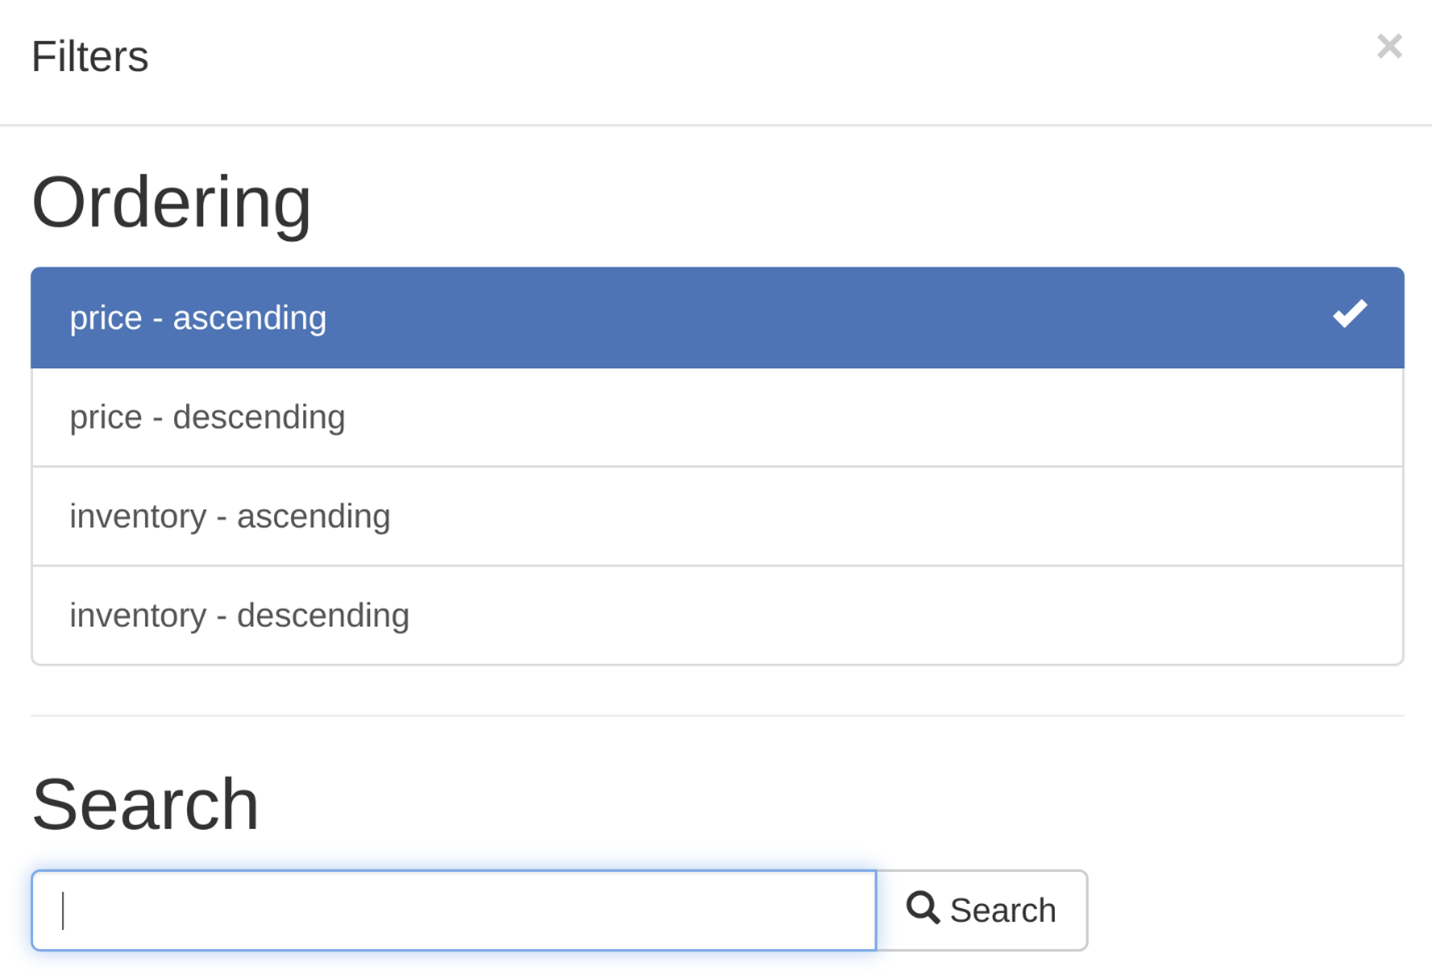
You can type anything, and DRF will search inside the title field and display the output accordingly. The default lookup_field value for searching in DRF is icontains. If the client searches for ILLA it will match every menu item where the title has ILLA in a case-insensitive fashion. So both Vanilla and VANILLA would come up as search results.
Searching in the nested fields
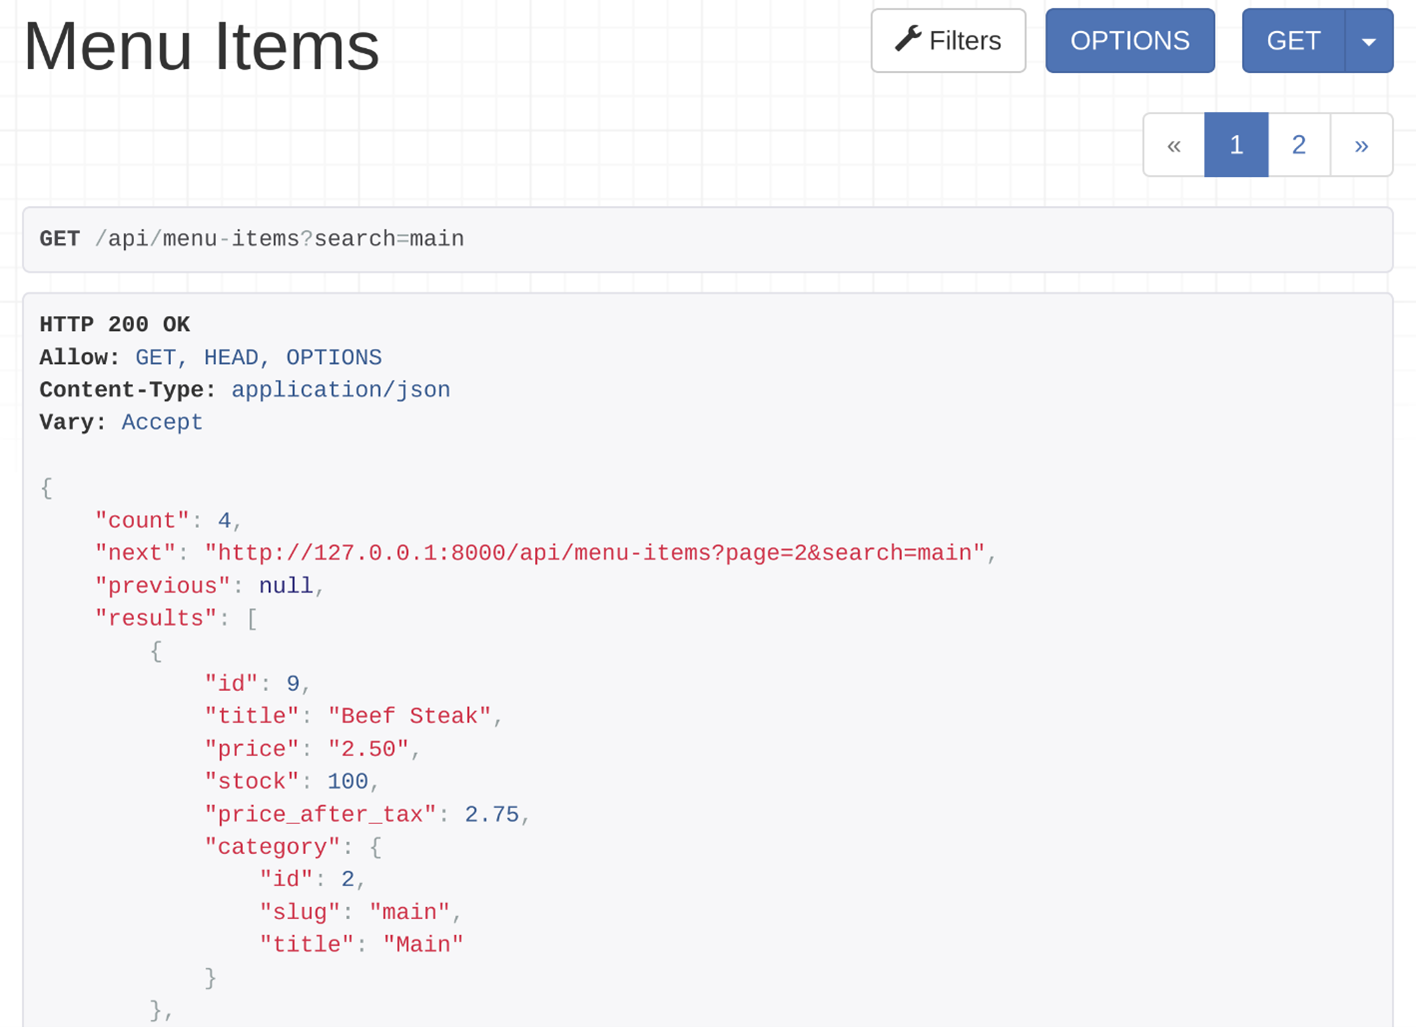
What if the API client also wants to search a category title, like Icecream or main? In the serializers.py file, the category was set as a related field to the MenuItem model in the MenuItemSerializer class, and the clients will be searching in the title field of the category model.
The naming convention for searching in the related model is, RelatedModelName_FieldName. Here, the related model name is category and the field name is title. So, to search in the title field of the category model, you need to pass category__title in the search_fields list.
class MenuItemsViewSet(viewsets.ModelViewSet):
    queryset = MenuItem.objects.all()
    serializer_class = MenuItemSerializer
    ordering_fields=['price','inventory']
    search_fields=['title','category__title']
By adding these lines of code, the API clients will be able to search for text in both menu item titles and category titles. Notice that the pagination and ordering still work together with the search feature.
Conclusion
In this reading, you learned how to implement complex features like filtering, pagination and searching with just a few lines of code in a class-based view using the built-in filtering and pagination classes in DRF.
Caching
Imagine the little lemon restaurant featured on a prominent food blog. The positive reviews got people so excited, that the visitors on the little lemon website increased tremendously. The app downloads also peaked.
While this is good news, it will take no time to turn into a nightmare if your app and website can’t handle this traffic. In such a scenario, your database would stop responding and your web server will go down.
You need to implement a few techniques to ensure nothing goes wrong. Caching is one of those.
Caching
Caching is a technique of serving saved results instead of creating a fresh one every time it is requested. This reduces the server load and bandwidth consumption to a great extent.
By now, you also know that REST API is a layered architecture. The interesting thing is that the caching can happen in multiple layers.
HTTP request flow
A visitor sends a request to your domain, which goes to the firewall first. From there, it goes to a reverse proxy server that sits in front of your web server. The reverse proxy server transfers the call to one of your web servers. Then the web server connects to the database servers. The database server prepares the response and sends it back to the reverse proxy, which finally sends it back to the visitor who made that request.
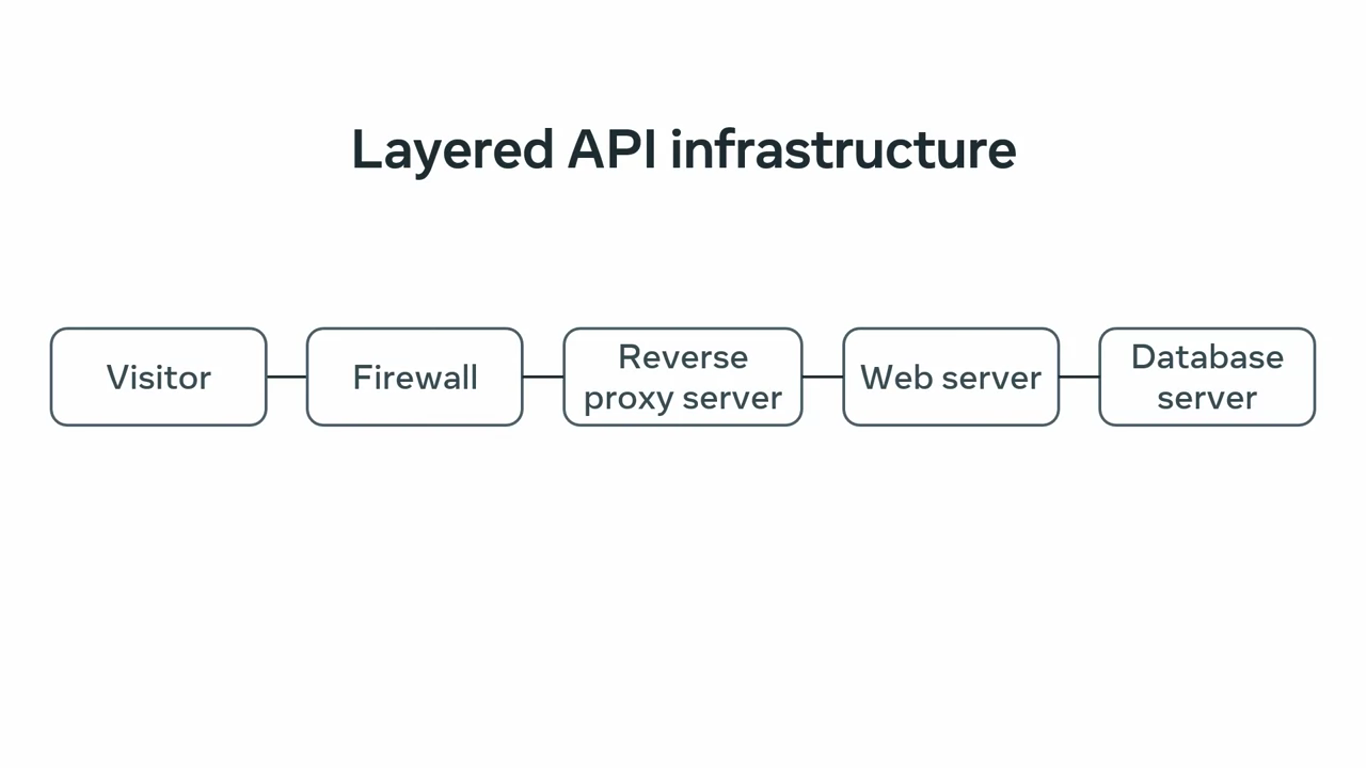
Now, the caching can be done in the client, reverse proxy, web server, and database server.
Role of each of these layers in caching
Database server
Most modern databases do caching to prevent excessive read-write operation in the actual storage. Typically, they use query cache where the SQL queries and their result are stored in the memory.
If there is no change in any of those fields in that SQL, they serve the result from the memory, instead of preparing the result by running that query against the real data.
This can save a huge amount of processing power and time. However, relying only on database caching is a bad idea, because your server-side scripts are still connecting to the database to get a cached result.
For a given amount of RAM and CPU, database engines can only accept a fixed number of connections at a time.
Web server
The web server runs the server-side scripts, which can cache the response if it is certain that there was no change in the data since the last time it was queried or accessed.
Server-side scripts cache the result in a separate cache storage which could be simple files, or a database, or in caching tools like Redis, or Memcached, which can save you from connecting to the database every time.
Just imagine you have 1,000 hits every minute and you update the data once every day, there is simply no reason to connect the database thousands of times every minute.
Instead, you hit the database onetime and cache the result, and then serve the 1,000 times 60 times 24 requests straight from the cache every day. That’s 1,440,000 requests.
When the database is updated, you flush the old cache and then cache the new result to keep going on.
But even the web servers have limited capacity to respond to a number of active requests at a time, and that’s where reverse proxy caching comes in.
Reverse proxy
Traffic heavy applications use multiple web servers behind reverse proxies to distribute the requests evenly.
The web server can send responses with appropriate caching headers, and the reverse proxy then caches the result for a certain amount of time, as mentioned in those headers. They then serve the request straight from the cache.
This way, your web servers will not get clogged with too many requests.
Client-side
Reverse proxies or web servers can send responses with caching headers, which tell the client to cache the request for a specific time. During this time, if a request is made the client browser or application decides whether it will use those caching headers, serve the result from a local cache, or create a call to your server.
Since this is a client-side behavior where you may not have complete control, it’s always a good idea to implement the proper caching strategy on the server side.
Additional resources
Overview of security in Django
Memcached: Open source, high-performance, distributed memory object caching system
PythonDjangoDRFRESTRESTfulDataHTTPDatabaseCache
Previous one → 5.Django REST framework essentials | Next one →