Working with databases and models
Recap: Django Database Configuration and Models
Introduction
Django employs the MVT architecture, wherein the model represents the application’s data layer.
The model is at the core of Django’s Object Relation Mapping (Django ORM).
It is the single, definitive source of information about your data, where each model maps to a single database table.
A model is a Python class that subclasses the Model class found in the django.db.models module.
Generally, the user-defined model has one or more class attributes. Just as the model class maps to a database table, the class attribute is mapped to a column in the table.
Django provides a mechanism to perform CRUD operations using an object-oriented QuerySet API when the model gets mapped to a table.
This process frees the developer from executing raw SQL queries.
Database configuration
You can choose from various databases supported by Django. Officially supported databases are:
- PostgreSQL
- MariaDB
- MySQL
- Oracle
- SQLite
In addition, you can use other types of databases with the help of third-party database back end modules.
The choice of database back end is registered in the Django project’s settings.py module.
The DATABASES variable in this module sets the back end to be used, the name of the database, and the credentials for accessing the database if required.
The Django project set up with the startproject command is configured to use the SQLite database by default. The DATABASES definition in the settings file reads like the following:
settings.py
DATABASES = {
    'default': {
        'ENGINE': 'django.db.backends.sqlite3',
        'NAME': BASE_DIR / 'db.sqlite3',
    }
}
After you create the project, run the migrate command:
python3 manage.py migrate
The tables required for the pre-installed apps are created in the database, located in the BASE_DIR by default. You can use an SQLite viewer to confirm this:
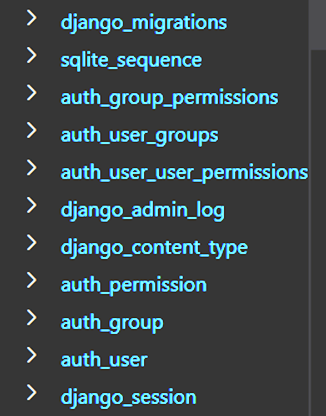
Django places app-specific models in the models.py file in the app package folder.
To create the mapped table in the database, run the commands makemigrations and then migrate.
Using another database
To use another type of database instead of the default SQLite, you need to change the DATABASES configuration in the settings.py file.
Most of the relational database types are server-based. Hence, Django must know the host and port on which the database is running and the user’s credentials, such as username and password.
You will also need the DBAPI-compatible database driver for your intended database.
Using the MySQL database
Suppose you intend to use a MySQL database as the back end for your Django application. In that case, you must first install the mysqlclient driver with pip.
pip3 install mysqlclient
Then, replace the DATABASES configuration with the following block of code:
settings.py
DATABASES = {
    'default': {
        'ENGINE': 'django.db.backends.mysql',
        'NAME': 'my_database',
        'USER': 'root',
        'PASSWORD': 'your_password',
        'HOST': '127.0.0.1',
        'PORT': '3306',
        'OPTIONS': {
            'init_command': "SET sql_mode='STRICT_TRANS_TABLES'"
        }
    }
}
Other important configuration settings
CONN_MAX_AGE: This parameter defines the maximum lifetime of a connection. The default value is 0, which preserves the historical behavior of closing the database connection at the end of each request.
To enable persistent connections, set CONN_MAX_AGE to a positive integer of seconds. For unlimited persistent connections, you can set it to None.
AUTOCOMMIT: Default: True. Set this to False to disable Django’s transaction management and implement your own.
OPTIONS: Default: {} (Empty dictionary). Extra parameters to use when connecting to the database. Available parameters vary depending on your database backend.
For MySQL, you can specify the connection parameters in the options using the following code:
settings.py
DATABASES = {
    'default': {
        'ENGINE': 'django.db.backends.mysql',
        'OPTIONS': {
            'read_default_file': '/path/to/my.cnf',
        },
    }
}


# my.cnf
[client]
'NAME': 'my_database'
'USER': 'root'
'PASSWORD': 'your_password'
default-character-set = utf8
SET sql_mode = 'STATIC_TRANS_TABLES', which handles invalid or missing values from being stored in the database by INSERT and UPDATE statements.
Using multiple databases
You can also configure your Django application to use more than one database. There must be a default database and then set the configuration for the other. For example:
settings.py
DATABASES = {
    'default': {
        'ENGINE': 'django.db.backends.sqlite3',
        'NAME': BASE_DIR / 'db.sqlite3',
    },
    'mydb': {

        'ENGINE': 'django.db.backends.mysql',
        'NAME': 'my_database',
        'USER': 'root',
        'PASSWORD': 'your_password',
        'HOST': '127.0.0.1',
        'PORT': '3306',
        'OPTIONS': {
            'init_command': "SET sql_mode='STRICT_TRANS_TABLES'"
        }
Conclusion
In this Reading, you revised configuring a database in Django and how to translate the model structure to the database table.
Exercise: Setting up the MySQL connection
Step 1
To install MySQL server, download the installer appropriate for your operating system from https://www.mysql.com/downloads/.
Start the MySQL server It runs on port number3306 by default.
To confirm it is running, start the MySQL command line client with the following command.
mysql -u root -p
Step 2
Activate the Python virtual environment you are using for this project, and open VS code in it. Follow the instructions from the earlier exercise.
Install the MySQL DB API Driver, mysqlclient from the CMD terminal in VS Code, use PIP utility with following command:
pip3 install mysqlclient
Step 3
Open the settings.py file in a VS Code window. Locate the DATABASES section. In place of the existing SQLite configuration, paste the following configuration for MySQL.
#Settings.py
 DATABASES = {
    'default': {
        'ENGINE': 'django.db.backends.mysql',
        'NAME': 'LittleLemon',
        'USER': 'root',
        'PASSWORD': '',
        'HOST': '127.0.0.1',
        'PORT': '3306',
        'OPTIONS': {
            'init_command': "SET sql_mode='STRICT_TRANS_TABLES'"
        }
    }
}
Step 4
Install MySQL extension from VS Code extension marketplace.
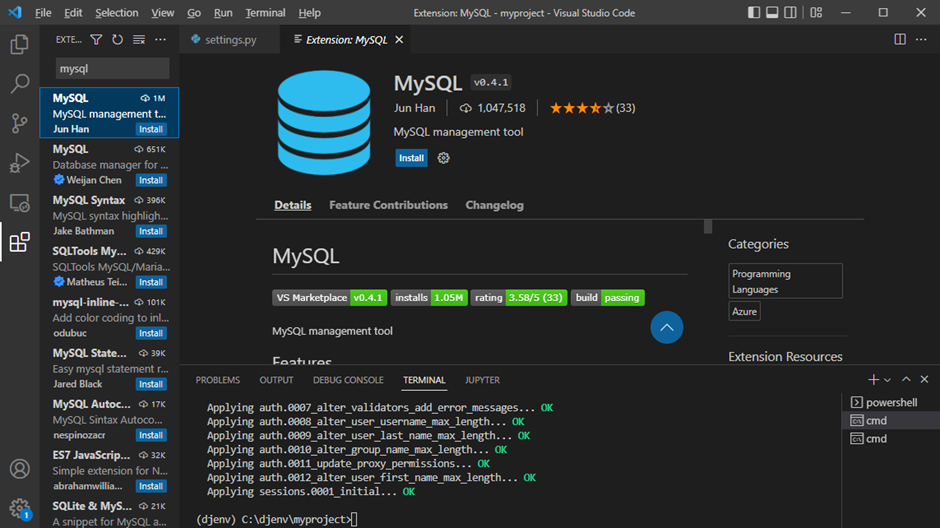
Step 5
From the CMD terminal on Windows(Command palette in Mac OS) inside VS Code, run the migrate command.
python manage.py migrate
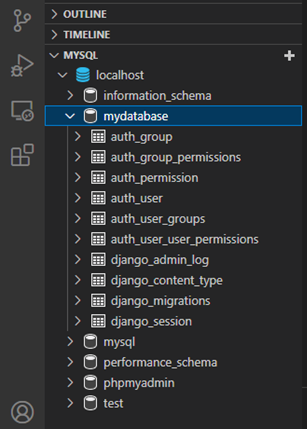
The table structure required for the INSTALLED_APPS will be created in the MySQL database named LittleLemon.
Step 6
Note that the MySQL tab appears in the file explorer bar of VS Code
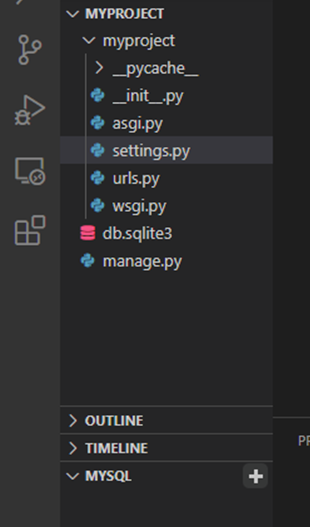
Click on + button and connect to the database. Enter localhost as the domain name and null password when prompted.
Now localhost appears in the MySQL tab.
Step 7
Expand the localhost to find your database – LittleLemon. Double click it to show the tables created by the migrate command
Conclusion
In this exercise, you configured the Django project to use MySQL as the back-end. You also ran migration to create the table structure for the pre-installed apps in the project.
Exercise: Setting up the models
Overview
By now, you have created a back-end Django application containing a project called LittleLemon, and an app called Restaurant. You have also configured the application to use a MySQL database.
In this exercise, you will create the Menu and Booking models for the Restaurant app and migrate them to the MySQL database tables of the same name.
Scenario
By the end of this project, you will have built REST APIs for ordering food using the Menu API and reserving the table using the Booking API.
You will build these APIs based on the Menu and Booking models using the model schema provided to you.
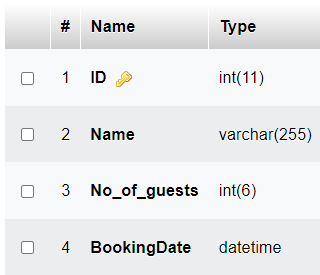
Booking table
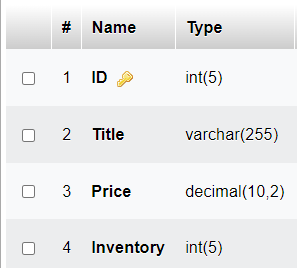
Menu table
Prerequisites
Ensure that you have created a Django virtual environment, and inside it, a project called LittleLemon. Inside the project, make sure you have an app called Restaurant.
You also need to have the MySQL server running with the LittleLemon database.
Steps
Step 1: Declare Menu and Booking models
Refer to the table schema for the Menu and Booking tables provided to you. Declare the menu and booking model classes with matching attributes.
You must save the code for these classes in the models.py file under the restaurant app package folder.
Step 2: perform migrations
First, run the makemigrations command of the manage.py script.
Then run the command python manage.py migrate.
The corresponding tables will be created in the database.
Confirm that tables are created using the MySQL browser extension you installed earlier in VS Code.
Step 3: Register the models in admin module
Open the admin.py file and register the Menu and Booking models with the admin site using the admin.site.register() method.
Step 4: Add data in models
Login to the admin panel with the superuser created earlier.
Add some data in Menu and Booking models using the admin interface.
Step 5: Check the data in VS Code
Refresh the MySQL browser in VS Code to display the data added through the admin interface.
Conclusion
In this exercise, you successfully declared the models for restaurant app and migrated to the MySQL database.
Additional Resources
Here is a list of resources that may be helpful as you continue your learning journey. These resources provide some more in-depth information on the topics covered in this module.
MySQL
Previous one → 3.Static Content | Next one → 5.Adding APIs