What is the Django REST framework (DRF)?
DRF is a toolkit built on top of the Django web framework. It comes with many helpful utility classes and objects that can help developers build robust APIs quickly.
DRF is a Django utility app that bridges your regular Django app, the Django framework, and the Object Relational Mapping or ORM Library, which communicates with the database.
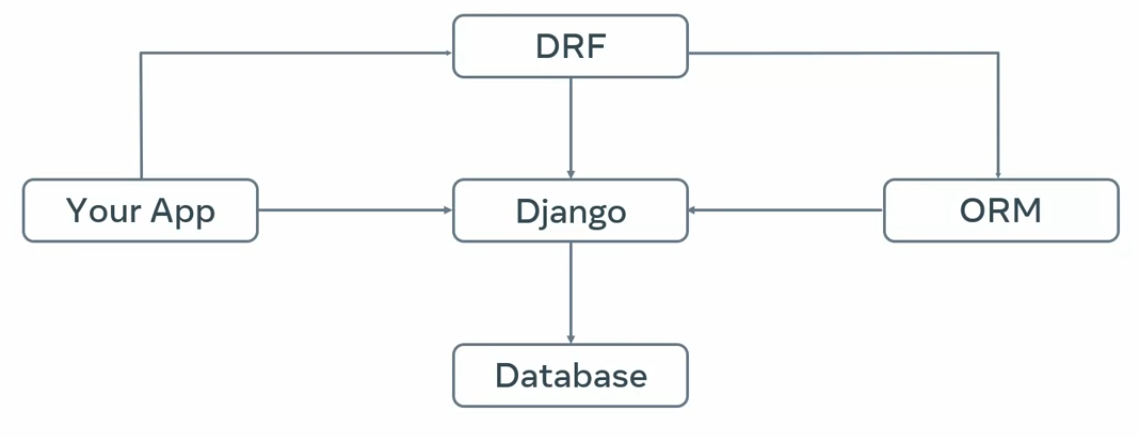
Although Django’s built in templating system is great for developing web applications, DRF provides more functionalities. Because when it comes to API development, you need to be able to deal with other data types like JSON and XML and this is where DRF comes in handy.
You will frequently need to retrieve data from the database, process it, and then represent it to your clients as mainly JSON.
This conversion process is called serialization; One of the DRF’s biggest benefits.
With DRF, you don’t have to worry about transforming your database models into a RESTful API. It takes care of that for you with its support for data conversion utility classes.
Benefits of using DRF
Easy to integrate
It’s pretty straightforward to integrate DRF into your existing Django app. With just a few changes in the settings, you can have a fully functional Django app powered by DRF almost instantly.
Web browsable API
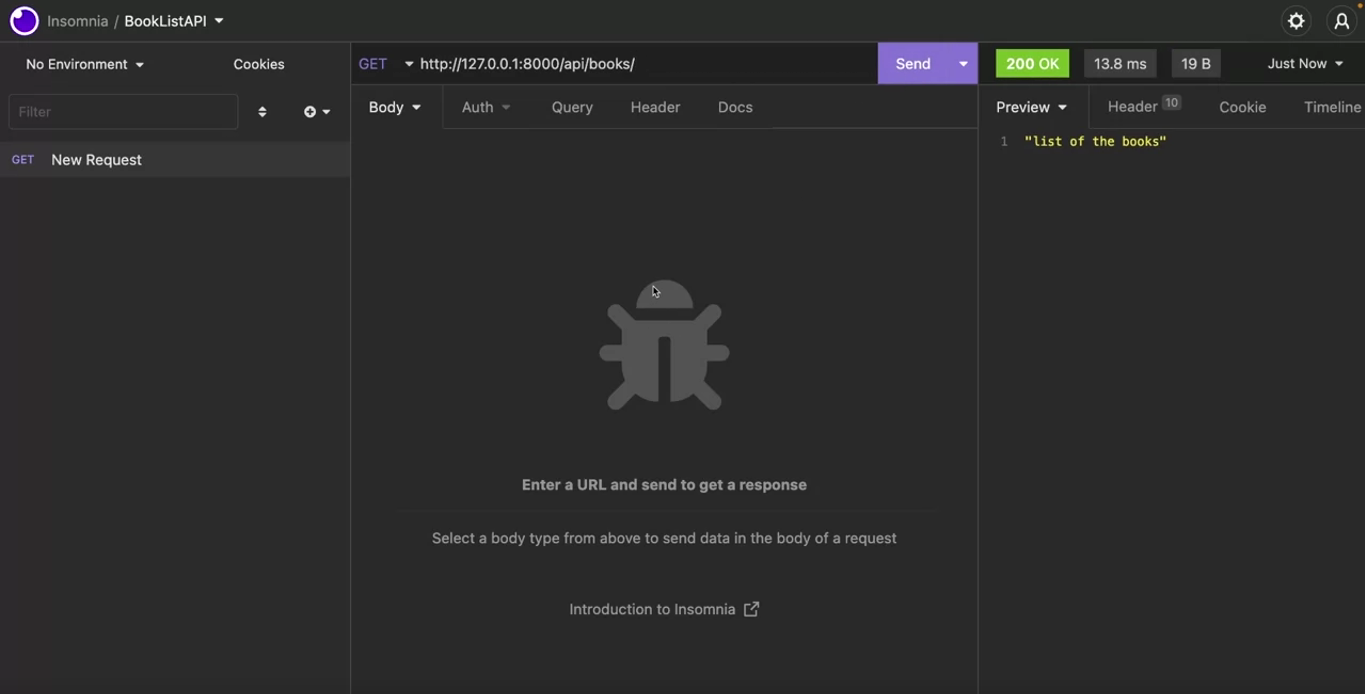
DRF comes with an API viewer that allows you to send different HTTP methods with data and evaluate the output without needing an external application like Insomnia.
This API viewer has limited features, but it works when you want to quickly experiment with your APIs.
Request and response processing
DRF comes with its own request and response objects, which are wrappers of the regular Django HTTP response and HTTP request object, but offers more flexibility on processing data in and out.
Readable HTTP Status codes
The status module has a list of human-readable HTTP Status codes. When you use the status module from DRF, you don’t need to send status codes like 404 or 200 with your responses.
Instead, you can use a readable representation like status, Status.HTTP_ 200_OK or Status.HTTP_404_NOT_FOUND.
CRUD helpers
The Django Rest Framework’s built-in view set classes, make it quick and easy to create a functional CRUD. You can extend the workflow if you need to. But for basic data manipulation, the view set from the Django Rest Framework works really well.
You will have the full support for all the necessary HTTP methods out of the box.
Serializers
The DRF package comes with a number of built-in serializers to help with data conversion between models.
Serializers also support converting other non-ORM objects. This can be a great time-saver. A serializers make it easy to convert complex data into native Python datatypes that can be quickly rendered into JSON, XML, or other content types.
Serializers and DRF also provide a method called deserialization, which converts requested data and connects them back to the existing models.
TIP
This deserialization process also validates the user input to ensure no data corruption.
Authentication
DRF also comes with great support for modern API authentication systems. Building an authentication layer is a complex process and usually takes time. But with DRF and some supporting packages, you can effortlessly develop an authentication system for your Django app.
You can also enable social connection where your users can authenticate and authorize themselves using an external provider like Facebook and then consume the APIs.
Installing and setting up DRF
pip or pipenv
Now the question is, are you going to use pip or pipenv. If you’re eating just pip, you’ll need to manage all those dependencies and keep track of those packages. You will also need to set up the virtual environment and configure it to function correctly. However, is in pipenv, which works on top of pip, makes everything easier with a lot of work going on behind the scenes.
pipenv creates and manages the virtual environment. You don’t have to manually configure so many things to make it work.
pipenv install django
pipenv shell
django-admin startproject BookList .
python manage.py startapp BookListAPI
pipenv install djangorestframework
Configuring the DRF
In the settings.py and in the INSTALLED_APPS list, add rest_framework.
Also include the BookList app.
# views.py

from django.shortcuts import render
from rest_framework.response import Response
from rest_framework import status
from rest_framework.decorators import api_view

@api_view()
def books(request):
	return Response('list of the books', status=status.HTTP_200_OK)
The DRF comes with a more advanced version of the HTTP response, which is Response.
You have to add the api_view() decorator to the methods; This so you can use the Reponse class
# urls.py (app)

from django.urls import path
from . import views
urlpatterns = [
	path('books/', views.books)
]
# urls.py (project)
from django.contrib import admin
from django.urls import path, include
urlpatterns = [
path('admin/', admin.site.urls),
path('api/', include(BookListAPI.urls))
]python manage.py runserver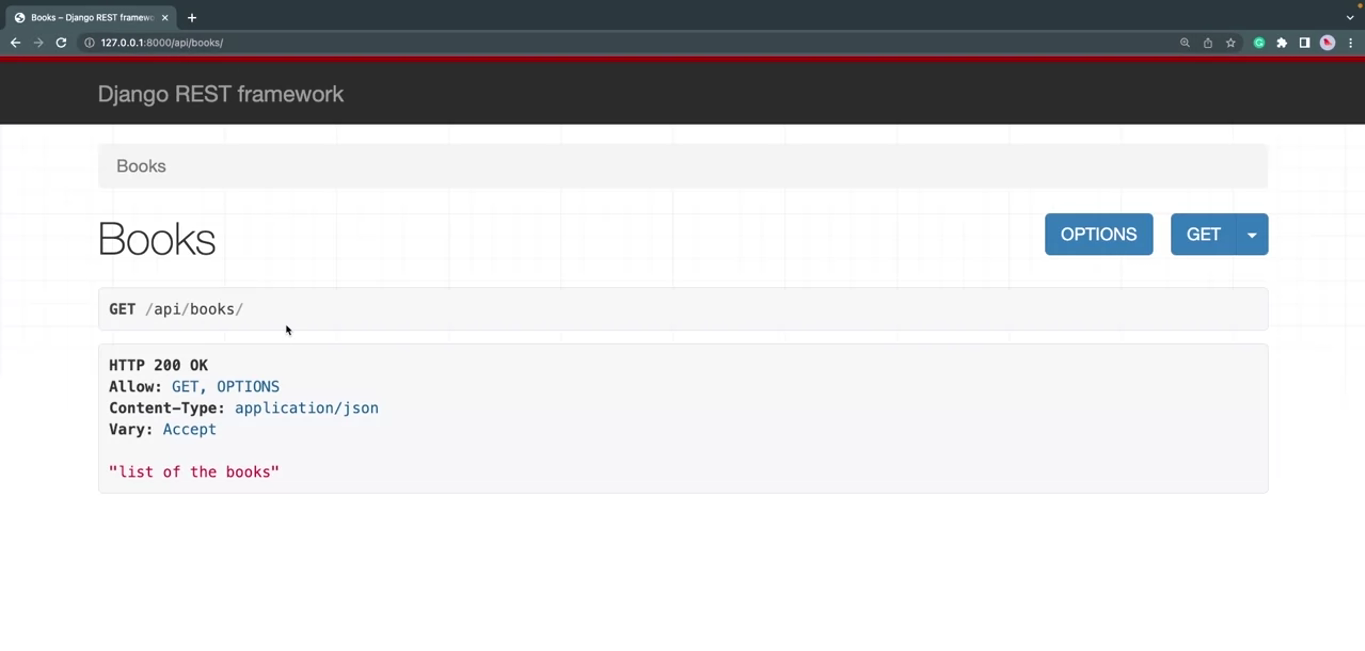
Can i accept any HTTP methods?
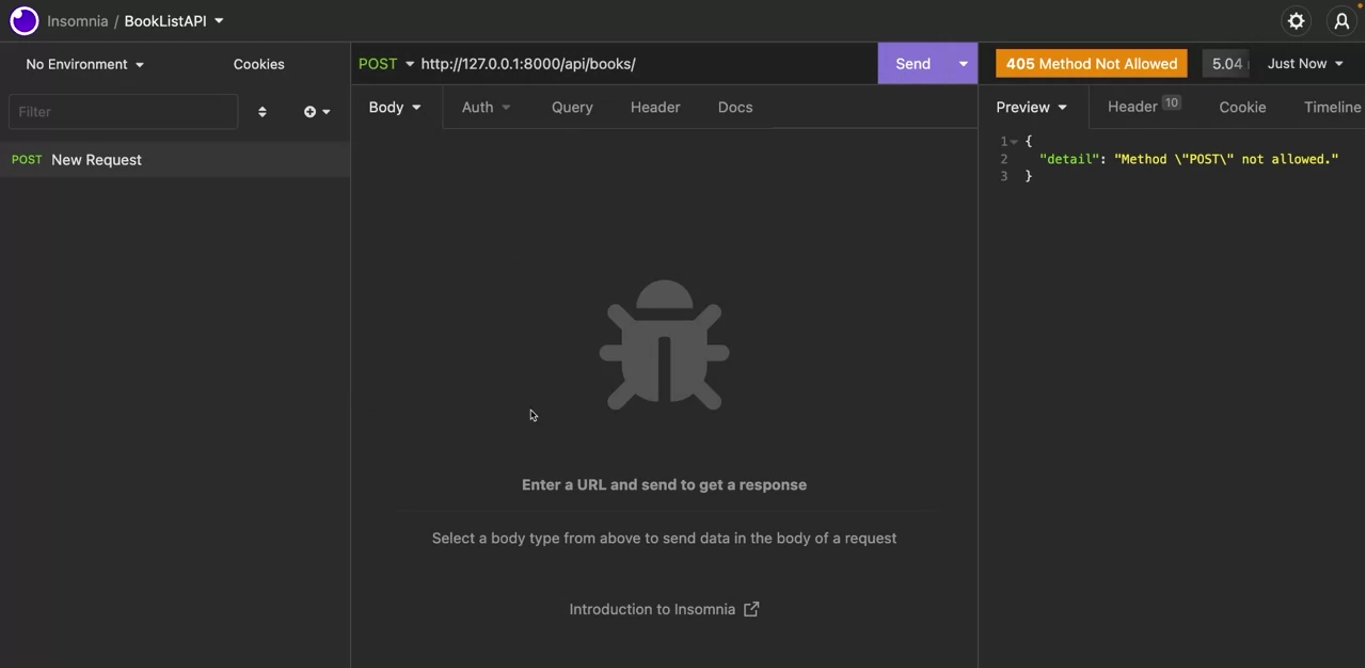
Note that DRF is not accepting an HTTP post call to this end point and it’s returning a message saying method post not allowed. This is happening because you did not instruct DRF to accept any other HTTP methods than GET, which is the default one.
If your API endpoints need to accept other HTTP methods like POST, PUT, or DELETE you need to define them in the API view decorator.
# views.py

from django.shortcuts import render
from rest_framework.response import Response
from rest_framework import status
from rest_framework.decorators import api_view

@api_view(['POST'])
def books(request):
	return Response('list of the books', status=status.HTTP_200_OK)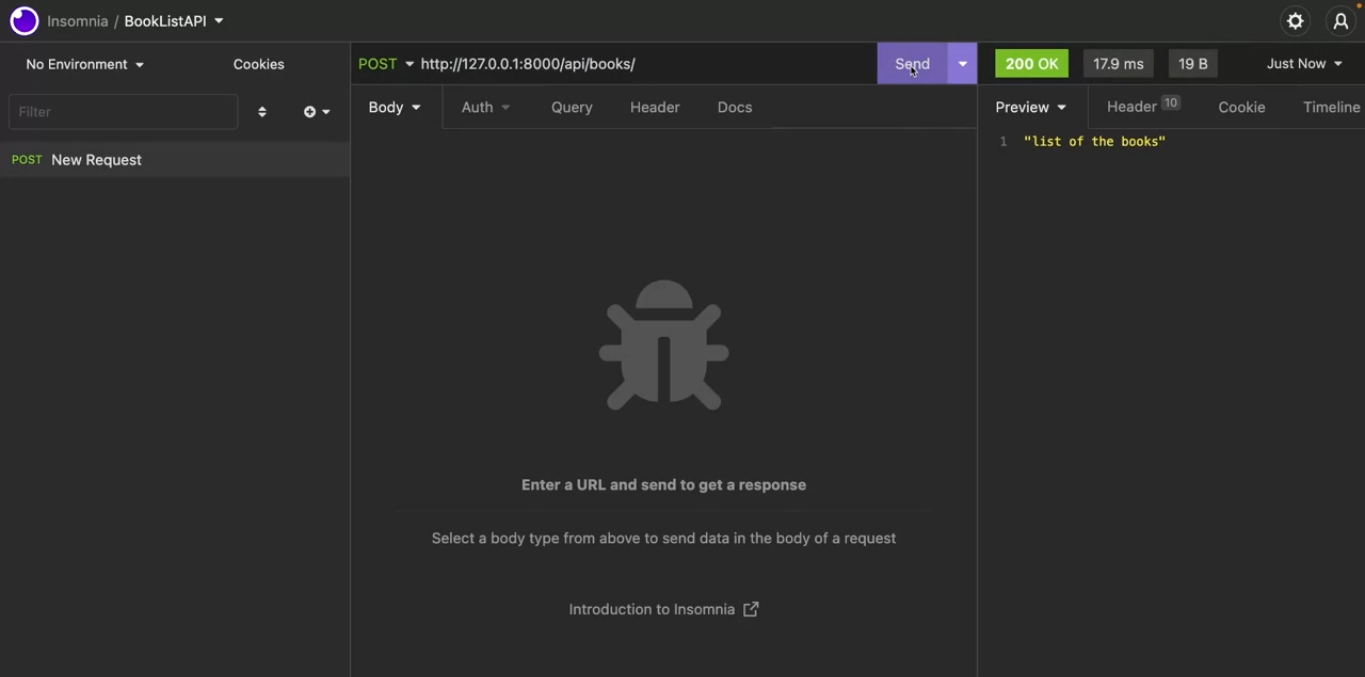
Better API view with decorators
Benefits of decorator in DRF
The views from the [[#[Installing and setting up DRF](https //www.coursera.org/learn/apis/lecture/EE4hl/installing-and-setting-up-drf)|Previous note]]:
The @api_view() allows you to use the Response.
Nice Browsable interface
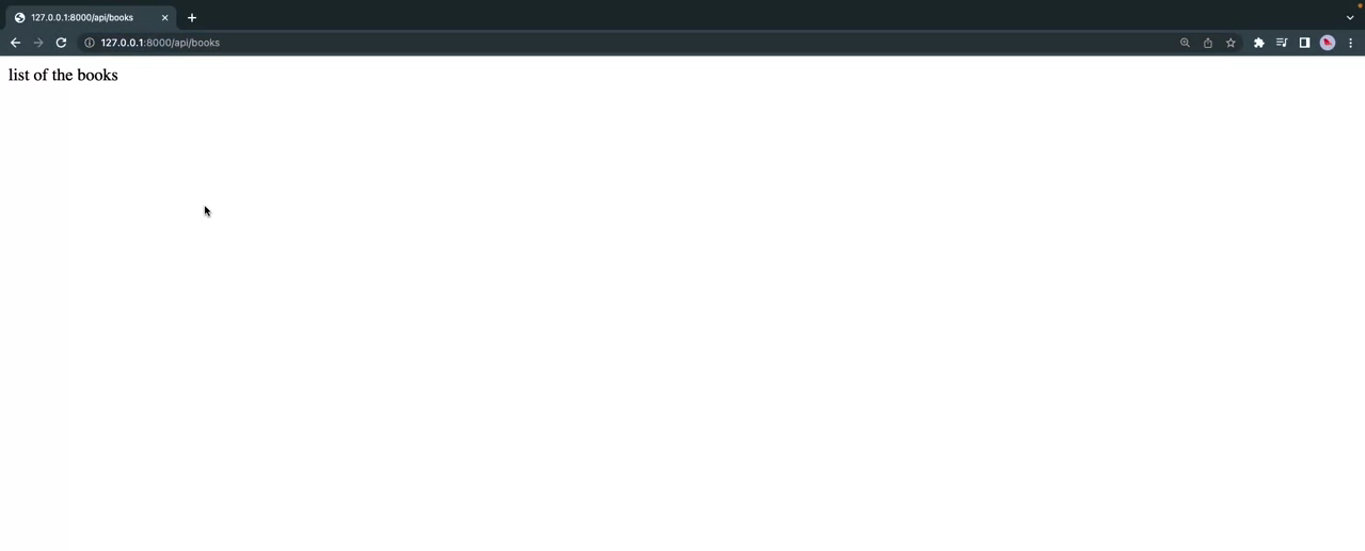
One of the most significant benefits of using the API view decorator is that it turns your standard AP output into a nice brow sable API interface. But you must use the response class to get this view.
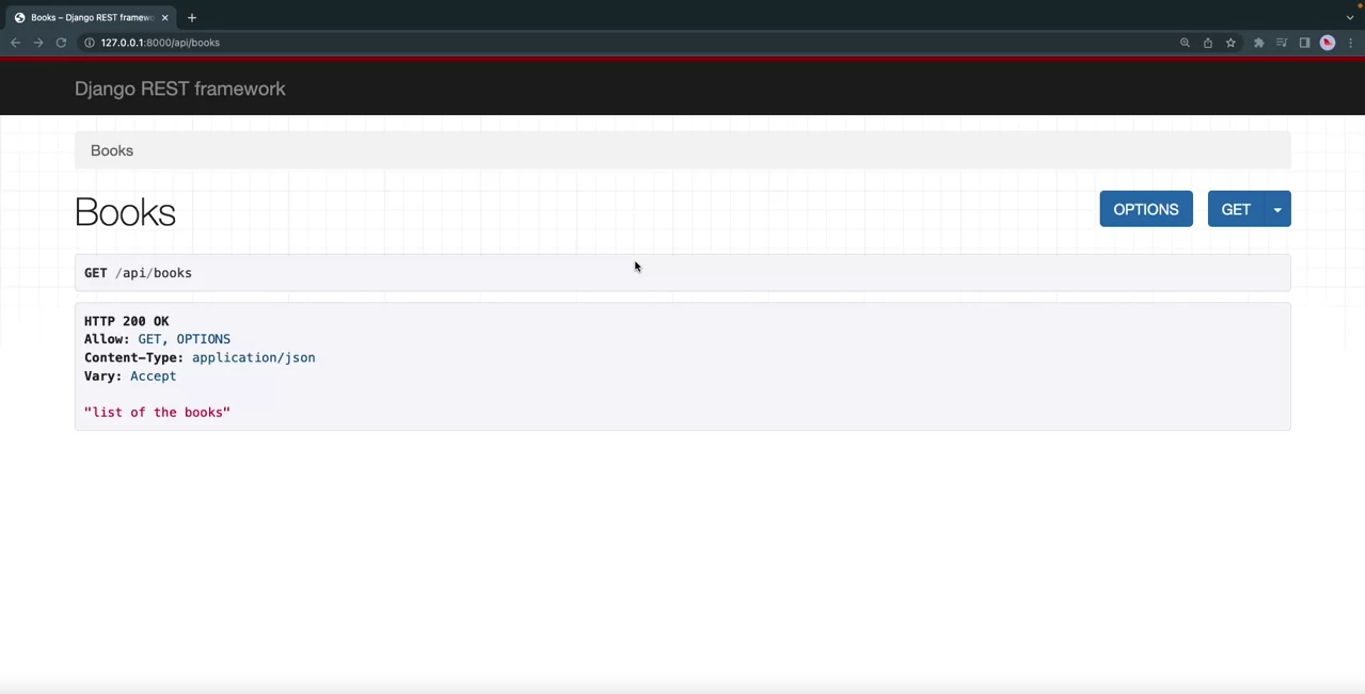
If you change the view function to →
from django.shortcuts import render
from rest_framework.response import Response
from rest_framework import status
from rest_framework.decorators import api_view
from django.http import HttpResponse

def books(request):
	return HttpResponse('list of the books', status=status.HTTP_200_OK)
you see →
What HTTP method your function should support
from django.shortcuts import render
from rest_framework.response import Response
from rest_framework import status
from rest_framework.decorators import api_view

@api_view(['GET', 'POST'])
def books(request):
	return Response('list of the books', status=status.HTTP_200_OK)
OPTIONS button
By clicking on the Options button, you can view helpful information about the current API endpoint, such as which rendered DRF users to dispel the API put, what types of data this API accepts, and so on.
Throttling or Rate-limiting
The API view decorator also allows you to implement Throttling or Rate-limiting, by which you can define how many times someone can access this API in a given period.
Authentication
The API view decorator also helps you to authentic your endpoints so that only authenticated users can call this API endpoints.
Different types of routing in DRF
Introduction
The Django REST framework provides different ways of URL mapping or routing in an API project. Besides the traditional style of routing, there are other routing techniques that can save you time while developing. In this reading, you are going to learn about both traditional and other techniques.
Note: All the routings should be done in the urls.py file in your Django app.
Regular routes
The code below maps a function from a views.py file to an API endpoint. Don’t forget that you have to import the path function from the django.urls module first.
from django.urls import path
from . import views
urlpatterns = [
	path('books’,views.books) ,
]
This URL pattern maps the books function to the /api/books endpoint. You already know how to specify which HTTP methods a function view can serve by supplying them in the api_decorator function. The following code allows any function view to serve both HTTP GET and POST methods.
@api_view([‘GET’,’POST’])Routing to a class method
If you map a specific method from a class, then you need to declare that method as a @staticmethod first. After that, you can map it in the urls.py file. Here’s an example of a class in the views.py file.
class Orders():
	@staticmethod
	@api_view()
	def listOrders(request):
    	return Response({'message':'list of orders'}, 200)
You can also map this listOrders method in the urls.py file as follows.
from django.urls import path
from . import views
urlpatterns = [
	path('orders', views.Orders.listOrders)
]
Routing class-based views
You can save a lot of time in DRF by mapping a class that extends the APIview. You don’t need to individually map every method of such classes. In an upcoming video, Function and class-based views, you will learn that such classes have HTTP verb-specific methods inside them. When a class extends APIview or generic views, you can simply map those classes in the urls.py file.
Here’s the code of the class that extends the APIView.
class BookView(APIView):
	def get(self, request, pk):
    	return Response({"message":"single book with id " + str(pk)}, status.HTTP_200_OK)
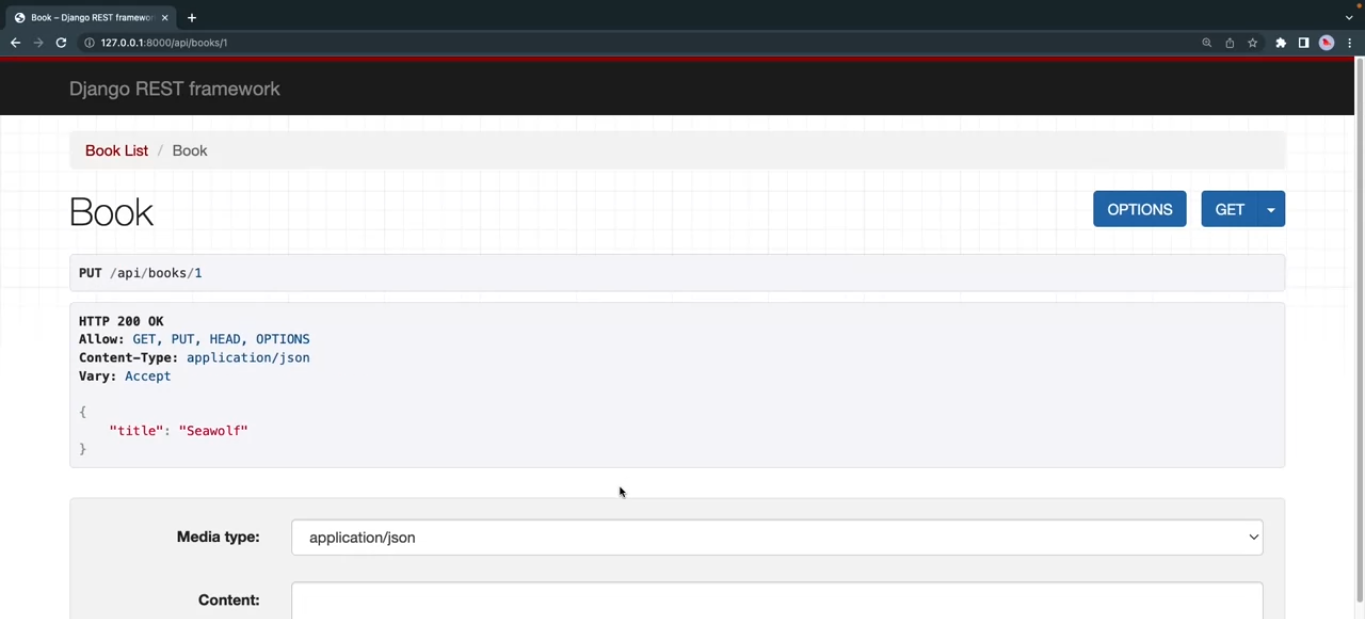
	def put(self, request, pk):
    	return Response({"title":request.data.get('title')}, status.HTTP_200_OK)
And here is how you map this class in the urls.py file. All you have to do is map the class as a view against an endpoint.
from django.urls import path
from . import views
urlpatterns = [
    path('books/<int:pk>',views.BookView.as_view())
]
Now you can make HTTP, GET and PUT calls to the /api/books/{bookId} endpoint without issues. If the class has post(), delete() and patch() methods, it will work with HTTP POST, DELETE and PATCH methods too.
Routing classes that extend viewsets
You can have classes that extend the different types of ViewSets in your API project. Just like the classes that extend APIView, these classes also have specific methods used to respond to different types of HTTP requests. Here’s an example of a typical class that extends the viewset.Viewset class.
Class BookView(viewsets.ViewSet):
	def list(self, request):
    	return Response({"message":"All books"}, status.HTTP_200_OK)
	def create(self, request):
    	return Response({"message":"Creating a book"}, status.HTTP_201_CREATED)
	def update(self, request, pk=None):
    	return Response({"message":"Updating a book"}, status.HTTP_200_OK)
	def retrieve(self, request, pk=None):
    	return Response({"message":"Displaying a book"}, status.HTTP_200_OK)
	def partial_update(self, request, pk=None):
        return Response({"message":"Partially updating a book"}, status.HTTP_200_OK)
	def destroy(self, request, pk=None):
    	return Response({"message":"Deleting a book"}, status.HTTP_200_OK)
You can map this class in the urls.py file in your Django app as follows.
urlpatterns = [
	path('books', views.BookView.as_view(
    	{
        	'get': 'list',
        	'post': 'create',
    	})
	),
    path('books/<int:pk>',views.BookView.as_view(
    	{
        	'get': 'retrieve',
        	'put': 'update',
        	'patch': 'partial_update',
        	'delete': 'destroy',
    	})
	)
]
Notice how the HTTP verbs are mapped with each method in this class. Also, note that both the list() and retrieve() methods are present. The list() method is used to display all books, and the retrieve() method is used to display a single book.
After this mapping, you can access the http://127.0.0.1:8000/api/books endpoint with GET and POST methods. While you can access the http://127.0.0.1:8000/api/books/1 endpoint with GET, PUT, PATCH and DELETE.
Routing with SimpleRouter class in DRF
If you have a class that extends ViewSets then you can use different types of built-in routers to map those classes in your urls.py file. Doing things this way means you don’t have to map the individual methods as you did in the previous section. Initiate a SimpleRouter object and map the class in the urls.py file in your Django app as follows.
from rest_framework.routers import SimpleRouter
router = SimpleRouter(trailing_slash=False)
router.register('books', views.BookView, basename='books')
urlpatterns = router.urls
After mapping, you can access the api/books and api/books/1 endpoints with the same methods as in the previous example.
Did you notice that the argument trailing_slash=False was passed, instantiating the SimpleRouter object? Without this argument, your API endpoints will have a trailing slash. And, since you don’t want a trailing slash at the end of your API endpoints, you have to pass this argument.
Routing with DefaultRouter class in DRF
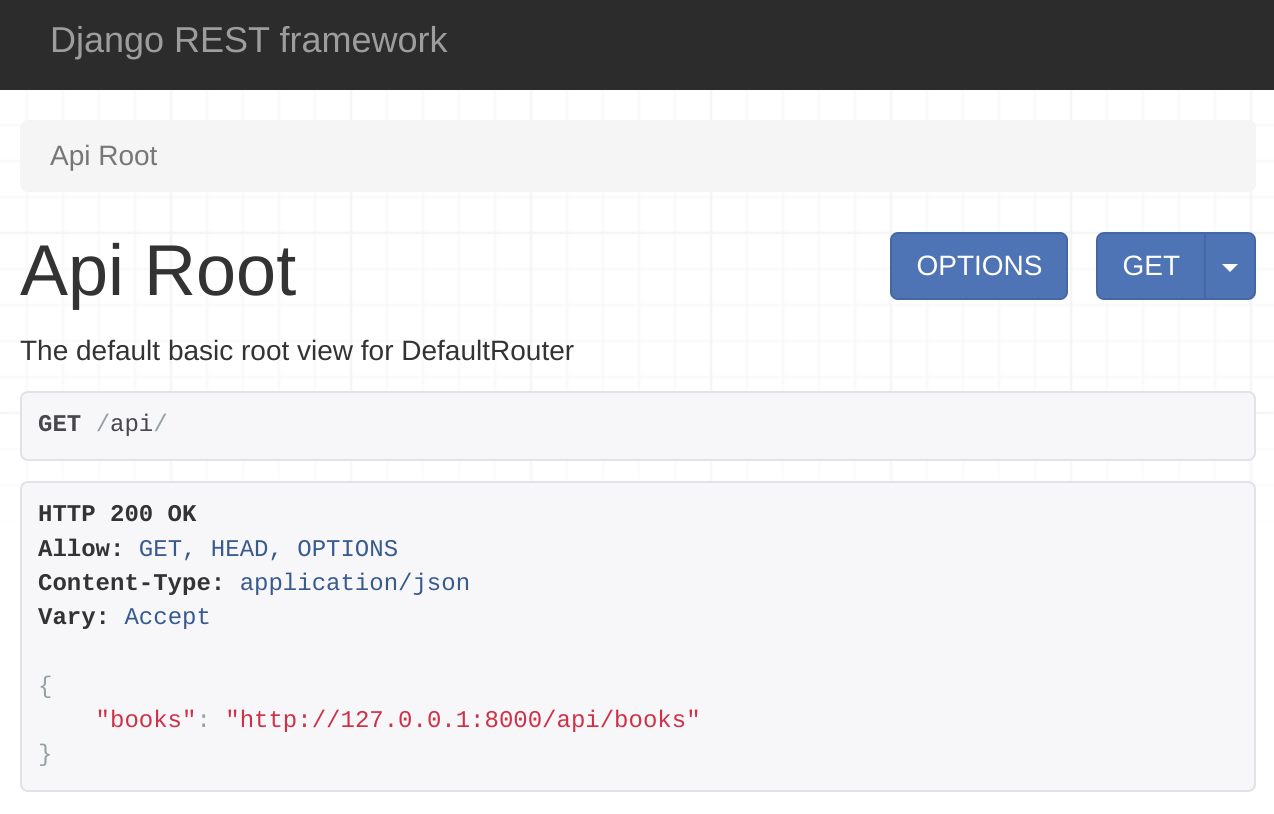
There is another type of router called DefaultRouter which provides an extra benefit over the SimpleRouter. It creates an API root endpoint with a trailing slash that displays all your API endpoints in one place. You can use it this way in the urls.py file.
from rest_framework.routers import DefaultRouter
router = DefaultRouter(trailing_slash=False)
router.register('books', views.BookView, basename='books')
urlpatterns = router.urls
Again, after mapping, you can access the api/books and api/books/1 endpoints with the same methods as in the previous examples.
Additionally, you can access the API root view when you visit the http://127.0.0.1:8000/api/ endpoint. This will display all the available endpoints as in the screenshot below.
You can read about all of these routers and more in the DRF documentation shared in the additional resources of this lesson.
Conclusion
In this reading, you learned about different types of URL routing for your Django REST framework-based API project.
Generic views and ViewSets in DRF
Introduction
DRF comes with many generic views and ViewSet to speed up API development. When you use these classes, you don’t need to start from scratch and using them will reduce the code in your API project. In this reading, you will learn about different types of generic views and ViewSet as well as their purposes and benefits.
ViewSets
ViewSets are simple class-based views, but they come with benefits. There are a few ViewSets classes available in DRF that you can use to quickly scaffold a functioning API CRUD project. You can also provide permission classes and throttle classes to allow authenticated API calls and rate limiting.
To use these classes, you must import the viewsets module from the rest_framework:
from rest_framework import viewsetsViewSet
There are a few ViewSet classes but the foundation is ViewSet and it extends the APIView. When your class-based views extend a ViewSet you get browsable API views out of the box. Except for that, every ViewSet comes with a method naming convention for easier one-line routing that saves a lot of time.
When a ViewSet is used to deal with a collection of resources, you can write your business logic in list() and create() methods inside this class.
| Class method | Supported HTTP method | Purpose |
|---|---|---|
list() | GET | Display resource collection |
create() | POST | Create new resource |
You can use the following methods to write the business logic when a ViewSet deals with a single resource.
| Class method | Supported HTTP method | Purpose |
|---|---|---|
retrieve() | GET | Display a single resource |
update() | PUT | Completely replace a single resource with new data |
partial_update() | PATCH | Partially update a single resource |
destroy | DELETE | Delete a single resource |
When you extend a ViewSet, you will have to manually write code to perform the database operations. But there are two more ViewSet classes that can automatically do that for you. This is how you extend a ViewSet class.
class MenuItemViewSet (viewsets.ViewSet)ModelViewSet
If the class-based view extends a ModelViewSet, it can automatically handle CRUD operations for you. All you must do is give this class a queryset and a serializer, and everything else will be done automatically. You don’t need to write code for all those database operations anymore. Later in this course, you will see a practical example of using ModelViewSet to write a functioning CRUD API project with only a few lines of code. Here’s an example of how to extend this ViewSet.
class MenuItemView (viewsets.ModelViewSet)ReadOnlyModelViewSet
As the name suggests, when your class-based views extend a ReadOnlyModelViewSet, it can only display a single resource and resource collection. No write-operation is allowed by such views, so it doesn’t handle POST, PUT, PATCH or DELETE methods. Here’s an example of extending a ReadOnlyModelViewSet.
class ReadOnlyMenuItemView (viewsets.ReadOnlyModelViewSet)Generic views
Generic views are another way of quickly writing class-based views to scaffold fully functional CRUD API projects. There are several generic views that offer a particular functionality, like displaying resources or creating a new resource and so on. All you must do is extend these generic views to make your API endpoints work.
To use these generic view classes, you must import the generics module from the rest_framework.
from rest_framework import genericsAll generic view classes require a queryset and a serializer to work properly.
Here is a list of generic views in DRF and their purposes.
| Generic view class | Supported method | Purpose |
|---|---|---|
CreateAPIView | POST | Create a new resource |
ListAPIView | GET | Display resource collection |
RetrieveAPIView | GET | Display a single resource |
DestroyAPIView | DELETE | Delete a single resource |
UpdateAPIView | PUT and PATCH | Replace or partially update a single resource |
ListCreateAPIView | GET, POST | Display resource collection and create a new resource |
RetrieveUpdateAPIView | GET, PUT, PATCH | Display a single resource and replace or partially update it |
RetrieveDestroyAPIView | GET, DELETE | Display a single resource and delete it |
RetrieveUpdateDestroyAPIView | GET, PUT, PATCH, DELETE | Display, replace or update and delete a single resource |
Example code
If you want API endpoints to be capable of displaying resource collection and creating a new resource, you have to extend both ListAPIView and CreateAPIView, or just ListCreateAPIView. Both of the following lines of code do the same job.
class MenuItemView (generics.ListAPIView, generics.CreateAPIView)And
class MenuItemView (generics.ListCreateAPIView)Just like ModelViewSet, you must give these generic view classes a queryset and a serializer and you don’t need to manually write code to perform these database operations.
Authentication and selective authentication
If you want all API calls to be authenticated in a class-based view that extends the generic views, you can add the permission_classes public attribute in the class.
Permission_classes = [IsAuthenticated]If you want to selectively enable authentication for some calls, like POST, PUT, PATCH and DELETE then you need to override the get_permission method in your class-based view like this.
def get_permissions(self):
        permission_classes = []
        if self.request.method != 'GET':
            permission_classes = [IsAuthenticated]

        return [permission() for permission in permission_classes]
This way, anyone will be able to make GET call, but other HTTP methods like POST, PUT, PATCH and DELETE will require authentication or a valid user token.
Return items for the authenticated user only
Sometimes in a class-based view that extends a generic view, you may want to return resources created by the authenticated users only. In that case, you need to override the get_queryset method. The following code in a class-based view returns only those orders created by the authenticated user.
class OrderView(generics.ListCreateAPIView):
    queryset = Order.objects.all()
    serializer_class = OrderSerializer
    permission_classes = [IsAuthenticated]
    def get_queryset(self):
        return Order.objects.all().filter(user=self.request.user)
Override default behavior
Though generic views automate everything, you still have full scope to change the default behavior by overriding any of the default methods. Here is an example that returns a simple static response instead of the resources.
class OrderView(generics.ListCreateAPIView):
    queryset = Order.objects.all()
    serializer_class = OrderSerializer
    def get(self, request, *args, **kwargs):
        return Response(‘new response’)
The other methods you can override are post(), put(), patch() and delete().
Conclusion
In this reading, you explored the ViewSet classes and generic view classes which can help you to scaffold a fully functional CRUD API project in a very short time.
Function and class-based views
Function-based VS Class-based views
Function-based views advantages
- Function-based views are easy to implement
- offer better readability
- it’s easier to use decorators with them
- you can quickly write a one-off solution using function-based views
Class-based views advantages
- With class-based views, you don’t need to write as much code
- there’s less code duplication
- you can extend the clusters and add features that anytime
- you can write specific methods for each type of HTTP request
The views.py from before
Open the views.py file from the same booklet project you worked on before, you’ll create your first class-based views in this file. Class-based views help you to keep your code clean and less cluttered, and you can avoid writing extra code by reusing the common functionalities.
To create a class-based view in a DRF project, you must extend the APIView class, so let’s import it first from the rest framework module.
You also need to import the Response class.
NOTE
When adding methods in a class name, you should name them the same as the HTTP verbs. For example, get and post.
from django.shortcuts import render
from rest_framework.reponse import Response
from rest_framework import status
from rest_framework.decorators import api_view
from rest_framework.views import APIView

@api_view()
def books(request):
	return Reponse('list of the books', status=status.HTTP_200_OK)

class BookList(APIView):
	def get(self, request):
		return Response({"message":"list of the books"}, status.HTTP_200_OK)
# urls.py (app)
from django.urls import path
from . import views
urlpatterns = [
path('books', views.BookList.as_view()),
]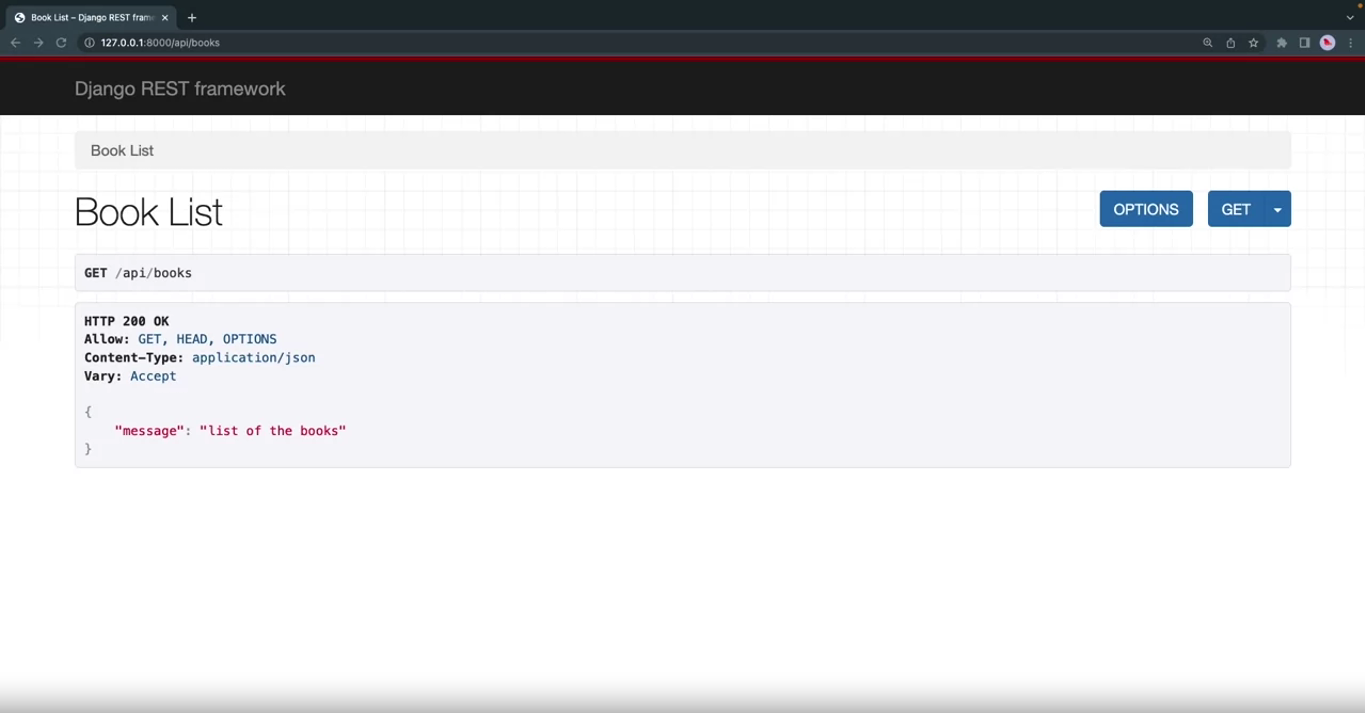
This endpoint will not accept an HTTP post request because there isn’t a post method in this BookList class. Let’s add one. The post method also accepts three or four arguments, like the get method.
from django.shortcuts import render
from rest_framework.reponse import Response
from rest_framework import status
from rest_framework.decorators import api_view
from rest_framework.views import APIView

@api_view()
def books(request):
	return Reponse('list of the books', status=status.HTTP_200_OK)

class BookList(APIView):
	def get(self, request):
		return Response({"message":"list of the books"}, status.HTTP_200_OK)

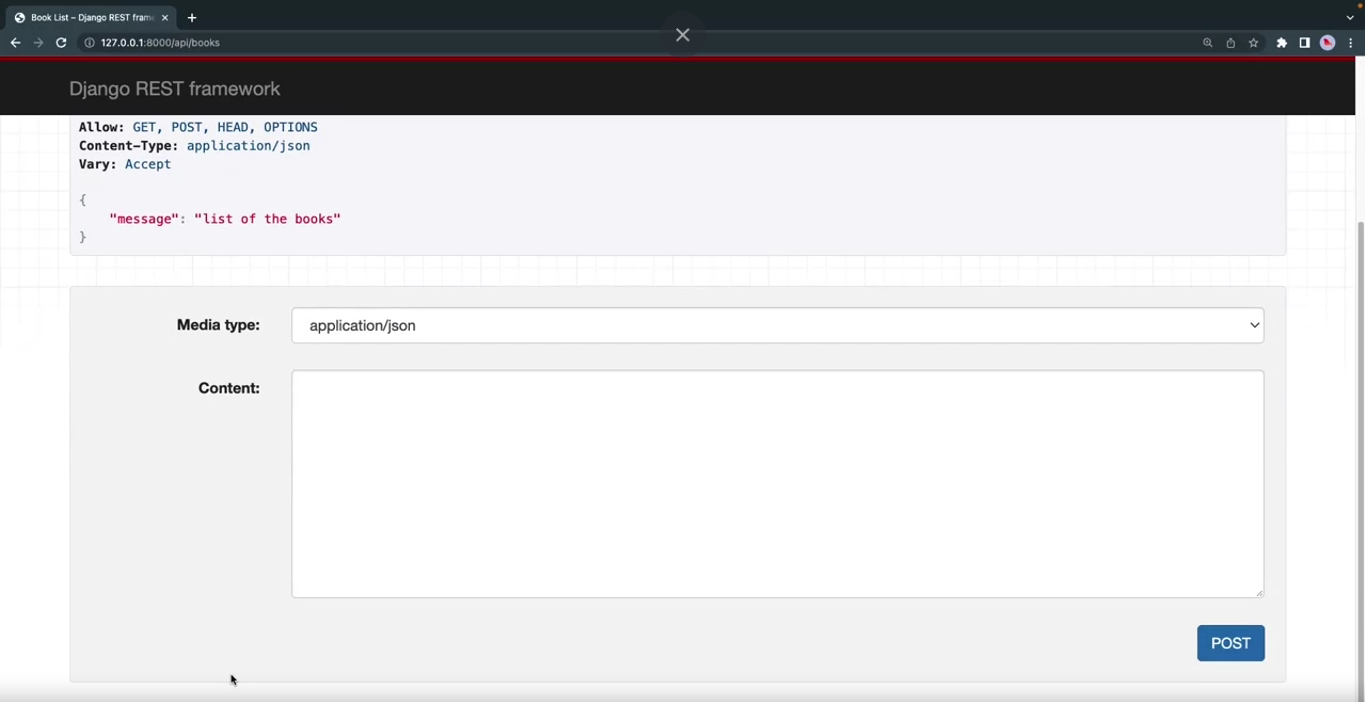
	def post(self, request):
		return Response({"message":"new book created"}, status.HTTP_201_CREATED)
Remember, you’re using the browsable API view. This means you can taste this post method right from your browser.
Filtering the contents
What if the APA client wants to list the books by a specific author, how can we exit the query string parameter from the falling request?
from django.shortcuts import render
from rest_framework.reponse import Response
from rest_framework import status
from rest_framework.decorators import api_view
from rest_framework.views import APIView

@api_view()
def books(request):
	return Reponse('list of the books', status=status.HTTP_200_OK)

class BookList(APIView):
	def get(self, request):
		author = request.GET.get('author')
		if(author):
			return Response({"message":"list of the books by " + author}, status.HTTP_200_OK)
		return Response({"message":"list of the books"}, status.HTTP_200_OK)

	def post(self, request):
		return Response({"message":"new book created"}, status.HTTP_201_CREATED)
You can accept the JSON or form URL-encoded data elements in a post method using request.data.get('').
Now, visit the book’s endpoint in the browser, scroll to the bottom, and in the Content textbox, add this JSON data.
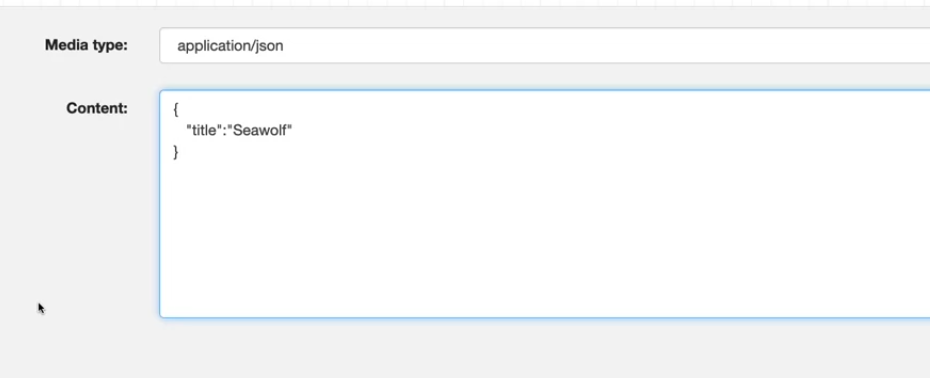
This is called a payload. Payload is a common term used for any JSON data or form URL-encoded data that you sent to an API.
from django.shortcuts import render
from rest_framework.reponse import Response
from rest_framework import status
from rest_framework.decorators import api_view
from rest_framework.views import APIView

@api_view()
def books(request):
	return Reponse('list of the books', status=status.HTTP_200_OK)

class BookList(APIView):
	def get(self, request):
		author = request.GET.get('author')
		if(author):
			return Response({"message":"list of the books by " + author}, status.HTTP_200_OK)
		return Response({"message":"list of the books"}, status.HTTP_200_OK)

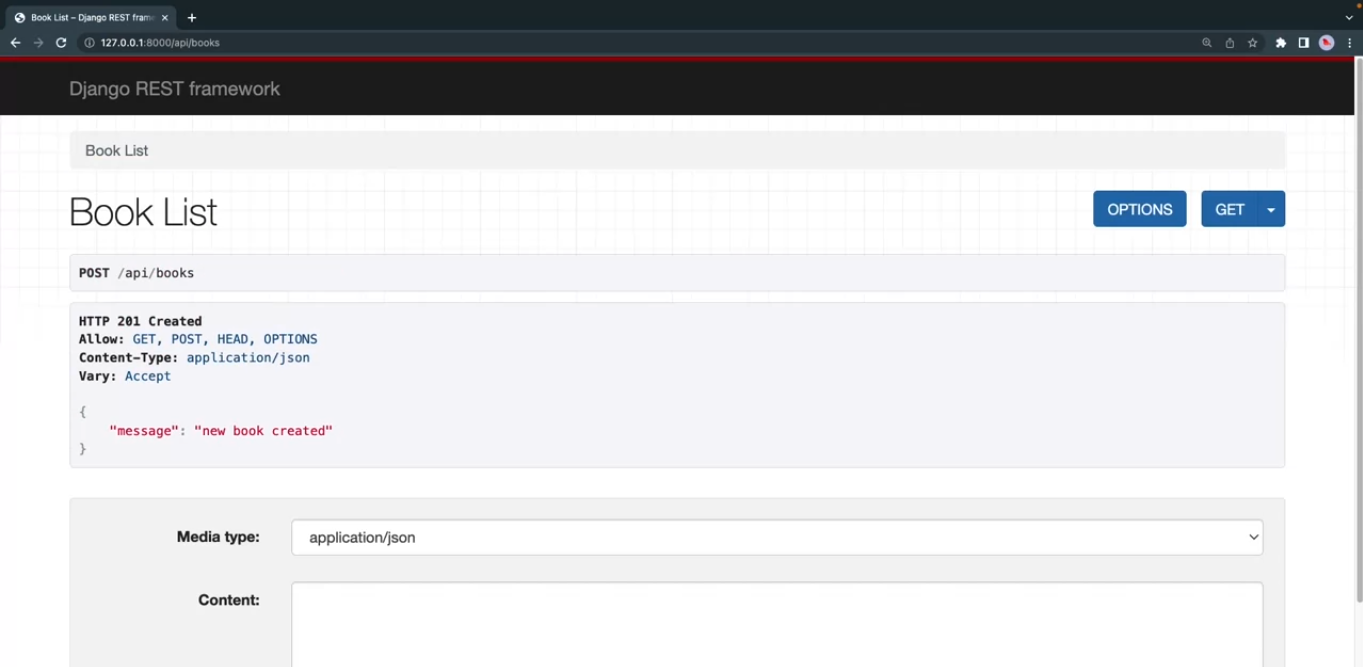
	def post(self, request):
		return Response({"title":request.data.get('title')}, status.HTTP_201_CREATED)
Click on the post button and check the result.
Accepting primary key
from django.shortcuts import render
from rest_framework.reponse import Response
from rest_framework import status
from rest_framework.decorators import api_view
from rest_framework.views import APIView

@api_view()
def books(request):
	return Reponse('list of the books', status=status.HTTP_200_OK)

class BookList(APIView):
	def get(self, request):
		author = request.GET.get('author')
		if(author):
			return Response({"message":"list of the books by " + author}, status.HTTP_200_OK)
		return Response({"message":"list of the books"}, status.HTTP_200_OK)

	def post(self, request):
		return Response({"title":request.data.get('title')}, status.HTTP_201_CREATED)

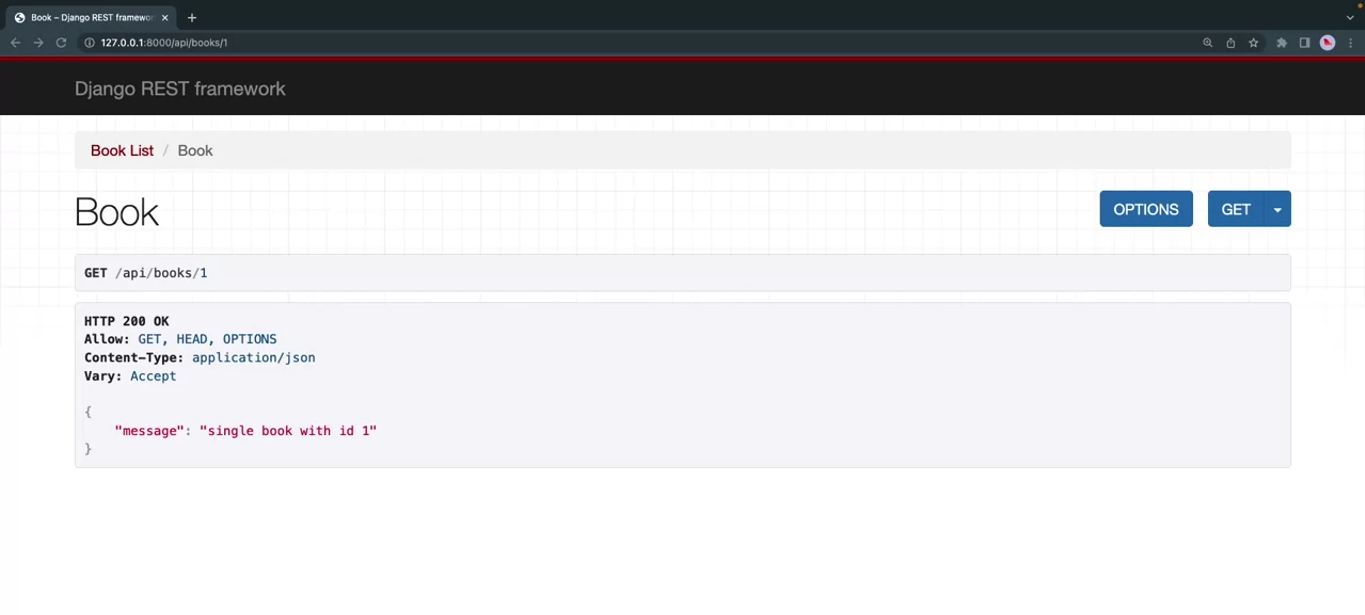
class Book(APIView):
	def get(self, request, pk):
		return Reponse({"message":"single book with id" + str(pk)}, status.HTTP_200_OK)
# urls.py (app)
from django.urls import path
from . import views
urlpatterns = [
path('books', views.BookList.as_view()),
path('books/<int:pk>', views.Book.as_view())
]
from django.shortcuts import render
from rest_framework.reponse import Response
from rest_framework import status
from rest_framework.decorators import api_view
from rest_framework.views import APIView

@api_view()
def books(request):
	return Reponse('list of the books', status=status.HTTP_200_OK)

class BookList(APIView):
	def get(self, request):
		author = request.GET.get('author')
		if(author):
			return Response({"message":"list of the books by " + author}, status.HTTP_200_OK)
		return Response({"message":"list of the books"}, status.HTTP_200_OK)

	def post(self, request):
		return Response({"title":request.data.get('title')}, status.HTTP_201_CREATED)

class Book(APIView):
	def get(self, request, pk):
		return Reponse({"message":"single book with id" + str(pk)}, status.HTTP_200_OK)

	def post(self, request, pk):
		return Reponse({"title":request.data.get('title')}, status.HTTP_200_OK)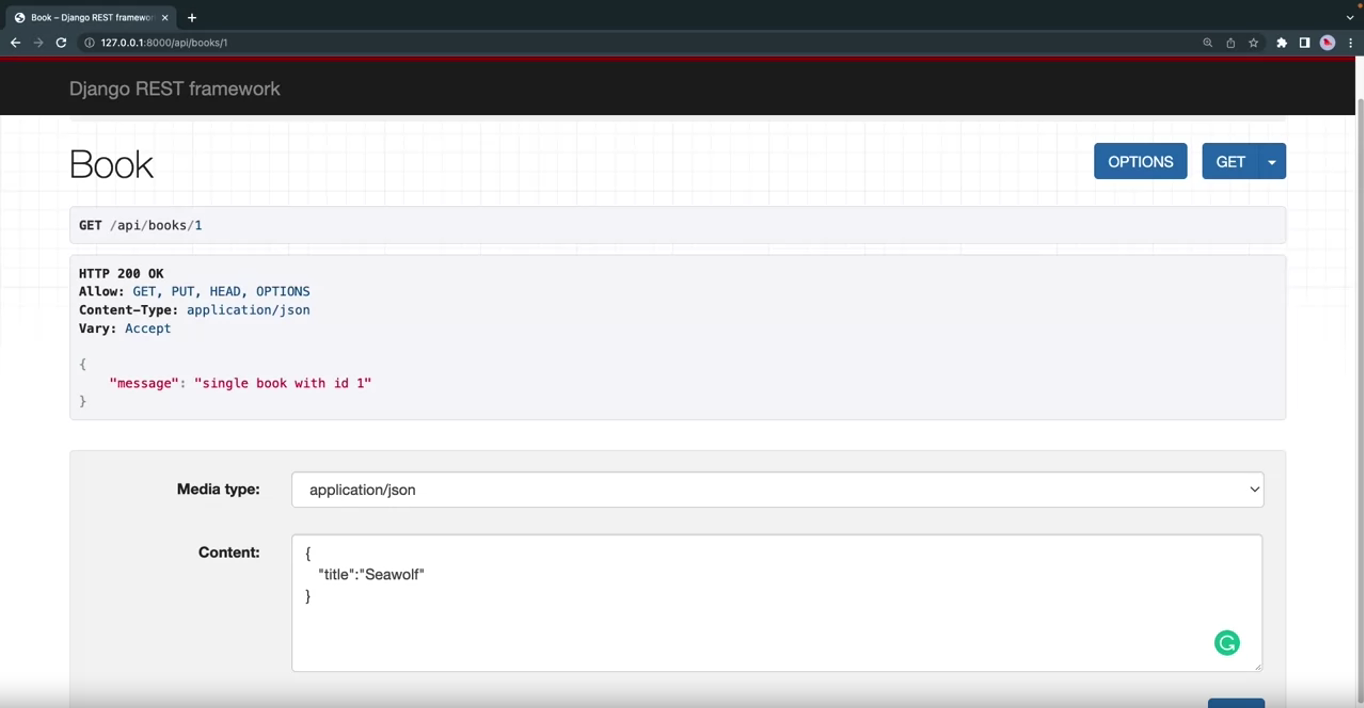
Click the Put button, and note the output.
Like the APA view decorator, you can use throttling and authentication policies.
Django debug toolbar
pipenv shell
pipenv install django-debug-toolbar
Add the debug_toolbar in the INSTALLED_APPS in the settings.py.
Add a special URL pattern in your project.
path('__debug__/', include('debug_toolbar.urls'))Include the debug_toolbar.middleware.DebugToolbarMiddleware in the MIDDLEWARE section in settings.py.
Finally add the following at the end of the settings.py file:
INTERNAL_IPS = [
	'127.0.0.1'
]
This section is not in the settings.py file by default, so you have to add it.
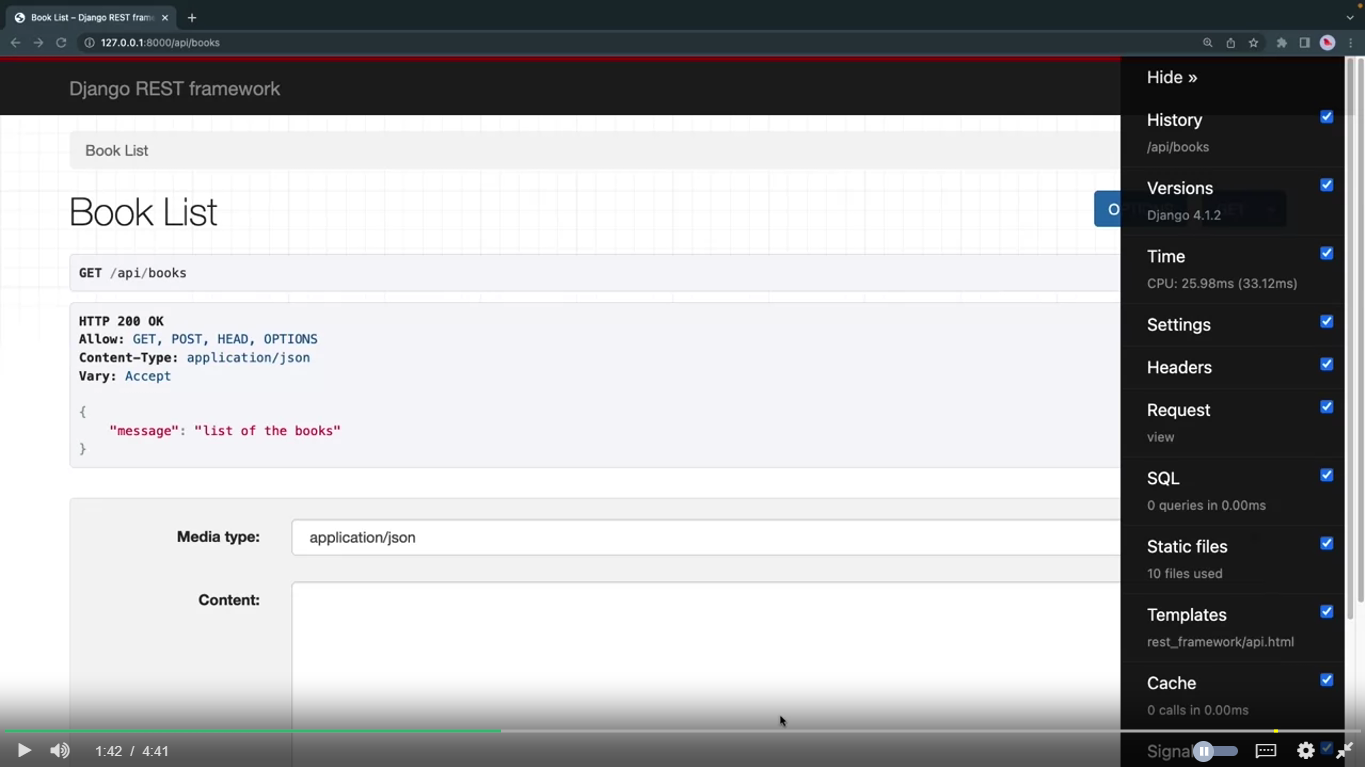
Now if you go to any API endpoint, you will notice the debug toolbar at the right side of the screen.
The toolbar sections
Settings
The settings section displays all the settings you have in your settings.py file and other settings used throughout the project and the installed apps.
If you want to override a setting, copy its name and value from here and then add it in the settings.py file with the new value.
Headers
This section includes all the header information sent to this request and those generated in the response.
SQL
The SQL section is one of the most useful sections in the Django debug toolbar. It shows the list of the SQL queries executed for this end point. This is a place where you often check for performance tuning and optimization. From here, you can easily detect if more than required SQL queries are running and then take the necessary steps to fix them.
Static files
The static file section displays all the static files loaded for the current request and those used by the installed apps.
Developers usually do not serve static files from API requests. Still, you should know about this.
Cache
The Cache section displays applications that use the Cache. By now, you should know that Cache helps to reduce the several load for a great extent.
Profiling
This is unchecked by default and you can enable it using the checkbox next to it. The profiling section displays the complete call stack. When you make a request, a file in your project intercepts the call. Then it invokes another function, that function calls another one and it goes on and on like this. It then comes to your function or class based views and thereafter, jumps to another file to generate the response and display it.
So, the profiling section contains this full code execution flow.
NOTE
Please note that the Django debug toolbar will only be visible during development time when you use the browser API. It will not show when you’re making the API call in the production view or when it returns data as the client apps are consuming the APIs.
Restaurant menu API project with DRF
Create a LittleLemonAPI app, and add it to the settings.py. Ensure to add rest_framework too.
# models.py

from django.db import models

class MenuItem(models.Model):
	title = models.CharField(max_length=255)
	price = models.DecimalField(max_digits=6, decimal_places=2)
	inventory = models.SmallIntegerField()
Another thing you need for this project, is a serializers object. By now, you know that serializers helped to convert model instances into Python datatypes that can be displayed as JSON or XML. It also helps you to convert HTTP request body into Python datatypes and made them to a model instance.
Create a serializers.py in the app:
from rest_framework import serializers
from .models import MenuItem

class MenuItemSerializer(serializers.ModelSerializer):
	class Meta:
		model = MenuItem
		fields = ['id', 'title', 'price', 'inventory']
Make sure it has every field in the models section.
# views.py

from rest_framework import generics
from .models import MenuItem
from .serializers import MenuItemSerializer

class MenuItemView(generics.ListCreateAPIView):
	queryset = MenuItem.objects.all()
	serializer_class = MenuItemSerializer
ListCreateView can display records and accept Post calls to create new records. To function correctly, at least CreateView needs two items, a queryset that retrieves all the records using a model, and a serializer class to display and store the records properly.
# urls.py (app)

urlpatterns = [
	path('menu-items', views.MenuItemsView.as_view())
]

# urls.py (project)

urlpatterns = [
	path('admin/', admin.site.urls),
	path('api/', include('LittleLemonAPI.urls'))
]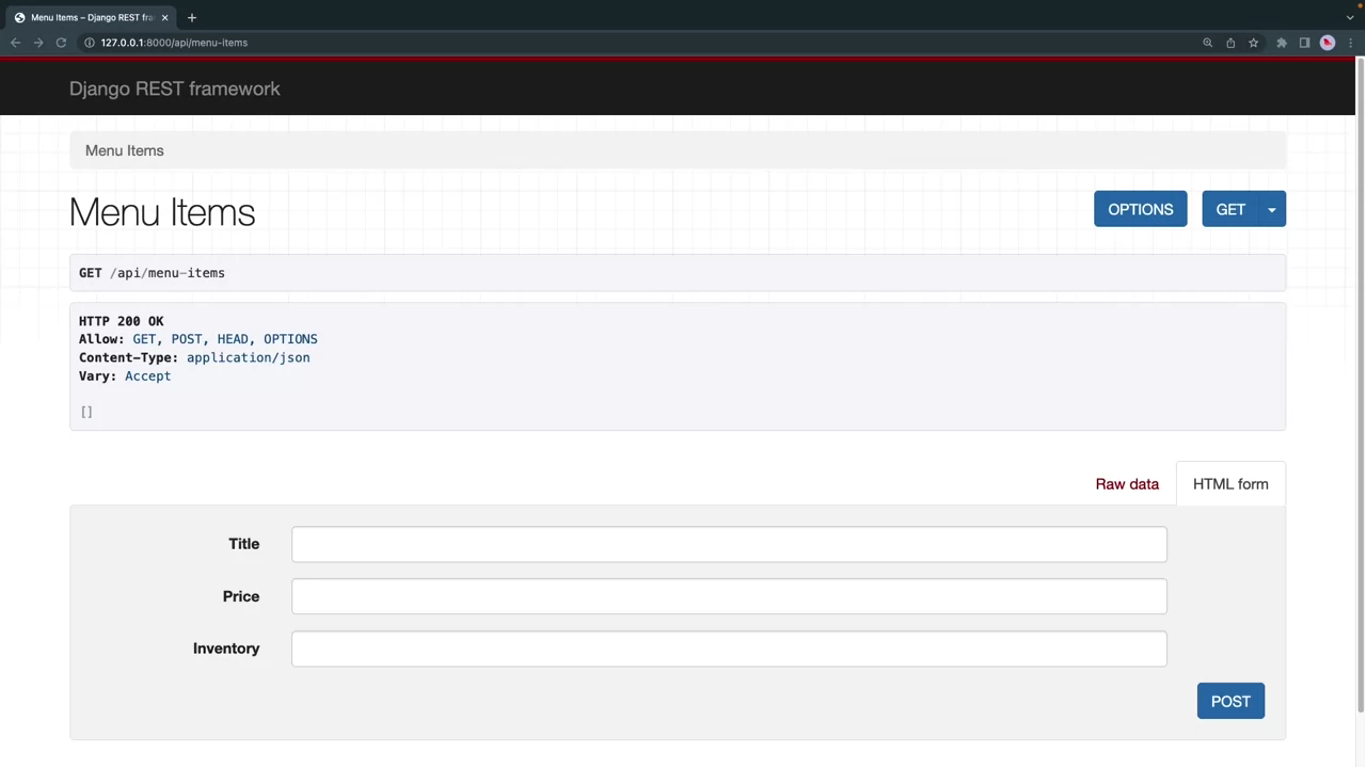
At this point, you don’t have any menu items, so none are included in the output. It’s time to create records.
Since you have extended listcreateapiview, this menu items endpoint automatically supports HTTP post calls. Scroll down and you’ll notice a form to add menu items with the title, price and inventory fills.
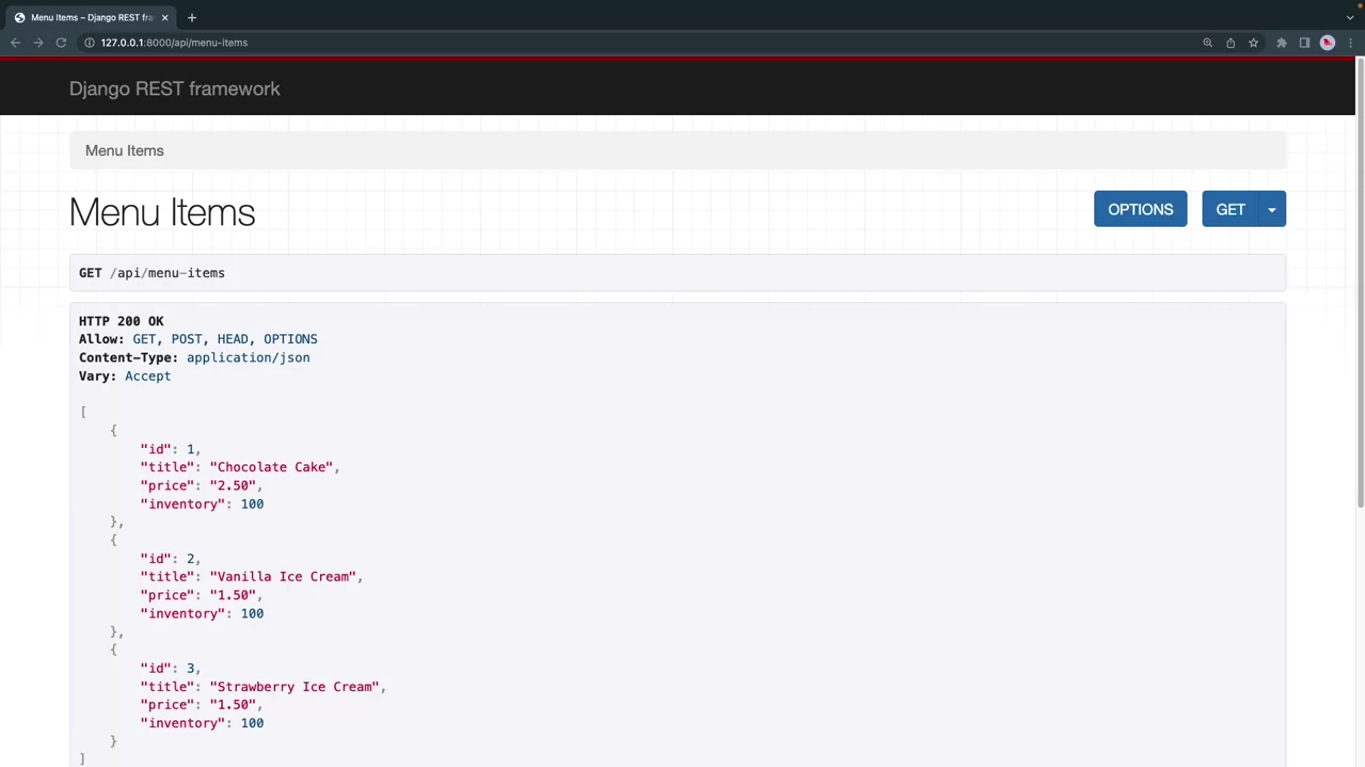
For single item: http://127.0.0.1/api/menu-items/{itemId}, you need to create another class in views.py.
# views.py

from rest_framework import generics
from .models import MenuItem
from .serializers import MenuItemSerializer

class MenuItemView(generics.ListCreateAPIView):
	queryset = MenuItem.objects.all()
	serializer_class = MenuItemSerializer

class SingleMenuItemView(generics.RetrieveUpdateAPIView, generics.DestroyAPIView):
	queryset = MenuItem.objects.all()
	serializer_class = MenuItemSerializer
# urls.py (app)
urlpatterns = [
path('menu-items', views.MenuItemView.as_view()),
path('menu-items/<int:pk>', views.SingleMenuItemView.as_view()),
]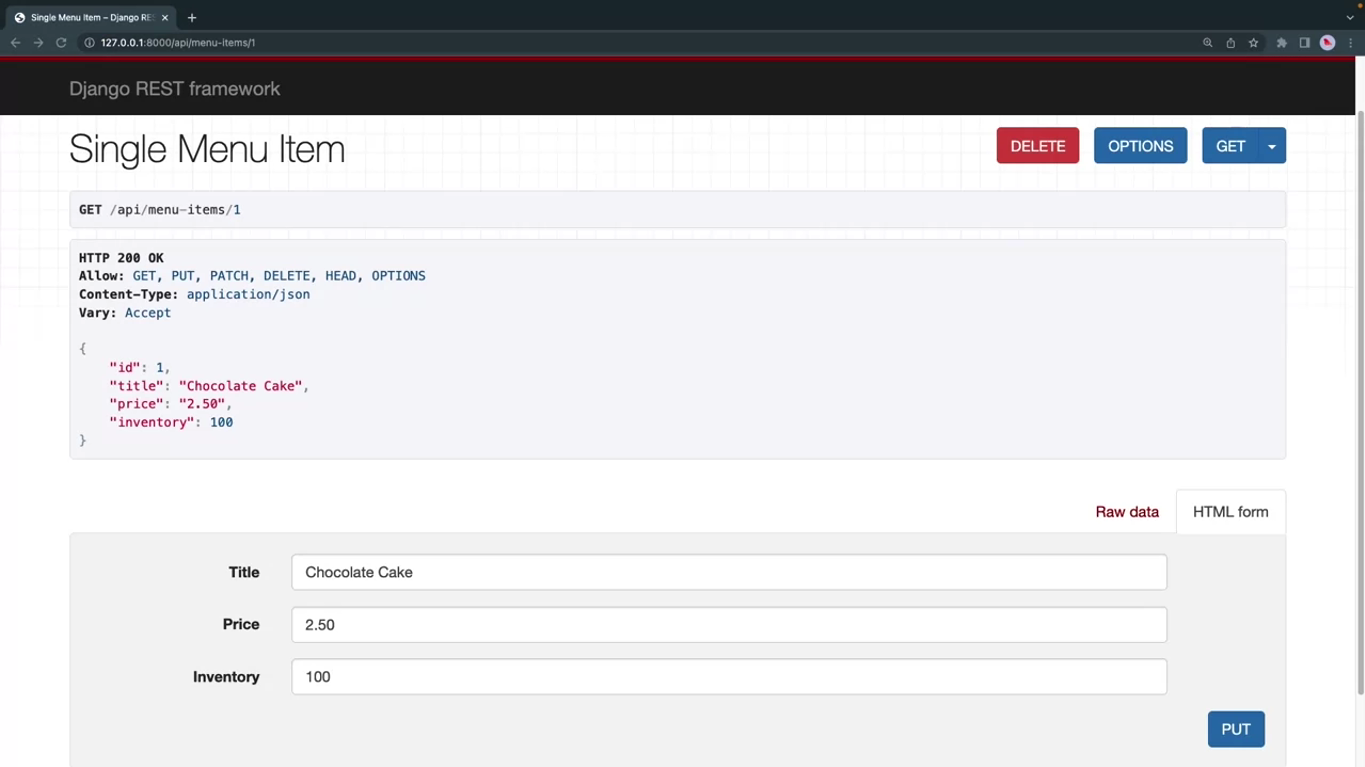
If you scroll down, you can see a form that you can use to update this record. There is also a Delete button, to delete the record.
You can send HTTP, get, put, patch, and delete calls to this endpoint, which works without any issues.
Additional resources
The following resources will be helpful as additional references in dealing with different concepts related to the topics you have covered in this section.
Django rest framework toolkit for building web APIs
Django debug toolbar documentation
Django Debug toolbar source code
DjangoPythonHTTPAPIRESTRESTfulDRF
Previous one → 3.Writing your first API | Next one → 5.Django REST framework essentials