Serializers
The function of serializers
You can pull data from the database using Django models and then represent this data to your clients.

You can also convert user supplied data into models to store them safely in a database. And before storing this data you can use serializers to ensure the integrity of the data and avoid data corruption.

Serializers are the most popular feature in DRF. They are essential for converting objects and Django models into a more readable format like JSON or XML. They can also parse the JSON data and map them onto an existing model. This is the opposite of serialization and it is called deserialization.
Serializers can also validate data during this deserialization process, ensuring that your data is clean and consistent.
Creating a new file called serializers.py will help to put all of the serializers specific code in one place. This will be located in the Django app directory.
# views.py

from rest_framework.reponse import Reponse
from rest_freamework.decorators import api_view
from .models import MenuItem

@api_view()
def menu_item(request):
	items = MenuItem.objects.all()
	return Reponse(itmes.values())
If you visit the menu items endpoint, all menu items are displayed as JSON data. The DRF will automatically take care of converting a query set object and display every field of the menu items.
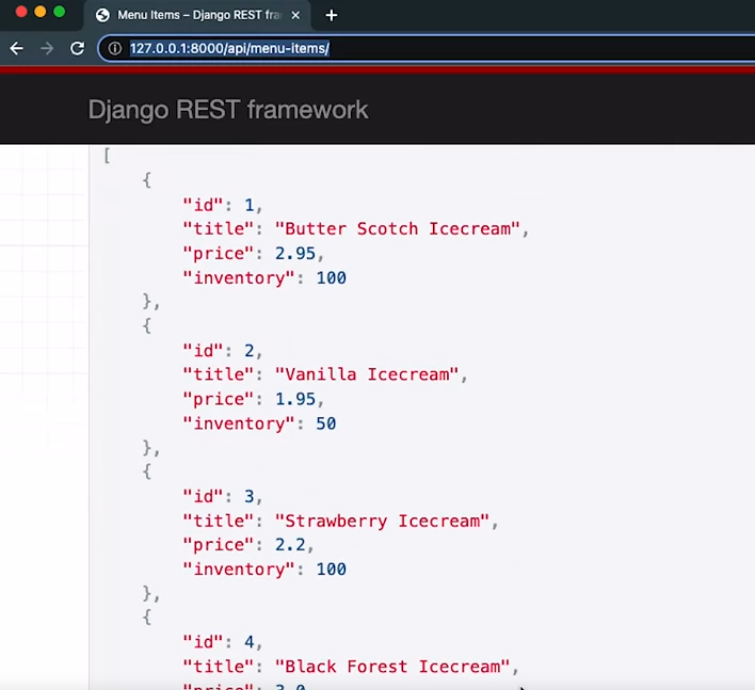
If there is a sensitive field you don’t want to expose to the public, you cannot hide it without the help of a serializer.
from rest_framework import serializers

class MenuItemSerializer(serializers.Serializer):
	id = serializer.IntegerField()
	title = serializer.CharField(max_length=255)
You can add all the fields you want to display in the API result or hide them from here.
# views.py

from rest_framework.reponse import Reponse
from rest_freamework.decorators import api_view
from .models import MenuItem

@api_view()
def menu_item(request):
	items = MenuItem.objects.all()
	serialized_item = MenuItemSerializer(items, many=True)
	return Reponse(serialized_item.data)
NOTE
Note you are passing an argument called
many=True. This argument is essential when you are converting a list to JSON data
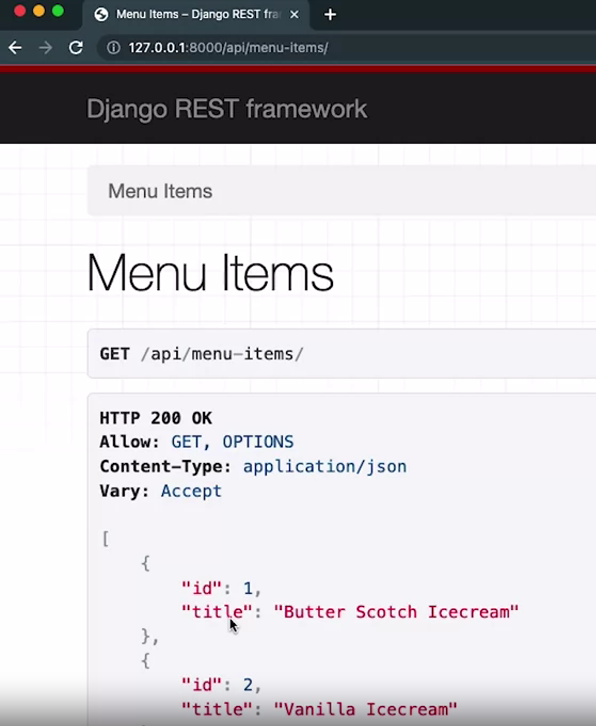
The title and inventory fields are not in the result anymore. To bring them in, you can add price and inventory fields to your serializer.
# views.py

from rest_framework.reponse import Reponse
from rest_freamework.decorators import api_view
from .models import MenuItem

@api_view()
def menu_item(request):
	items = MenuItem.objects.all()
	return Reponse(itmes.values())

@api_view()
def single_item(request, id):
	item = MenuItem.objects.get(pk=id)
	serialized_item = MenuItemSerializer(item)
	return Response(serialized_item.data)
NOTE
Did you notice that I’m not using the many equals True argument this time that’s because it’s not required to convert a single object.
# urls.py

from django.urls import path
from . import views

urlspatterns = [
	path('menu-items/', views.menu_items),
	path('menu-items/<int:pk>', views.single_item)
]
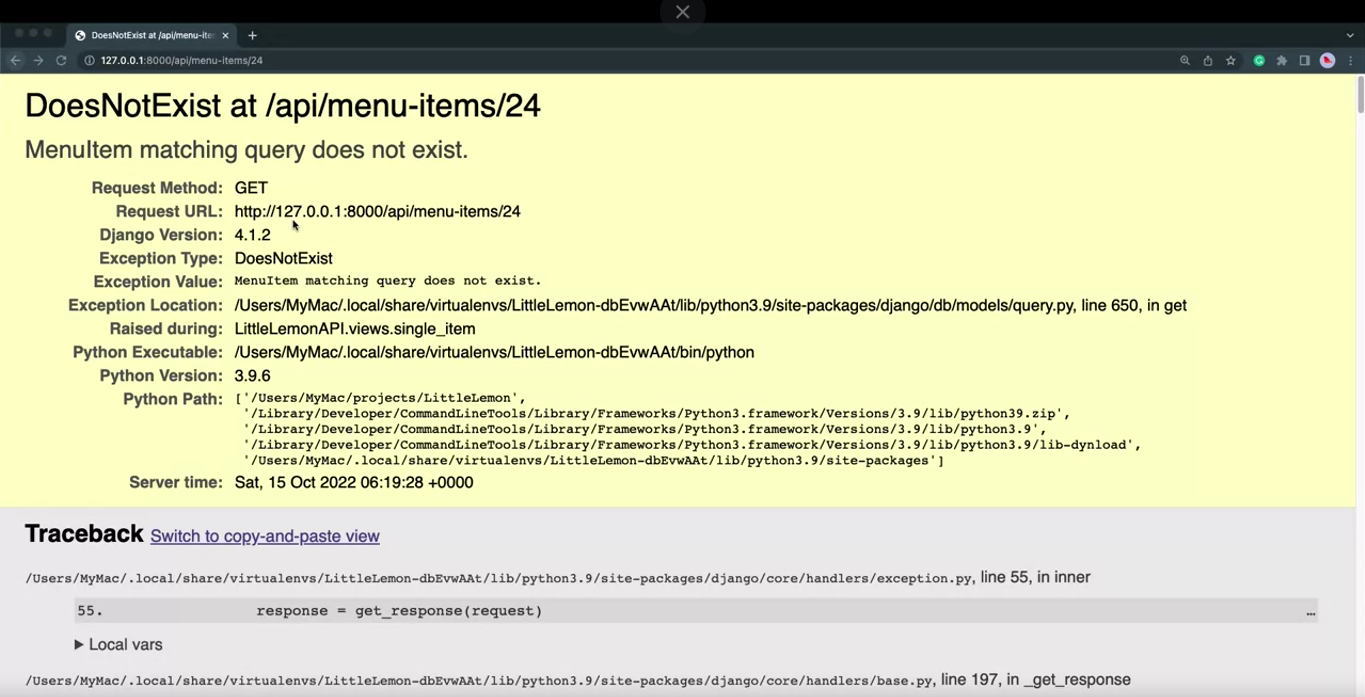
What happens when you visit this endpoint with a non existing ID? You will get server errors, but you can convert it to a friendly error message using the get object or 404 method.
# views.py

from rest_framework.reponse import Reponse
from rest_freamework.decorators import api_view
from .models import MenuItem

@api_view()
def menu_item(request):
	items = MenuItem.objects.all()
	return Reponse(itmes.values())

@api_view()
def single_item(request, id):
	item = get_object_or_404(MenuItem, pk=id)
	serialized_item = MenuItemSerializer(item)
	return Response(serialized_item.data)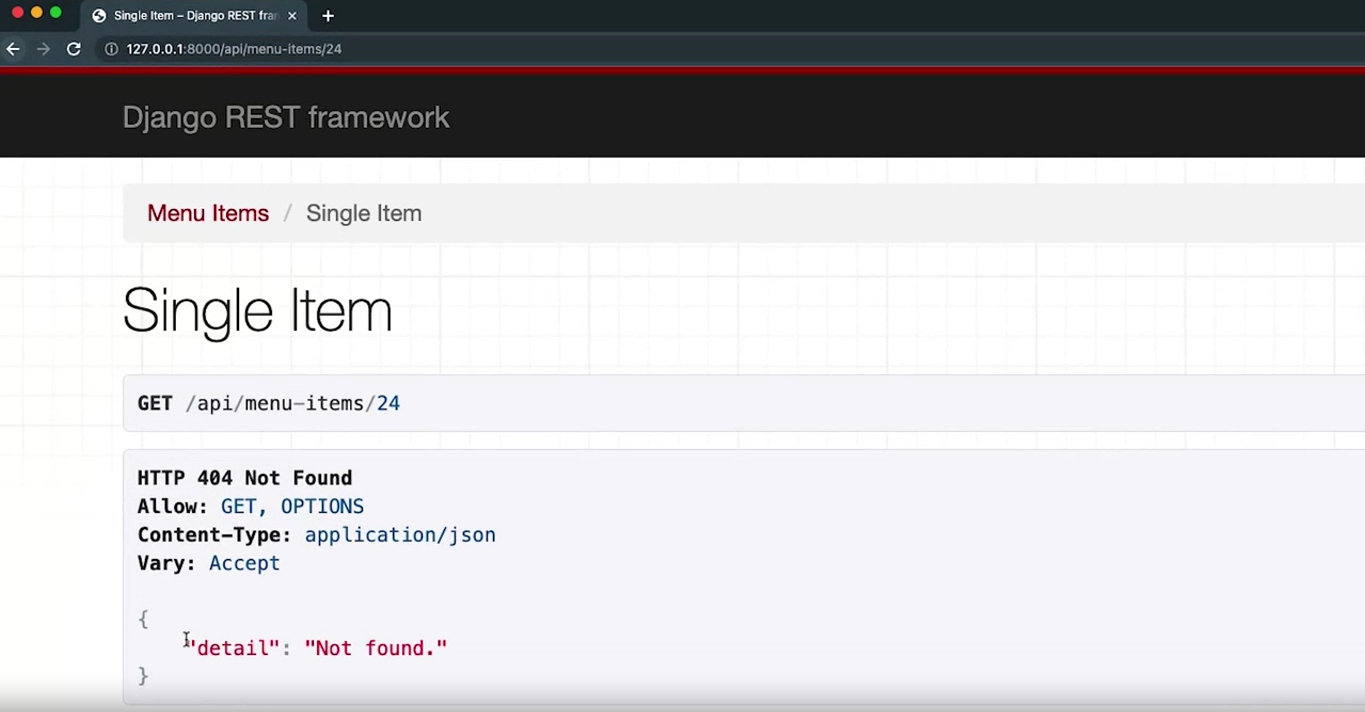
Model serializers
# models.py

from django.db import models

class MenuItem(models.Model):
	title = models.CharField(max_length=255)
	price = models.DecimalField(max_digits=6, deciaml_places=2)
	inventory = models.SmallIntegerField()
# serializers.py
from rest_framework import serializers
class MenuItemSerializer(serializers.Serializer):
id = serializers.IntegerField()
title = serializers.CharField(max_length=255)
price = serializers.DecimalField(max_digits=6, decimal_palces=2)
inventory = serializers.IntegerField()Change it to :
class MenuItemSerializer(serializers.ModelSerializer):
	class Meta:
		model = MenuItem
		fields = ['id', 'title', 'price', 'inventory']
You don’t need to change anything in the views.py file.
Changing the name of a field
class MenuItemSerializer(serializers.ModelSerializer):
	stock = serializers.IntegerField(source='inventory')
	class Meta:
		model = MenuItem
		fields = ['id', 'title', 'price']
Did you notice how I created a new field in this serializer but linked it to an existing field with the source argument. Remember to include this new field in the metal glass. Otherwise, you will see an error.
You can also use a calculated field in the serial ledgers and model serializers.
Let’s introduce a new field called price after texts, which will be an extra 10 percent of the product price.
from rest_framework import serializers
from .models import MenuItem
from decimal import Decimal

class MenuItemSerializer(serializers.ModelSerializer):
	stock = serializers.IntegerField(source='inventory')
	pirce_after_tax = serializers.SerializerMethodField(method_name='calculate_tax')
	class Meta:
		model = MenuItem
		fields = ['id', 'title', 'price']
	def calculate_tax(self, product:MenuItem):
		return product.price * Decimal(1.1)
Relationship serializers
# models.py

from django.db import models

class Category(models.Model):
	slug = models.SlugField()
	title = models.CharField(max_length=255)

class MenuItem(models.Model):
	title = models.CharField(max_length=255)
	price = models.DecimalField(max_digits=6, deciaml_places=2)
	inventory = models.SmallIntegerField()
	category = models.ForeignKey(Category, on_delete=models.PROTECT, default=1)
WARNING
While creating the foreign key, you have to ensure that the category cannot be deleted before all the related menu items are deleted first and this is done using on underscore delete equals models dot protect.
from rest_framework import serializers
from .models import MenuItem
from decimal import Decimal

class MenuItemSerializer(serializers.ModelSerializer):
	stock = serializers.IntegerField(source='inventory')
	pirce_after_tax = serializers.SerializerMethodField(method_name='calculate_tax')
	class Meta:
		model = MenuItem
		fields = ['id', 'title', 'price', 'stock', 'price_after_tax', 'category']
	def calculate_tax(self, product:MenuItem):
		return product.price * Decimal(1.1)
What if you want to do something special, like display the category name using the relationships serializer in DRF?
from rest_framework import serializers
from .models import MenuItem
from decimal import Decimal
from .models import Category

class MenuItemSerializer(serializers.ModelSerializer):
	stock = serializers.IntegerField(source='inventory')
	pirce_after_tax = serializers.SerializerMethodField(method_name='calculate_tax')
	category = serializers.SteingRelatedField()
	class Meta:
		model = MenuItem
		fields = ['id', 'title', 'price', 'stock', 'price_after_tax', 'category']
	def calculate_tax(self, product:MenuItem):
		return product.price * Decimal(1.1)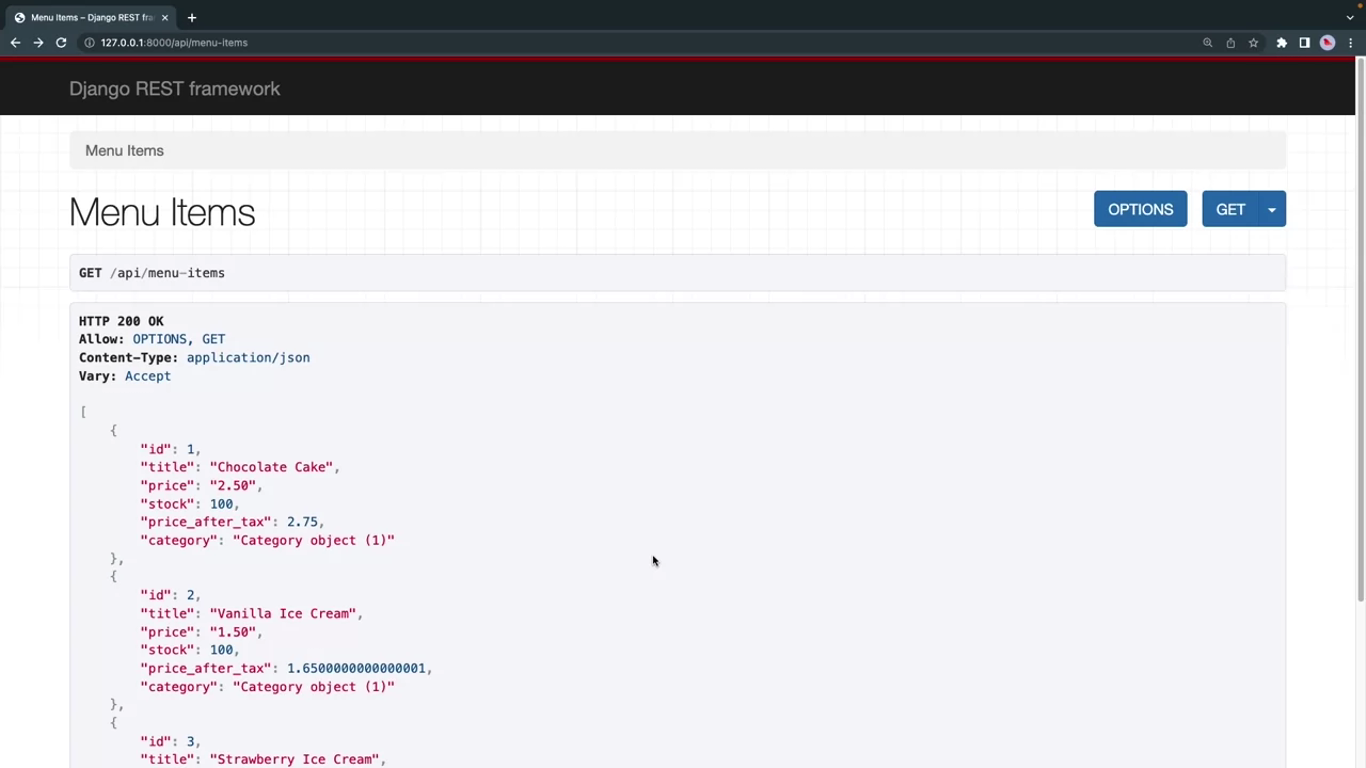
When you visit the menu items endpoint, it is clear that nothing has changed. Why is that? Because you did not specify in the category model how to convert the category model to a string.
# models.py

from django.db import models

class Category(models.Model):
	slug = models.SlugField()
	title = models.CharField(max_length=255)

	def __str__(self) -> str:
		return self.title

class MenuItem(models.Model):
	title = models.CharField(max_length=255)
	price = models.DecimalField(max_digits=6, deciaml_places=2)
	inventory = models.SmallIntegerField()
	category = models.ForeignKey(Category, on_delete=models.PROTECT, default=1)
In this case, when you are converting a connected model to string, you also need to change your view files to load the related model in a single SQL code.
TIP
This will make your API more efficient by not running a separate SQL query for every item to load to the relative data.
# views.py

from rest_framework.reponse import Reponse
from rest_freamework.decorators import api_view
from .models import MenuItem

@api_view()
def menu_item(request):
	items = MenuItem.objects.select_related('category').all()
	serialized_item = MenuItemSerializer(items, many=True)
	return Reponse(serialized_item.data)

@api_view()
def single_item(request, id):
	item = get_object_or_404(MenuItem, pk=id)
	serialized_item = MenuItemSerializer(item)
	return Response(serialized_item.data)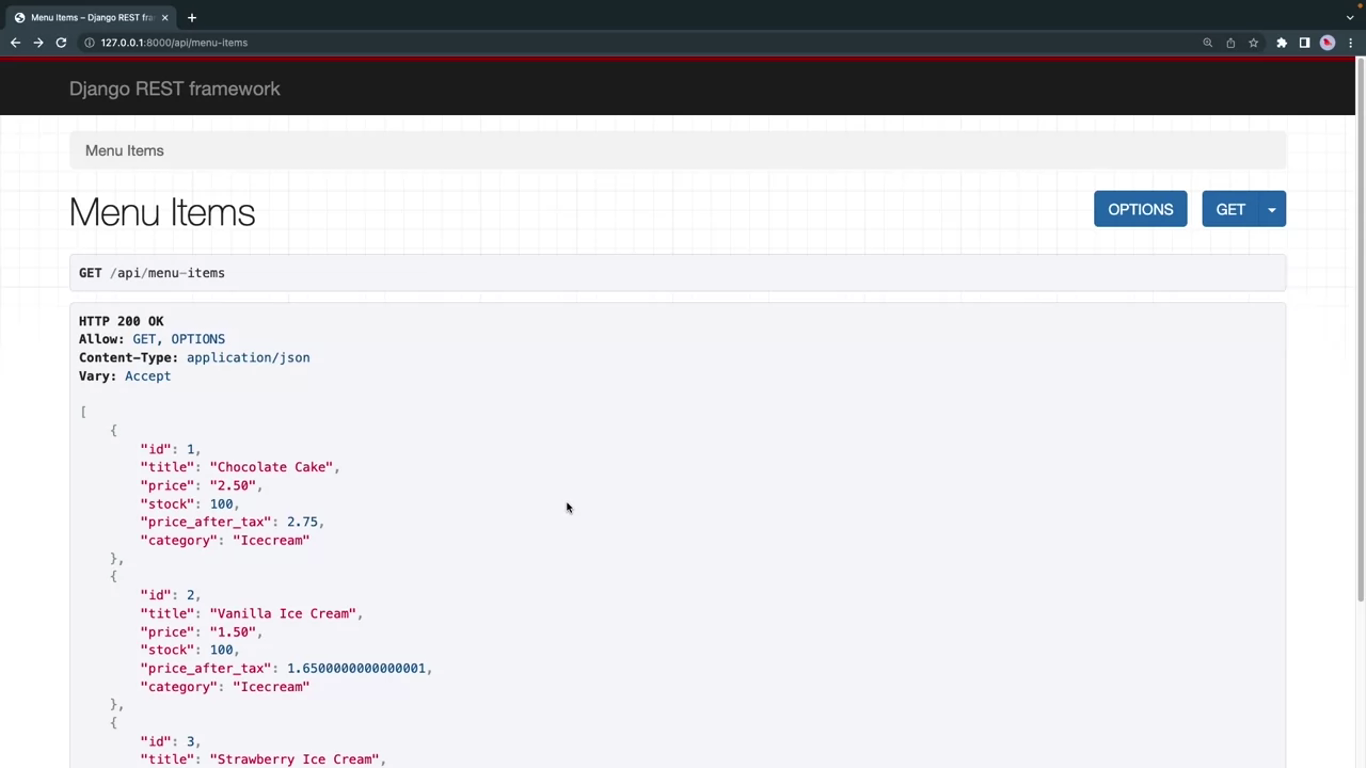
Now let’s use a separate serializer for the category. To make it even more detailed, open the surreal serializers.py file, add a new category serializer above the menu item serializer.
from rest_framework import serializers
from .models import MenuItem
from decimal import Decimal
from .models import Category

class CategorySerializer(serializers.ModelSerializer):
	class Meta:
		model = Category
		fields = ['id', 'slug', 'title']

class MenuItemSerializer(serializers.ModelSerializer):
	stock = serializers.IntegerField(source='inventory')
	pirce_after_tax = serializers.SerializerMethodField(method_name='calculate_tax')
	category = CategorySerializer()
	class Meta:
		model = MenuItem
		fields = ['id', 'title', 'price', 'stock', 'price_after_tax', 'category']
	def calculate_tax(self, product:MenuItem):
		return product.price * Decimal(1.1)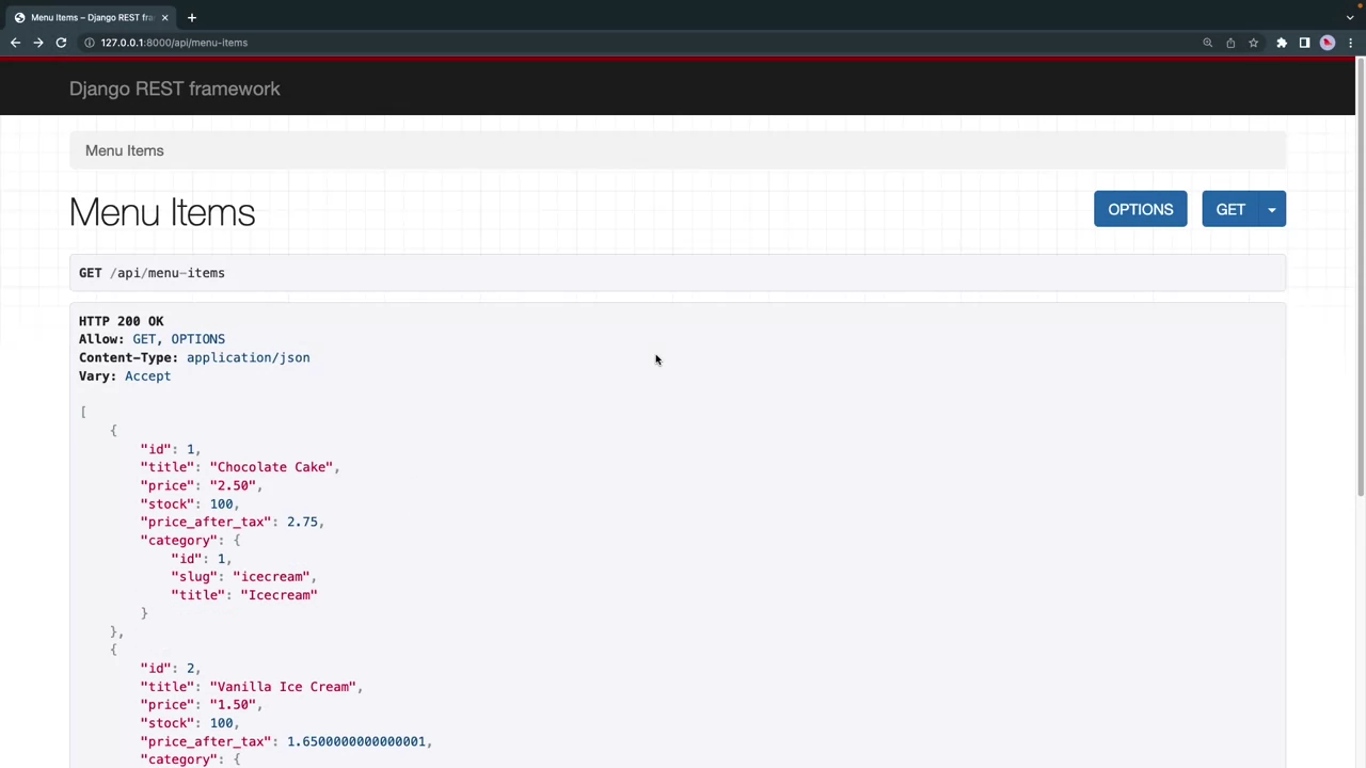
Other types of serializers in DRF
Introduction
You now know about serializers in DRF and you learned how to use model serializers to serialize model relationships. This reading has some interesting tips and tricks regarding serialization, like how to automatically display a nested model field using the depth option of the serializer. You will also learn how to display related model fields as hyperlinks by using the HyperlinkedRelatedField or by using a new type of serializer called the HyperlinkedModelSerializer.
Note: The code for this reading builds on what you just learned in the video, Relationship serializers.
Nested fields
If you were to visit the menu-items endpoint, you would note the category displays as a nested field with its id, title, and slug.
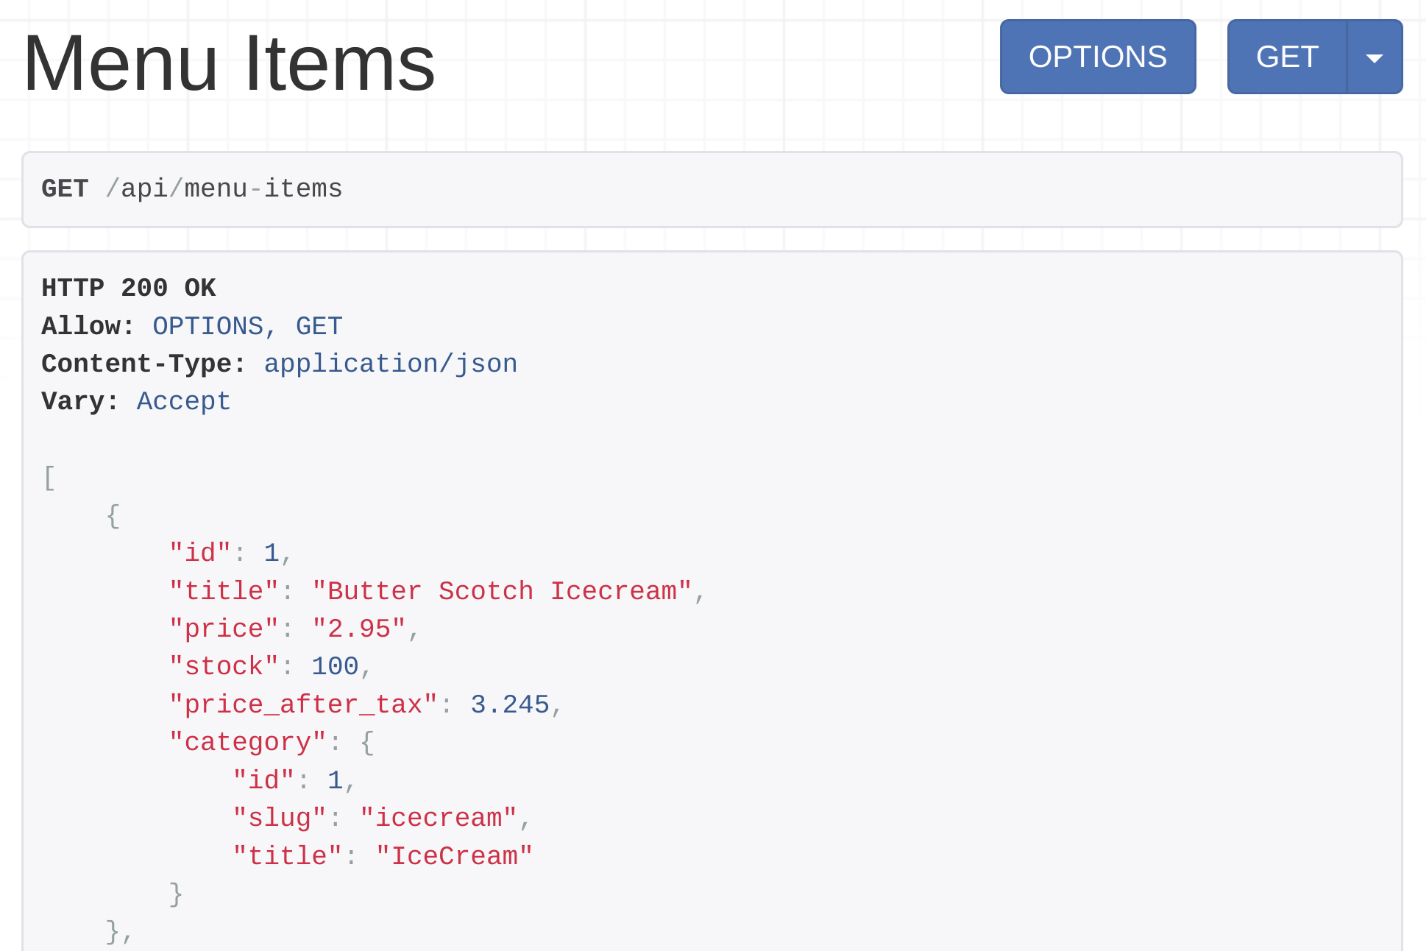
This can be achieved in two ways.
Method 1
The first way to do this is to create a category serializer in serializers.py and include it in the menu item serializer as demonstrated in the code below.
from rest_framework import serializers
from decimal import Decimal
from .models import MenuItem, Category
class CategorySerializer (serializers.ModelSerializer):
    class Meta:
        model = Category
        fields = ['id','slug','title']

class MenuItemSerializer(serializers.ModelSerializer):
    stock =  serializers.IntegerField(source='inventory')
    price_after_tax = serializers.SerializerMethodField(method_name = 'calculate_tax')
    category = CategorySerializer()
    class Meta:
        model = MenuItem
        fields = ['id','title','price','stock', 'price_after_tax','category']

    def calculate_tax(self, product:MenuItem):
        return product.price * Decimal(1.1)
Method 2
There is another way of doing this. Instead of declaring the category field as CategorySerializer you can specify that depth=1 is in the Meta class in MenuItemSerializer. This way, all relationships in this serializer will display every field related to that model. You can change the code of the MenuItemSerializer as below.
class MenuItemSerializer(serializers.ModelSerializer):
    stock =  serializers.IntegerField(source='inventory')
    price_after_tax = serializers.SerializerMethodField(method_name = 'calculate_tax')
    # category = CategorySerializer()
    class Meta:
        model = MenuItem
        fields = ['id','title','price','stock', 'price_after_tax','category']
        depth = 1

    def calculate_tax(self, product:MenuItem):
        return product.price * Decimal(1.1)
Note the commented line, category = CategorySerializer(). And the new line, depth = 1, was added in the Meta class. Now, if you were to visit the menu items endpoint at http://127.0.0.1:8000/api/menu-items you’d note that the output is exactly the same as it was before.
Displaying nested fields this way provides more information. It also reduces the amount of code the client application developers need to write. This is because they don’t have to make separate API calls to retrieve the details for those nested fields anymore.
Next, let’s focus on different serialization techniques that you can use to display related model fields as hyperlinks.
Display a related model fields field as a hyperlink
In DRF you can display every related model field as a hyperlink in the API output. Like this: http://127.0.0.1:8000/api/category/{categoryId} for the category field. There are two different ways to do this. The first method is to use the serializer field called HyperlinkedRelatedField and for the second method you use the HyperlinkedModelSerializer.
Method 1: HyperlinkedRelatedField
Step 1: Create and map a new view function
Every HyperlinkedRelatedField field in a serializer needs a queryset to find the related object and a view name that is used to map the hyperlinked URL pattern.
Thus you have to create a new function in the views.py file that will handle the categoryId endpoints.
from .models import Category from .serializers import CategorySerializer
@api_view()
def category_detail(request, pk):
    category = get_object_or_404(Category,pk=pk)
    serialized_category = CategorySerializer(category)
    return Response(serialized_category.data)
Then you map this function in the urls.py file with a view name.
path('category/<int:pk>',views.category_detail, name='category-detail')Tip: There is a convention you must follow when you create this view name. The rule is that you have to add -detail after the related field name, which is category in the MenuItemSerializer. This is why the view name was category-detail in this code. If the related field name was user, the view name would be user-detail.
Step 2: Create a HyperLinkedRelatedField in the serializer
The next step is to change the MenuItemSerializer code. The following code sets the category field as a HyperLinkedRelatedField in the MenuItem serializer.
from .models import Category
class MenuItemSerializer(serializers.ModelSerializer):
    stock =  serializers.IntegerField(source='inventory')
    price_after_tax = serializers.SerializerMethodField(method_name = 'calculate_tax')
    category = serializers.HyperlinkedRelatedField(
        queryset = Category.objects.all(),
        view_name='category-detail'
    )
    class Meta:
        model = MenuItem
        fields = ['id','title','price','stock', 'price_after_tax','category']
    def calculate_tax(self, product:MenuItem):
        return product.price * Decimal(1.1)
Note how a queryset and a view name are provided in the category HyperlinkedRelatedField. The code follows the convention so you can remove the line, view_name='category-detail. It is only necessary if you didn’t follow the convention and you created the view name in a different way in the urls.py file.
Step 3: Add context
The final step is to add context to the MenuItemSerializer in the menu_items function, as below.
serialized_item = MenuItemSerializer(items, many=True, context={'request': request})Note: The argument context={'request': request} lets the menu-items endpoint display the category field as a hyperlink.
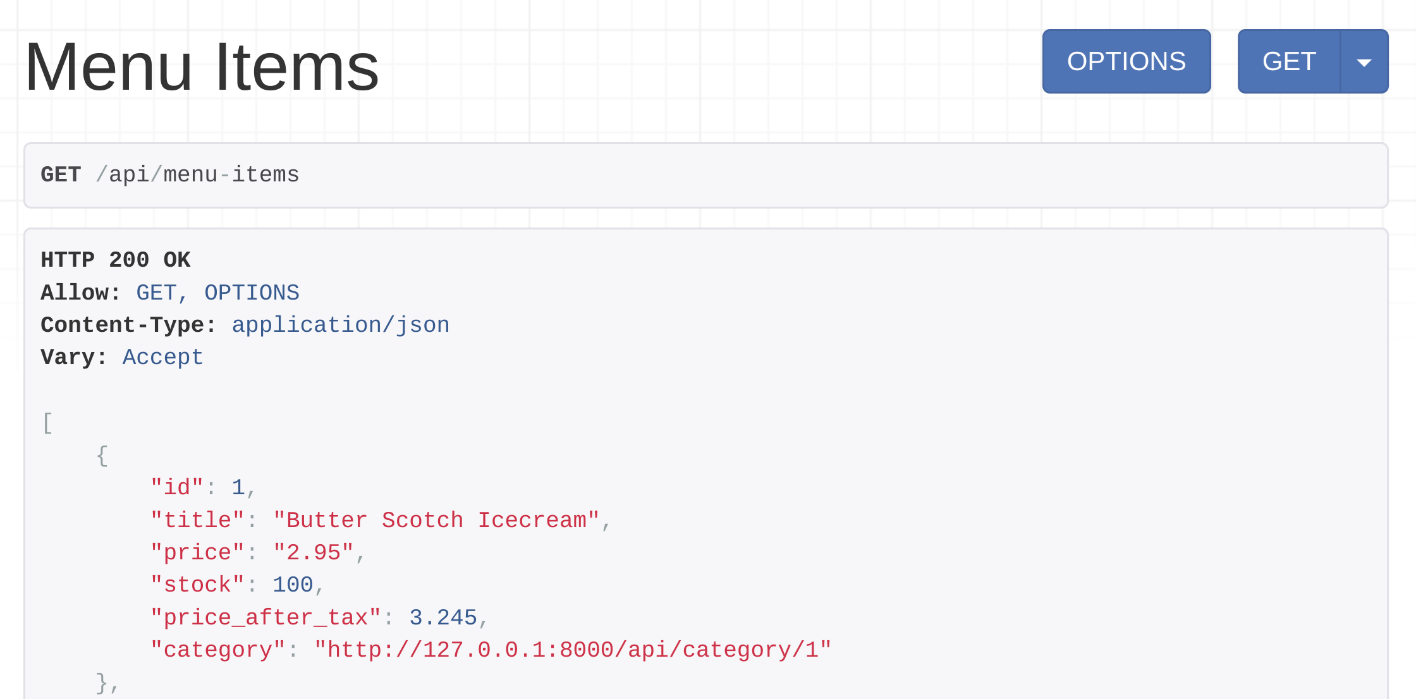
You can click on that hyperlink and check the category details.
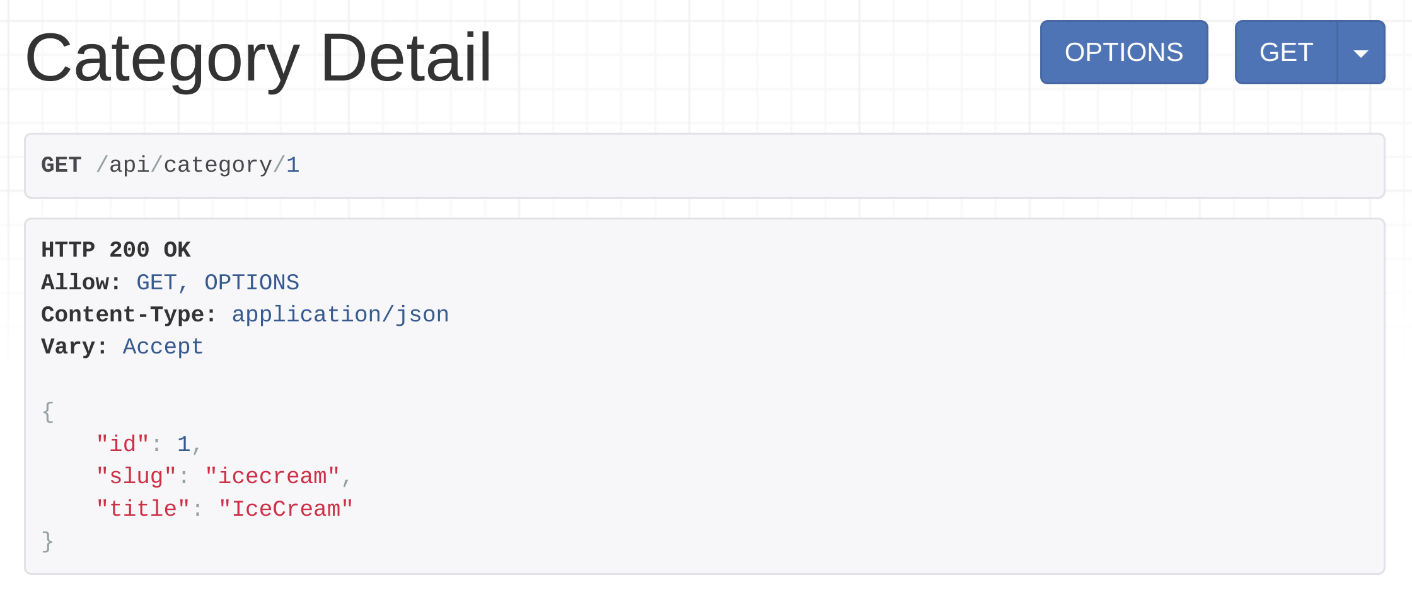
Method 2: HyperlinkedModelSerializer
But there is another way to display a category field as a hyperlink. With this method, you need to change the code in the serializers.py file. so that the MenuItemSerializer extends the serializers.HyperlinkedModelSerializer class instead of the serializers.ModelSerializer class.
class MenuItemSerializer(serializers.HyperlinkedModelSerializer):
    stock =  serializers.IntegerField(source='inventory')
    price_after_tax = serializers.SerializerMethodField(method_name = 'calculate_tax')

    class Meta:
        model = MenuItem
        fields = ['id','title','price','stock', 'price_after_tax','category']

    def calculate_tax(self, product:MenuItem):
        return product.price * Decimal(1.1)
When you use the HyperlinkedModelSerializer the output of the menu-items endpoint produces the same output with a hyperlinked category field like in the screenshot in Method 1 but the code is much cleaner and simpler.
Note: When you use a HyperlinkedModelSerializer, you still need the URL pattern with a view name as you did in the previous section.
urlpatterns = [
    path('menu-items',views.menu_items),
    path('menu-items/<int:id>',views.single_item),
    path('category/<int:pk>',views.category_detail, name='category-detail')
]
Conclusion
In this reading, you learned to automatically display a nested model field using the depth option of the serializer. You also learned how to display a related field as a hyperlink using HyperlinkedRelatedField and HyperlinkedModelSerializer.
Deserialization and validation
Deserialization is the opposite process of serialization. And it happens when the client sends some data to your api endpoints and DRF maps those data to an existing model.
Currently both the menu items and the single item functions only accept the http get call. Go to the menu items function and add post method support by adding get and post in the api view decorator function.
# views.py

from rest_framework.reponse import Reponse
from rest_freamework.decorators import api_view
from .models import MenuItem

@api_view(['GET', 'POST'])
def menu_item(request):
	if request.method == 'GET':
		items = MenuItem.objects.select_related('category').all()
		serialized_item = MenuItemSerializer(items, many=True)
		return Reponse(serialized_item.data)
	if request.method == 'POST':
		serialized_item = MenuItemSerializer(data=request.data)
		serialized_item.is_valid(raise_exception=True)

@api_view()
def single_item(request, id):
	item = get_object_or_404(MenuItem, pk=id)
	serialized_item = MenuItemSerializer(item)
	return Response(serialized_item.data)
You must check the request type before processing the request type. If it’s a get request retrieve the records, otherwise create a new record and save it using the deserialization process.
TIP
If any of this information is missing it should raise an error so that client can send the request again correcting the payload. The data validator is built into the serializer and it can be invoked using easy valid method.
You can access the data using serialized_item.validated_data or you can save the data in the database using serialized_item.save().
Using the data attribute of the serial measure you can access the record after saving it.
# views.py

from rest_framework.reponse import Reponse
from rest_freamework.decorators import api_view
from .models import MenuItem

@api_view(['GET', 'POST'])
def menu_item(request):
	if request.method == 'GET':
		items = MenuItem.objects.select_related('category').all()
		serialized_item = MenuItemSerializer(items, many=True)
		return Reponse(serialized_item.data)
	if request.method == 'POST':
		serialized_item = MenuItemSerializer(data=request.data)
		serialized_item.is_valid(raise_exception=True)
		return Response(serialized_item.data, status.HTTP_201_CREATED)

@api_view()
def single_item(request, id):
	item = get_object_or_404(MenuItem, pk=id)
	serialized_item = MenuItemSerializer(item)
	return Response(serialized_item.data)
WARNING
Please be error that you cannot access this data attribute until the safe method is called. If you need to access the data before calling the safe method you can use the validated data attribute.
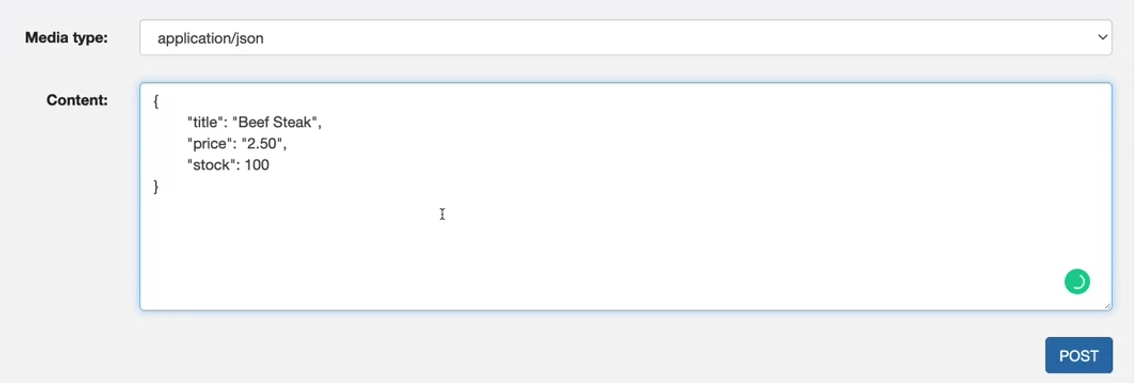
But there is an error saying the category field is required.
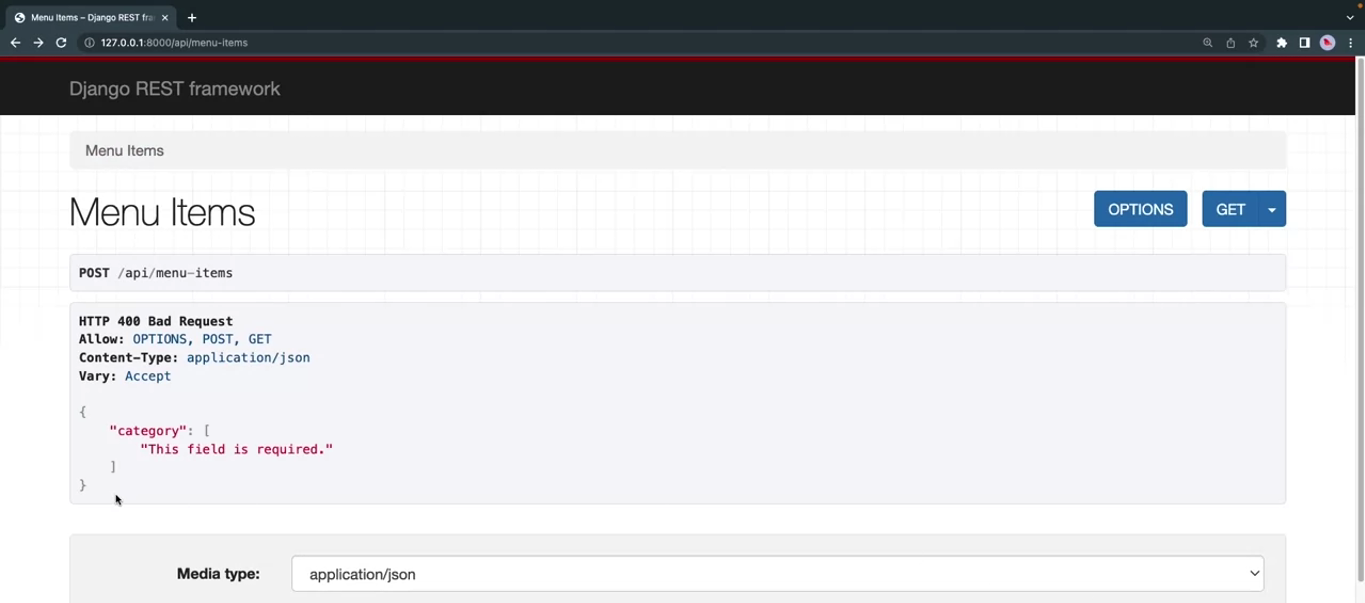
Why is that? Open the little lemon api serializer start by file and check the line where you included the category serializer.
from rest_framework import serializers
from .models import MenuItem
from decimal import Decimal
from .models import Category

class CategorySerializer(serializers.ModelSerializer):
	class Meta:
		model = Category
		fields = ['id', 'slug', 'title']

class MenuItemSerializer(serializers.ModelSerializer):
	stock = serializers.IntegerField(source='inventory')
	pirce_after_tax = serializers.SerializerMethodField(method_name='calculate_tax')
	category = CategorySerializer()
	class Meta:
		model = MenuItem
		fields = ['id', 'title', 'price', 'stock', 'price_after_tax', 'category']
	def calculate_tax(self, product:MenuItem):
		return product.price * Decimal(1.1)
This category field should be read only because it is only needed to show the category details in the get call.
To solve the problem you have two options, comment out this line which will hide this field from the get request but you do not want that.
So let’s rather go with the second option which is marking this field as read only.
from rest_framework import serializers
from .models import MenuItem
from decimal import Decimal
from .models import Category

class CategorySerializer(serializers.ModelSerializer):
	class Meta:
		model = Category
		fields = ['id', 'slug', 'title']

class MenuItemSerializer(serializers.ModelSerializer):
	stock = serializers.IntegerField(source='inventory')
	pirce_after_tax = serializers.SerializerMethodField(method_name='calculate_tax')
	category = CategorySerializer(read_only=True)
	class Meta:
		model = MenuItem
		fields = ['id', 'title', 'price', 'stock', 'price_after_tax', 'category']
	def calculate_tax(self, product:MenuItem):
		return product.price * Decimal(1.1)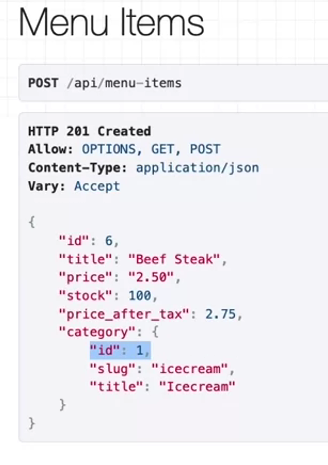
So what if you want to save a menu item with a different category id?
from rest_framework import serializers
from .models import MenuItem
from decimal import Decimal
from .models import Category

class CategorySerializer(serializers.ModelSerializer):
	class Meta:
		model = Category
		fields = ['id', 'slug', 'title']

class MenuItemSerializer(serializers.ModelSerializer):
	stock = serializers.IntegerField(source='inventory')
	pirce_after_tax = serializers.SerializerMethodField(method_name='calculate_tax')
	category = CategorySerializer(read_only=True)
	category_id = serializers.IntegerField()
	class Meta:
		model = MenuItem
		fields = ['id', 'title', 'price', 'stock', 'price_after_tax', 'category', 'category_id']
	def calculate_tax(self, product:MenuItem):
		return product.price * Decimal(1.1)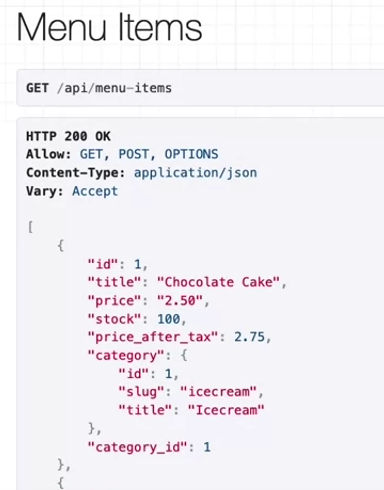
But something is off because the id of the category is already present in the category details and there is no need to display the category id again. So the question is how can you hide the category id field from only the get api calls in other words how do you make it a re write only field.
from rest_framework import serializers
from .models import MenuItem
from decimal import Decimal
from .models import Category

class CategorySerializer(serializers.ModelSerializer):
	class Meta:
		model = Category
		fields = ['id', 'slug', 'title']

class MenuItemSerializer(serializers.ModelSerializer):
	stock = serializers.IntegerField(source='inventory')
	pirce_after_tax = serializers.SerializerMethodField(method_name='calculate_tax')
	category = CategorySerializer(read_only=True)
	category_id = serializers.IntegerField(write_only=True)
	class Meta:
		model = MenuItem
		fields = ['id', 'title', 'price', 'stock', 'price_after_tax', 'category', 'category_id']
	def calculate_tax(self, product:MenuItem):
		return product.price * Decimal(1.1)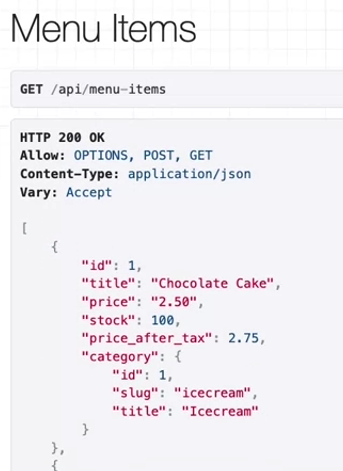
TIP
Instead of making one serializer to do everything, you can create multiple serializers and use them separately in your get and post calls.
Renderers
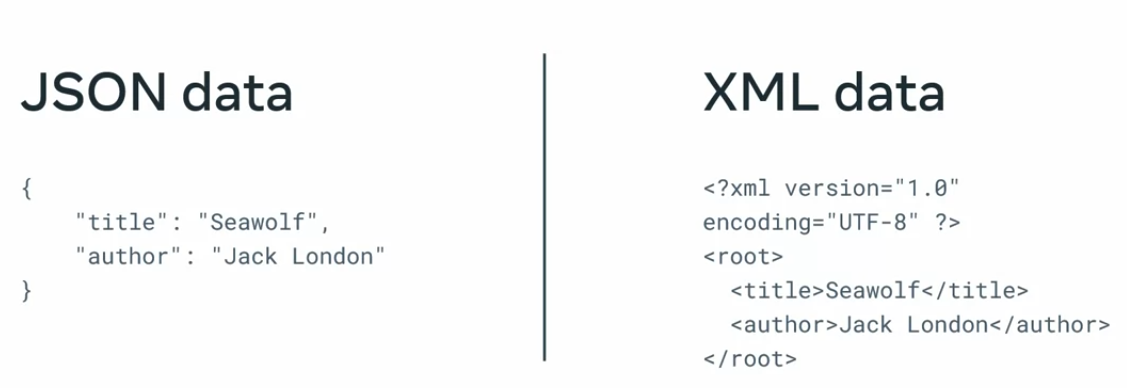
While JSON is the most popular data format for APIs these days, it’s not the only format client applications use. Some of these clients prefer XML and some of them may want the output in YAML.
So, the more support you add for your API output, the more usable it becomes.
Renderers are responsible for displaying the output of your APIs. Some of these renderers display the JSON content, some XML and some are responsible for the HTML.
Commonly used renderers
Built-in renderers
- JSONRenderer
- BrowsableAPIRenderer
- XMLRenederer
Thrid-party renderers
- XMLRenederer
- YAMLRenderer
- JSONP Renderer
Renderers are everywhere in DRF and you’ve been using them all along. It’s just been happening behind the scenes.
One of the most popular views, the browsable API view is rendered using the browsable API renderer. In DRF, you can change the renderers any time. You can use a particular one or multiple renderers so that one from this list will respond to the API depending on the type of content requested.
So, where can you set the type of content you want from the API?
You do this by setting a header in the HTTP request which is called Accept.
Type Accept: application/json.
By default, DRF uses two renderers, one is the JSON renderer for JSON output and the other one is called the browsable API renderer.
rest_framework.renderers.JSONRendererrest_framework.renderers.BrowsableAPIRenderer
Say you want to turn off the browsable API renderer and only want to include the JSON content every time.
To do this, open the settings.py file and add a new section called REST_FRAMEWORK if it’s not already present there.
REST_FRAMEWORK = {
	'DEFAULT_RENDERER_CLASSES': [
		'rest_framework.renderers.JSONRenderer',
		'rest_framework.renderers.BrowsableAPIRenderer',
	]
}
Now comment out the browser API renderer.
The output now comes in plain JSON because the browsable API interface does not work this time.
Let’s bring it back by removing that comment in the settings file. The browsable API view works only when the Accept header is set to text/html.
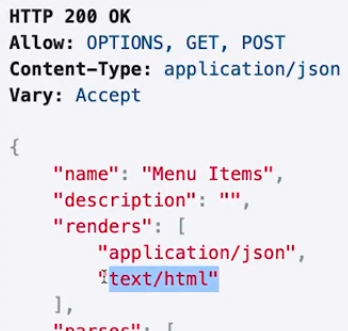
And this is the header that browser sent by default.
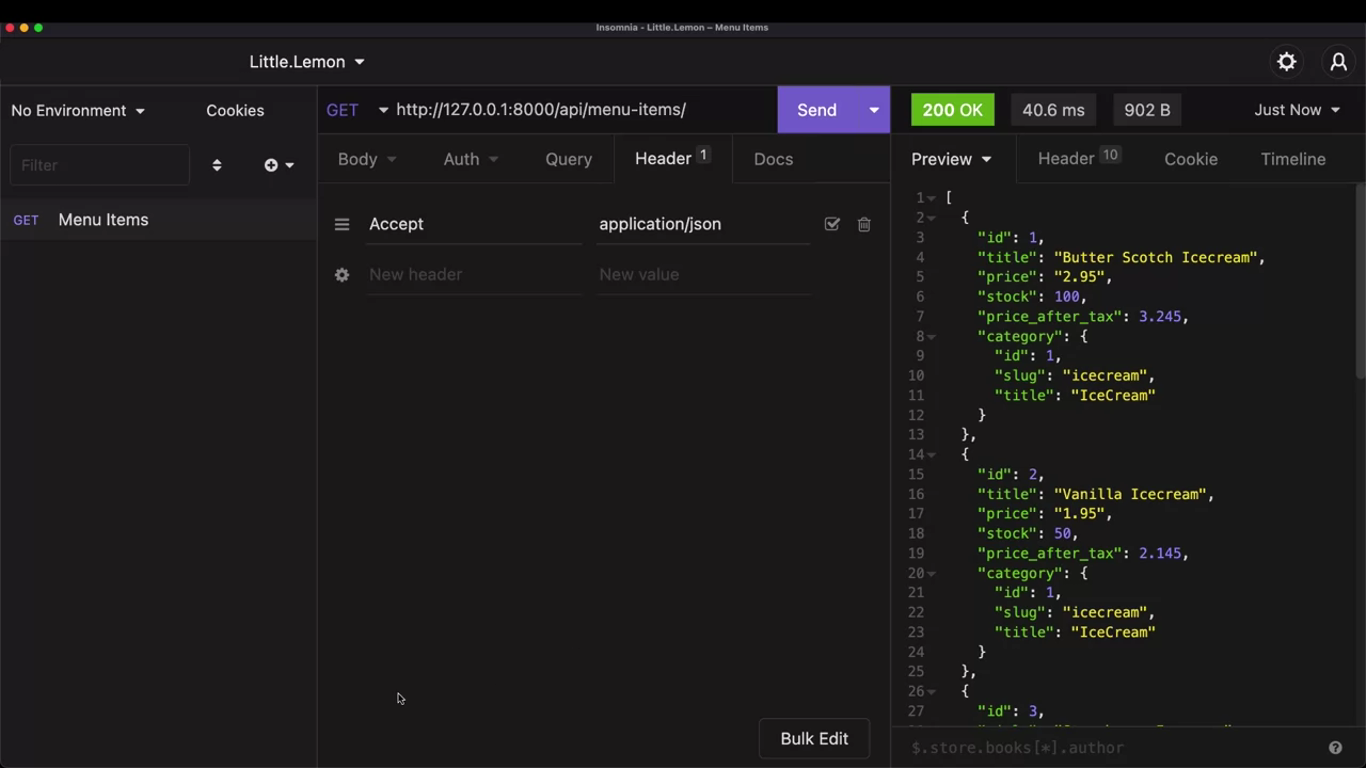
But if this header is not set, DRF returns only the JSON output. You can test it further in Insomnia.
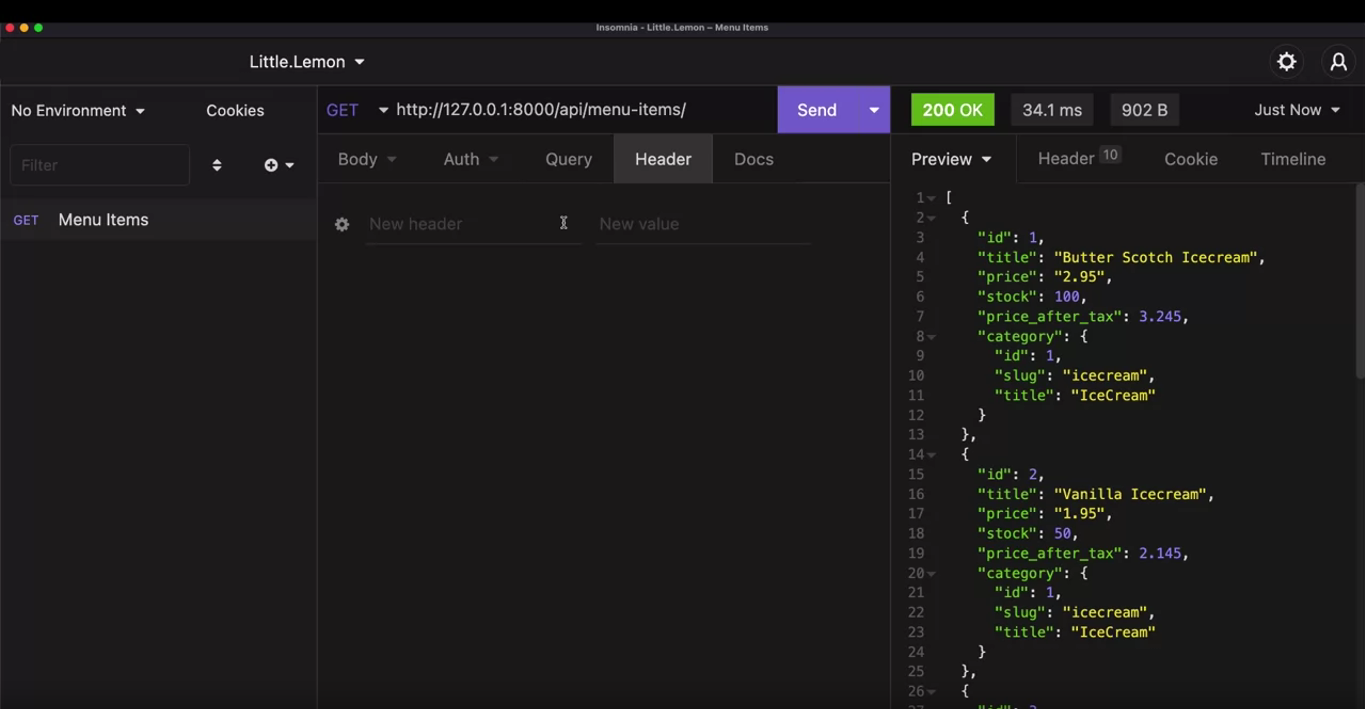
Only the JSON output displays, right? It happened because you did not exclusively send an Accept header.
So, DRF used the default renderer, the JSON renderer, and sent JSON data in the response.
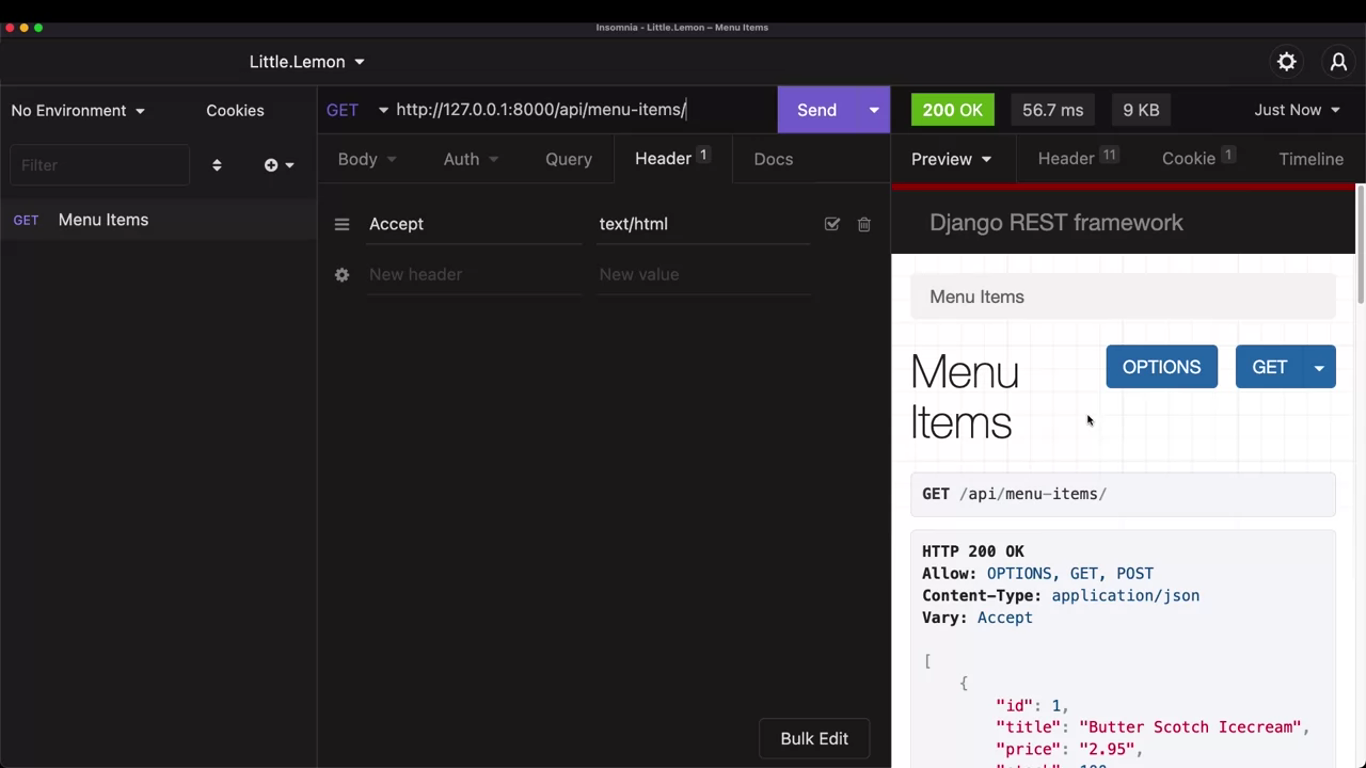
Adding support for a new content type
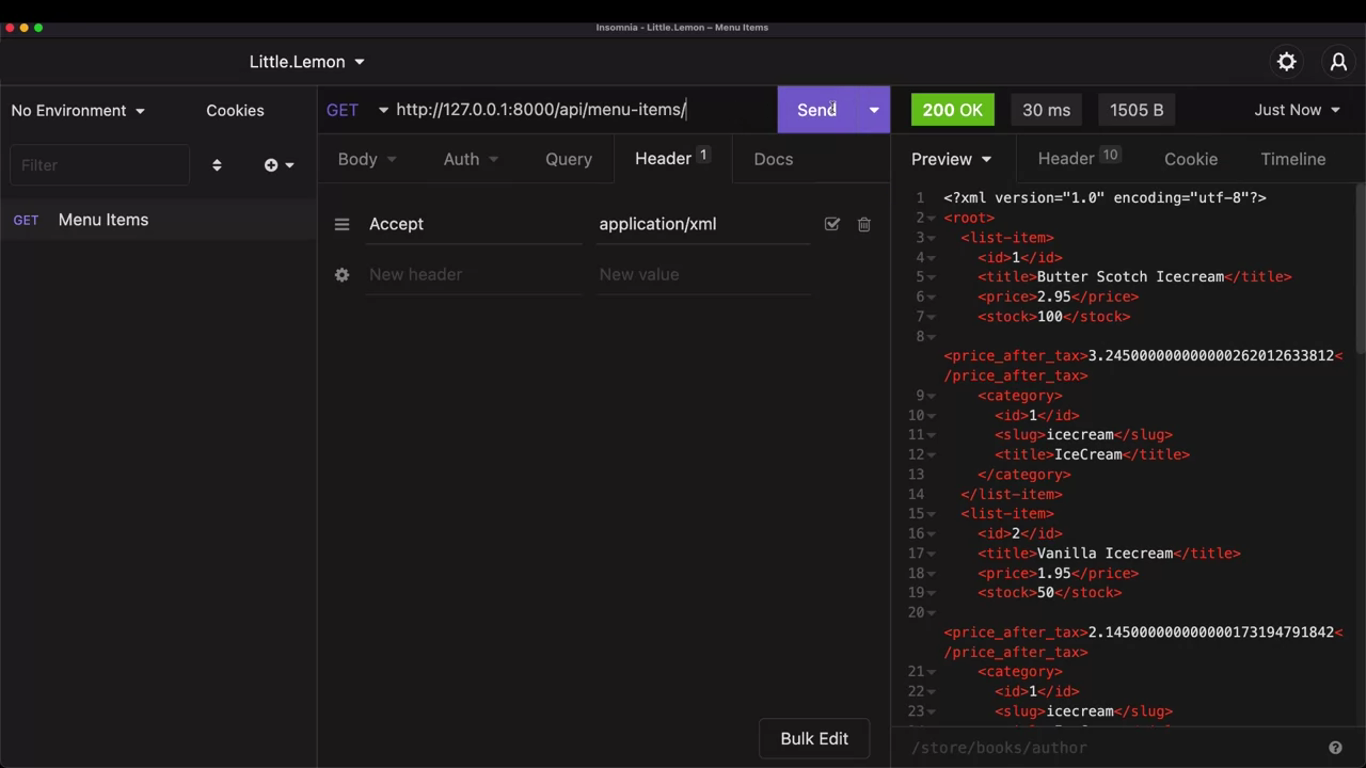
You will be using a package called djangorestframework-xml.
pipenv shell
pipenv install djangoframework-xml
REST_FRAMEWORK = {
'DEFAULT_RENDERER_CLASSES': [
'rest_framework.renderers.JSONRenderer',
'rest_framework.renderers.BrowsableAPIRenderer',
'rest_framework_xml.rednerers.XMLRenderer'
]
}
Different types of renderers
Introduction
Renderers are the core classes in DRF that display the API output in different formats like JSON and XML. You’ve already learned how to use the Browsable API renderer, JSON renderer, and a third-party renderer called XMLRenderer. In this reading, you are going to learn about a few other useful renderers that you can use in your API projects in DRF.
TemplateHTMLRenderer
Sometimes, even in an API project, it might be required to display HTML output. For example, if you generate an invoicing API, you need to display the transaction and order details in a nicely formatted way using HTML and CSS. In such cases, DRF’s TemplateHTMLRenderer can help.
Step 1
Using the TemplateHTMLRenderer, you can pass the data to an HTML file and then display that data using Django’s native templating language called DTL, or Django Templating Language.
To test this TemplateHTMLRenderer the menu items need to be displayed in an HTML file instead of JSON. To use this renderer, you first import it from the rest_framework.renderers module in the views.py file. You also need to import the renderer_classes decorator.
from rest_framework.renderers import TemplateHTMLRenderer
from rest_framework.decorators import api_view, renderer_classes
Step 2
The second step is to create a new function called menu in the views.py file.
@api_view()
@renderer_classes ([TemplateHTMLRenderer])
def menu(request):
    items = MenuItem.objects.select_related('category').all()
    serialized_item = MenuItemSerializer(items, many=True)
    return Response({'data':serialized_item.data}, template_name='menu-items.html')
Note how the serialized data is passed as context to the HTML template file named menu-items.html. You need to put this HTML file inside the templates directory in your Django app, so the path of this file is: LittleLemon/LittleLemonAPI/templates/menu-item.html
Step 3
The third step is to add the following templating code to this HTML file. This code block accepts the template data and displays them in a HTML table.
<!DOCTYPE html>
<html lang="en">
<head>
    <meta charset="UTF-8">
    <title>Menu Items</title>
</head>
<body>
    <table width="100%" style="text-align: left;">
        <tr>
            <th>Item</th> <!-- item column heading -->
            <th>Price</th> <!-- price column heading -->
            <th>Price After Tax</th> <!-- price after tax column heading -->
            <th>Stock</th> <!-- stock column heading -->
        </tr>
        {% for item in data %}
        <tr>
            <td>{{ item.title }}</td>
            <td>{{ item.price }}</td>
            <td>{{ item.price_after_tax }}</td>
            <td>{{ item.stock }}</td>
        </tr>
        {% endfor %}
    </table>
</body>
</html>
Step 4
The final step is to map this function to an API endpoint in the urls.py file so that it can be browsed as http://127.0.0.1:8000/api/menu.
from django.urls import path
from . import views
urlpatterns = [
    path('menu-items',views.menu_items),
    path('menu-items/<int:id>',views.single_item)
    path('menu',views.menu),
]
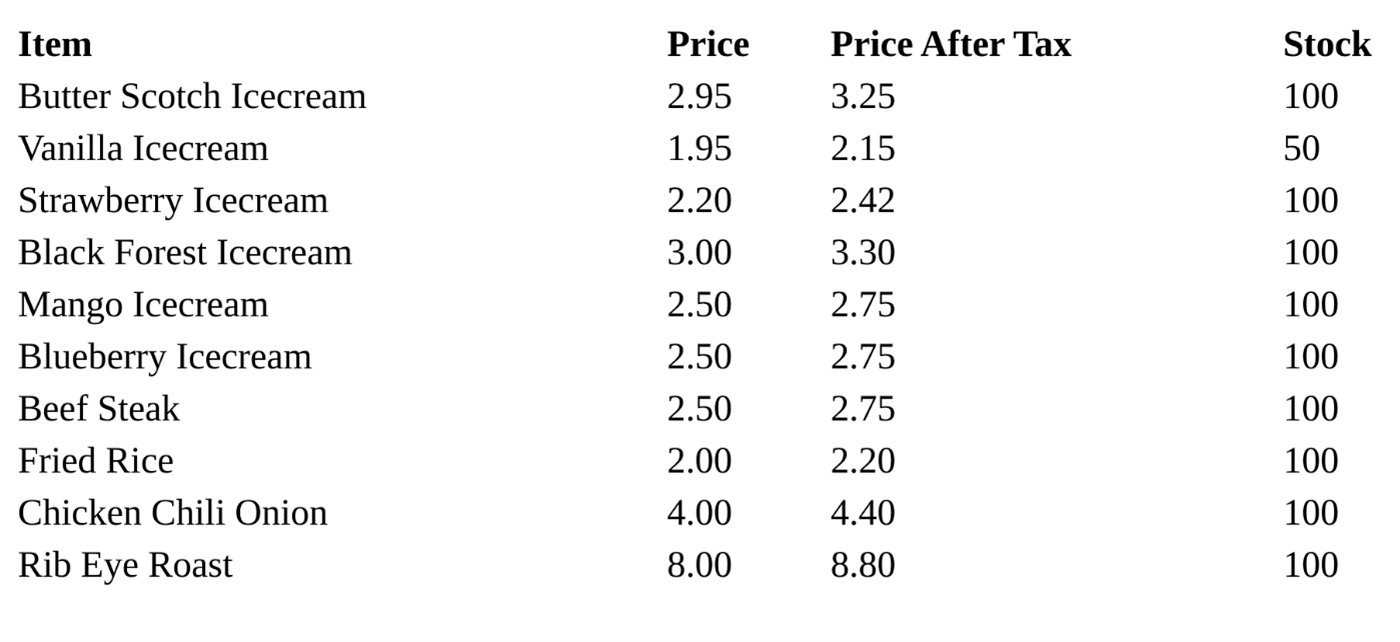
Now the http://127.0.0.1:8000/api/menu API endpoint displays all the menu items in a nicely formatted HTML table.
StaticHTMLRenderer
You can use the StaticHTMLRenderer if any of your API endpoints need to display some HTML content without using any DTL code inside an HTML file.
Step 1
The first step is to import the StaticHTMLRenderer class and renderer_classes decorator like before.
from rest_framework.renderers import TemplateHTMLRenderer
from rest_framework.decorators import api_view, renderer_classes
Step 2
Then you need to create a new function called welcome in the views.py file.
@api_view(['GET'])
@renderer_classes([StaticHTMLRenderer])
def welcome(request):
    data = '<html><body><h1>Welcome To Little Lemon API Project</h1></body></html>'
    return Response(data)
Step 3
The final step is to map this endpoint to an API endpoint. This time, you want to display this message whenever someone visits the endpoint http://127.0.0.1:8000/api/welcome. To do this, you need to open the urls.py file and add the following line to the urlpatterns list:
path('welcome',views.welcome)This greeting will now display if someone visits this endpoint.

CSV renderer
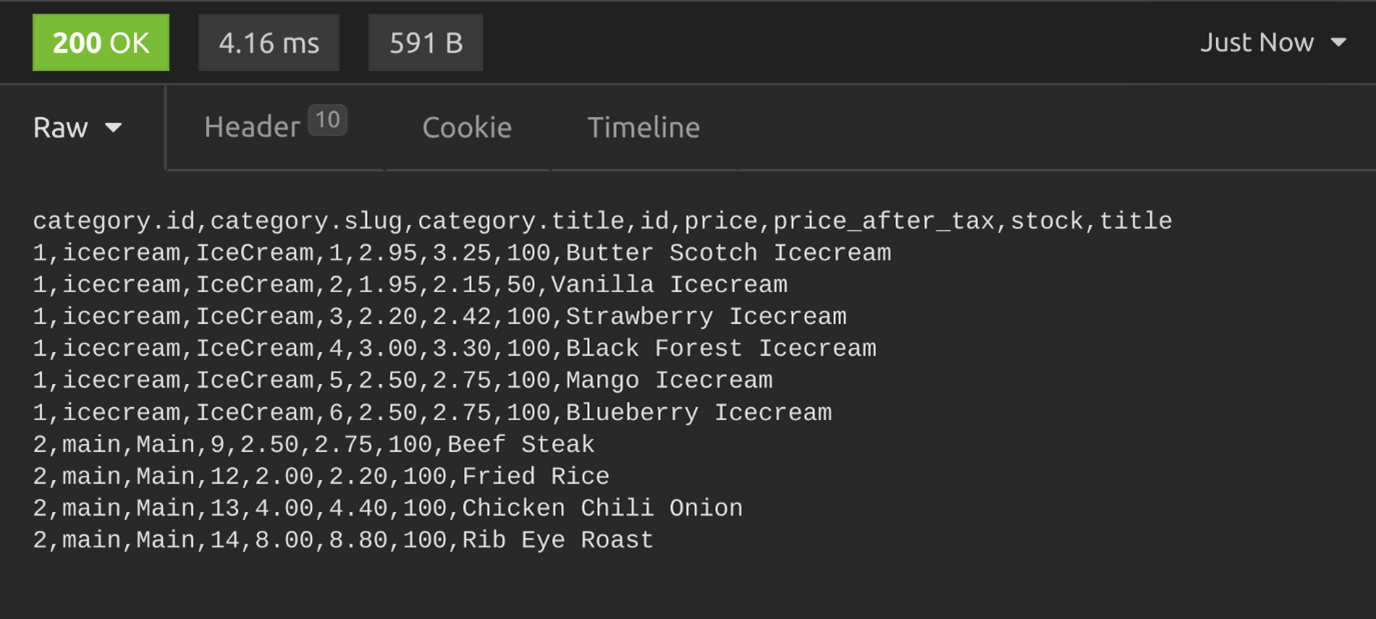
CSV, or comma-separated values, is another popular format used by API developers. Unlike JSON or XML, every field in a database record is displayed separated by a comma and every record is on a new line.
Step 1
DRF doesn’t come with a CSV renderer class by default. So the first step is to install a popular third-party package using pipenv.
pipenv install djangorestframework-csvStep 2
Import this renderer in the views.py file.
from rest_framework_csv.renderers import CSVRendererStep 3
Add the renderer using the renderer_classes decorator to convert an API endpoint to display CSV instead of JSON. Add the following line of code in the menu-items function after the @api_view() decorator:
@renderer_classes([CSVRenderer])Now if you visit the endpoint http://127.0.0.1:8000/api/menu-items in a REST API client like Insomnia, you’d get the following output.
YAML renderer
Step 1
To display the output of your APIs in YAML, another popular data format, you need to install the djangorestframework-yaml using pipenv.
pipenv install djangorestframework-yamlStep 2
To test it with the menu-items function, import this YAML renderer in the views.py file.
from rest_framework_yaml.renderers import YAMLRendererStep 3
Pass the YAMLRenderer class inside the renderer_classes decorator, just below the api_view decorator above the menu-items function.
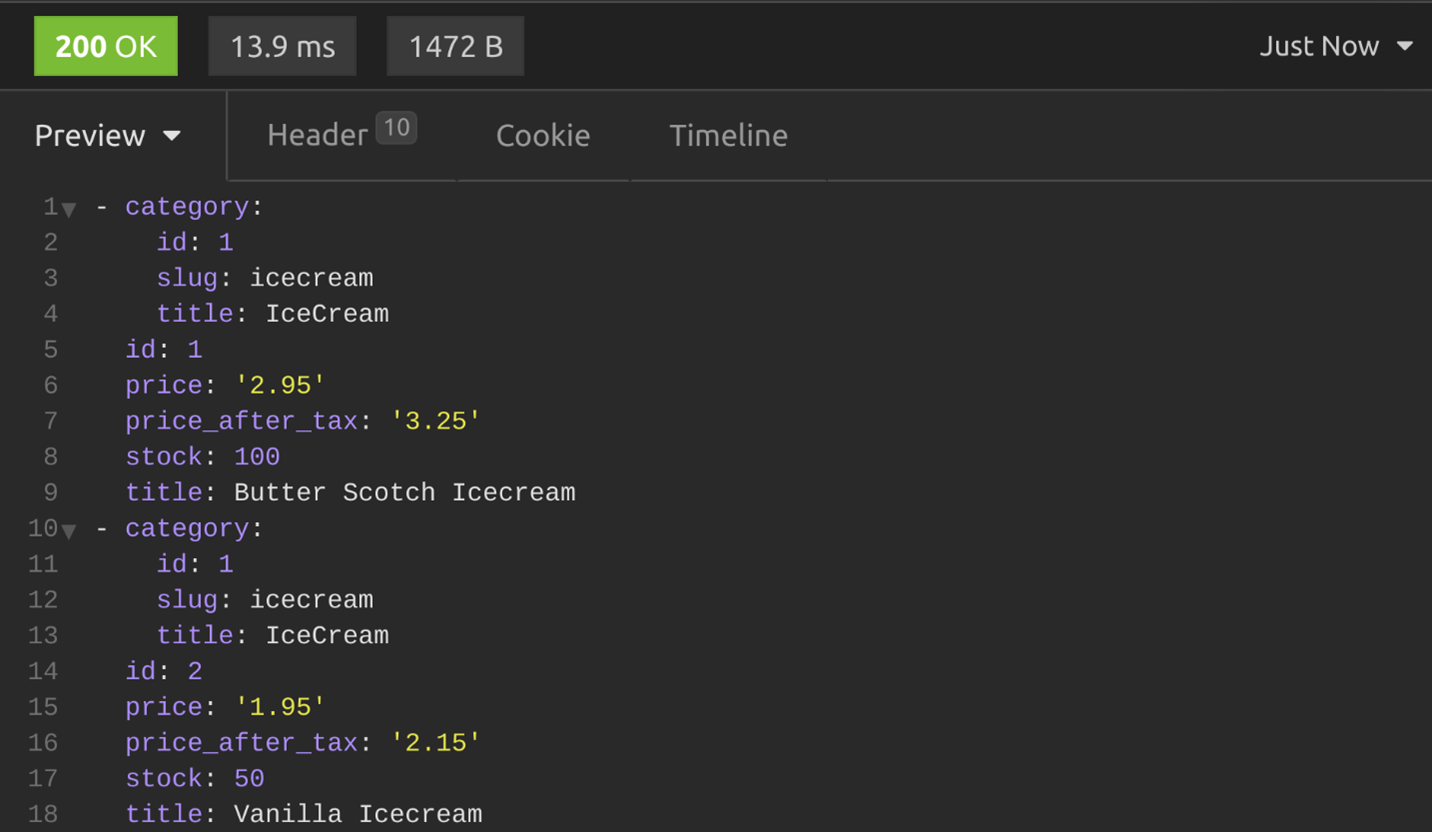
@renderer_classes([YAMLRenderer])Now if you visit the endpoint http://127.0.0.1:8000/api/menu-items in a REST API client like Insomnia, the menu items will be visible.
Global settings
Instead of importing the CSV and YAML renderer classes individually in the views.py file and then passing them to the renderer_classes decorator above each function, you can make them available globally in your API project. In this way, the client can get the desired output with a valid Accept header.
To make these renderers available globally, add the following two lines in the settings.py file in the DEFAULT_RENDERER_CLASSES section.
'rest_framework_csv.renderers.CSVRenderer',
'rest_framework_yaml.renderers.YAMLRenderer',
This is what the DEFAULT_RENDERER_CLASSES section will be like after adding those two lines.
REST_FRAMEWORK = {
    'DEFAULT_RENDERER_CLASSES': [
        'rest_framework.renderers.JSONRenderer',
        'rest_framework.renderers.BrowsableAPIRenderer',
        'rest_framework_xml.renderers.XMLRenderer',
        'rest_framework_csv.renderers.CSVRenderer',
        'rest_framework_yaml.renderers.YAMLRenderer',
    ]
}
Now the client can send the following Accept headers to receive the API output in their desired format.
| Response type | Request header |
|---|---|
| CSV | Accept: text/csv |
| YAML | Accept: application/yaml |
Conclusion
In this reading, you have learned how to use different types of renderers in your DRF-based API project to display API output in different formats. There is a dedicated section on renderers in the DRF documentation, which you can access in the additional resources of this lesson. It showcases other types of renderers you can use with the Django REST Framework.
Additional resources
The following resources will be helpful as additional references in dealing with different concepts related to the topics you have covered in this section.
XML renderer, XML support for Django REST framework
YAML renderer, YAML support for Django REST framework
JSONP renderer, JSONP support for Django REST framework
DjangoPythonRESTAPIRESTfulJSONXMLYMLDataDRF
Previous one → 4.Introduction to Django REST Framework (DRF) | Next one → 6.Filtering, ordering and searching