What is Git and GitHub?
Git
Git is a version control system designed to help users keep track of changes to files within their projects.
Git was designed to address the challenges that its creator, Linus Torvalds, was having, managing the development of linux kernel.
Linux has thousands of contributors who commit changes and updates daily. Git was designed to help with the challenge of tracking all these changes and updates. As well as helping to keep track of changes, Git was also designed to tackle some of the shortcomings of other version control systems.
The benefits that Git offers over similar systems include:
- better speed and performance
- reliability
- free and open source axis
- an accessible syntax
It’s also important to note that Git is used predominantly via the command line. Developers tend to find Git syntax and commands easy to learn.
Github
GitHub is a Cloud-based hosting service that lets you manage Git repositories from a user interface.
A Git repository is used to track all changes to files in a specific folder, and keep a history of all those changes.
It incorporates Git version control features andextends these by providing its own features on top. Some of the most common of these features include:
- access control
- pull requests
- automation
The features are split out into different pricing models to suit different sized teams and organizations.
It’s like a social network. For example, projects can be private or public. Users on GitHub have their own profile which other users can follow. Public projects can accept code contributions from anyone across the globe. It also includes multiple features outside of its core development tools like
- documentation
- ticketing
- project features
Installing Git on Windows
Git works on all operating system platforms such as Windows, Mac, and Linux. On Mac or Linux, in some cases, it is installed by default. The majority of users will use Git via the command line as its syntax is very easy to understand and follow. Git also works well in development environments and integrates into IDEs and other GUI offerings.
Go to https://gitforwindows.org/ and download the latest version.
Once the download is complete, open the installation file and follow the instructions for installing.
After installation, open the Git Bash application. You can also use the windows command line.
To see what version of git was installed type git version and press the Enter key.
You should see something similar to the following output.
$ git version
git version 2.34.1.windows.1
Installing Git on Mac
Git works on all operating system platforms such as Windows, Mac, and Linux. On Mac or Linux, in some cases, it is installed by default. The majority of users will use Git via the command line as its syntax is very easy to understand and follow. Git also works well in development environments and integrates into IDEs and other GUI offerings.
Macs tend to have git installed by default, so before diving into the installation we can run a git version command to check if git is already installed. If the command returns a git version, then git is already installed. If it returns “command not found”, git needs to be installed.
Install with Xcode
Install the latest version of Xcode for your Mac by downloading it from the Apple Store or going to the official website - https://developer.apple.com/xcode/
Install Git from Homebrew
Homebrew is a popular package manager for Macs. It’s easy to use and makes it simple to install new packages such as git. First, you will need to install Homebrew on your machine. Go to the Homebrew website at https://brew.sh/
and follow the install instructions for Mac. Once Homebrew is installed, open a terminal window and then type the command brew install git
Once installed run the git version command to verify the installation is complete.
Connecting to GitHub via HTTPS
When using Github via the Coursera platform, it is required to authenticate using a Personal Access Token over HTTPS. A Personal Access Token is a special password that you use instead of your actual account password. When you’re finished using the token, you can revoke it so that it can no longer be used. It is also possible to set an expiry time for the token. This helps to keep your account secure.
Generate a Personal Access Token
We now need to set up our Personal Access Token.
Step 1: Log in to Github
Step 2: Click on the profile icon in the top right of the screen and select Settings.

Step 3: On the Settings screen, on the left-hand side click Developer Settings.
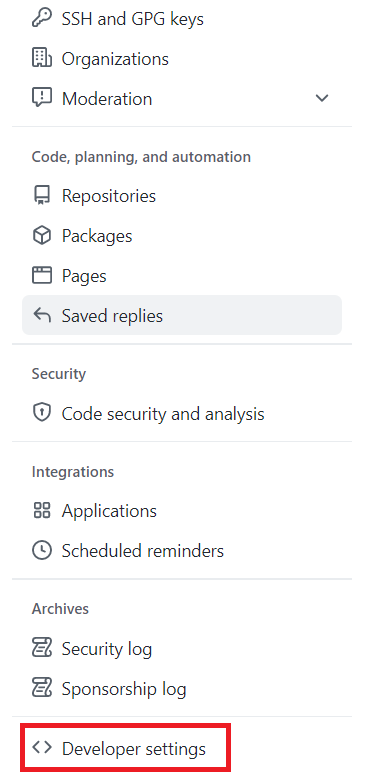
Step 4: On the Developer Settings screen, click Personal access tokens. Under that, click on Tokens (classic). Then, click the Generate new token button and select Generate new token (classic).

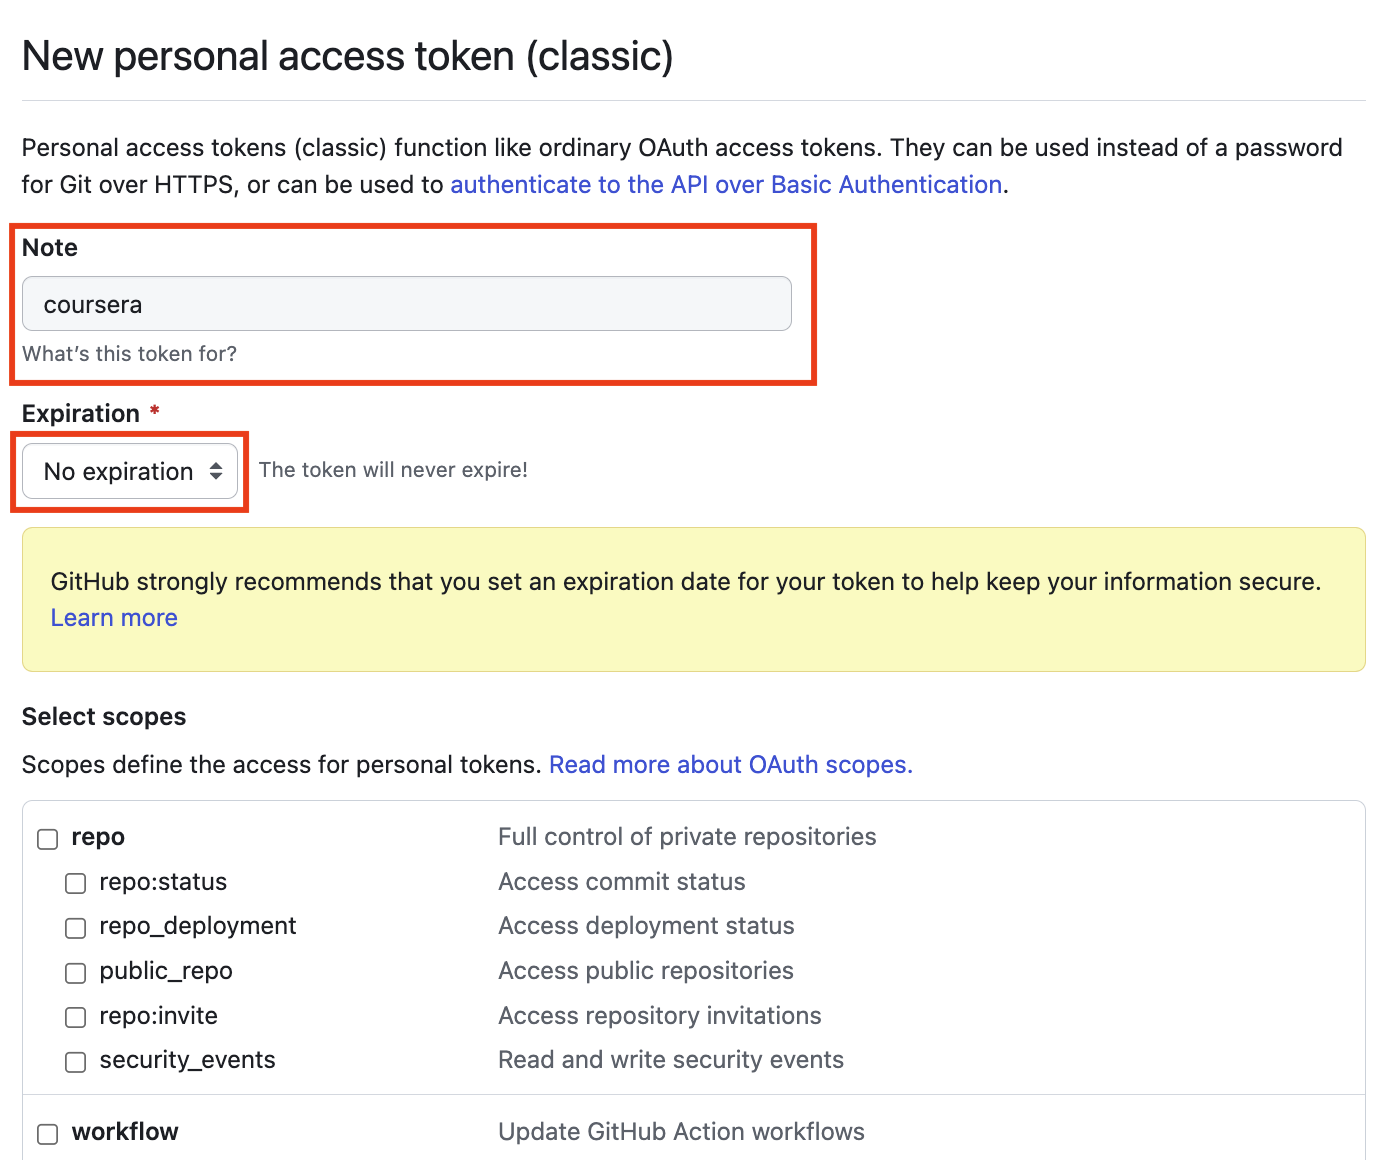
Step 5: On the New Personal Access Token page, enter a token name and an expiry time. If you wish to manually revoke the token, set the expiry time to No Expiration.
Step 6: Under scopes, select repo.
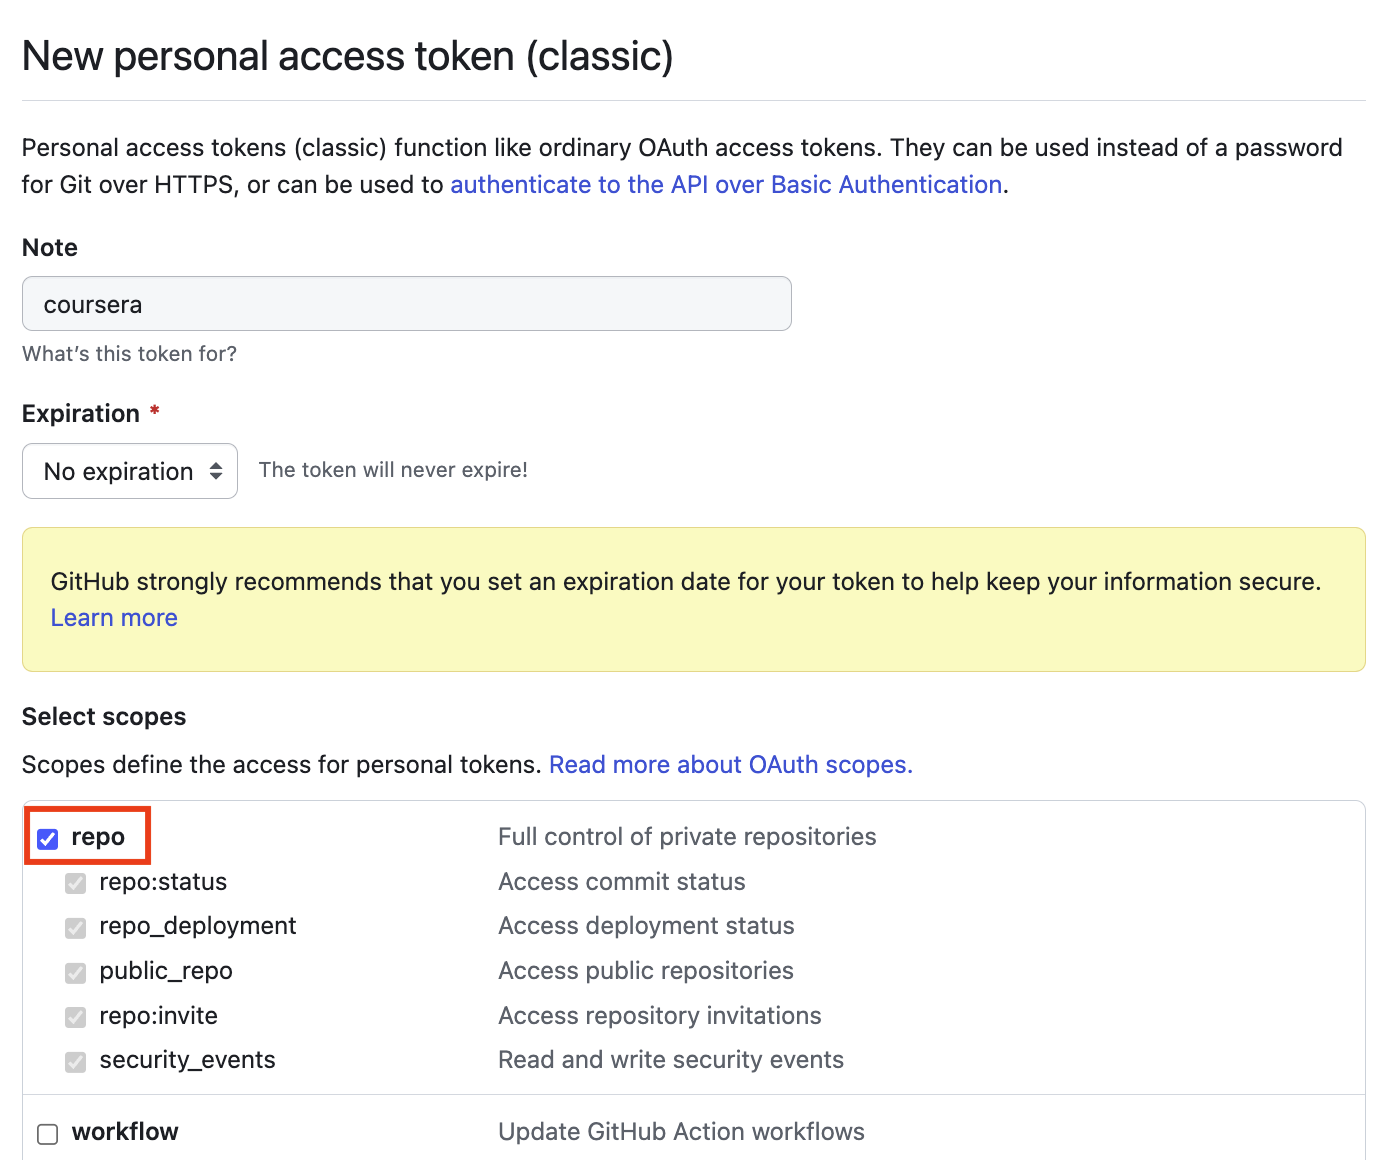
Step 7: Scroll to the end of the page and click Generate token.

Step 8: The token is now generated. Make sure to copy and keep note of the token as it will be hidden when you leave the page. This token can now be used when connecting to a repository over HTTPS.
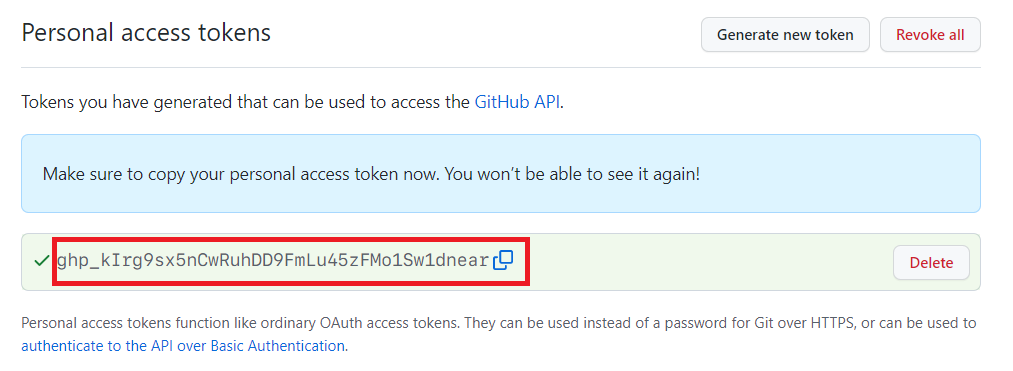
Note: If you lose the token, you can delete the old token and create a new one.
Accessing Repositories
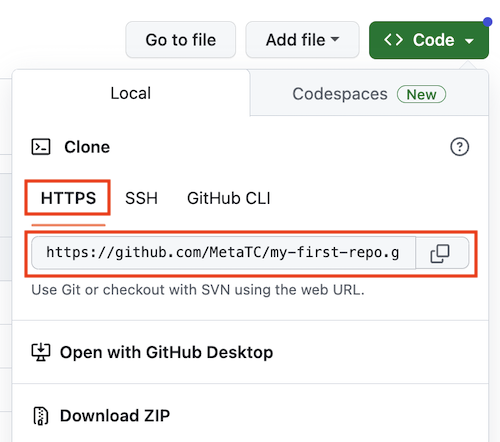
When accessing a repository and using HTTPS authentication, make sure you have access/permission to connect, and then just use the HTTPS address for the Git repository itself.
Connecting to GitHub via SSH
If you plan to use Github from your local device, the recommended way to authenticate is using Secure Shell, or SSH for short. This requires the creation of keys: a public and a private key. The advantage of using SSH is that you don’t need to enter in your credentials when interacting with the remote repository. The keys are generated and stored on your local machine and then the public key is copied to the Github server. After you finish setting up, every operation will be authenticated using the keys.
Generate SSH keys
The process is the same for both Windows and Mac. On Windows, you can use the Git Bash terminal and on Mac, the standard terminal will work.
-
Open the terminal
-
Enter the following:
ssh-keygen -t ed25519 -C "[email protected]" -
Replace the email with your own and press enter.
-
It will prompt to enter a password. Hit enter to skip setting a password and do the same for entering the same passphrase again.Generating public/private ed25519 key pair. Enter passphrase (empty for no passphrase): Enter same passphrase again: Your identification has been saved in ./ssh/private_key. Your public key has been saved in ./ssh/public_key.pub. The key fingerprint is: SHA256:UDQI5N1FL3QSq7Gj1o12mkr9Me7qGMZAeE1s9BWIln4 [email protected] The key's randomart image is:+--[ED25519 256]--+| .o+o=+oOo. || o +B+.= = || . +++ + o . || o ..E+ . || . .S || o + + || B = = || + + * o || oo=o+ |+----[SHA256]-----+ -
Once you have confirmed it will generate the above to confirm the keys have been created.
-
Both keys will be stored in the .ssh folder.
-
In order to add our key to Github, we need to get a copy of the public key which is always identified as .pub in your local directory.
Find the name of the key file using the below command.
ls ~/.ssh/
Then, use the below command to copy the file, replacing the <YOUR KEY> with the name of the key file on your device. This step differs between Windows and Mac.
For Mac: pbcopy < ~/.ssh/<YOUR KEY>.pub
For Windows: cat ~/.ssh/<YOUR KEY>.pub | clip
Adding Your Keys to Github
We now need to add our public key to Github to grant access to the repositories we create.
Step 1: Log on to Github
Step 2: Click on the profile icon in the top right of the screen and select Settings.

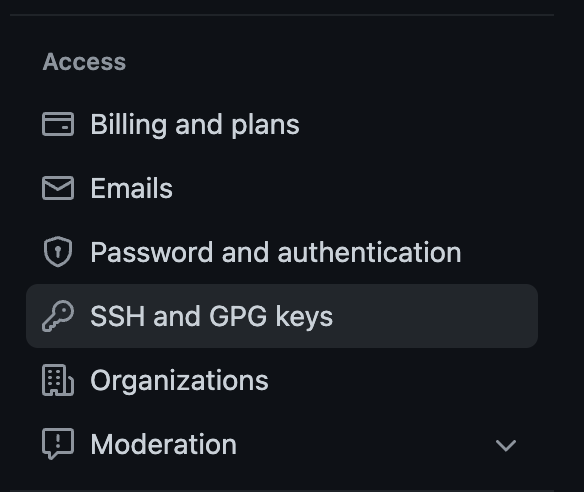
Step 3: On the Settings screen, on the left-hand side under the Access section, click SSH and GPG Keys
Step 4: Click the New SSH key button in Green on the right-hand side of the screen.

Step 5: Enter a title and paste in your public key that you copied previously.
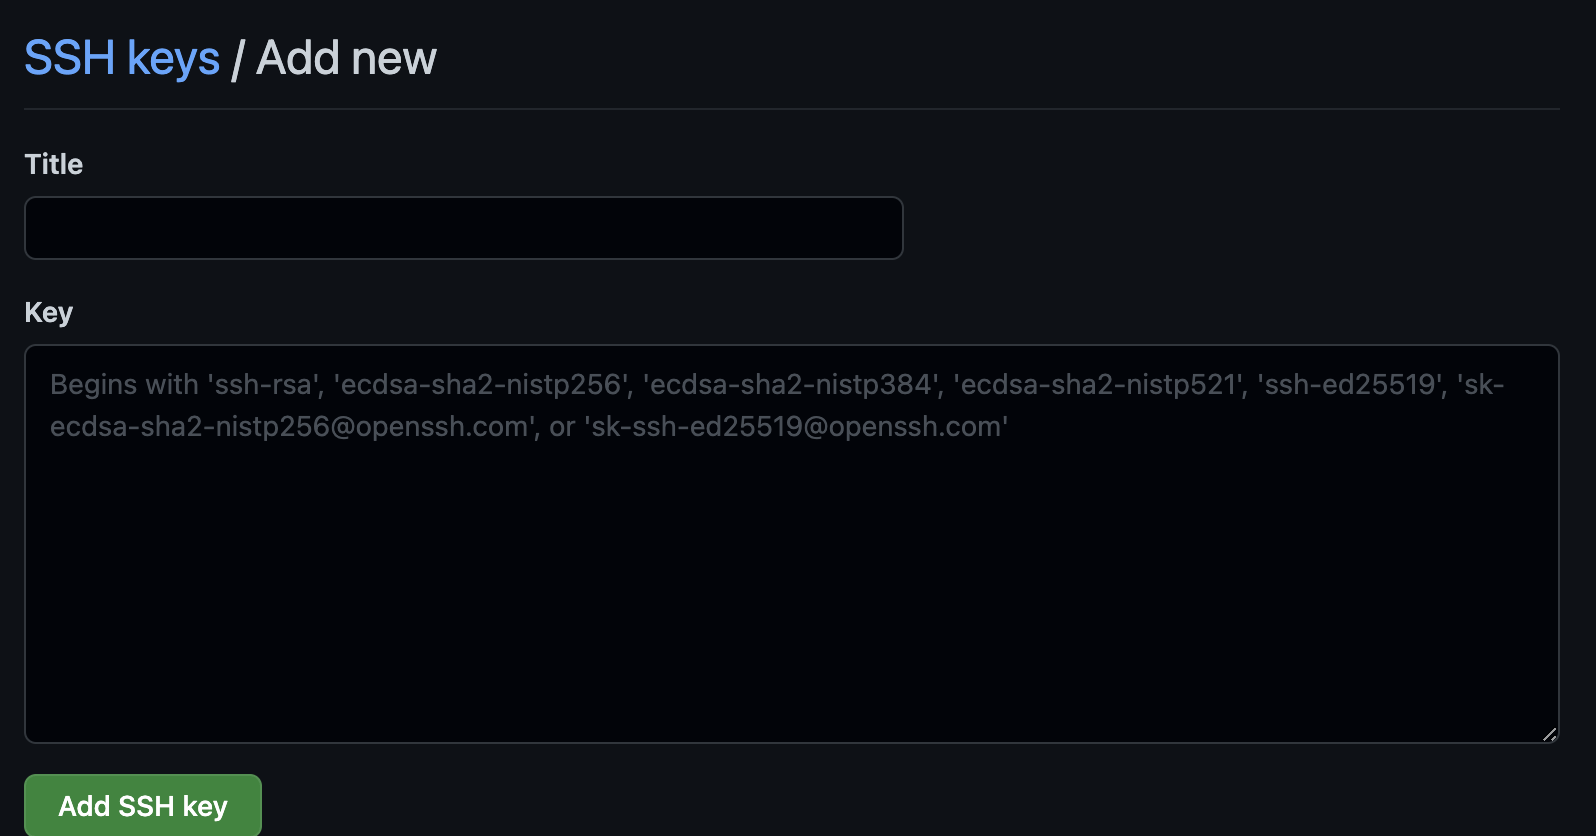
Step 6: Click the Add SSH key button.
You are now ready to access Github via SSH.
Accessing Repositories
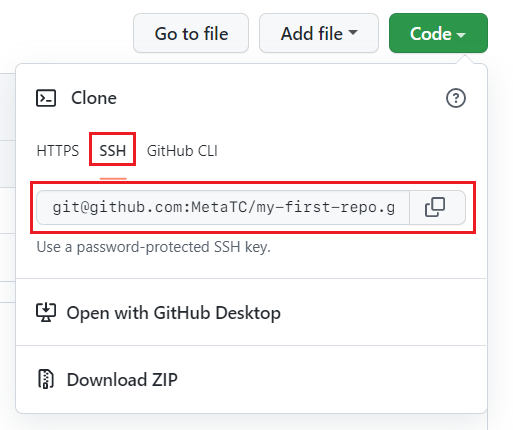
When accessing a repository and using SSH authentication, make sure to always use the SSH address of the repository.
How Git works
GitHub is a cloud based hosting service, that lets you manage Git repositories from a user interface. It’s like a social network. You can follow users or accept code contributions from anywhere in the world.
Some command (Gitbash → Windows, Terminal → Mac)
After cloning the your repository using:
git clone https://The.Address.of.your.ripository.domainThere are your repository files and a .git folder; Which is hidden and you have to see it using ls -la command (list all).
It is automatically created when you create a repository and tracks all the changes.
TIP
In Linux, any folder starting with a dot is a hidden folder.
The .git folder is initialized using git init . command.
As the repository was created on GitHub, it was not required for us to run it. GitHub handled all of this as part of its create new repo flow.
Git workflow
Git uses workflows which can be broken into three states namely, modified, staged, and committed.
Modified
Adding, removing, and updating any file inside the repository is considered a modified state.
Git knows the file has changed, but does not track it. This is where the staging state comes in.
Staged
In order for Git to track a file, it needs to be put in the staged area. Once added, any modifications are tracked, which offers a security blanket prior to committing the changes.
Committed
Committing a file in Git is like a save point in many ways. Git will save the file, and have a snapshot of the current changes.
An Example
Suppose you have a workflow that contains the three stages just mentioned, as well as the remote repository, a file is added from the working directory to the staging area. From there the file is committed, and then pushed to the remote repository. From the remote repository, the file can now be fetched and checked out, or merged to a working directory.
Add and commit
Before I add any files or make any changes, it’s always good practice to check if any changes or commits are currently there.
git status
This means that all the latest files on my local machine are exactly the same as what is displayed on the GitHub UI, which represents the server that everyone commits to.
Git status also tells me that I have nothing to commit and that my working tree is clean.
If you add a file and use git status:

git add
The purpose of the git add command is that I’m essentially prompting git and letting it know that I want to track this file, and that it will be included as part of my commit.
The first phase of this process is just to run the command git add test.txt.

Running the command git resotre --staged <file>... will unstage the file from the commit. (It will show like the previous image.)
Now any changes that I make from here on will be tracked and then at the end I will use the git commit command. The staged area is really important because you’re essentially preparing to get all of the files and changes that you want as part of whatever feature you’re working on.
Basically, you are getting all of that content ready for commit. You also have to remember that this is only on your local machine.
The distributed manner of git means it will only push to the server using the actual push command itself.
But any change you make here is only specific to you and your local machine.
Anyone else who pulls down the project from GitHub will only get what’s available on the remote server.
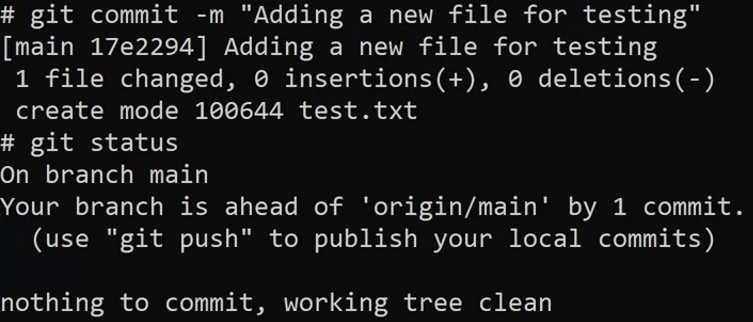
git commit
You can pass in a flag of -m which stands for message, allowing you to type in a message which will be attached to the commit. The massage is in "".
Branches
New branch
git checkout -B 'feature/lesson'git branch 'branch-name'The difference is that with the first command, it also moves you to the new branch created.
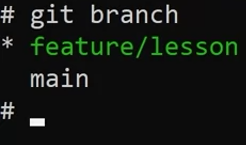
Now every change will be applied in the new branch.
NOTE
It’s important to remember that the main branch has no indication or knowledge of any of these changes even when I push code to the main repository, this is because that branch exists in isolation. The new branch needs to be merged back into the main branch to recognize changes in the feature lesson branch.
Pull Request
The purpose of a pull request is to obtain a peer review of changes made to the branch.
In other words, to validate that the changes are correct when coding, many teams will have conditions around the unit tests and integration tests.
These conditions will usually include validating that the standards have been met for merging back into the main line.
A team will also check for any issues that might have been missed.

NOTE
It’s good practice to specify dash U. This means that I’m only going to get updates from the upstream, which in this case will be the main branch.
The result of this is that the origin won’t be my main branch anymore. Instead, it’s feature lesson.
Next step is to open the GitHub UI. GitHub will show my new branch with a prompt. Click on the compare and pull request button.
A pull request lets the team know that I’ve made new changes that I want them to review and that I also want to approve or request changes to the actual poll request itself.
Another thing to note on the GitHub UI is that I’m comparing this with the main branch. I’ve essentially cut a branch from the main called feature lesson. I’ve then added a new file called test2.txt. It’s this file which is the main difference between the two branches.
Next, I check the pull request. I can see that there has been one commit. In other words, just one file has been changed and it’s been added as test2.txt. I then click create pull request. The team will then review the changes and either approve or decline them. Once approved, you can then merge your changes to the main branch.
In a lot of cases when adding a new feature, you can add the keyword feature then followed by the branch name, like a URL path, such as feature forward slash lesson in this example. For bug fixing, fix forward slash can be used.
Remote vs. local
In the pre-internet era, saving project files to different machines for backup and transfer was a tedious process. It required manually copying files between machines, one at a time. Making things slow for teams. Nowadays the cloud has enabled a more efficient way to do this.
Remote
Remote refers to any other remote repository to which developers can push changes. This can be a centralized repository, such as one provided by Git hub or repositories on other developer devices.
The remote code is accessed through a URI which is unique and only accessible to those who have permission.
Local on the other hand refers to your machine which can be a laptop, desktop or even a mobile device and is only accessible to you.
Let’s say we have a project called coding project one which is located on Git hub with a unique URL.
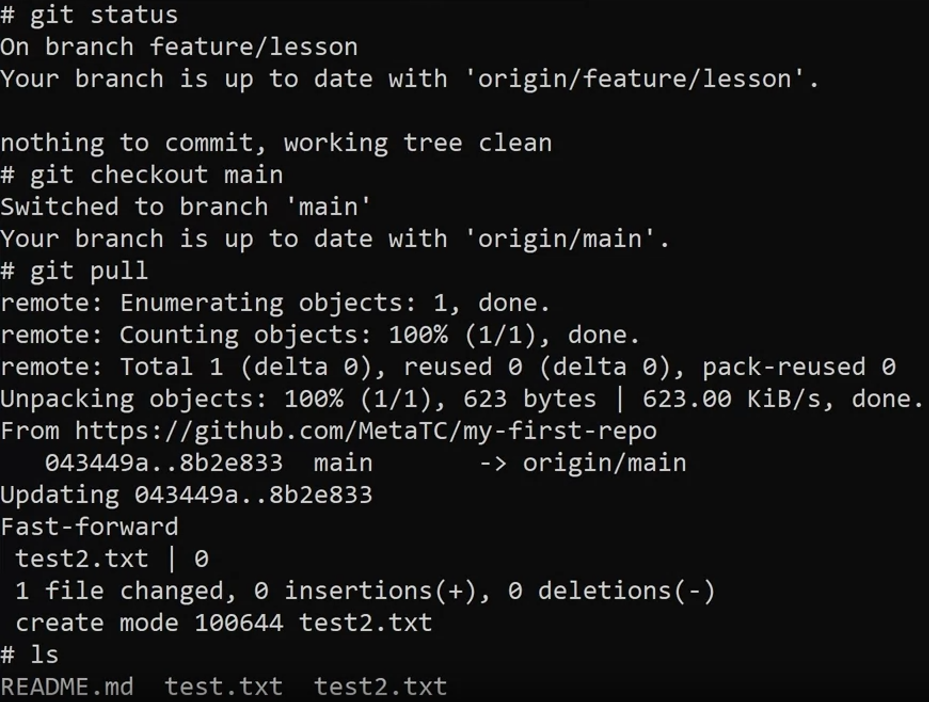
In other words, this project is stored on a remote server. When a user wants to copy this project to their local device, they need to either perform a clone if it’s the first time or pull it to get the latest changes.
The user can then make changes to the project and push those changes back to the server. Other users working on the code base won’t see those changes on their local machines unless they pull the latest changes from the server.
Creating a new local repository:
git initNow if git remote is executed, it comes back as blank.
The reason for that is that I’ve only initialized a local repository which has no connection to a central repository that sits either on Git hub or another server.
git remote add origin [email protected]:GitTutorials101/my-first-repo.git
git remote -v
git pullbut when I check the directory it’s blank.
The reason for this is that I haven’t set up a branch that matches with what I have on the server repository.
git checkout mainIt will set up a branch main on my local that tracks the branch main from the remote.
Push and pull
Before we begin, let’s go over the command line and perform the command git status.
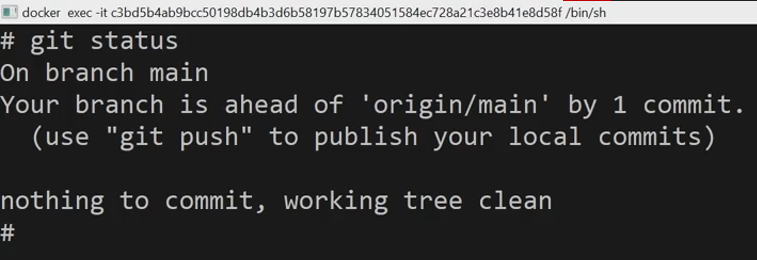
Git tells me that I’m on the branch, main, but also the my branch is ahead of the origin main branch by one commit.
What this means is that all the changes that I have on my local repository are currently ahead of what is stored in the remote repository on GitHub that ties into Git’s distributed workflow in which you can work in an offline state and then only ever communicate with a remote repository when you use the commands of git push or git pull.
It’s always good practice to check which branch you’re currently on. You can use git status or git branch to do this.
This is important because if you do make changes in a different branch, you need to specify where you’re pushing up to.
git push origin/mainI’ll specify the origin branch to be the main branch. As in, I’m pushing my changes to the origin as the remote repository, and then I want to push it to this branch as the main.
I’ll be prompted for my login information as I am pushing using HTTPS. Once I enter my login information, you’ll notice that the commit is pushed from the local main to the remote main, on the remote repository.
You can see that my test.txt file now appears in Github. That’s taken the commit snapshots that I have in my local repository and pushed it up to the remote repository.
Git has then compared those files with what’s on the remote repository to find any conflicts or problems. If none are found, it’ll just merge them straight through, which is classed as an auto merge. If there are any conflicts, my push will fail.
TIP
Before doing a push, it’s also good practice to perform a git pull in order to get the latest changes from the remote repository and reduce the odds of encountering a conflict.
Normally when you’re working on a project, you could have several developers all submitting with different branches, different code, and different features. In order for you to get those changes, you need to use the git pull command.
git pullWith git pull, you’re taking all that data from the remote server. Git then merges the snapshot from the remote with the snapshot that’s on your local. It will auto merge them if there is no conflicts.
Once that’s complete, I’ll have the latest changes on my local machine.
Resolving conflicts
Conflicts will normally occur when you try to merge a branch that may have competing changes. Git will normally try to automatically merge (auto-merge), but in the case of a conflict, it will need some confirmation. The competing changes need to be resolved by the end user. This process is called merging or rebasing.
The developer must look at the changes on the server and their local and validate which changes should be resolved.
A merge conflict example is when two developers work on their dependent branches. Both developers are working on the same file called Feature.js. Each of their tasks is to add a new feature to an existing method. Developer 1 has a branch called feature1, and developer 2 has a branch called feature2.
Developer 1 pushes the code with the changes to the remote repository. Developer 2 pushes their changes.
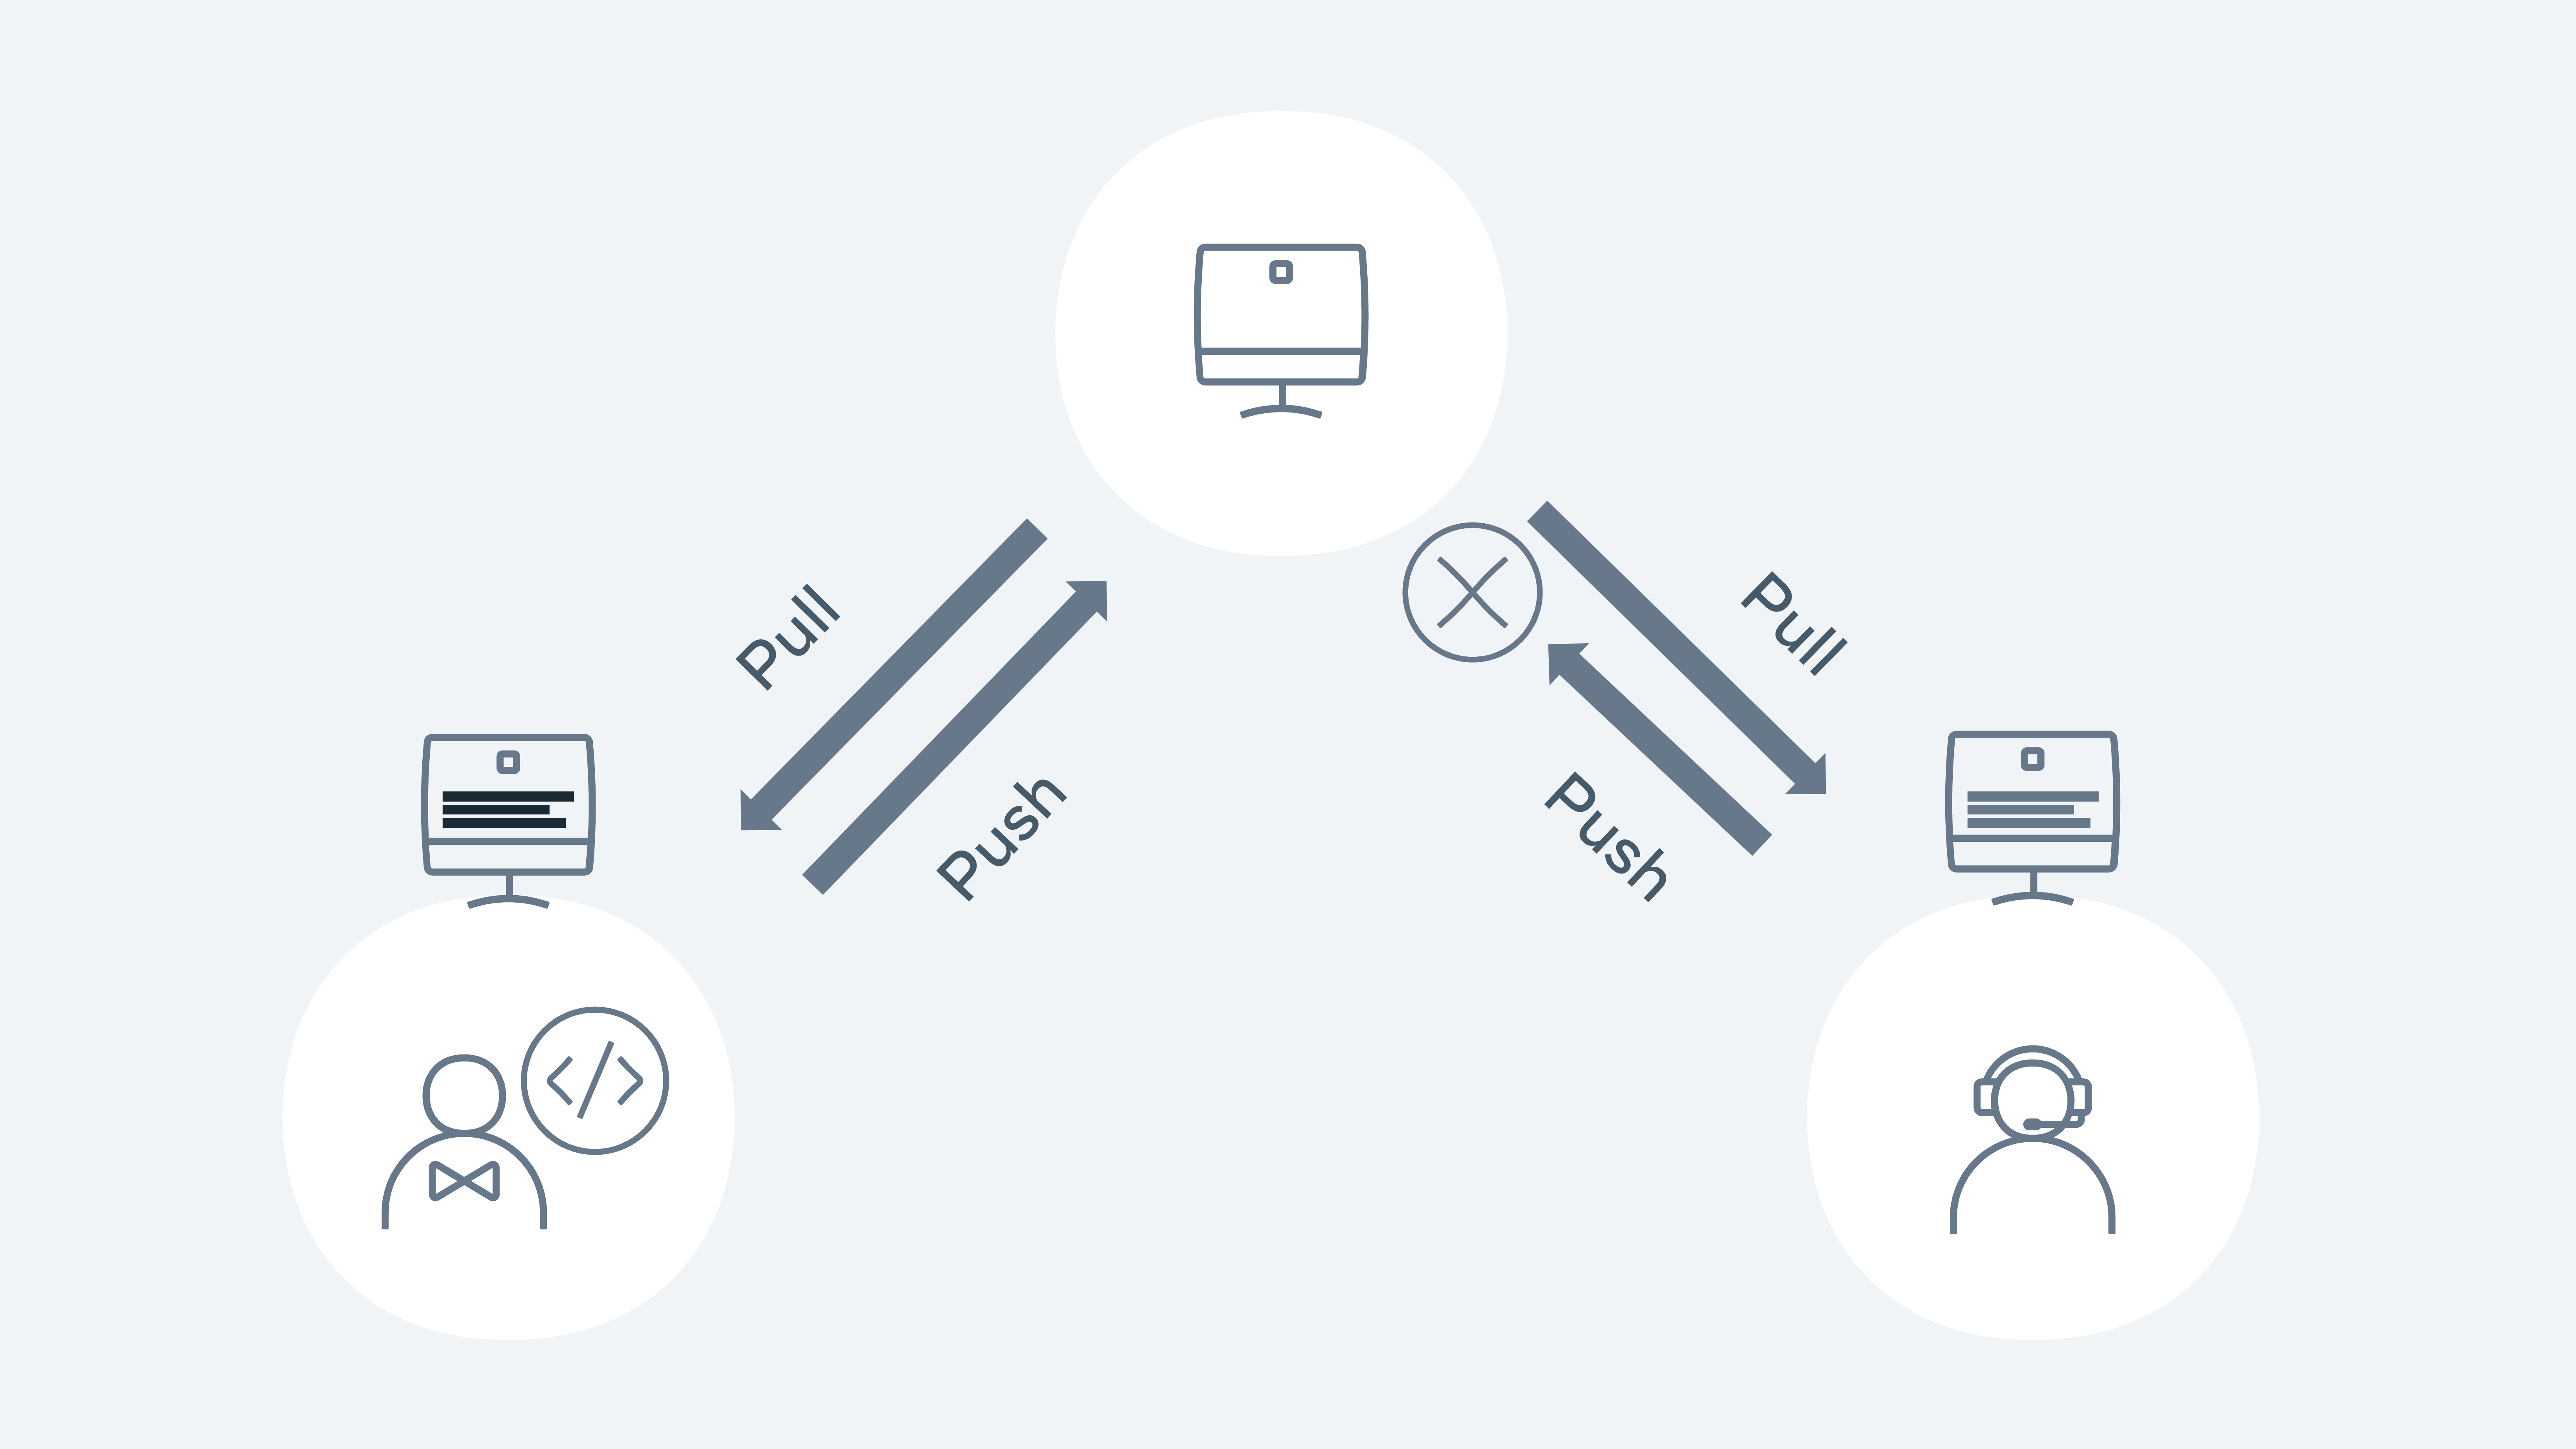
Let’s walk through how this would happen in Git. Both developers 1 and 2 check out the main repository on Monday morning. They both have the same copy. Both developers check out a new branch - feature 1 and 2.
    git pull
    git checkout -b feature1
git pull
git checkout -b feature2Developer 1 makes their changes to a file called Feature.js and then commits the changes to the repository for approval via a PR (pull request)
    git add Feature.js
    git commit -m 'chore: added feature 1!!'
    git pull origin main
    git push -u origin feature1
The PR is reviewed and then merged into the main branch. Meanwhile, Developer 2 is starting to code on his feature. Again, they go through the same process as Developer 1:
    git add Feature.js
    git commit -m 'chore: added feature 2!!!'
    git pull origin main

From github.com:demo/demo-repo
 * branch            main       -> FETCH_HEAD
   9012934..d3b3cc0  main       -> origin/main
Auto-merging Feature.js
CONFLICT (content): Merge conflict in Feature.js
Automatic merge failed; fix conflicts and then commit the result.
Git lets us know that a merge conflict has occurred and needs to be fixed before it can be pushed to the remote repo. Running git status will also give us the same level of detail:
    git status
    On branch feature2
You have unmerged paths.
  (fix conflicts and run "git commit")
  (use "git merge --abort" to abort the merge)

Unmerged paths:
  (use "git add <file>..." to mark resolution)
        both modified:   Feature.js

no changes added to commit (use "git add" and/or "git commit -a")
In order to merge, Developer 2 needs to see and compare the changes from Developer 1. It is good practice to first see what branch is causing the merge issue. Developer 2 runs the following command:
 git log --merge

commit 79bca730b68e5045b38b96bec35ad374f44fe4e3 (HEAD -> feature2)
Author: Developer 2
<[email protected]>
Date:   Sat Jan 29 16:55:40 2022 +0000

    chore: add feature 2

commit 678b0648107b7c53e90682f2eb8103c59f3cb0c0
Author: Developer 1
<[email protected]>
Date:   Sat Jan 29 16:53:40 2022 +0000

    chore: add feature 1
We can see from the above code that the team’s conflicting changes occurred in feature 1 and 2 branches. Developer 2 now wants to see the change that is causing the conflict.
git diff

diff --cc Feature.js
index 1b1136f,c3be92f..0000000
--- a/Feature.js
+++ b/Feature.js
@@@ -1,4 -1,4 +1,8 @@@
  let add = (a, b) => {
++<<<<<<< HEAD
 +  if(a + b > 10) { return 'way too much'}
++=======
+   if(a + b > 10){ return 'too much' }
++>>>>>>> d3b3cc0d9b6b084eef3e0afe111adf9fe612898e
    return a + b;
  }
The only difference is the wording in the return statement. Developer 1 added ‘too much,’ but Developer 2 added ‘far too much. Everything else is identical in terms of merging and it’s a pretty easy fix. Git will show arrows <<< >>> to signify the changes. Developer 2 removes the markers so the code is ready for submission:
let add = (a, b) => {
  if(a + b > 10) { return 'way too much'}
  return a + b;
}
git add Feature.js
git commit -m 'fix merge conflicts'
git push -u origin feature2Developer 2 has now fixed a merge conflict and can create their PR to get the code merged into the main line.
Example workflow
Why workflows are important?
As a developer working on a project, you first need to pull the project down from a remote repository to your local machine. This is commonly called checking out a project or pulling a project.
Once on your local machine, you can build and run the project and make changes. When you’re done, you have to push the changes you made back to the remote repository so other developers can see them.
The purpose of a workflow is to guide you and other members of your team. It should not disrupt or cause blockers for deployment or testing or for any other developer who contributes to the project itself.
Choosing a workflow needs careful consideration. It can depend on the size of the team, the culture of your workplace and also the type of product you intend to build or update.
Feature Branching
A common workflow used by many developers.
Feature branching means you create a new branch from the main line and work on this dedicated branch until the task is completed.
Rules and conditions need to be made in order for this branch of code to be kept in a good state. Every code base has a main repository which is essentially the source of truth for the application. All changes such as add, edit or delete are submitted directly to the feature branch, the main branch stays as is.
When you are ready and happy with the code you have added, you have to commit the changes and then push to the server repository.
To commit, you push the changes and as it’s a feature branch, a pull request follows. The pull request is compared to the main branch, so developers who peer reviewed the code can see exactly what was changed. Once it’s reviewed and approved, it can then be merged into the mainline.
The way it works with Git and Github
git pull- Creating a new branch :
git checkout -b feature/my-new-feature - Adding new content :
git add .git add README.md - Commit the new file and provide a meaningful message so other developers can see what you added :
git commit - m 'chore: created new branch with new README file - The file has now been added to the local branch, this means that the file is only visible locally to you. To allow other developers to see the changes, you need to push the file to the remote repository :
git push -u origin feature/my-new-feature
HEAD
Knowing what branch you are on
It keeps a special pointer called head which is one of the files inside the dot git folder. This file refers to the current committee you are viewing.
cd .git
cat HEAD
In git we only work on a single branch at a time. This file also exists inside the dot Git folder under the refs forward slash heads path.
cd .git
cat /refs/heads/main
After you entered this command, a single hashed ID appears, the single hashed ID is a reference for the current commit.
git checkout testing
git branch
This moves the head to point to the testing branch.
Diff commands
You probably know that the git status command tells you which of your files have been changed.
The git diff command it goes a step further and tells you what exactly these changes are.
When used together, you can think of them as a file system. Git status tells you the file names, but to open the file and see the contents, you’ll need to use git diff.
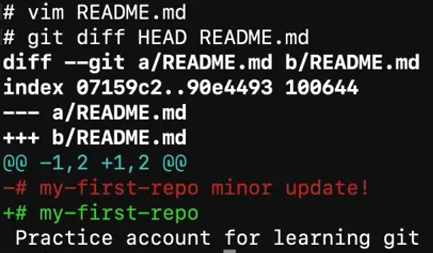
Git diff will compare the previous version of the file with your current one to find any differences. It will then tell you specifically what content has been removed as well as what content has been added to the file.
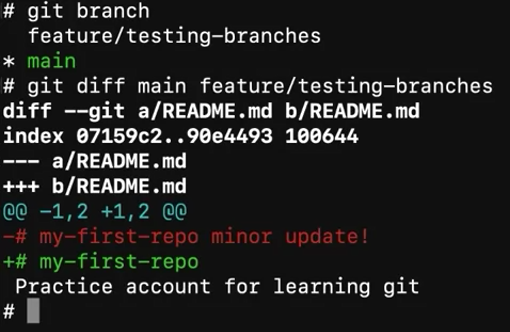
Diff is used to make comparisons against files on your local repository. It can also be used against commits and against branches.
WARNING
You have to first complete commit and then use
diff.


Comparison between branches
Blame
Git has a very helpful command for keeping track of who did what and when. It’s called git blame.
One of the core functions of git is its ability to track and record the full history of changes for every file in the repository. In order to view and verify those changes, git provides a set of tools to allow users to step through the history and view the edits made to each file.
The git blame command is used to look at changes of a specific file and show the dates, times, and users who made the changes.
git blame <File Name>Every line will start with the ID and then the author, the date and time when the change was made, and the exact line number where the change occurred.
Then the actual change or content is also returned.
The ID is a reference ID of the commit. The same ID might appear in several lines. This happens when a single commit has been made by the same developer.
The author is the person who created the commit.
The timestamp is the date and time when the changes were committed.
Line number represents the location in the file or the exact line where the changes were made.
The content is the code that was added to the file.
For large files, blame has a flag:
git blame -L 5,15 <File Name>git blame -lThis time, there are a few changes to the output. For instance, the hash dash ID is in its full length form. It’s not in the shortened version. The output is now a bit more detailed. You can also control if you want to show email addresses or change the date format. These are the examples of the various things that you can do.
Secondly, another aspect of using git blame is that you can see detail changes or the actual commit changes of a specific hash dash ID.
git log -p <ID>Forking
In previous lessons, you have touched on workflows such as branching and how they can be used to simplify a process for a team. Forking is another type of workflow. The key difference between branching and forking is that the workflow for forking creates a new repository entirely. Branching cuts a new branch from the same repository each time and each member of the team works on the single repository.
Let’s take a simple example of how forking works. In the diagram below the coolgame repo has been forked by Joe. The entire contents and the history of the repository are now stored in Joe’s account on GitHub. Joe is now free to make edits and changes to the repository at his own will. You, the owner of the coolgame repository can continue to work as normal and not know about Joe’s edits or changes.
Joe created a new branch on his repository and added a new cool feature that he felt was needed. In order for Joe to get his feature back into the original repository, he will need to create a PR as normal but instead of comparing with the main branch, it needs to be compared with the original repository. Essentially the two repositories are compared against each other. The owner of the original repository can then review the PR and choose to accept of decline the new feature.
Forking
Let us take a look at how you can fork an existing repository that is available on GitHub. For this example, we used a repository we can access on GitHub.
Step 1: If you have access to your own repository on GitHub, you can access this now to follow along.
Step 2: Click on the Fork button on the top right of the page.

Step 3: It will then prompt you to fork the repository to your desired account. Choose the account you wish to fork to.
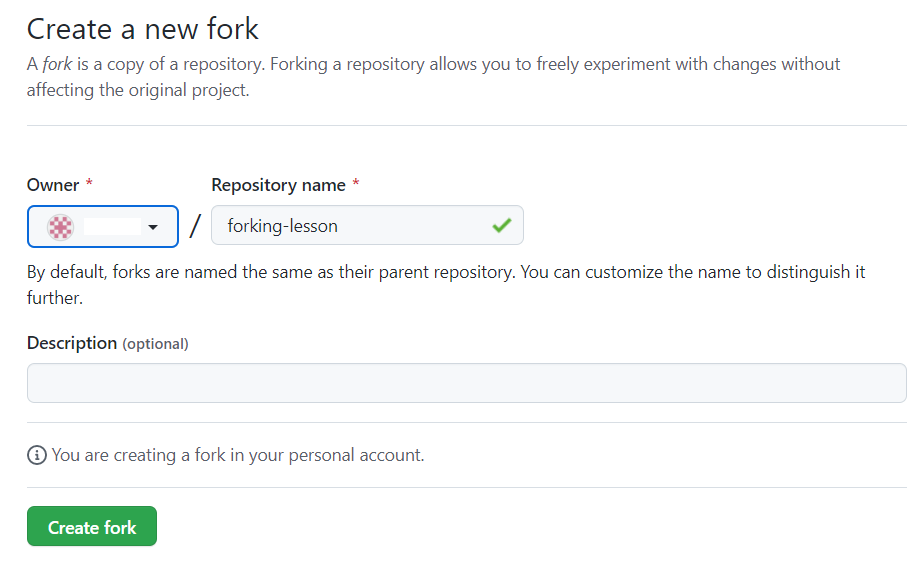
Step 4: Github will then clone the repository into your chosen GitHub account.
In a couple of steps, you have successfully forked a repository into our own GitHub account. The full repository is cloned and allows us to work directly in that repository as if it was our own.
On the landing page of the GitHub repository, it will show directly under the repository name that it was forked from Meta-Front-End-Developer-PC/forking-lesson.

Other subtle differences in the GitHub UI on a forked branch is the top information bar above the files.
It now shows that the branch is up to date with forking-lesson:main. It also adds a Fetch upstream drop-down to allow you to pull and merge the latest changes from the original repository.

Example
Let’s run through a typical flow of creating a new branch and adding some new content.
Step 1: Clone the repository.
Step 2: Create a new branch.
git checkout -b test/forking-example
Step 4: Create a new file and commit it to the repository.
touch text.txt
git add .
git commit -m 'chore: testing'
Step 5 Push the branch to your remote repository.
git push -u origin test/forking-example
Step 6: Go to Github and click the Compare & pull request button. If it’s not available, click on the branch dropdown button and change it from main to the branch name of test/forking-example:

After clicking the Compare & pull request button it will now redirect to the original repository in order to create the PR.
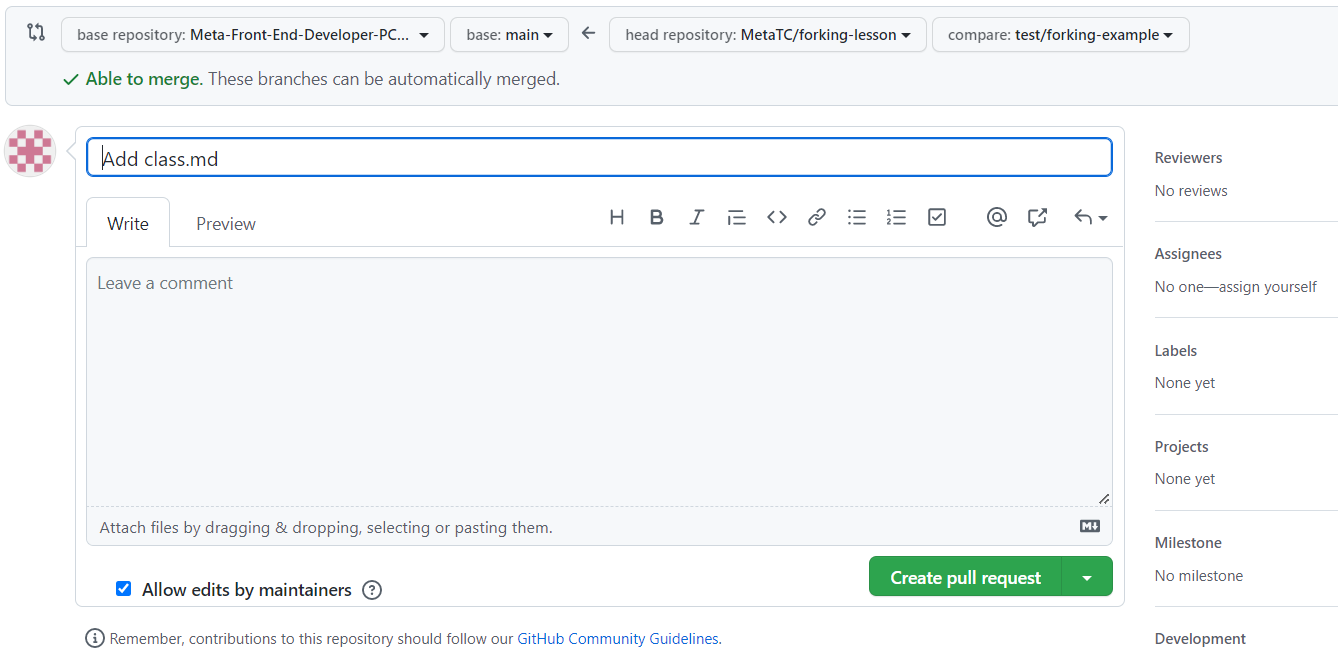
Each repository will have its own guidelines for submitting PRs against them and usually provide a how-to contribute guide. As you can see, in order to get the changes from our forked repository, you need to compare it against the original. This gives a lot of control to the repository owners of the original and they get to decide what makes the cut to be merged in.
In this lesson you covered the basics of forking a repository, adding some changes, and then creating a PR to get it back to the original repository.
Additional Resources
GitHub: Pricing
GitHub is free to use, but it also offers different pricing models to suit the needs of different-sized teams and organizations. Check out the link below:
Git: An Origin Story
https://www.linuxjournal.com/content/git-origin-story
Git Cheatsheet
https://education.github.com/git-cheat-sheet-education.pdf
Git patterns and anti-patterns for successful developers
Tech Talk: Linus Torvalds on git
https://www.youtube.com/watch?v=4XpnKHJAok8
Vim Cheatsheet
Previous one → 2.Unix Commands | Next one → 1.Databases and data
