Django Admin
When you develop a web application, much of the content is stored somewhere like in a database. As a result, a common task is to provide an administration or admin site as part of the application.
The purpose of this admin side is to allow certain users to administer and manage the data of the application.
You may remember this when you covered the topic where the path configurations for the admin were set by default inside the URL configuration files. Now, suppose the owners of Little Lemon have asked you to store all of the website content in a database so it can be updated by the restaurant staff.
For example, managers can use the admin site to add or edit content. That content is displayed on the public site.
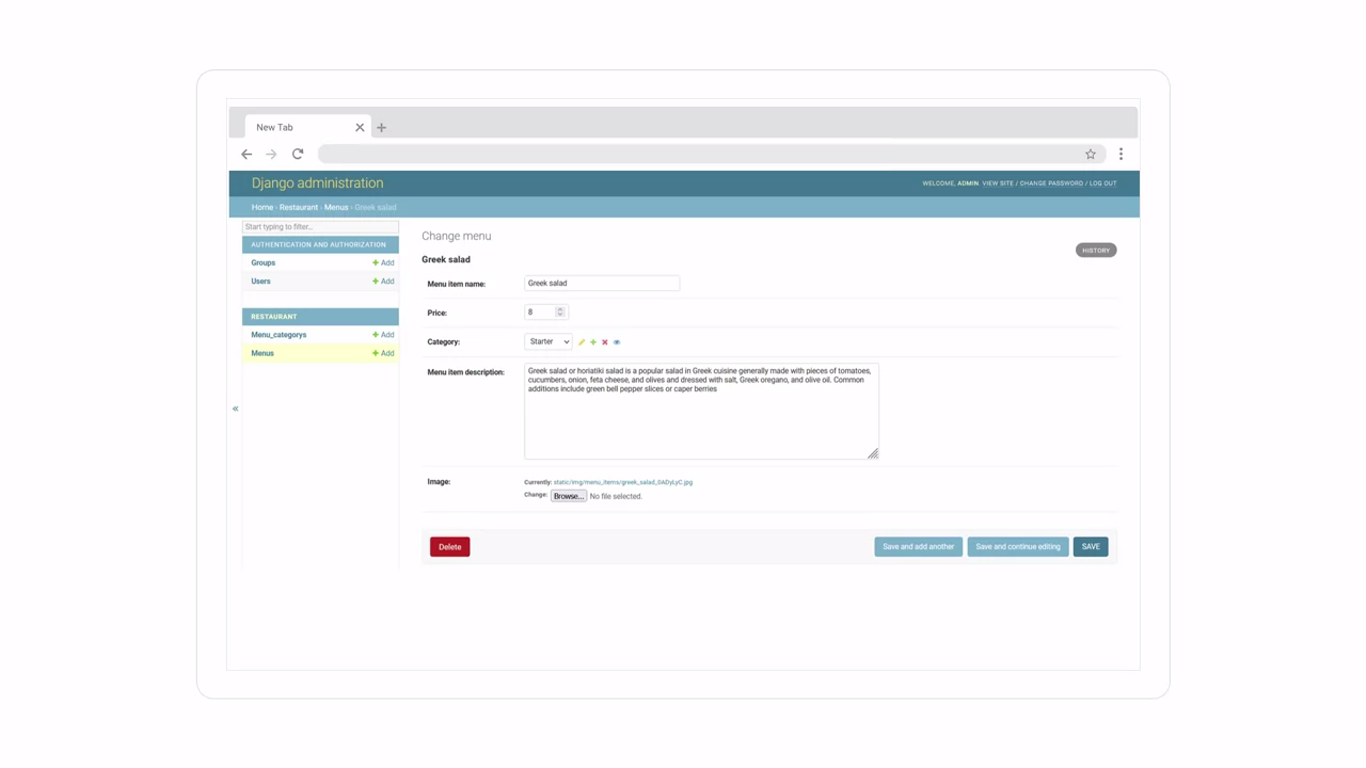
For developers, building such as site for each project can be tedious work. Django solves the problem by automatically creating a unified admin interface for site administrators to add, edit and delete content, such as users, permissions and database entries.
This process is automated as the admin interface directly links to the models in the project once registered.
The admin interface is usually a part of a large web application to help the administrator perform certain administrative tasks. The tasks such as:
- creating and managing users
- controlling access permission
- forming user groups
Django reads the models declared in the project and from the metadata of models declared in a project, it quickly builds an easy-to-use interface.
WARNING
The admin site isn’t intended to be used by site visitors. It’s for site managers.
django-admin
In addition to the interface, another powerful feature of Django is that it provides a ready-to-use admin interface named django-admin. As you have already learned, you use this command line utility for administrative tasks.
The Django admin utility is executed from inside the terminal. It is enabled and assigned to a project by default when you run a command such as startproject inside Django.
As the admin interface depends on django.conrtib.admin app, you’ll find it in the installed app section of the settings.py file, along with certain other apps.
Database
Databases are an inherent part of building a web application. Using Django and Django admin provides a convenient means of accessing and modifying these databases from a friendly user interface.
Before you access this interface, you first need to create an admin user that provides you with the necessary credentials.
Using django admin interface
python3 manage.py createsuperuserNext, in the username prompt, you must create a username.
Notice that if a user is already created, Django will throw an error stating that the username is already taken.
Notice that because this is not a strong password, Django displays a warning stating that the password should be more secure. You can ignore this for now and press Y, which stands for yes. This will let us continue. But it’s important to know that in a real-world application, the password should be strong and meet security equirements.
Now start the server and go to /admin path.
After logging in, notice that there is a basic interface. The first option gives an overview of the groups and users. There is already a sample model named reservations. Below that, there is a list of recent actions which are empty at the moment.
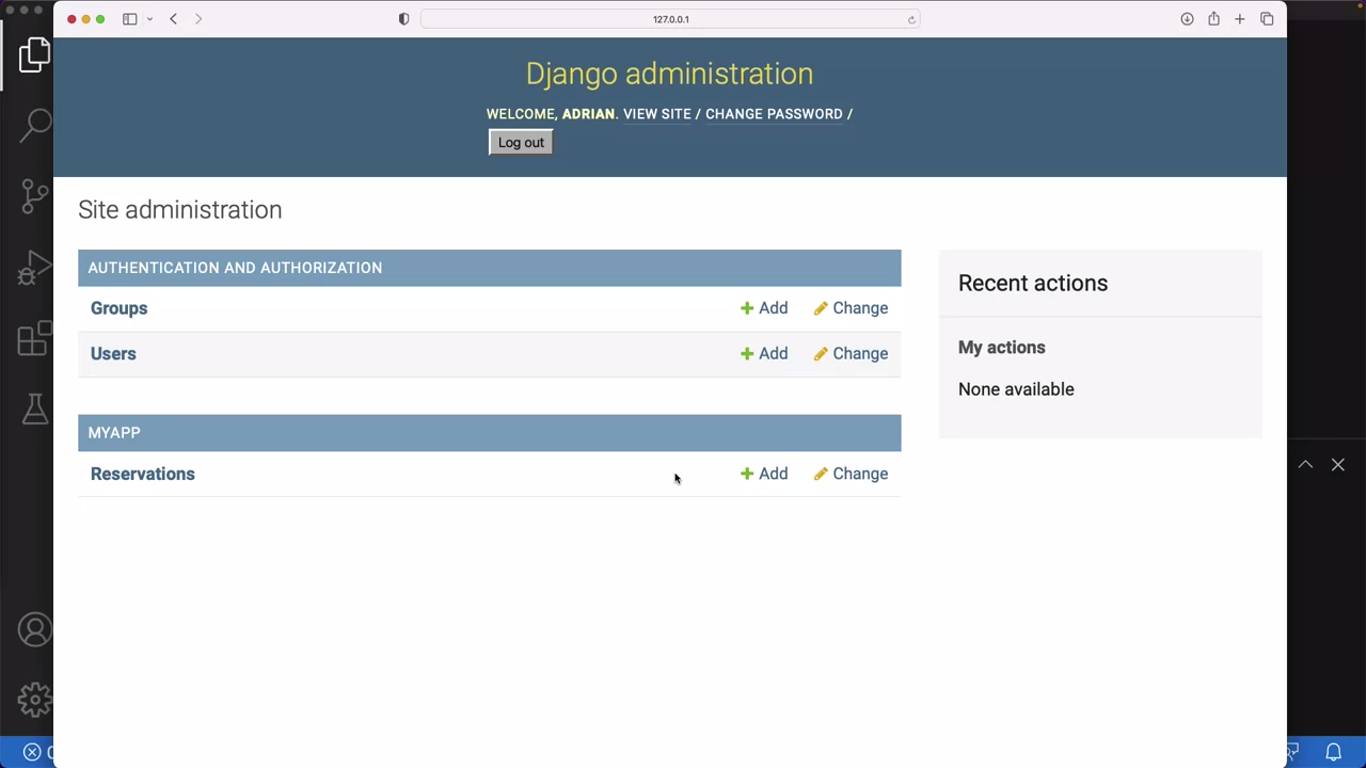
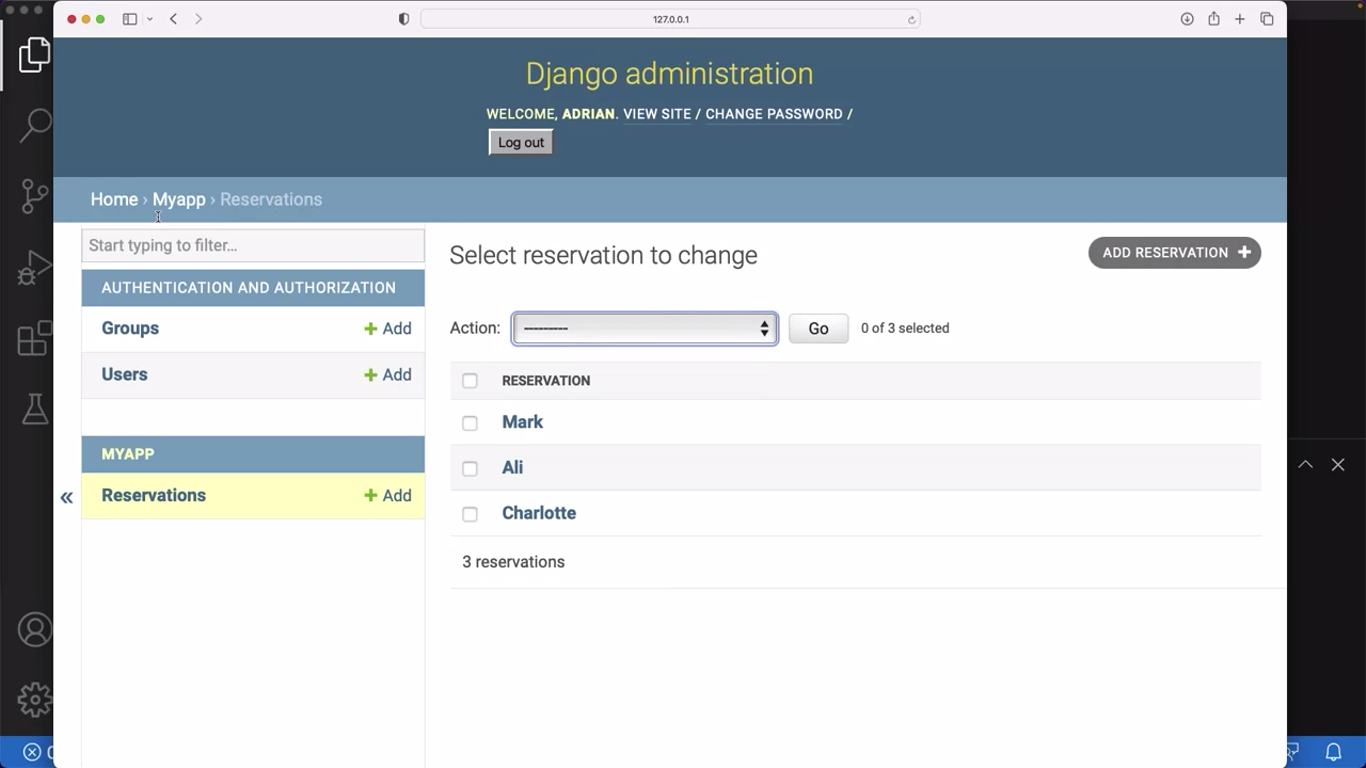
You have an option to add and change these configurations. If, let’s say you go to the reservations model and click “Change”, notice that there are a few entries listed. You have an option to directly update the reservations data using the form or add new entries. You can also delete the selected reservation by clicking the checkbox next to the names.
If you go back to the main page, there are other options to add or modify the users that already exist. For example, if you click a specific user, you can change the username and password, the personal info, and also assign the user to some groups.
Additionally, you can designate specific permissions that the user can have, which would be listed below.
There are also other additional details such as last login information and days of joining for the user. You can also go to the top of the page and check the history of the user and the changes they have made.
Managing users in Django Admin
Django’s authorization and authentication system are provided by django.contrib.admin app, which is installed by default. It can be seen in the INSTALLED_APPS in the project’s settings.py file.
A super user has the privilege to add or modify users and groups. As you log in as a super user, the admin interface appears as below:
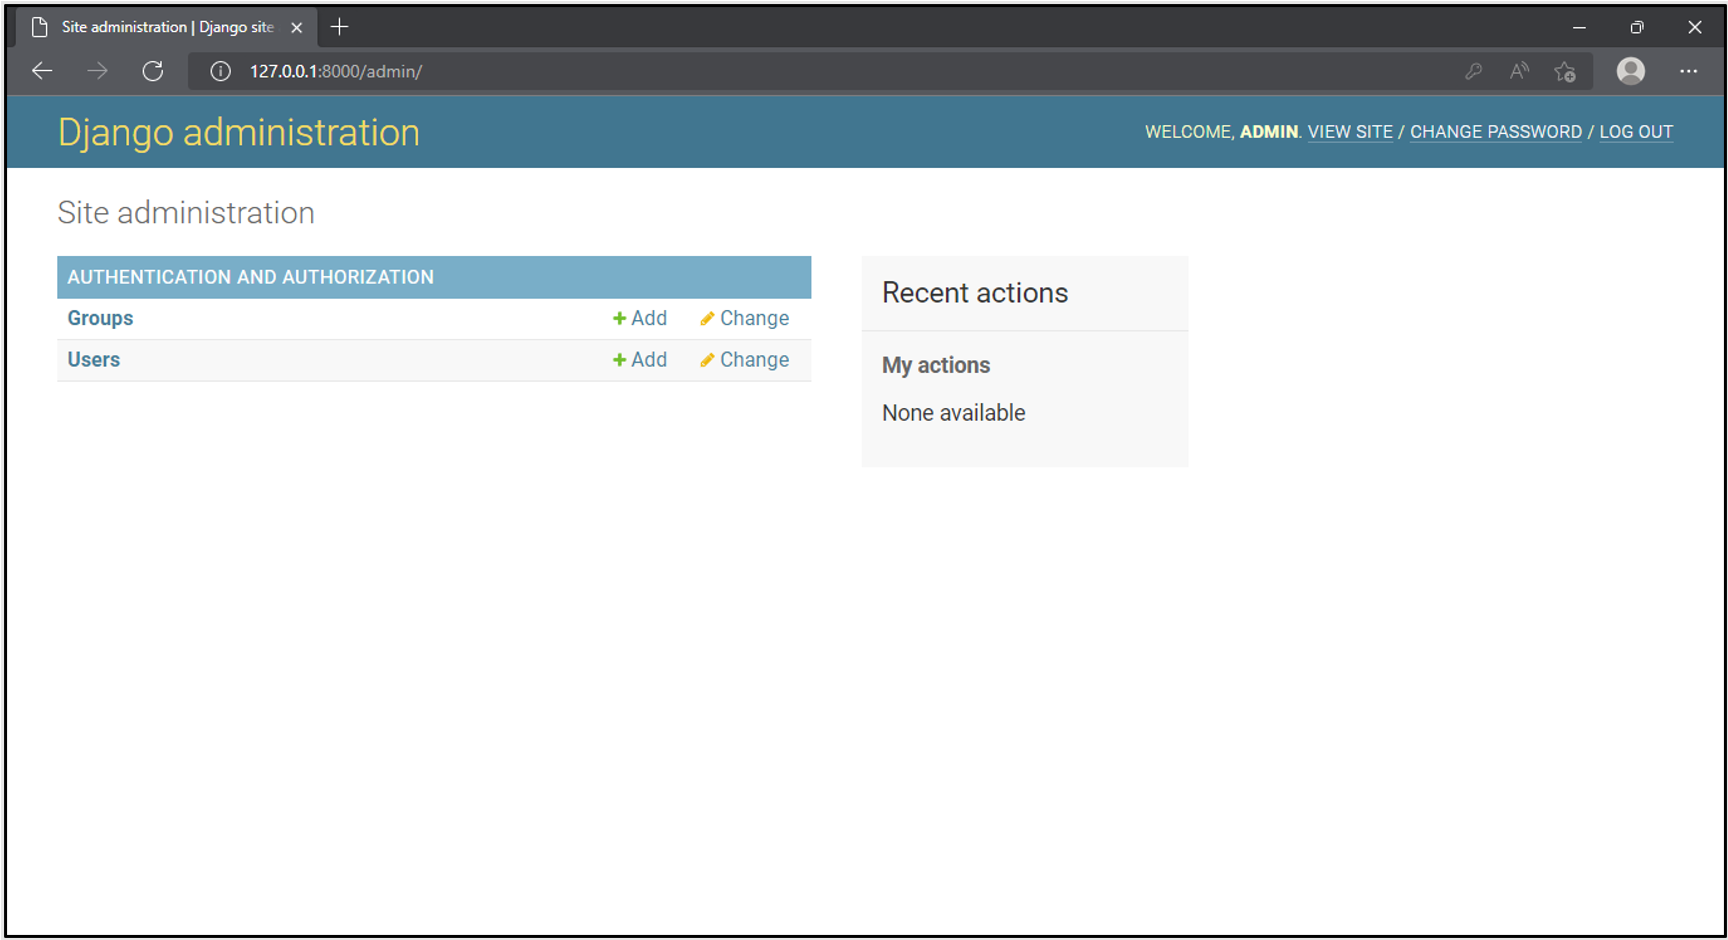
One can add users through the interface, which is straightforward. It’s as easy as following the onscreen instructions.
A user without permission to perform any task is virtually useless. Different permissions can be granted to the user individually or by creating a group with a set of permissions. Users can be added to the group so that a set of users with common permissions is created.
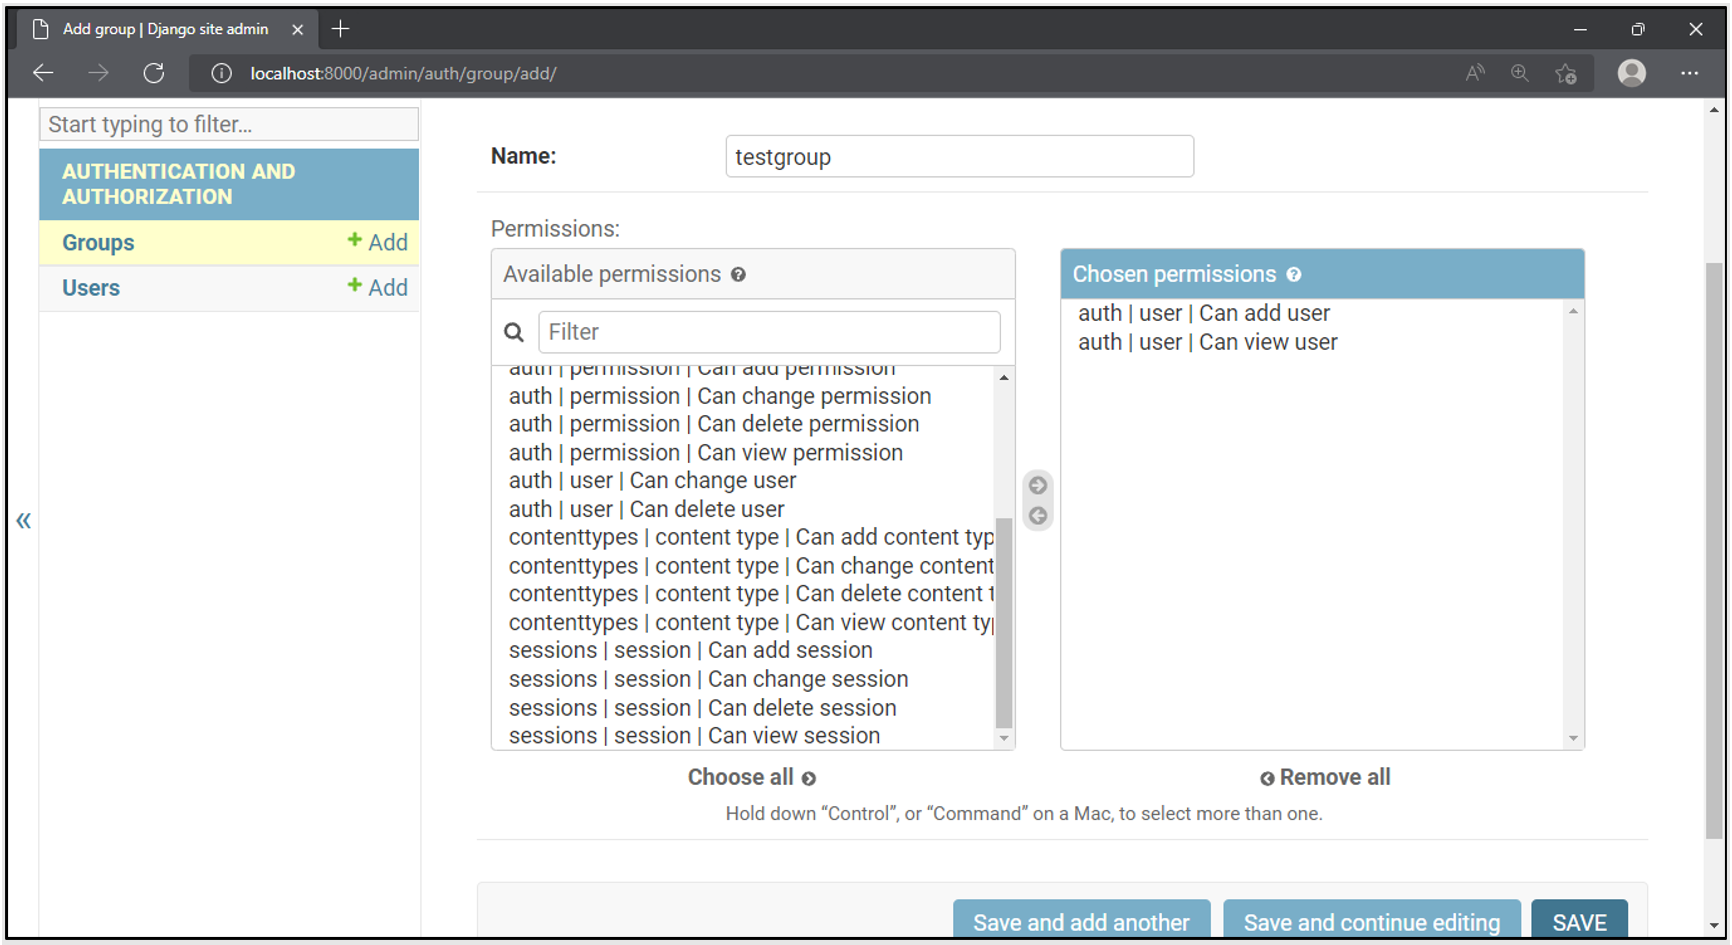
If a user’s is_staff property is set to True, it can log in to the admin interface.
Django admin’s user management system is very efficient, yet it can be tricky. Unless you grant the permissions to the users very judiciously, the system might be put at considerable risk.
Even though Django’s admin site provides a very easy-to-use interface to add and modify users and groups, there are no real restrictions as the User admin.
For example, a user with a staff status can manage the other users. But they can also edit their own permissions, which is not warranted. A staff user can also allocate superuser rights. The out-of-box implementation of the admin site doesn’t prevent this.
So, what do you do to resolve this?
Let’s assume that the Django site has a superuser named Admin and a user named test123 with staff status enabled.
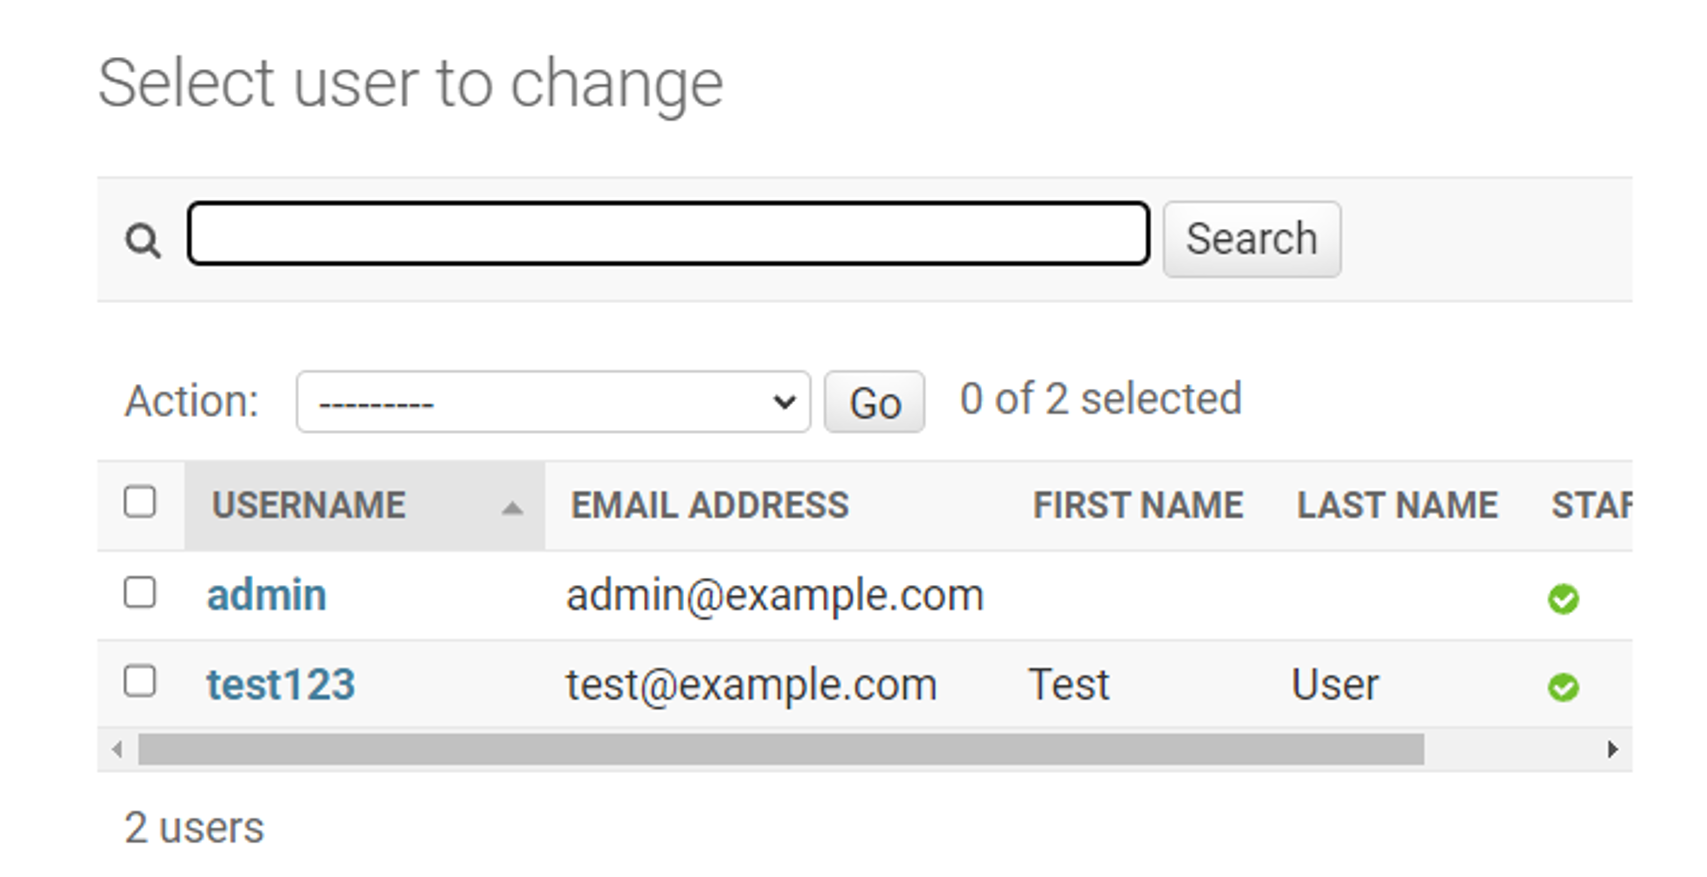
To customize the User Admin, first, unregister the existing user profile and register a new one.
Use the following steps to unregister a user:
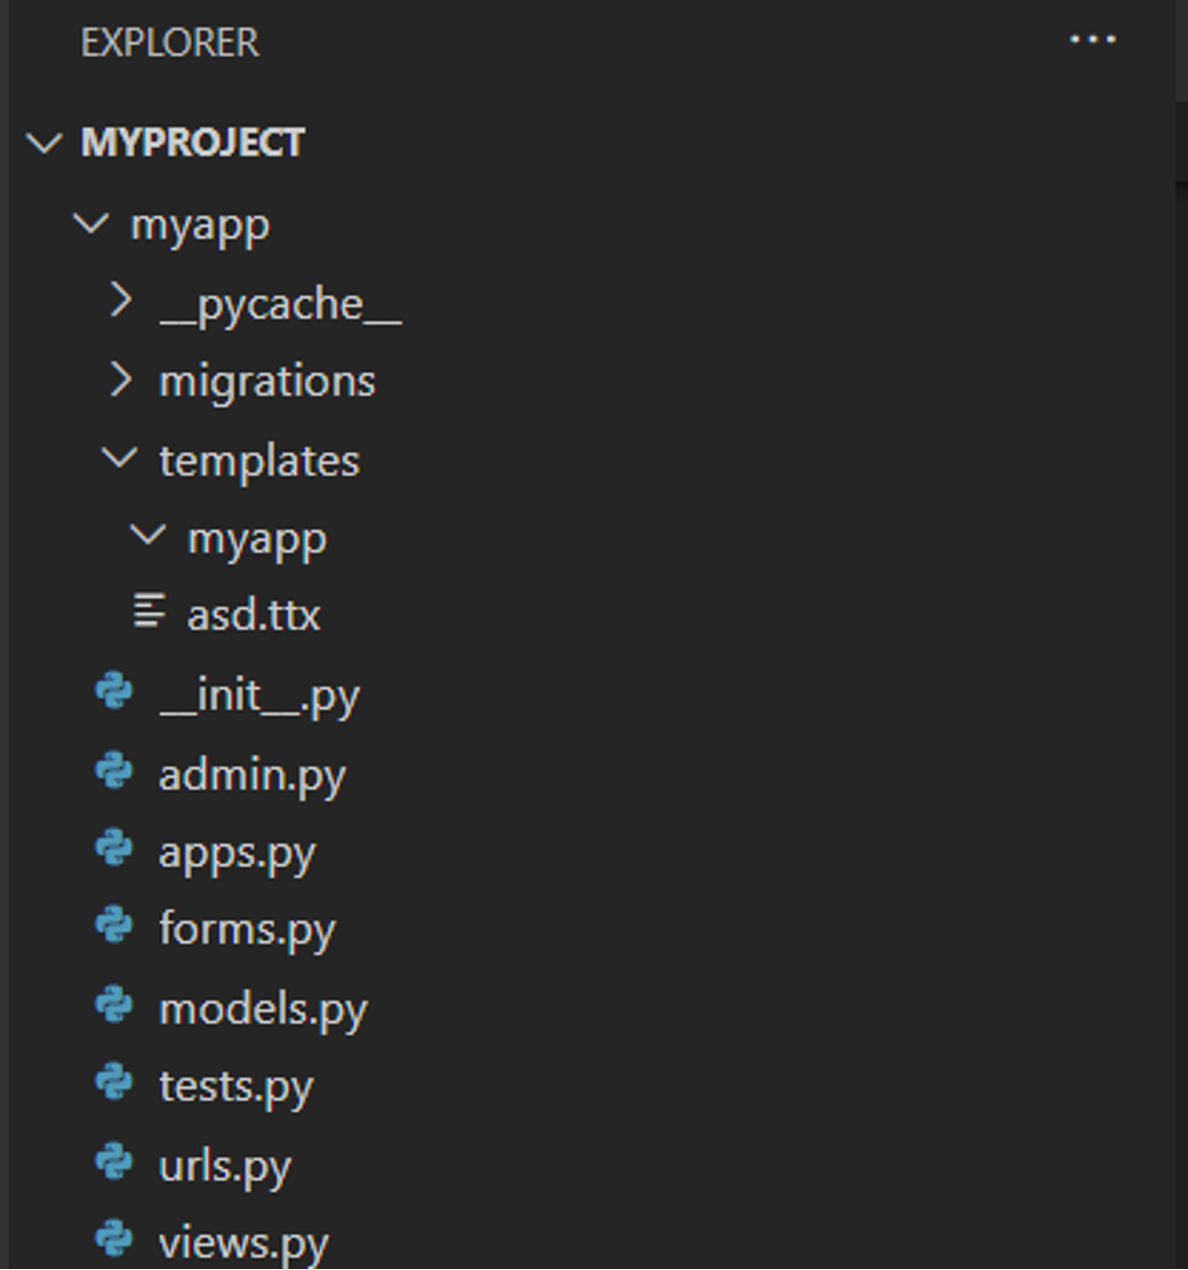
Add the following statements in the app’s admin.py.
from django.contrib, import admin
# Register your models here.
from django.contrib.auth.models, import User
# Unregister the provided model admin:
admin.site.unregister(User)
To register our own admin, use @admin.register() decorator. Give the user a model as the argument. Decorate a sub-class of UserAdmin class.
from django.contrib.auth.admin import UserAdmin
@admin.register(User)
class NewAdmin(UserAdmin):
    pass
You can now add some customizations to how the User Admin functions. At this point, though, if you log in with the super user credentials, there’s no change in the interface.
Next, you’ll explore how to prevent any admin user from changing the content of one or more fields of a model.
The UserAdmin class has a property called readonly_fields. You can specify a list of fields that you want the user (or a super user) to be prevented from modifying.
The user model has a field date_joined. Suppose you want that its value given at the time of creating a new user should never be changed. So, keep this field in the readonly_fields list.
Modify the app’s admin.py by changing the NewAdmin class as follows. Include this at the end of admin.py.
from django.contrib.auth.admin import UserAdmin
@admin.register(User)
class NewAdmin(UserAdmin):
    readonly_fields = [
        'date_joined',
    ]
Django Admin’s change form will show date_joined field as disabled, thereby, it will not be editable.
Instead of restricting all the staff users from changing the value of a certain field, it is possible to allow it for some users and prevent others.
For example, the user model has a username field. If any user accidentally modifies the username field of the other user, it may create many problems. Like the other user may not be able to log in. The ideal solution for this situation is to rest this privilege only with the super user and nobody else.
Now, explore how this is done:
The UserAdmin class (the base class for NewAdmin class that you have registered in the admin site) has a method known as get_form(). You need to override it to disable the username field in it.
def get_form(self, request, obj=None, **kwargs):
        form = super().get_form(request, obj, **kwargs)
It generates the change form for a model.
Next, verify if the current user is a super user. If yes, disable the username field in the form.
is_superuser = request.user.is_superuser

        if not is_superuser:
            form.base_fields['username'].disabled = True
The NewAdmin class that is registered as admin will now look like this:
from django.contrib.auth.admin import UserAdmin
@admin.register(User)
class NewAdmin(UserAdmin):
    def get_form(self, request, obj=None, **kwargs):
        form = super().get_form(request, obj, **kwargs)
        is_superuser = request.user.is_superuser

        if not is_superuser:
            form.base_fields['username'].disabled = True

        return form
If you now log in as a staff user and try to modify the username of another user, it will not be allowed.
Now, let’s customize the view of models from the apps added to the project.
Add a Django app named as myapp. Then, register this app in the INSTALLED_APPS list of the project’s settings.py.
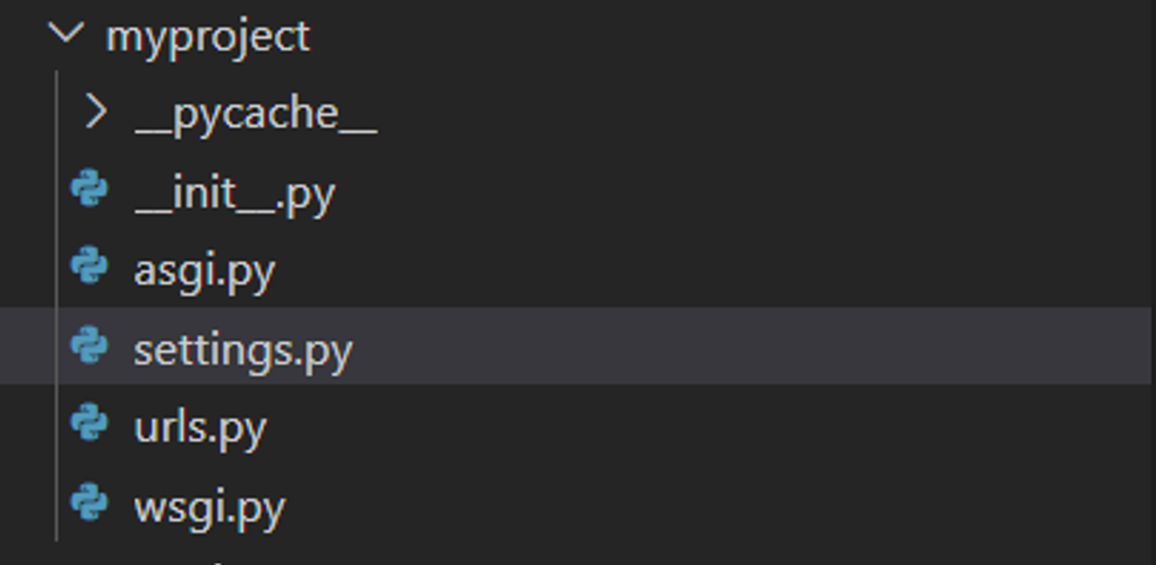
INSTALLED_APPS = [
    'django.contrib.admin',
    'django.contrib.auth',
    'django.contrib.contenttypes',
    'django.contrib.sessions',
    'django.contrib.messages',
    'django.contrib.staticfiles',
    'myapp.apps.MyappConfig',
]
Let us add a person model. Add the following code in the models.py file, in the myapp folder.
From django.db import models.

class Person(models.Model):
    last_name = models.TextField()
    first_name = models.TextField()
You need to register this model in the admin.py code.
From django.contrib import admin.

# Register your models here.
from .models import Person
admin.site.register(Person)
Log in with the super user username and password. You’ll now see the models from myapp.
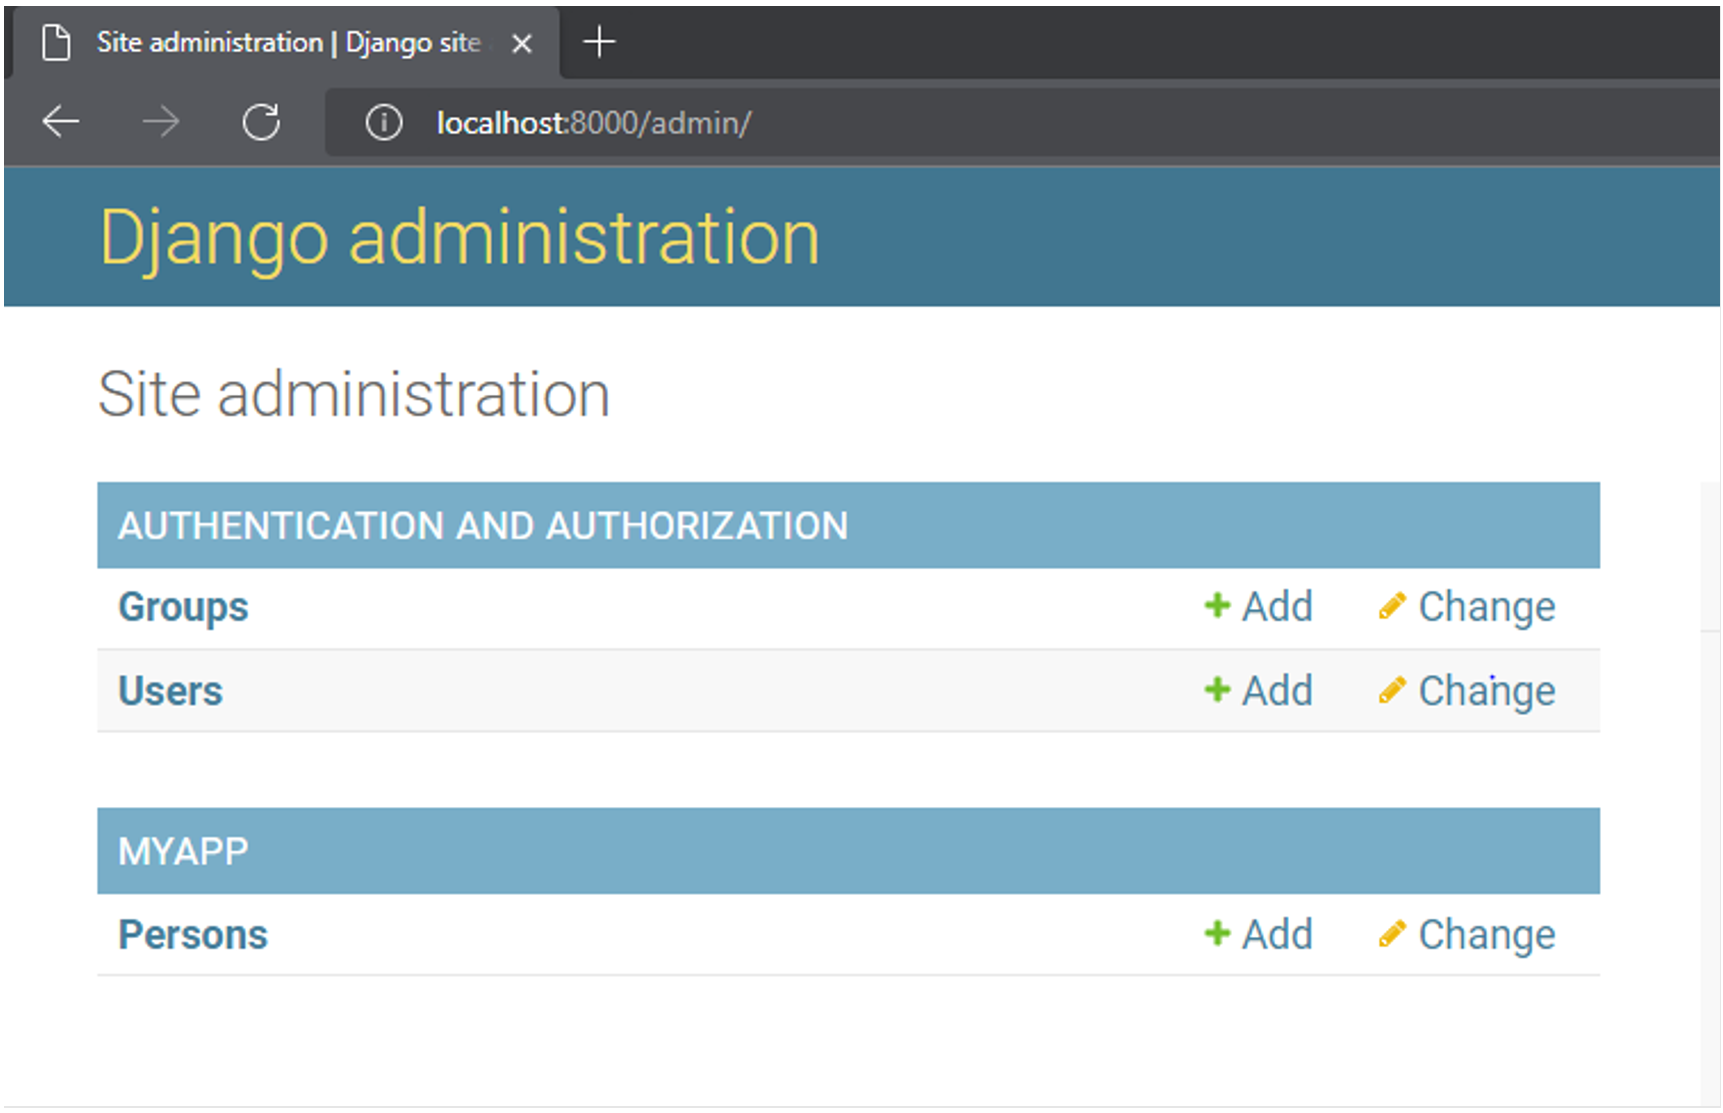
Let’s add a Person object. The following view shows that the one-person object is added.
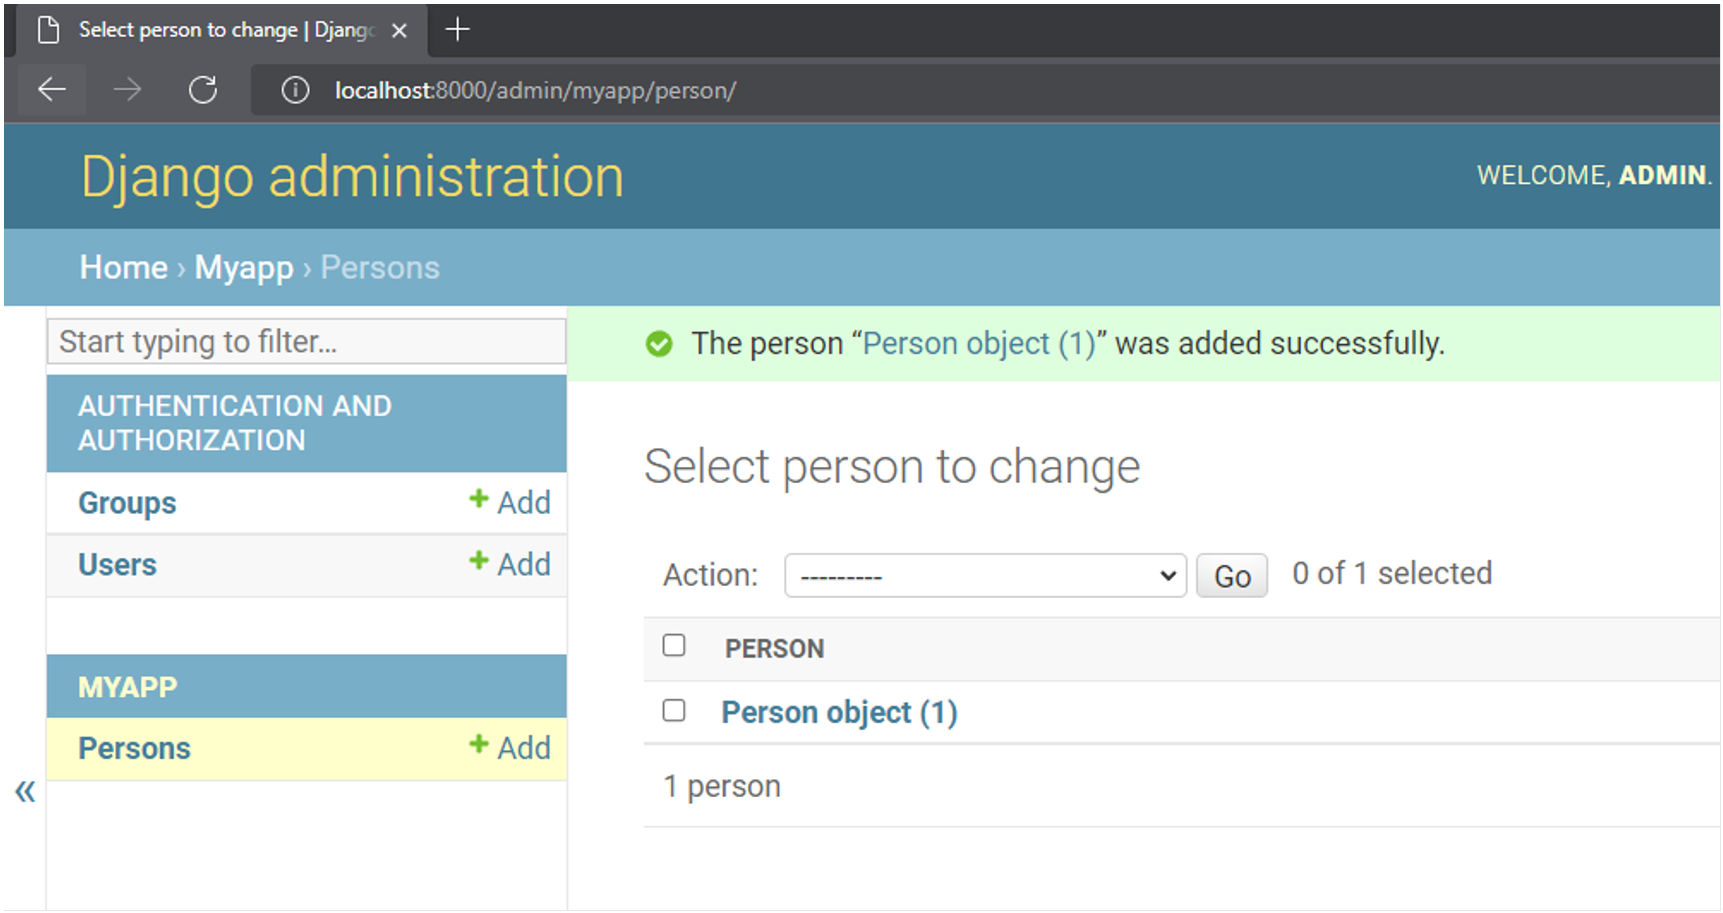
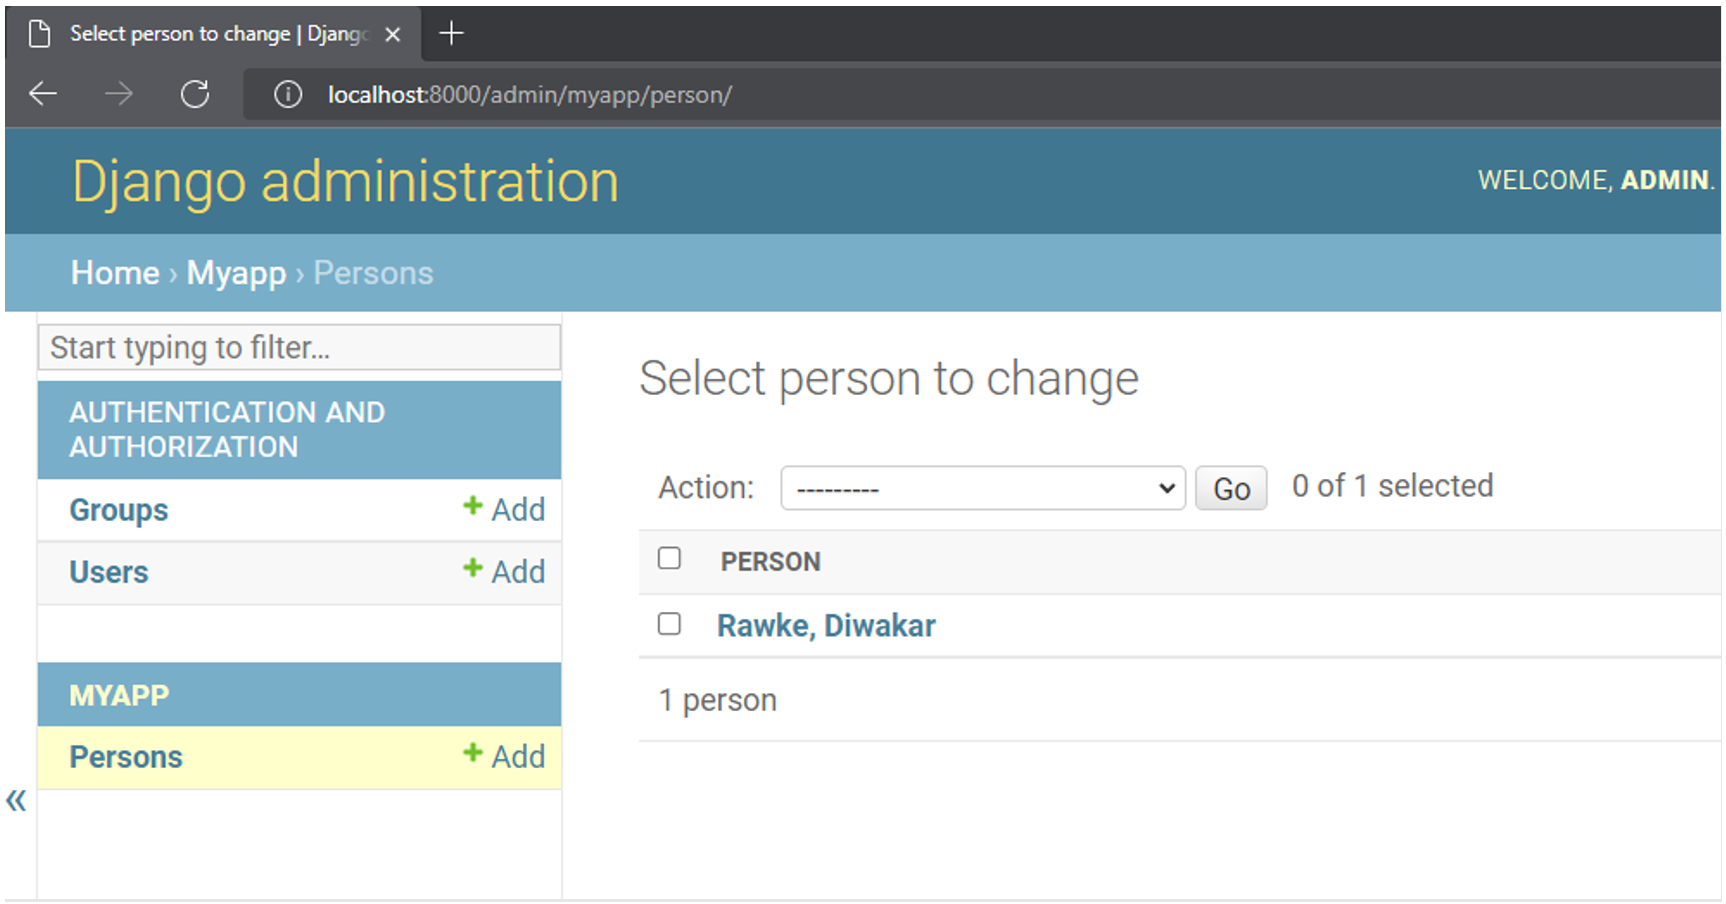
Instead of the count of objects currently present, you would like to have a more meaningful output. To do that, add __str__() method to Person class. The string representation of the object will show the first and last name in concatenated form.
From django.db import models.

class Person(models.Model):
    last_name = models.TextField()
    first_name = models.TextField()

    def __str__(self):
        return f"{self.last_name}, {self.first_name}"
Refresh the model page. It now shows the display as desired.
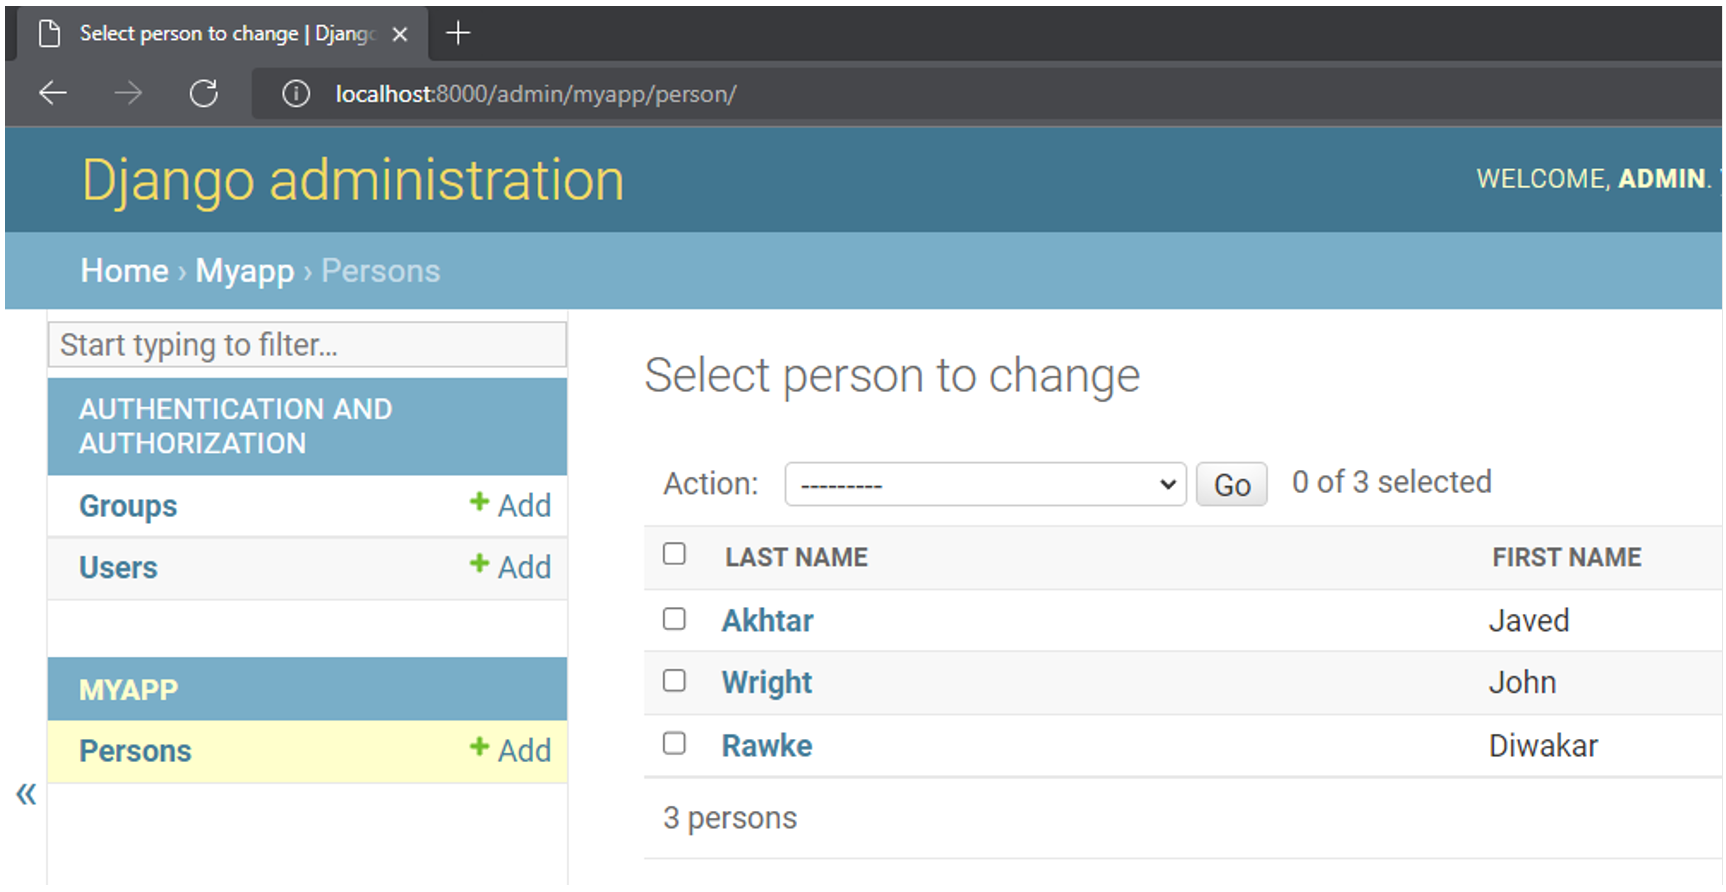
To further customize how the models are displayed in the admin interface, decorate a subclass of ModelAdmin and register it with @admin.register() decorator (just as you did with UserAdmin). Set the list_display attribute of this class to display the fields in columns.
From django.contrib import admin.

from .models import Person
@admin.register(Person)
class PersonAdmin(admin.ModelAdmin):
    list_display = ("last_name", "first_name")
The person model is displayed in the interface with the first and last names in two columns. The columns are clickable so that the object can be edited.
Further, you can provide a search field so that the objects satisfying the filter will be displayed only. Here, the filter is applied to the first name starting with the given letter.
From django.contrib import admin.

# Register your models here.
from .models import Person
@admin.register(Person)
class PersonAdmin(admin.ModelAdmin):
    list_display = ("last_name", "first_name")
search_fields = ("first_name__startswith", ) 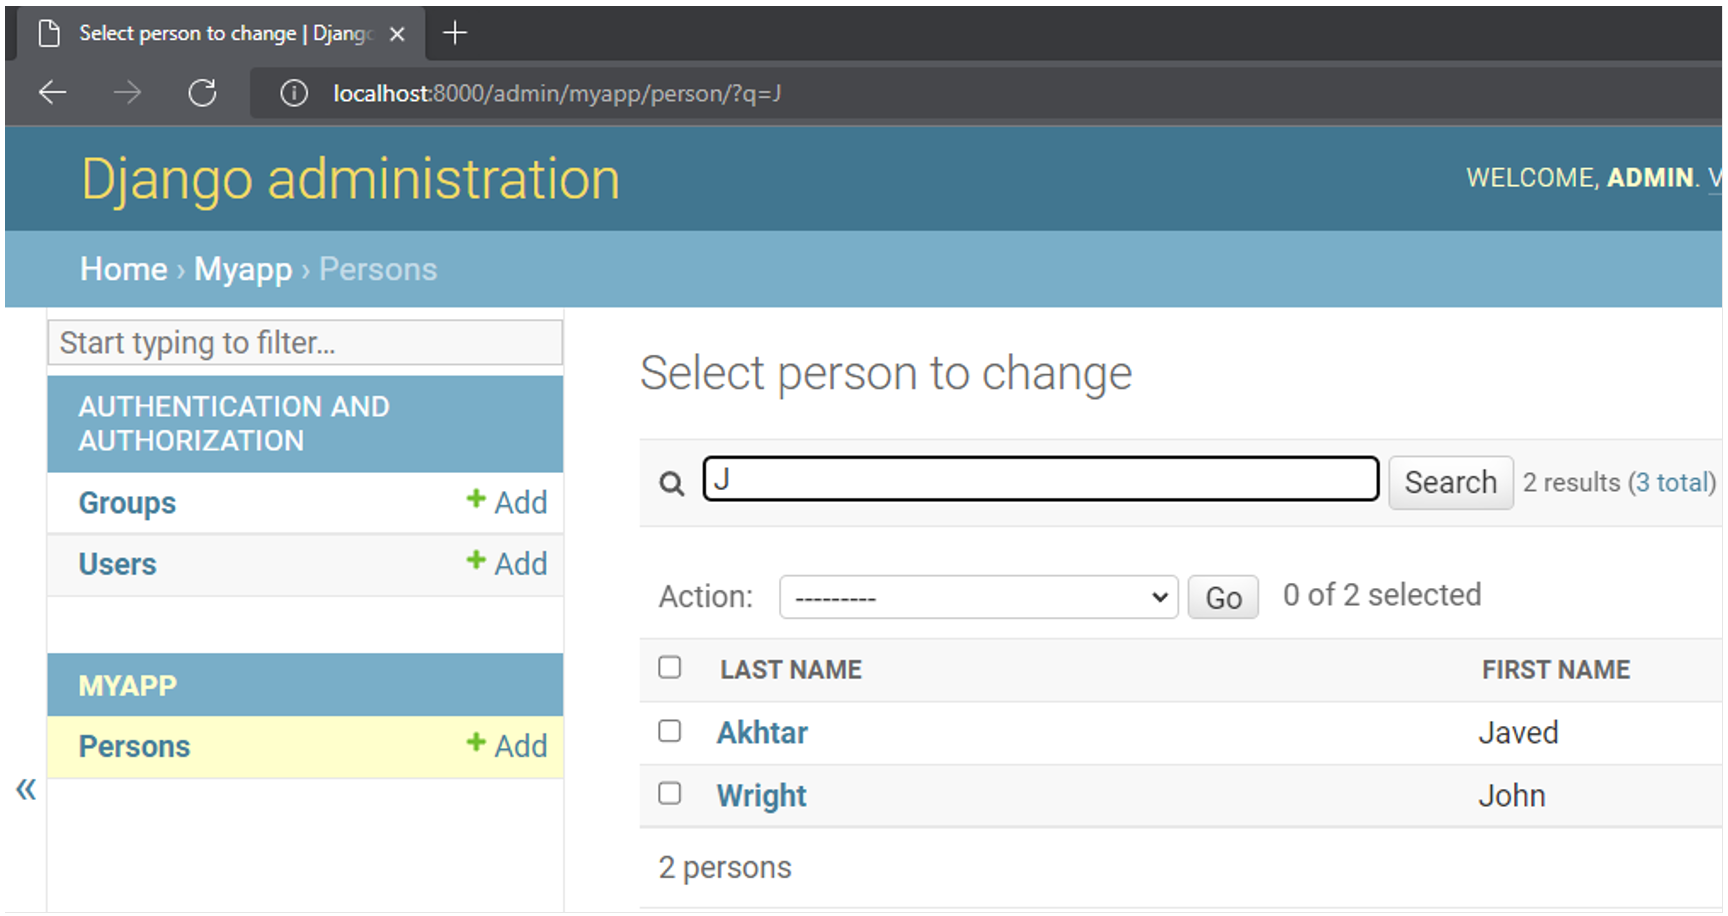
In this reading, you learned how to manage users by creating individual user profiles and user groups using Django’s Admin panel.
Adding groups and users
Employees at Little Lemon have been manually entering reservation details on a sheet. However, they want a more efficient way to do it.
First, let me open the ÷ file which contains a model and notice it’s already populated with some code. It contains a reservation class with five attributes. The attributes consist of the name of the customer, their contact details and the time of their arrival. The final two attributes will be to count the number of guests and for some additional notes.
# models.py

from django.db import models

# Create your models here.

class Reservation(models.Model):
    name = models.CharField(max_length=100, blank=True)
    contact = models.CharField('Phone number', max_length=300)
    time = models.TimeField()
    count = models.IntegerField()
    notes = models.CharField(max_length=300, blank=True)
Next I need to open the settings.py file and ensure that the app is added to the installed apps list. Everything looks good so I just need to make the migrations, and I’m ready to create the reservation system.
# settings.py

INSTALLED_APPS = [
    'myapp.apps.MyappConfig',
    'django.contrib.admin',
    'django.contrib.auth',
    'django.contrib.contenttypes',
    'django.contrib.sessions',
    'django.contrib.messages',
    'django.contrib.staticfiles',
]
python manage.py makemigrations
python manage.py migrateThe first thing I need to do is to create a super user. I do this using the command python manage.py createsuperuser. I enter user names such as meta, and again enter an email address such as [email protected]. I will use a weak password for this demonstration but it’s important to know that you should always use a strong password in production. Notice that Django sends a prompt for password validation, I type y and the super user is created successfully.
One final thing I need to do before running the server is register the super user.
Now I’m ready to work in the admin.py file. First I import the reservation model using the import statement. On a new line, I type admin.site.register, and
inside the parentheses the name of the table reservation. Now I can save this file and run the server.
# admin.py

from django.contrib import admin
from myapp.models import Reservation

# Register your models here.

admin.site.register(Reservation)
In the browser I opened Django at the default URL and add /admin to it. I press Enter and notice that a new page loads with a login form containing user name and password fields. So I entered the credentials I set up earlier and click on the login button.
The default Django administration page loads containing two sections, site administration and myapp. In site administration, notice there are links for groups and users. Then in the my apps section, notice a link for the reservations table I created earlier. If I click the link notice that there are no reservations added and this means that the table is empty.
MYAPP
So let me first create some reservations. I click on the add reservation button and now an add reservation form displays.
I enter some details such as name and phone number. For the time input I can click on the word Now to get the current time and then modify its format. I will set the reservation count to four people, and finally I will add a note such as we would prefer an outdoor table. I want to add another reservation, so I click on the Save and add another button. Notice that its success message displays and the form has been reset.
However, this does not display much information about the reservation, so let me fix this. Back in the models.py file, I can use the str method to override the default straining representation of the object and define my own. I want this representation to be the name of the customer. So using the return statement, I type self.name which will display the value stored in the name attribute of the object.
Notice that the name of the reservation objects have now been renamed according to the customer. If I click on the customer name, the web form will load where I can edit the details if I want to. There are also options to delete the object and explore the version history.
Now let me navigate to the app. Notice I have options to add a new table(??) or change the current one.
AUTHENTICATION AND AUTHORIZATION
Now let’s explore the users and groups of Django administration. I click on the home link and first let’s explore users. Notice that there is just one user which I added earlier. I can add another user by clicking on the Add user button. I type Little Lemon staff and the user name input and now the password. Notice that I may try and add a weak password Django will not let me, so let me add a password that’s a bit stronger.
Once created, I can add personal info for the user such as first name, last name and email address.
In the permission section, I assigned permission such as active staff and super user.
NOTE
Recall that users with the permission of staff can access the admin page.
I can also set some permissions. For example, I select that this user can only view and change the log entry. To the right, notice that these are the added user permissions. Finally, details for the last login and date joined are displayed in the important date section.
I can filter users according to super user status. So if I select this option, notice that only the meta super user is displayed. I can also create groups by selecting the groups link and clicking on the Add group button. On the add group page I can assign the name of the group such as staff. Then I can set their missions for the staff member and save them.
And this allows me to configure which Little Lemon staff can access the admin panel and make the reservations. Finally, I can preview the table in VS Code using the SQLite Explorer.
Notice that these entries are updated in the table. So once I make the changes in Django administration, they’re reflected in the table.
Permissions
In most apps, users are allocated different roles that allow them to perform certain actions. To enable these actions, they need to have the relevant permission granted to them. Think about the following scenario. When you visit a restaurant, you’re not allowed to go into the kitchen. However, if you are a member of staff, you are allowed to go into the kitchen. Web applications have a similar concept for controlling which users are allowed to do which action. This is called permissions.
The Django framework has an in-built system for handling permissions. This authentication system has features for both authentication and authorization, coupled for ease of use.
For a user to perform a certain action, they need to have the relevant permission granted to them. Before you explore permissions, it is important to note that a user in Django can be one of three classifications, namely :
- Superuser
- Staff user
- User
Much like other components of Django, users in Django are Python objects. The specific type of user is characterized by special attributes that are set inside the user object.
Classifications
- A super user is a top level user or administrator of the system. This type of user possesses permission to add, change, or delete other users, as well as perform operations on all the data in the project.
- A staff type user is allowed to access Django admin interface. However, a staff user doesn’t automatically get the permission to create, read, update, and delete data in the Django admin, it must be given explicitly.
NOTE
Note that a super user is a staff user by default.
- Everyone else is irregular user by default, a user is not authorized to use the admin site. Users are marked as active by default. A user may be marked as inactive if it’s authentication fails or has been banned for some reason.
Creating User
While you can create the user through the admin interface, it can also be done through the Django shell.
The permission mechanism is handled by the django.contrib.auth app. You can use the create user function to create a new user object.
python manage.py shell

>>> from django.contrib.auth.models import User
>>> usr = User.objects.create_user('testusr', '[email protected]', 'pass123')
Once the user is created, you can grant a certain status to a user to become a staff member.
To grant the staff status, set the user is staff property to true.
>>> usr.is_staff=True
>>> usr.save()
Creating Superuser
Use a command directly inside the Django shell. When prompted, a password is assigned to this super user, followed by an authentication.
python manage.py createsuperuser --username=john [email protected]Go to the admin interface and view the list of users. The new user appears in the list.
NOTE
Remember that the superuser has every permission in the system, whether it is custom permissions or Django created permissions.
Setting permissions to models
There are several places where specific permission settings can be enabled, for example, to a specific model or object. How do you set permissions in a model?
As you create models in your Django application, Django automatically creates add, change, and delete and view permissions.
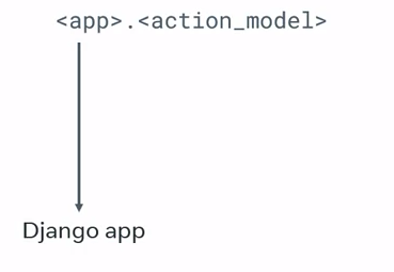
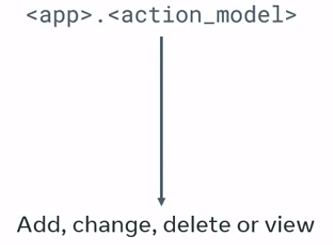
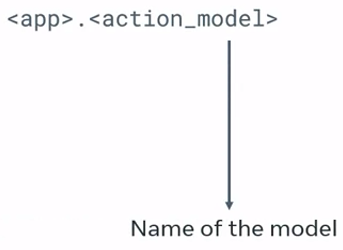
Permissions are named using the app action model pattern.

App is the name of the Django app.
Action is add, change, delete or view.
And model is the name of the model in lowercase.
Assume that a Django app called myapp is created in the current project, and it has a model with the name my model declared in it. You can now apply your newly acquired knowledge. What will the permissions be?
The permissions on this model will be as follows:
myapp.add_mymodelmyapp.change_mymodelmyapp.delete_mymodelmyapp.view_mymodel
Check user permission
In Python code, it is possible to check if a user has a certain type or permission enabled on it. To do this, you can use the has_perm() function, which returns true or false.
To do this, you can use the has_perm function, which returns true or false. For example, if the requesting user doesn’t have the appropriate permissions, you can raise a permission denied error instead of returning the normal HTTP response.
def myview(request):
	if not request.user.has_perm('myapp.view_mymodel'):
		raise PermissionDenied()
	return HttpResponse()
Groups
Assigning permissions to each user individually is a tedious task, especially if you have large numbers of users. Fortunately, Django has a solution. You can manage permissions to sets of users in Django groups. That proves to be very useful.
Now what is a group?
Group
In Django, a group is a list of permissions that can be assigned to one or more users. A user can belong to any number of groups.
To go back to the restaurant example, you might have a group for kitchen staff and another group for waiters. When you create or modify a user, simply choose the desired group. All the permissions listed in the group will be automatically assigned to the user.
NOTE
It is important to note that you can still manually add permissions to users, even if they belong to a group.
You can give permissions to a user while creating it in the admin panel or from the shell interface. Using groups is a convenient way of enabling similar sets or permissions to multiple users. To enforce a permission while executing a view function, you can use the app permission required decorator.
Enforcing Permissions
The Django Admin interface makes it possible to grant and enforce permissions to access the model data. By default, all users get the Add, Change, View and Delete permissions on all models.
If a model requires a user to gain access through special permissions, this can be granted through Django Admin.
Model Permissions in Admin Interface
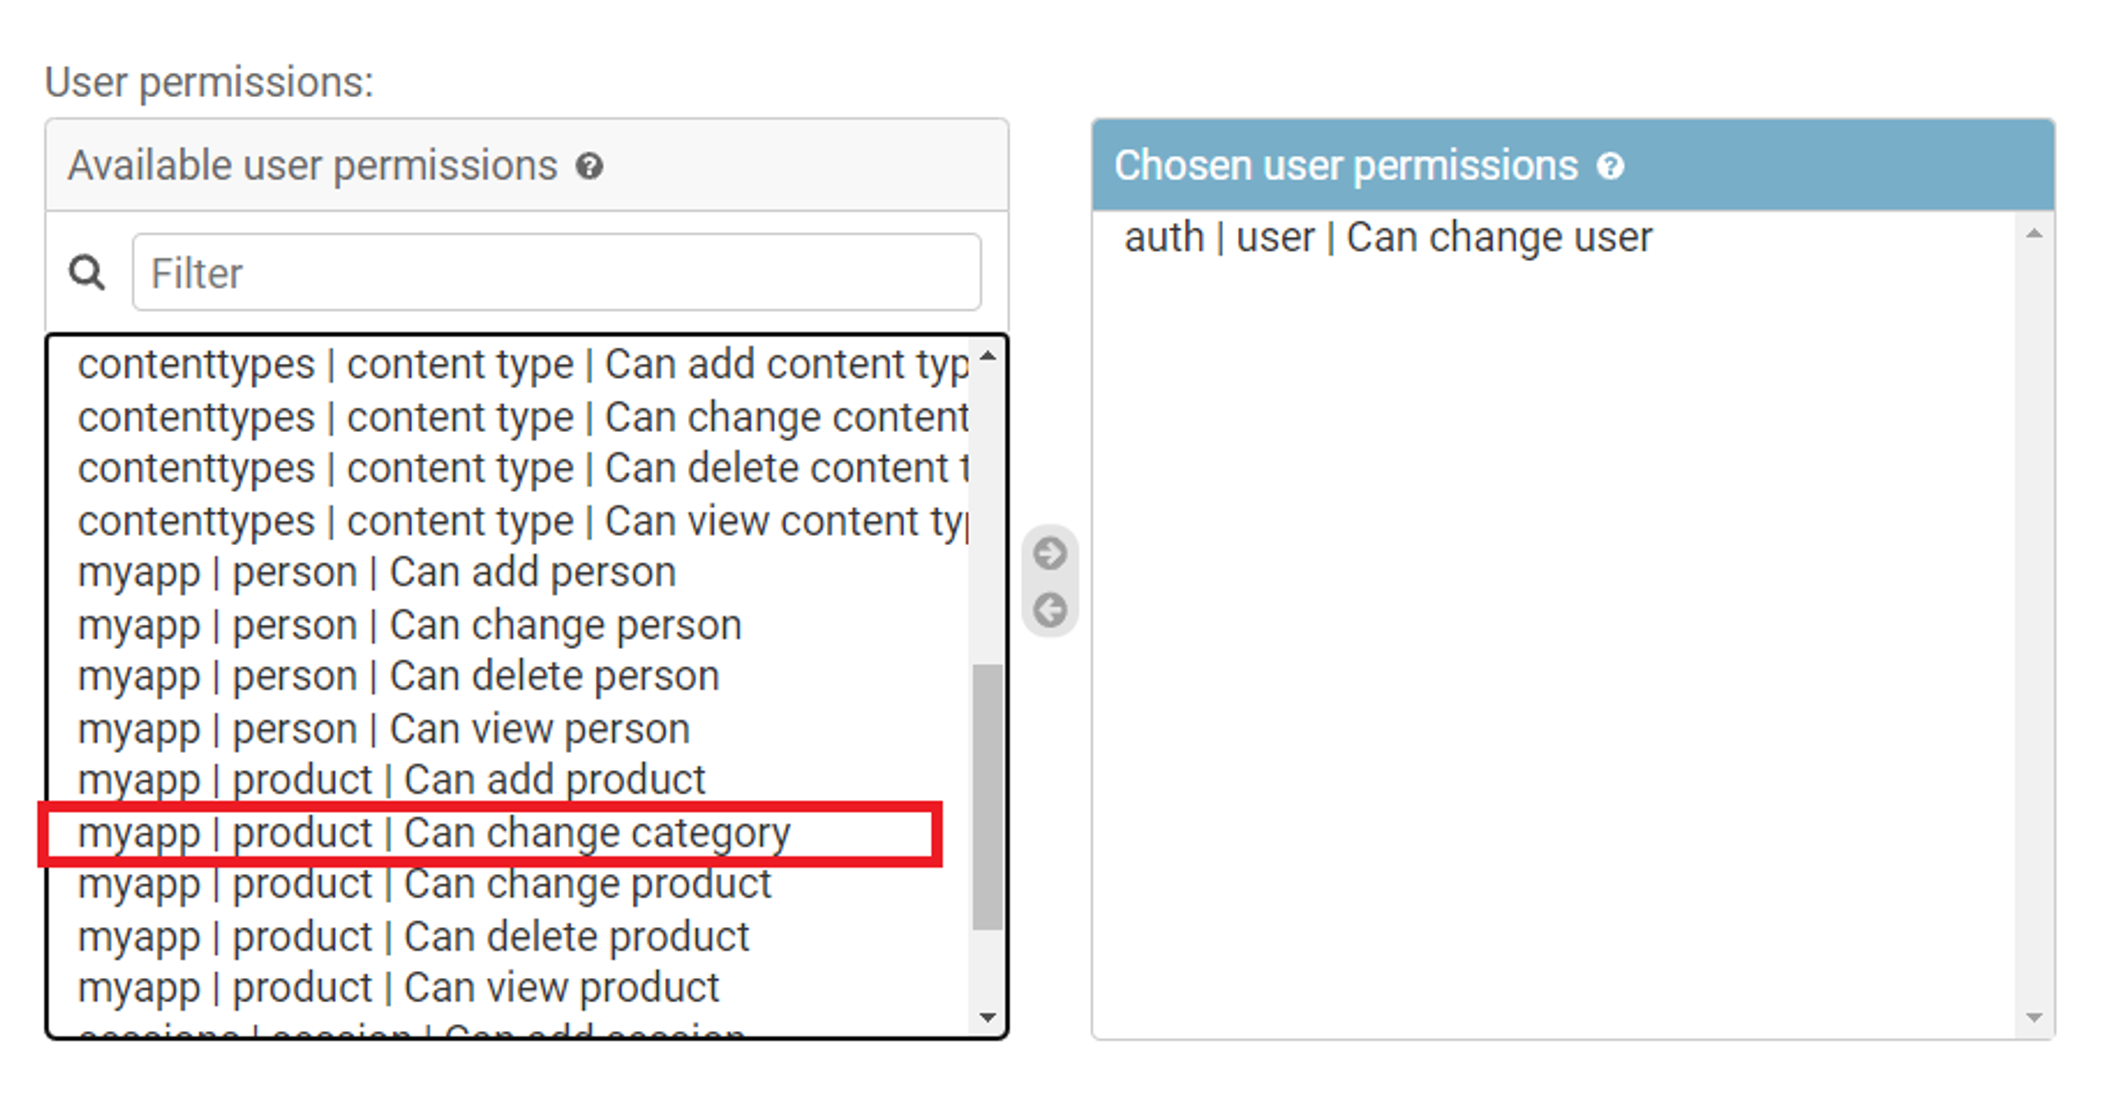
Let’s assume that there is a Product model in a Django app named myapp. Here, a custom permission called change_category has been defined.
class Product(models.Model):
    ProductID: models.IntegerField()
    name : models.TextField()
    category : models.TextField
    class Meta:
        permissions = [('can_change_category', 'Can change category')]
This name of permission will be visible in the list of available user permissions when a new user is added or an existing group is edited.
However, outside of the admin environment, the Django models by themselves don’t have a mechanism to enforce permissions because it is unaware of the user identity that is performing the action.
The Django app receives user information through the request context. Often, permissions are enforced at the view layer. However, you can do so from inside templates, URLs and function-based and class-based views.
Enforcing permissions at the view level
If a user has logged in and has been authenticated, its details are available to the view function in the form of request.user object. If not, the value of request.user is an instance of AnonymousUser. In that case, the permission to call a view can be denied as follows:
from django.core.exceptions import PermissionDenied
def myview(request):
    if request.user.is_anonymous():
        raise PermissionDenied()
Alternatively, you can decorate the view with a login_required decorator. It only allows access for logged users.
from django.http import HttpResponse
from django.contrib.auth.decorators import login_required
 @login_required
def myview(request):
    return HttpResponse("Hello World")
Another way of restricting access to a view is by using the @user_passes_test() decorator. It takes one mandatory argument, which is a function returning True or False. If True is returned, the decorated view function defined below it is invoked.
Let’s define a function testpermission(). It returns True if the user is authenticated and has a change_category permission.
def testpermission(user):
    if user.is_authenticated() and user.has_perm("myapp.change_category"):
        return True
    else:
        return False
This function is then used as an argument to the @user_passes_test() decorator. The view function defined below it will be invoked if the testpermission() function returns True.
from django.contrib.auth.decorators import user_passes_test

@user_passes_test(testpermission)
def change_ctg(request):
    # Logic for making change to category of product model instance
The user_passes_test() can be given an additional argument – login_url. The user will be redirected to this URL if the testpermission() function returns False. Typically, it is mapped to a view that renders a login page.
Another method to enforce permission at the view level is with the @permission_required() decorator. Unless the user possesses the permission mentioned as an argument, the view function won’t be called.
from django.contrib.auth.decorators import permission_required

@permission_required("myapp.change_category")
def store_creator(request):
    # Logic for making change to category of product model instance
The above example enforces the permission on a function-based view. Django framework also has a class-based view mechanism.
To enforce permissions on a class-based view, you need to use PermissionRequiredMixin and set the permission_required attribute of the view class to the permission you want to enforce.
Here is an example:
Assuming that a product model is present in models.py. The ProductListView class view renders a list of products only if the user has view permission on this model.
from django.contrib.auth.mixins import PermissionRequiredMixin
from django.views.generic import ListView

from .models import Product

class ProductListView(PermissionRequiredMixin, ListView):
    permission_required = "myapp.view_product"
    template_name = "product.html"
    model = Product
Enforcing permissions in Template
To generate dynamic content on the web page, Django uses its own template language. Along with conditional and iterative statements (if and for), the special variables user and perms are available inside the template language blocks.
These variables are passed into the template context by the view function. Then, you can check various user attributes, such as is_authenticated and render the information on the web page accordingly. A typical template looks like this:
<html>
<body>
{% if user.is_authenticated %}
         {#  to be rendeed if the user has been authenticated  #}
    {% endif %}
<body>
</html>
Similarly, the available permissions can be checked inside the template with perms.name syntax. For example:
<html>
<body>
{% if perms.myapp.change_category %}
  {#  To be rendered for users having required permission #}
   {% endif %}
<body>
</html>
Enforcing permissions in URL patterns
This method is especially useful when there’s a view function to intercept the request and the URL directly sends the control to a static page.
To configure the pattern, you use the url() function, in which the permission decorators can be used.
from django.conf.urls import url
from django.contrib.auth.decorators import login_required, permission_required

urlpatterns = [
    url(r'^users_only/', login_required(myview)),

    url(r'^category/', permission_required('myapp.change_category', login_url='login')(myview)),
]
In this reading, you learned about the various available methods to enforce permissions. It can be done through the admin site, at the view level, inside the template as well as while defining URL patterns.
Users and Permissions
Now you will explore how to add and remove permissions for these users. The Django framework has a built in mechanism that manages permissions quite efficiently.
The Django admin web interface makes it easier for you to create and modify users or user groups. You can also grant or revoke permissions for individuals and user groups.
While Django admin has a user friendly interface which makes handling permissions quite easy. It is also possible to handle permissions through the Django shell. To demonstrate this, let’s first create a user and then locate the required user by its user name.
Handle permissions in shell
To do this, you must first open the interactive Django shell that has Django settings already imported. It allows you to directly work with the root project folder.
python3 manage.py shellNext import the user module from the specific django.contrib package.
from django.contrib.auth.models import UserThen define a variable and assign it to create user method, and pass the arguments for user name, email, and password in that order.
user = User.objects.create_user('mario', '[email protected]', 'Rissotto22#')Once the user is created to find another variable and assign it the get method of the user object then past the user name as the argument.
user_name = User.objects.get(username="mario")Once the user is created, the next step is to assign permissions.
Permissions
Django comes with a built-in permission system. It provides a way to assign permissions to specific users and groups of users. When django.contrib.auth is listed in your installed apps setting, it will ensure that four default permissions are available.
This functionality allows you to add, change, delete, and view permissions, and are created for each Django model defined in one of your installed applications.
Permissions can be set not only per type of object, but also per specific object instance. By using the methods provided by the model admin class, it is possible to customize permissions for different object instances of the same type.
Similar to the admin permissions you learned about, permission specific to models can also be managed using the model admin class. The model admin class methods include view, add, change, and delete, and are used to customize the permissions.
User objects
User objects have two main fields known as groups and user permissions.
User permissions store and reference a single or multiple permission objects. Permissions can be granted or removed by calling the methods set(), add(), remove(), and clear() on the user object.
Let’s explore an example using the add method to grant permissions to the user Mario. In this scenario, let’s provide one or more permission objects.
mario.user_permissions.add('myapp.change_menu')WARNING
It’s important to know that once you add
django.contrib.authto the installed apps list, you must run the migrate command to implement the change.
NOTE
Note that when you run manage.py migrate each Django model is assigned the default permissions.
For example, suppose you have a Django app called myapp in which there is a model named mymodel. If you run boolean expression to verify the permissions to add, change, delete, and view, they will return true.
mario.has_perm('myapp.add_mymodel')
mario.has_perm('myapp.change_mymodel')
mario.has_perm('myapp.delete_mymodel')
mario.has_perm('myapp.view_mymodel')
In addition to the default permissions, custom permissions can be declared in the models meta class, which can be declared inside the model.
So far you have covered how you can modify permissions on the Django shell. However, in practice it is much easier to deal with them using the Django admin interface in the browser.
Handling permission on django admin interface
In the browser at the admin login page, let’s enter the credentials for the existing super user. Once you log into the admin panel notice that you have choices for groups and users.
In the authentication and authorization section, click on the link for groups.The first thing to know is that you can create groups in addition to the existing staff group.
For example, let’s say you want to add some more groups. The first is for the reservation desk staff and the second is for the little lemon website administrators.
Click on the add group button and a new page with a form to add a group loads. You must give the group a name. In this example the name will be reservation desk. Inside the permission section, notice that you have several options in the available permissions table.
Let’s say you want to assign this group permissions for the reservations model. You can select the reservation permissions to add, change, delete or view reservations. Then click the choose button to add the permissions to the chosen permissions table.
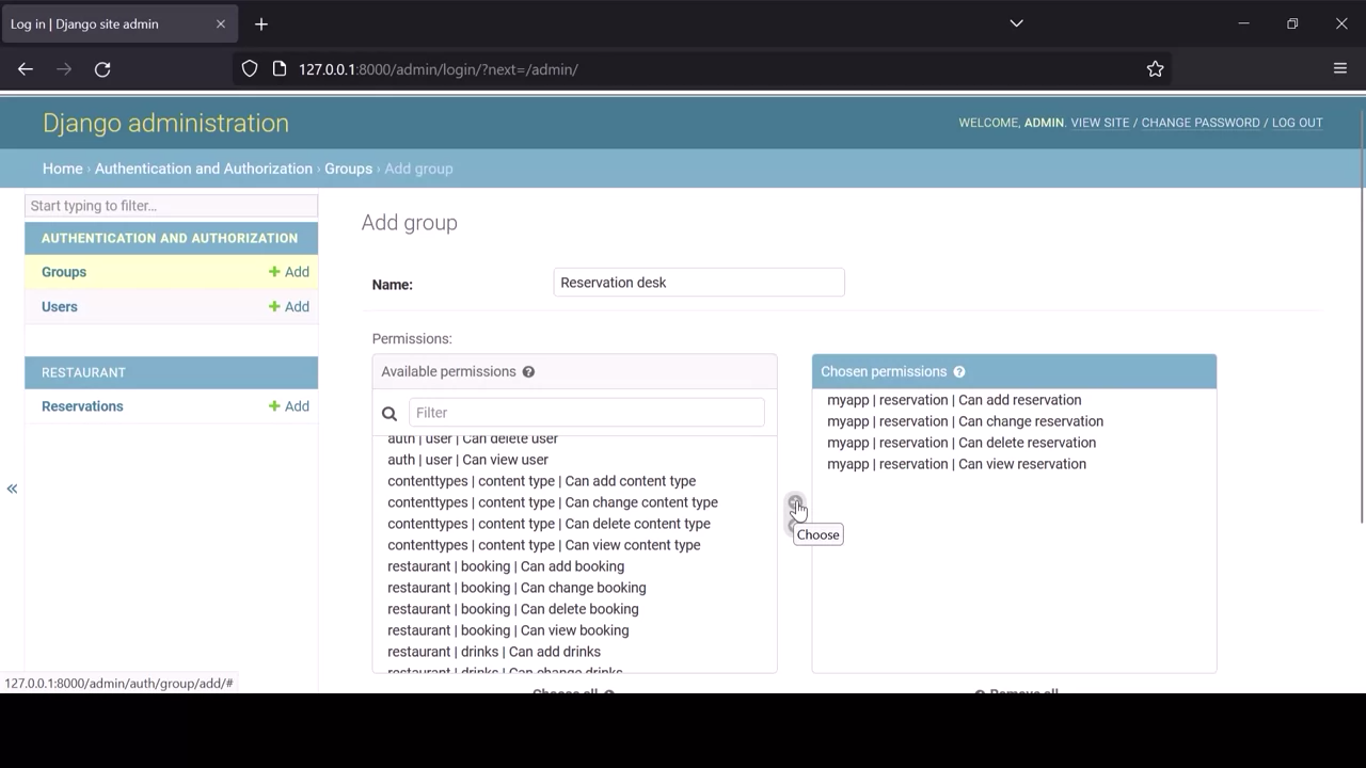
Once transferred, click the save and add another button to create the group for the website administrators.
Notice that the add group form resets allowing you to add another group. Create a new group called admin users but this time assign all the permissions by clicking the choose all button. As all the groups are created, you can click the save button.
So now that the groups are created, the next step is to add the users.
In the authentication and authorization section, click the user’s link to open the user’s page. Suppose you want to create a user called Mario inside this section. Remember Mario is the owner of Little Lemon.
Click the add user button to load a new web page that displays an ad user form. To add a new user, you must enter the login credentials. So enter Mario as the user name and then set a password. Click the save and add another button to add a new user. The second user is Maher a staff member at Little Lemon. Assign a password and click the save button.
Notice that when you click the save button Django administration immediately takes you to the page where you can assign additional information to the user you just created. There is a personal info section where you can add the user’s first name, last name, and email address.
In the permission section, you can change the permission level and assign the user to a group. In this example the user Maher is a staff member. So let’s keep the permission as active and also assigned the permission of staff status.
Next assign Maher to be part of the reservation desk group. It’s important to know that once you assign a user to a specific group, all the permissions that are entitled to the group get automatically assigned to the user. And it’s also possible to assign additional user permissions. When you finish assigning a group and permissions to a user, press the save button.
Next it’s time to add a group and permissions to the user Mario by clicking on the user’s name in the user’s table. First enter the personal info for the user Mario. Next assign him the status of super user. Make him a part of the admin group and save the changes to return to the user’s page.
It’s also possible to filter the users by different categories. In the filter panel, you can filter by the staff status, super user status or the status of the groups in which they are assigned such as admin users.
Finally, on the main home page notice your recent actions display in that recent action section. This feature allows you to configure different users quickly and set their permission levels.
Additional resources
The following resources will be helpful as additional references in dealing with different concepts related to Django admin, Django-admin and manage.py commands and permissions.
django-admin and manage.py – official documentation
Using the Django authentication system
Django Admin site – MDN web docs
Django Admin-site – Comprehensive
Django permissions – TestDriven
PythonDjangoPermissionAuthentication
Previous one → 9.Models and Forms | Next one → 11.Database Configuration